SDS1000 Sliding Door Track System Template
Open the original PDF document
View PDFSDS-1000 SLIDING DOOR TRACK SYSTEM SDS-1060 SDS-1080 (for 36" Opening) (for 48" Opening) 10 12 12 10 78 3/4 102 3/4 TRACK CUT TO LENGTH H+2" FLOOR TO CENTERLINE OF TRACK H+2" FLOOR TO CENTERLINE OF TRACK 4=DOOR HEIGHT 4=DOOR HEIGHT H+1-3/4" DOOR 6,7 & 8 INCLUDED COMPONENTS ITEM 2 ITEM DESCRIPTION ITEM 3 WALL SPACER 2 2 *78-3/4" TRACKS 5/16" x 3-1/2" TRACK MOUNT LAG BOLTS FOR DRYWALL INSTALLATION 4 5 5/16" x 2-3/8" CARRIAGE BOLTS FOR TRACK 5 5/16" x 1-1/8" WALL ANCHORS FOR TRACK ITEM 5 6 1 FLOOR MOUNTED SLIDING DOOR GUIDE ITEM 7 7 2 #8 X 1" SLIDING DOOR GUIDE SCREWS ITEM 8 8 2 1/4" FLOOR ANCHOR ALLEN WRENCH 9 1 ITEM 6 TOP MOUNT ROLLER W/ MOUNTING HARDWARE 10 11 2 TRACK STOPS ANTI-JUMP BLOCK ITEM 11

ITEM 10
www.abhmfg.com E-mail: abhinfo@abhmfg.com Architectural Builders Hardware Mfg., Inc. 1222 Ardmore Ave., Itasca, IL 60143 630.875.9900; FAX 800.9FAXABH (932.9224)
ITEM 12
SDS-1000 SLIDING DOOR TRACK SYSTEM-1-00.dwg
SDS-1000 SLIDING DOOR TRACK SYSTEM
© 2020 ABH Mfg., Inc. PAGE 1 OF 4 ISSUED 01-10-20
SDS-1000 SLIDING DOOR TRACK SYSTEM
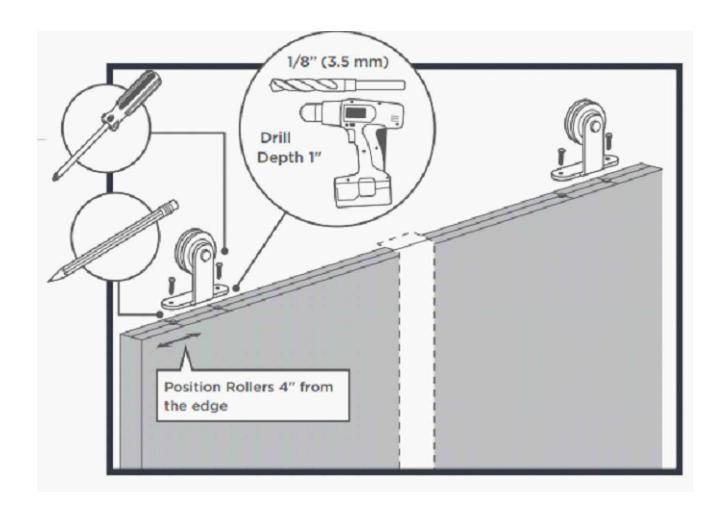
Step 1
Attach Top Rollers to Door
Position each roller 4" from the edge of the door and using 1/8" drill bit, drill pilot holes in door for the Top Mount Rollers (ITEM 10) screws. Ensure pilot holes are centered in door thickness.
STEP 2
Mount Top Mount Rollers (ITEM 10) to Door using provided screws.
STEP 3
Install the Anti-Jump Block
Position each anti-jump block (ITEM 12) at least 1" from the inside edge of the rollers.
The hole for the anti-jump blocks should be offset from the center of the door so the block can be rotated out of the way to be able to hang the door on the track.
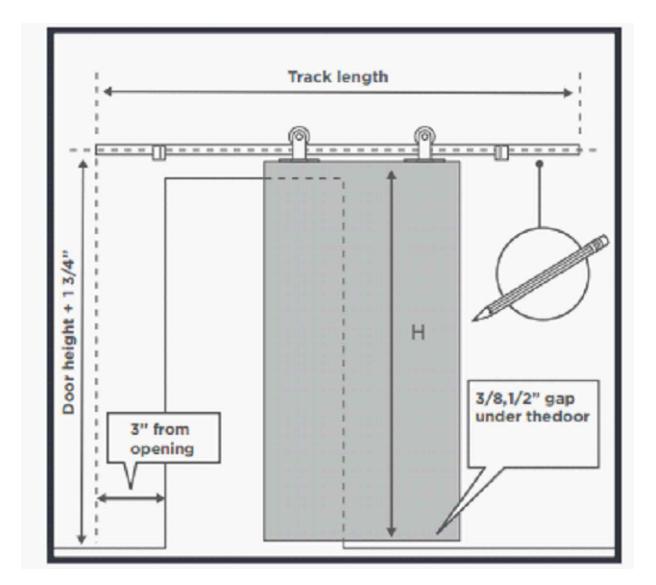
STEP 4
Concrete Wall Installation
Find the center line position of the track by adding 1-3/4" to the door height and measuring up from the floor. Mark with a pencil.
To find end location of the track, measure 3" over from opening. Mark with a pencil.

www.abhmfg.com E-mail: abhinfo@abhmfg.com Architectural Builders Hardware Mfg., Inc. 1222 Ardmore Ave., Itasca, IL60143 630.875.9900; FAX 800.9FAXABH (932.9224)
SDS-1000 SLIDING DOOR TRACK SYSTEM-2-00.dwg
SDS-1000 SLIDING DOOR TRACK SYSTEM
c 2020 ABH Mfg., Inc. printed in USA
ISSUED 01-10-20 PAGE 2 OF 4
SDS-1000 SLIDING DOOR TRACK SYSTEM
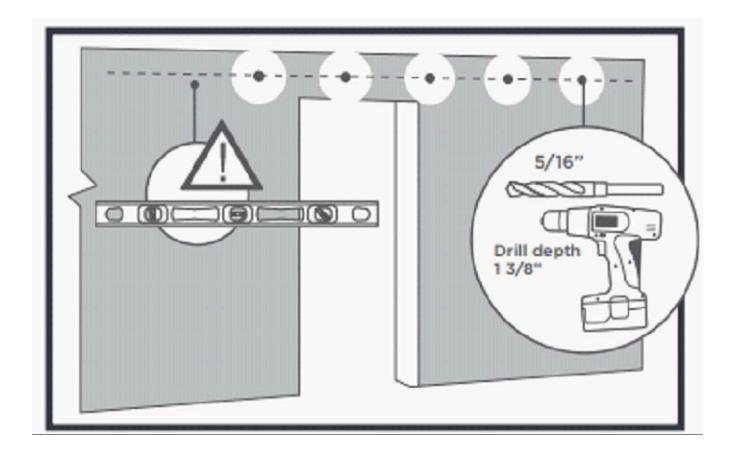
STEP 5
Concrete Wall Preparation
Using a level and track as a template, mark screw locations on wall. Predrill the concrete at marked location using 5/16" masonry drill bit. Remove wall anchors (ITEM 5) and install into holes using a hammer.
INSTALLATION TIP: Locate and temporarily install track with one end bolt without spacer. This will hold one end of the track up so you can move the free end to ensure the track will be level then proceed to mark the other locations of mounting holes.
STEP 5A
Dry Wall Preparation
When installing on drywall or plaster, a 1x4 wood board (not provided) must first be fastened to the structural wall members (studs) behind the drywall before mounting the track.
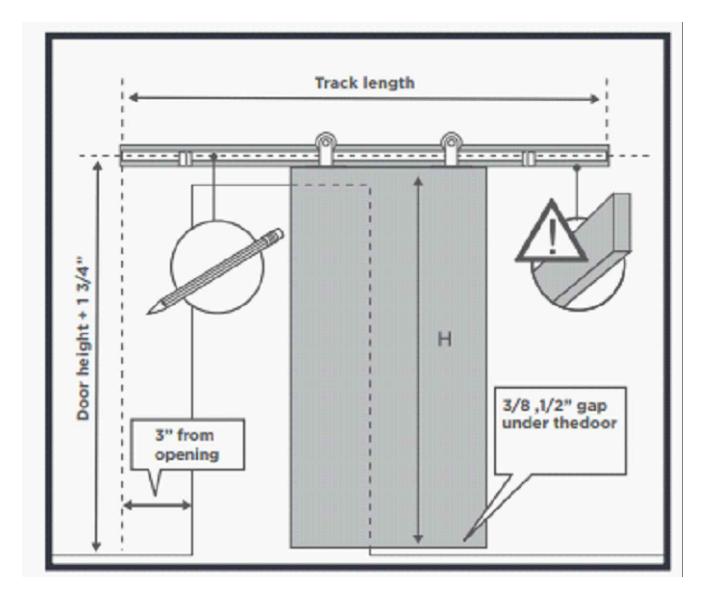
Find the center line position of the track by adding 1-3/4" to the door height and measuring up from the floor. Mark with a pencil.
To find end location of the track, measure 3" over from opening. Mark with a pencil.
Mounting board to have same center as track. End of mounting board may vary from track end.
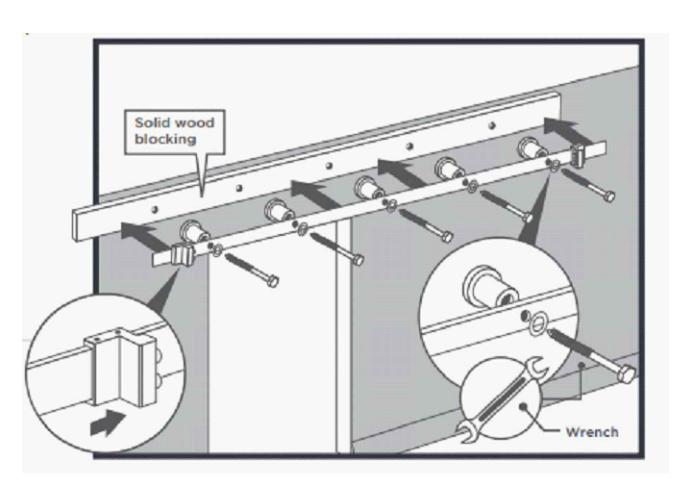
STEP 6
Secure Track
Position the track in place using the marks in previous step. Ensuring it is level and attach the track (ITEM 2) to wall using wall spacers (ITEM 1) and fasteners (ITEM 3 or 4) . Then slide the track stops (ITEM 11) onto track ends. Do not tighten stops at this time.
*Solid Wood Blocking only for Dry Wall Installation
c 2020 ABH Mfg., Inc.

www.abhmfg.com E-mail: abhinfo@abhmfg.com Architectural Builders Hardware Mfg., Inc. 1222 Ardmore Ave., Itasca, IL 60143 630.875.9900; FAX 800.9FAXABH (932.9224)
SDS-1000 SLIDING DOOR TRACK SYSTEM-2-00.dwg
SDS-1000 SLIDING DOOR TRACK SYSTEM
ISSUED 01-10-20 printed in USA PAGE 3 OF 4
SDS-1000 SLIDING DOOR TRACK SYSTEM
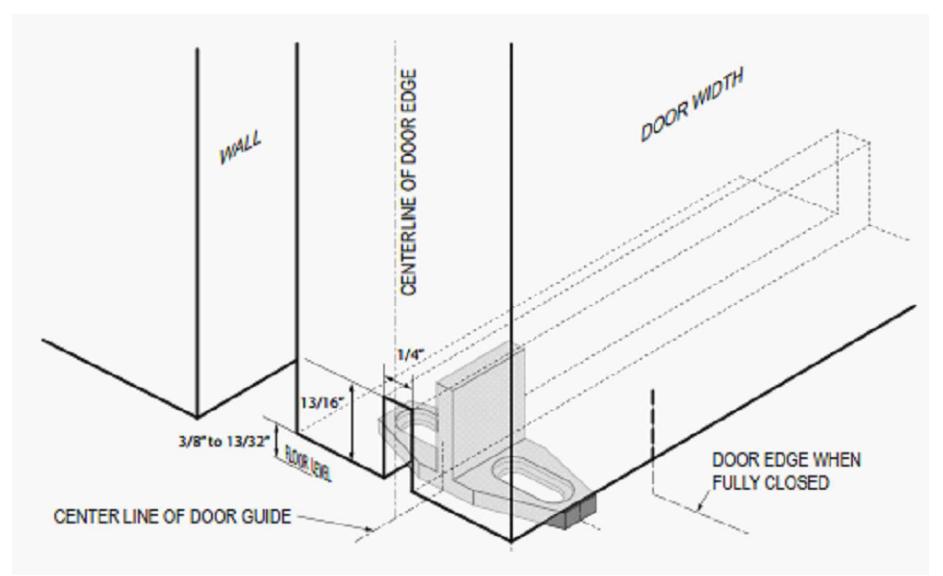
FIG. 1
STEP 7
Install Door Guide to floor
- -Route door (FIG. 1)
- -Locate center line of guide (ITEM 6) .
- -Using door guide as a template, position and mark screw locations.
- -Drill pilot holes for anchors using 5/16" drill bit.
- -Mount guide (ITEM 6) to floor with screws (ITEM 7) and anchors (ITEM 8)
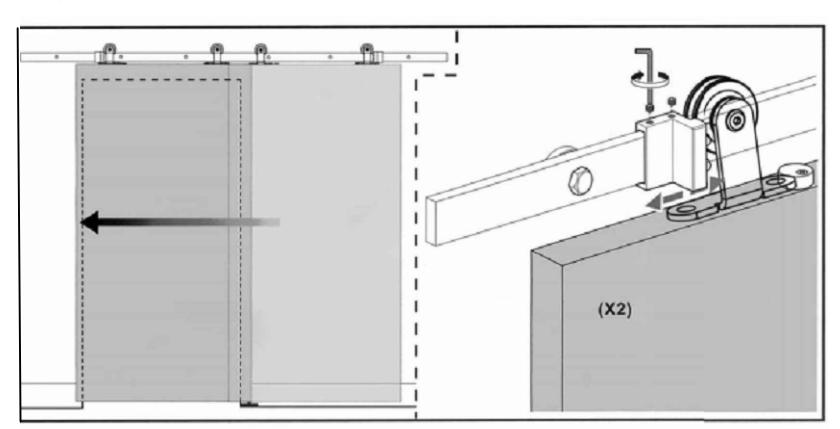
STEP 8
Hang door
- -Lift door onto track.
- -Routed bottom of door will receive floor mounted guide.
- -Adjust stops accordingly.Tighten set screws with Allen Wrench (ITEM 9) . Start with bottom set screws then move to top set screws with sufficient force to drive set screws into bar after final adjustment.
- -Test Door

www.abhmfg.com E-mail: abhinfo@abhmfg.com Architectural Builders Hardware Mfg., Inc. 1222 Ardmore Ave., Itasca, IL 60143 630.875.9900; FAX 800.9FAXABH (932.9224)
SDS-1000 SLIDING DOOR TRACK SYSTEM-2-00.dwg
SDS-1000 SLIDING DOOR TRACK SYSTEM
c 2020 ABH Mfg., Inc. printed in USA
ISSUED 01-10-20 PAGE 4 OF 4