Select Hinges Wide Throw Swing Clear Geared Installation Instructions
Open the original PDF document
View PDF


Wide Throw • Swing Clear Geared Hinges
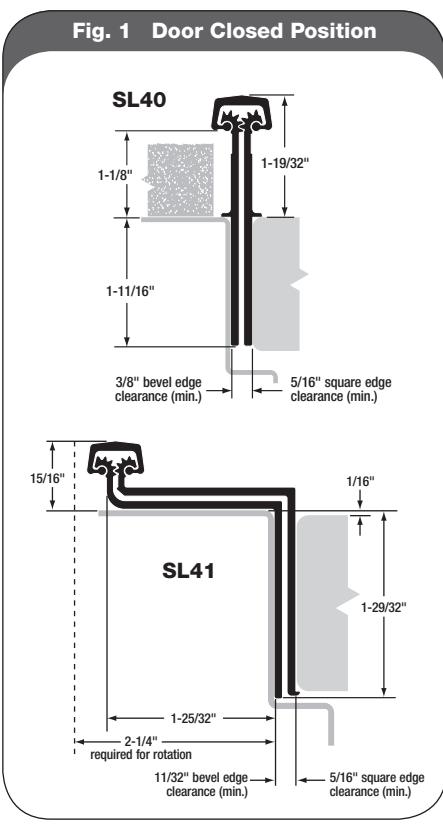
Calculating Required Door Clearances
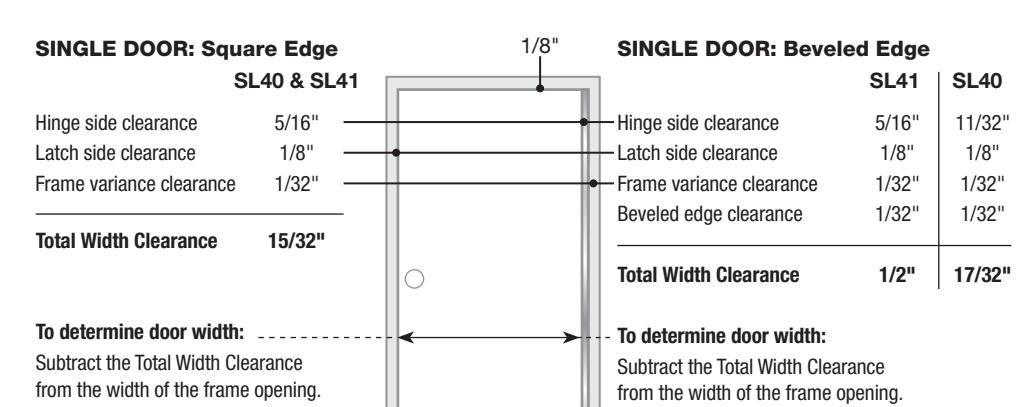
For Square and Beveled-Edge Doors
IMPORTANT: All standard length SELECT hinges are supplied slightly shorter than nominal door height to avoid threshold or flooring clearance problems.
IMPORTANT: All uncut SL40 and SL41 hinges are non-handed and templated. Model SL40 remains non-handed after cutting. Model SL41 becomes handed after cutting.
IMPORTANT: Refer to NFPA 80 manual for clearance requirements on fire-rated entrances.
Important Warranty Information:
The following actions will void any warranty, expressed or implied:
- Failure to install the hinge according to manufacturer's specifications and requirements. (For more information, visit selecthingerequirements.com.)
- Use of fasteners other than those supplied with the hinge.
- Unauthorized field modifications, including alteration or removal of the factory-applied lubricant, altering the original finish or painting the hinge.
|
1/8"
DOUBLE DOORS (PAIR): Square Edge |
DOUBLE DOORS (PAIR): Beveled Edge | |||
|---|---|---|---|---|
| SL40 & SL41 | SL41 | SL40 | ||
|
Hinge side clearance
5/8" (5/16" x 2) Latch side clearance 3/16" Frame variance clearance 1/16" (1/32" x 2) |
Hinge side clearance
Latch side clearance Frame variance clearance 1/16" (1/32" x 2) |
5/8" (5/16" x 2)
3/16" |
11/16" (11/32" x 2)
3/16" 1/16" (1/32" x 2) |
|
|
Total Width Clearance
7/8" |
Beveled edge clearance
Total Width Clearance |
1/16" (1/32" x 2)
15/16" |
1/16" (1/32" x 2)
1" |
|
|
To determine door width:
Subtract the Total Width Clearance from the width of the frame opening; divide the result by 2. |
To determine door width:
Subtract the Total Width Clearance from the width of the frame opening; divide the result by 2. |
|||
NOTE: For double-door entrances with a mullion between the pair of doors, calculate each door width using the Single Door clearances. For double-door entrances with a mullion behind the pair of doors, calculate each door width using the Double Doors clearances.
Tools Needed
- Metal-cutting saw
- Tape measure
- #13 or 3/16" drill bit
- 5/32" drill bit (wood frames/doors)
- #3 Phillips drive
- Shims
Parts Supplied
■ #12-24 self-drilling, thread-forming (SDTF) 410 SS Phillips undercut flathead screws
Optional Parts
- #12 410 SS Phillips undercut flathead wood screws
- #12-24 thread-forming (TF) 410 SS Phillips undercut flathead screws
- Protective gloves are recommended
How to Cut the Hinge to Fit
- A. Keep hinge in "door closed" position (Fig. 1).
- B. Determine whether this will be a righthand or left-hand installation.
IMPORTANT: Cut only one end of hinge. Cut end will be installed at the bottom. Keep original templated six-hole pattern at top end of hinge.
NOTE: SL40 is non-handed and remains nonhanded after cutting.
C. Using a metal-cutting saw, begin the cut through the gear cap first.
NOTE: DO NOT cut through a set screw bearing.
D. Reinstall any set screw bearing that may have been cut off.
A. Prepare Frame
- 1. Shim hinge to 1/8" below the header to allow for door clearance.
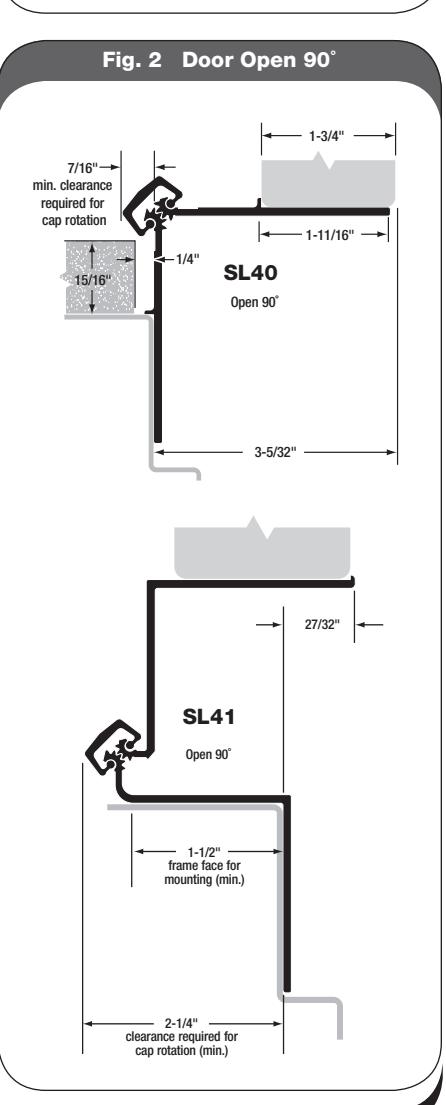
- 2. Hold hinge in "door open" position (Fig. 2), making sure frame leaf alignment flange (SL40) or frame face portion of the frame leaf (SL41) is tight against frame face.
- 3. Mark (or centerpunch) hole locations.
NOTE: TF screws and wood screws require pilot holes at marked locations. SDTF screws do not require pilot holes.
-
4. If using SDTF screws, go to Step 5. If using TF or wood screws, drill holes at marked locations. DO NOT attach hinge to the frame at this time.
- Metal frame: Use #13 (.185") bit or 3/16" (.188") bit
- Wood frame: Use 5/32" (.156") bit
B. Attach Door to Hinge
5. Align the door leaf alignment flange or the door leaf lip along the full length of the door edge (even if the door is slightly warped).
IMPORTANT: Top end of the hinge must be flush with the top of the door.
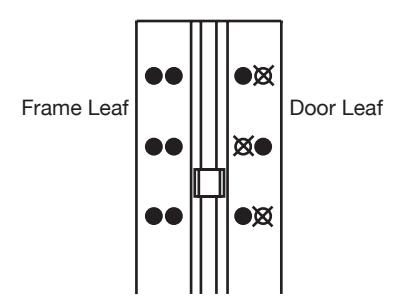
IMPORTANT: If installing hinge on a 90-minute fire-rated wood door, mark or centerpunch only one hole in each pair of holes at the top and bottom of the door leaf. DO NOT install the remaining screws in six-hole pattern on the door leaf. See illustration below.
-
6. Mark (or centerpunch) holes. If using SDTF screws, go to Step 7. If using TF or wood screws, drill holes at marked locations.
- Metal door: Use #13 (.185") bit or 3/16" (.188") bit
- Wood door: Use 5/32" (.156") bit
- 7. Fasten door leaf to door using #3 Phillips drive and fasteners provided.
C. Attach Door to Frame
- 8. Position door at 90 degrees to the frame. Shim door to the proper height so the door aligns with the top screw holes.
- 9. Install two screws at the top of hinge. Remove shim and align remaining holes. Install screws in middle and bottom two holes.
- 10. Check door for proper swing and clearance before installing remaining screws.
Reinforcing & Rivnuts®
No hinge reinforcement is necessary except on extremely high-frequency, extremely heavy or extra-wide doors. Rivnuts are recommended for use in the frame when the door exceeds 450 lb. (max. 600 lb.).
NOTE: Only SELECT steel Rivnuts are to be used with fire-rated SELECT hinges.
Grouted/Slushed-in Frames
For ease of installation, it is recommended some sort of mudguard be installed behind the frame. Do not use self-drilling, thread-forming (SDTF) screws to drill into grouted frames. If mudguards have not been used, carefully drill pilot holes through frame and remove grout for screw clearance. Do not oversize holes in frame.
Fire-Rated Hinges
All stock SELECT hinges are 90-minute UL-rated, without pins. Please contact SELECT for complete information about its fire-rated hinges.