Securitron Z-MM15 Z Brackets Kit Installation Instructions
Open the original PDF document
View PDF

MM15 Z-BRACKET KIT INSTALLATION INSTRUCTIONS
STEP 1: MOUNT Z-BRACKET
-
1. Assemble armature per MM15 instructions. Secure to Z-Bracket using shoulder screw.
- a. Use 2 or 3 spring washers behind armature stack as shown. Armature should not be loose, but be able to pivot enough to contact the Z-Bracket when pushed.
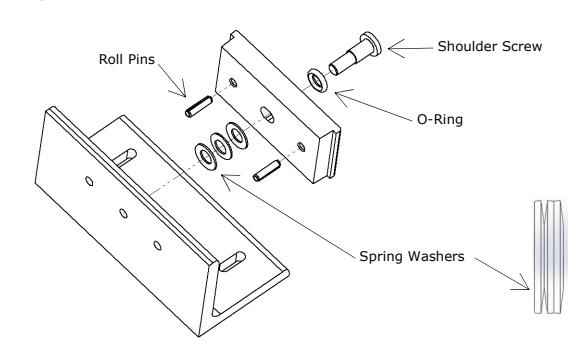
2. Assemble Z-Bracket components as shown. Hand tighten so bracket slides freely.
- 3. With door fully closed, locate Z-Bracket assembly flush with top of door and mark two hole locations. Check for interferences and relocate if necessary.
-
4. Drill door mounting holes:
- a. Metal Door Drill 3/8" holes through door. Enlarge the outside face holes only to ½".
- b. Wood Door Drill ½" holes through door.
-
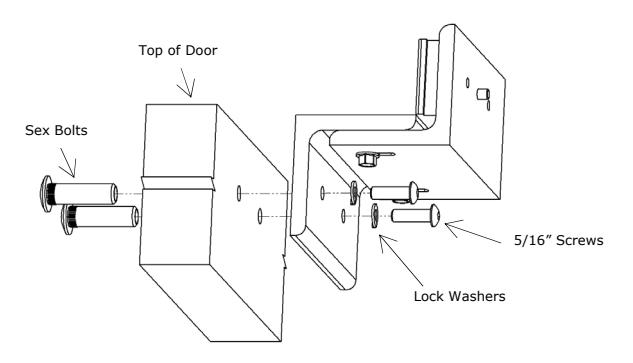
5. Fasten Z-Bracket assembly to door:
- a. Insert sex bolts (1 from MM15, 1 from Z-Bkt. Hardware packs) into holes on outside of door.
- b. Attach Z-Bracket using 5/16" button head screws and lock washers into sex bolts.
STEP 2: MOUNT ANGLE BRACKET
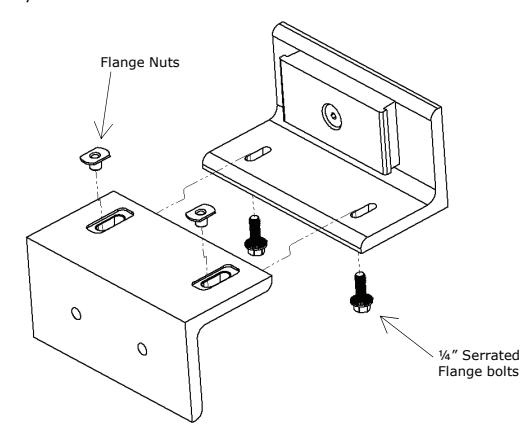
1. Align mounting plate with holes in angle bracket – secure using four ¼" button head screws from MM15 hardware pack.

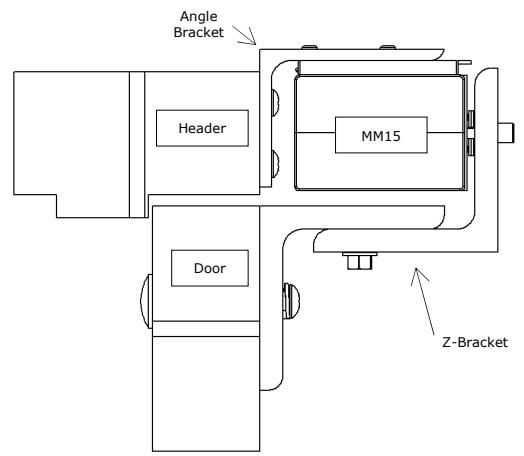
- 2. Place a ¼" spacer (not included) on the Z-Bracket; set the MM15 on spacer, against armature; engage angle bracket/mounting plate on top of MM15.
- 3. Mark location of angle bracket on header. Bottom edge of MM15 should be aligned with lower edge of header. Remove angle bracket, MM15 & spacer.
- 4. Relocate angle bracket; mark hole locations; drill 3/8" holes; install blind nuts from MM15 hardware pack.
- 5. Secure angle bracket to header.
STEP 3: MOUNT MM15
(See MM15 Installation Instructions for complete details.)
- 1. Remove MM15 cover.
-
2. Attach MM15 to bracket:
- a. Feed wiring through angle bracket or conduit.
- b. Secure MM15 with three cap screws from lock hardware pack.
- 3. Connect wires to appropriate switching device (such as key pad, card reader or switch) and power supply.
- 4. Replace MM15 cover align mounting holes then push up until lip snaps into place.
- 5. Fasten cover with two #6 flat head screws.
MAGNACARE LIFETIME REPLACEMENT WARRANTY
For warranty information visit: www.securitron.com/en/site/securitron/About/MagnaCare-Warranty/