Securitron DK-12 Keypads Operating Manual
Open the original PDF document
View PDF

ASSA ABLOY
SECURITRON MODEL DK-12 DIGITAL KEYPAD INSTALLATION & OPERATING INSTRUCTIONS
1. SPECIFICATIONS
| MECHANICAL | ELECTRICAL/ENVIRONMENTAL |
|---|---|
| Keypad Dimensions: | Power Supply: |
| 2" x 2-3/4" x 1/4" (Width x Length x Height | 12/24VDC @ 100 milliamps maximum |
| off of stainless steel faceplate) | 12/24VAC @ 325 milliamps maximum |
| Stainless Steel Faceplate Dimensions: | Relay Contacts: |
| 2-3/4" x 4-7/16" x 5/32" (Width x Length x Height) | Maximum 5 amps @ 30 volts |
| Environmental: | |
| Back Board Dimensions: | Operating: -10°F [-23°C] to 140°F [60°C] |
| 1-29/32" x 2-13/16" x 1-1/16" (Width x | Storage: -10°F [-23°C] to 150°F [65.6°C] |
| Length x Height off of stainless steel | Humidity: 0% to 95% RH |
| faceplate) |
2. INSTALLATION
SURFACE MOUNT WALL BOX
- Separate the wall box cover and base.
- Remove rectangular knockout in the center of the base.
- Cut out opening in the wall that will be used to route the wires through.
- Mount base to wall over wire opening using the #6 sheet metal screws and plastic anchors.
- Mount DK-12 to cover with either tamper resistant #6 screws (recommended) or #6 conventional screws. See Section 7 (Programming) before securing DK-12 in place.
- Pull wires through wall/center of base and connect to DK-12 wiring terminals (see Section 3 for wiring instructions).
- Push the wall box cover onto the base until it snaps into place.
FLUSH MOUNT WALL BOX
- Cut out opening in wall to mount box into.
- Route wiring through one of the four knockouts in the back of the box.
- Push the box into the wall and secure in place using the two swing clamps.
- Connect wires to DK-12 wiring terminals (see Section 3 for wiring instructions).
- Mount DK-12 to box with either tamper resistant #6 screws (recommended) or #6 conventional screws. See Section 7 (Programming) before securing DK-12 in place.
The DK-12 can be used outdoors with the optional rain cover (Securitron part #WCC) which will allow the DK-12 to be mounted in outdoor locations not directly exposed to rain or snow. When used outdoors you must supply a weatherproof, gasketed wall box (available from Securitron under part #WBB).
3. WIRING
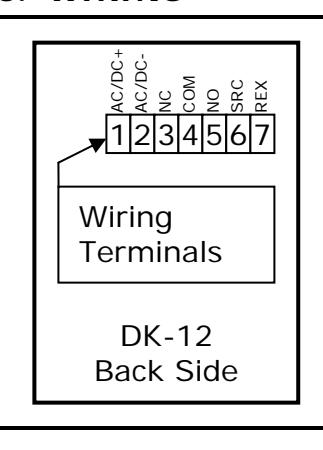
Wiring Terminal Connections:
- 1. 'AC/DC+' One AC supply lead or positive DC supply lead.
- 2. 'AC/DC-' Other AC supply lead or negative DC supply lead.
- 3. 'NC' Normally closed relay contact.
- 4. 'COM' Common for relay contacts.
- 5. 'NO' Normally open relay contact.
- 6. 'SRC' Supply for REX signal.
- 7. 'REX' REX Signal input.
NOTE: Each terminal is provided with a marking in front of it for easy reference.
PN# 500-24010
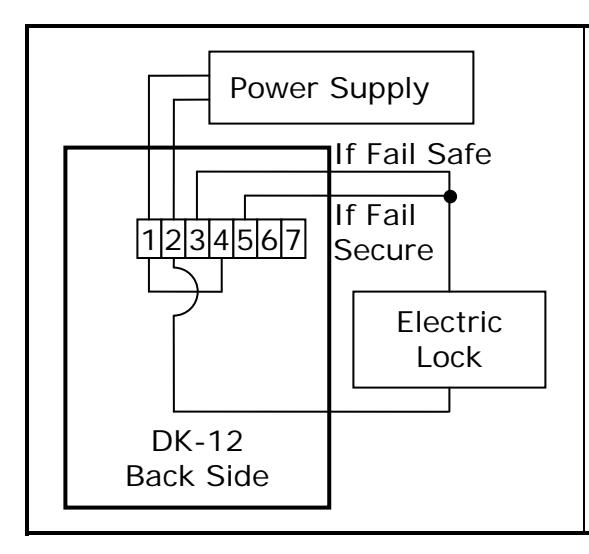
Basic Power and Electric Lock Connections:
- Connect supply to 'AC/DC+' and 'AC/DC-' terminals.
- Connect 'AC/DC+' terminal to 'COM' terminal.
- For fail-safe operation connect 'NC' terminal to one lead of lock (positive lead if a DC lock).
- For fail-secure operation connect 'NO' terminal to one lead of lock (positive lead if a DC lock).
- Connect other lead of lock to the 'AC/DC-' terminal.
NOTE: Use a DC supply for a DC lock and an AC supply for an AC lock. Ensure the supply has the capacity to operate both the lock and the DK-12. Relay contact MOV protection is built into the DK-12.
4. REX SOURCE AND INPUT
The REX (Request To Exit) function allows the door to be opened from the inside when an electric lock (such as a magnetic lock) is securing the door. To use the REX a normally open switch is placed between the 'SRC' and "REX' terminals. When this switch is pushed/closed it operates the DK-12 relay the same as if a code were entered.
REX CHARACTERISTICS
- Holding the REX switch closed will keep the lock released.
- When the REX switch re-opens the lock will remain released for the programmed time.
- When in toggle mode the REX switch will toggle the relay state.
- When in lockout mode the REX switch will still release the lock.
When using exit switches the possibility must be considered that an electronic failure may occur to the DK-12 and people will not be able to exit. If the DK-12 controls the only door exiting the area additional steps should be taken to improve the reliability of the exiting so as to avoid trapping people. This can most easily be done by implementing a secondary means of releasing the lock not dependant on the DK-12's REX input. Additional switch contacts should be used which directly control the electric lock. In the case of a fail-safe lock, which should always be employed when there is only one exit path, this can be easily accomplished with "double break" wiring between the exit button, electric lock, and DK-12. The exit button must have normally open and normally closed contacts and be of the DPDT type. Exit buttons that fit this need are available from Securitron. Note that you should always consult your local building department when securing doors that are part of an emergency exit path to make sure you are complying with local codes.
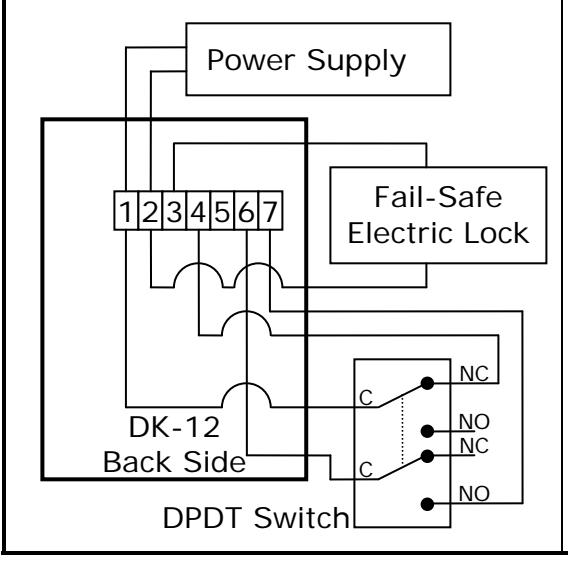
Double Break Wiring For Free Egress:
- Connect supply to 'AC/DC+' and 'AC/DC-' terminals.
- Connect 'AC/DC+' terminal to one common terminal of the DPDT switch.
- Connect the normally closed contact of that common to the 'COM' terminal.
- Connect 'NC' terminal to one lead of lock (positive lead if a DC lock).
- Connect other lead of lock to the 'AC/DC-' terminal.
- Connect 'SRC' to the other common terminal of the DPDT switch.
- Connect the normally open contact of that common to the 'REX" terminal.
Because the DK-12 was designed for use with AC and DC voltages the 'SRC' output was provided to supply a current limited DC source for the REX switch. The above diagram can be redrawn for use with a SPDT switch if required, however, an external resistor must be provided and this setup can only be done with a DC power supply; if an AC power supply is used the REX must be connected to the 'SRC' output.
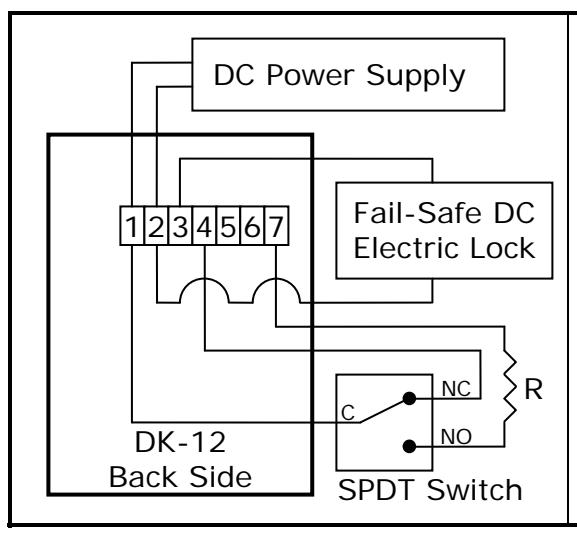
Double Break Wiring For Free Egress (SPDT):
- Connect DC supply to 'AC/DC+' and 'AC/DC-' terminals.
- Connect 'AC/DC+' terminal to the common terminal of the SPDT switch.
- Connect the normally closed contact of the SPDT switch to the 'COM' terminal.
- Connect the normally open contact of the SPDT switch to the 'REX" terminal through resistor (R).
- Connect 'NC' terminal to the positive lead of lock.
- Connect other lead of lock to the 'AC/DC-' terminal.
NOTE: Resistor (R) is 3300 ohms, ½ watt.
5. WIRING WITH SECUTITRON'S TOUCH SENSE BAR AND MAGNALOCK
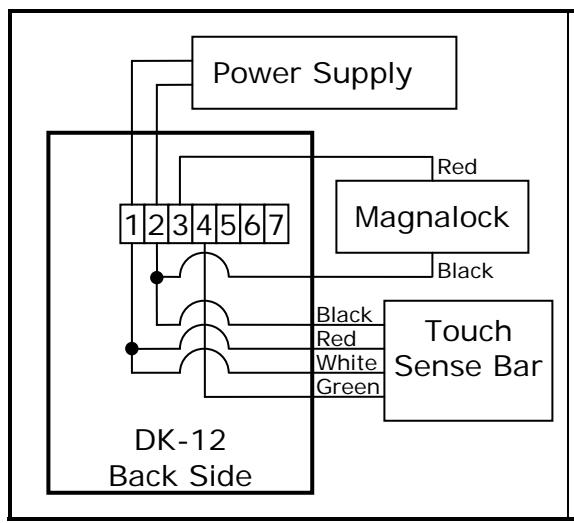
Touch Sense Bar and Magnalock Wiring:
- Connect supply to 'AC/DC+' and 'AC/DC-' terminals.
- Connect 'AC/DC+' terminal to the red and white wires of the Touch Sense Bar.
- Connect 'AC/DC-' terminal to the black wires of both the Touch Sense Bar and the Magnalock.
- Connect 'NC' terminal to the red lead of the Magnalock.
- Connect 'COM' terminal to the green lead of the Touch Sense Bar.
6. FEEDBACK AND ENTRY OVERVIEW
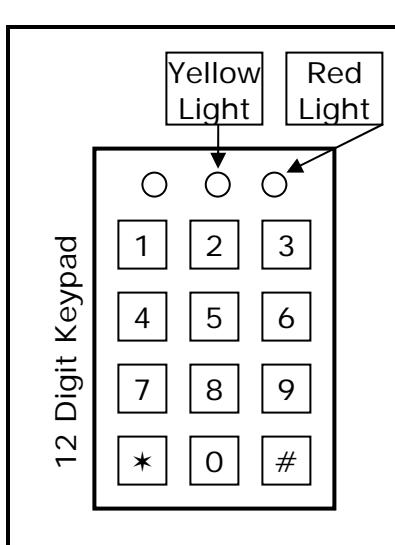
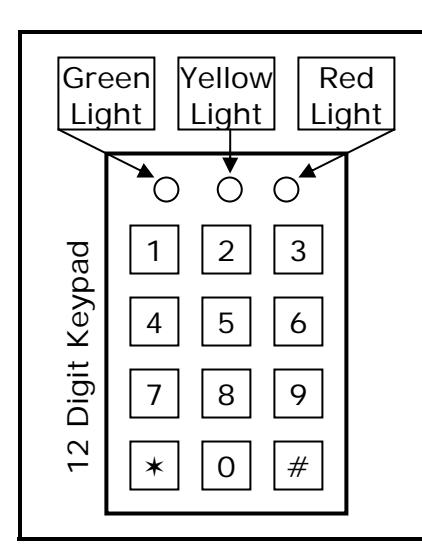
The DK-12 comes with indictor lights above the keypad; left-hand side green, center yellow, and right-hand side red. These three indictor lights, and the backlight, provide feedback during operation. Note that the green and red LEDs could be reversed thru programming.
| INDICATOR | ACTION | MEANING |
|---|---|---|
| Red Light | Single Flash |
While in programming mode an error was made during
program entry; or The program entry was correct but the DK-12 can not accept the programming, for example a code was trying to be set that is a subset of another code; or A 5 second timeout occurred at any time during a programming step. |
| Red Light | Double Flash |
While in programming mode a confirmation that a valid
program entry was made; or During normal operation the DK-12 was put into or taken out of lockout mode. |
| Red Light |
Continuous
Flashing |
During normal operation the relay is energized while the DK-12
is in relay timer mode; flashes once per second. |
| Red Light |
Continuously
On |
While in normal operation the DK-12 is in passage mode; or
The DK-12 is in toggle mode and the relay is energized; or The REX input is being held active. |
| Yellow Light |
Continuous
Flashing |
While in programming mode the light will flash once per
second; or While the 'PCR' jumper is in the 'ON' position the light will flash once per second. |
| Yellow Light |
Continuously
On |
While in normal operation this indicates that there are no codes
in memory. |
| Green Light | Single Flash | Key press detected. |
PN# 500-24010 Page 3 Rev. C, 04/11
| INDICATOR | ACTION | MEANING |
|---|---|---|
| Green Light |
Continuously
On |
While in normal mode a 30-Second lockout occurred after 16
wrong digits were entered; light turns off after lockout time. |
| Backlight | Double Flash |
While in normal mode a valid code was entered while the DK
12 was in lockout mode. |
The DK-12 codes will operate the unit when their sequence is entered regardless if other incorrect digits were entered before. For instance, if the correct code is 2-2-6-7 the unit will operate if 8-2-2-6-7 is entered. An exception to this is if a total of 16 wrong digits are entered. In this case a continuous audible alarm sound is made and the keypad will lock itself out for 30 seconds while the green light remains on constantly. After the 30 second lockout the audible alarm will silence, the green light will turn off, and the keypad will become active. This feature discourages attempts to guess the code.
When entering a sequence the DK-12 has a 5 second timeout that will erase the internal buffer when a key is not pressed within 5 seconds. For example, if the correct code is 2-2-6-7 and the user enters 2-2-6 followed by a 5 second delay and then enters 7 the DK-12 will not operate.
The DK-12 is also provided with a beeper that can be used to indicate when a button is pressed or the relay is energized. The beeper's functions are detailed later in this manual. Note that when shipped from the factory there is a paper label applied to the top of the beeper. This label decreases the volume of the beeper. If you find that more volume is needed in your application simply remove the label off the beeper to obtain maximum volume.
7. PROGRAMMING
With the exception of one function (Program Code Replacement) all programming is done through the keypad. The DK-12 employs memory that will retain all codes and settings in case of a power failure. Up to 100 codes can be stored. Each code is stored in an area of memory called a "code slot".
| CODE TYPE | CODE SLOT | DESCRIPTION |
|---|---|---|
| Program | 0 |
Code used to enter into programming mode which allows
entering/changing of all the codes and keypad functions. |
| User | 1 to 97 | Standard code used to gain access. |
| Lockout | 98 |
Will activate/deactivate lockout mode.
When active no valid |
| user or passage codes will activate the relay. | ||
| Passage | 99 |
Will activate/deactivate passage mode. When active the relay is
energized indefinitely. |
When setting and/or changing codes a two digit prefix is always entered first before the code, this prefix lets the DK-12 know what code slot the code is going into. The prefixes are '00' to '99' for a total of 100 code slots. The DK-12 is shipped from the factory without any codes in memory so before anything can be done with the DK-12 a program code must be entered. Start with the section below to get into programming mode through the hardware jumper. The section immediately following it explains the entry of a program code. Once a program code is entered all programming can be done easily through the keypad.
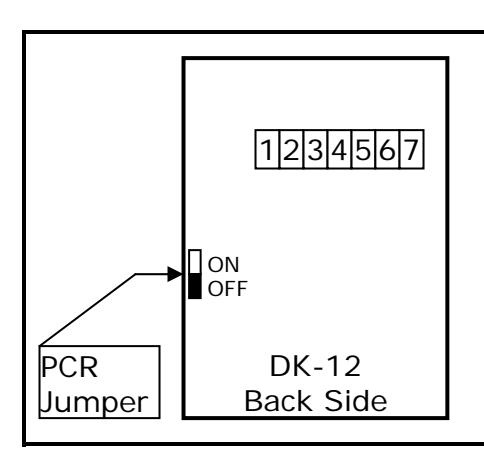
Entering Programming Mode Through the PCR Jumper:
- Disconnect the power supply.
- Move the jumper from 'OFF' to 'ON'.
- Apply power, the yellow light will flash and the beeper will sound continuously.
- Move the jumper from 'ON' to 'OFF'; the yellow light will continue to flash and the beeper will turn off.
- The DK-12 is now in programming mode.
NOTE: PCR jumper only needs to be used during initial installation or if the program code is ever lost/forgotten.
Setting/Changing Codes:
- Enter program code on the keypad.
- Press either '#' or '' and the yellow light will flash.
- On the keypad enter either 0-0 (program code), 0-1 through 9-7 (user code), 9-8 (lockout code), or 9-9 (passage code).
- Enter desired code on the keypad.
- Press either '#' or '', or wait 5 seconds to complete entry.
- The red light will flash twice to confirm a valid entry. If a single flash occurs then there was an error; try the above steps again. If the error still occurs read Section 8 (Subset Codes).
- Press either '#' or '' to exit programming mode and the yellow light will stop flashing.
Note: Program code length must be 5 to 7 digits long; all others are 2 to 7 digits long.
Deleting a Code Via Slot Number:
- Enter program code on the keypad.
- Press either '#' or '' and the yellow light will flash.
- Enter desired code slot on the keypad (0-0 to 9-9).
- Enter #-# on the keypad to complete entry.
- The red light will flash twice to confirm a valid entry. If a single flash occurs then there was an error; try the above steps again.
- Press either '#' or '' to exit programming mode and the yellow light will stop flashing.

Deleting Via Known Code:
- Enter program code on the keypad.
- Press either '#' or '' and the yellow light will flash.
- Enter 7-9- on the keypad.
- Enter known code to be deleted on the keypad.
- Enter #-# on the keypad to complete entry.
- The red light will flash twice to confirm a valid entry. If a single flash occurs then there was an error; try the above steps again.
- Press either '#' or '' to exit programming mode and the yellow light will stop flashing.

Deleting All User, Passage, and Lockout Codes:
- Enter program code on the keypad.
- Press either '#' or '' and the yellow light will flash.
- Enter 8-8- on the keypad.
- Enter #-# on the keypad to complete entry.
- The red light will flash twice to confirm a valid entry. If a single flash occurs then there was an error; try the above steps again.
- Press either '#' or '' to exit programming mode and the yellow light will stop flashing.
As delivered the DK-12 echoes key presses by a short flash of the green light. The red light flashes once per second while the relay is energized in timer mode or is on continuously in toggle or passage mode. The red light is also on continuously while the REX button is being pressed. These defaults can be changed so that these light's functions are reversed. If the functions are reversed they can later be changed back to their factory default setting.
Changing Red and Green Light Functions:
- Enter program code on the keypad.
- Press either '#' or '' and the yellow light will flash.
- Enter either 7-4- (reverse light's functions) or 7-5- (default light's functions) on the keypad.
- The red light will flash twice to confirm a valid entry if you set the light's function to default, otherwise the green light will flash twice. If a single flash occurs then there was an error; try the above steps again.
- Press either '#' or '' to exit programming mode and the yellow light will stop flashing.
As delivered the DK-12 echoes key presses by a short beep. This key press echo can be turned off if desired. If you turn it off it can always be turned back on later.
Changing Keypad Beeper Echo Function:
- Enter program code on the keypad.
- Press either '#' or '' and the yellow light will flash.
- Enter either 7-2- (turn on beeper key press echo) or 7-3- (turn off beeper key press echo) on the keypad.
- The red light will flash twice to confirm a valid entry. If a single flash occurs then there was an error; try the above steps again.
- Press either '#' or '' to exit programming mode and the yellow light will stop flashing.
The default state of the DK-12 is that there is no audible announcement when the relay is energized. However, the DK-12 can be setup so that it will produce a continuous double beep when the relay is energized in timer mode. If the DK-12 is in toggle or passage mode there is no audible announcement option.
Changing Beeper Door Announcement Function:
- Enter program code on the keypad.
- Press either '#' or '' and the yellow light will flash.
- Enter either 7-0- (turn on continuous double beep) or 7-1- (turn off continuous double beep) on the keypad.
- The red light will flash twice to confirm a valid entry. If a single flash occurs then there was an error; try the above steps again.
- Press either '#' or '' to exit programming mode and the yellow light will stop flashing.
There are two modes the relay can operate in, timer and toggle mode. In timer mode, which is the default mode of the DK-12, the relay will energize for a certain period of time and then de-
energize automatically after that timer period expires. The default time is 5 seconds but it can be changed to any value from 1 to 99 seconds.

Entering Timer Mode and Changing Timer Value:
- Enter program code on the keypad.
- Press either '#' or '' and the yellow light will flash.
- Enter 9- on the keypad.
- Enter a timer value on the keypad from 0-1 to 9-9 (1 to 99 seconds).
- The red light will flash twice to confirm a valid entry. If a single flash occurs then there was an error; try the above steps again.
- Press either '#' or '' to exit programming mode and the yellow light will stop flashing.
In toggle mode the relay will energize when a valid code is entered and de-energize when a valid code is entered a second time. When you have enabled toggle mode activation of the REX input will energize and de-energize the relay just as if a valid User Code were entered.

Entering Toggle Mode:
- Enter program code on the keypad.
- Press either '#' or '' and the yellow light will flash.
- Enter 9--0-0 on the keypad.
- The red light will flash twice to confirm a valid entry. If a single flash occurs then there was an error; try the above steps again.
- Press either '#' or '' to exit programming mode and the yellow light will stop flashing.
The DK-12 gives you the ability to return all the functions, including the timer, to their factory default settings. However, all codes will remain unchanged.
Returning to Factory Default Settings:
- Enter program code on the keypad.
- Press either '#' or '' and the yellow light will flash.
- Enter 8-9- on the keypad.
- Enter #-# on the keypad to complete entry.
- The red light will flash twice to confirm a valid entry. If a single flash occurs then there was an error; try the above steps again.
- Press either '#' or '' to exit programming mode and the yellow light will stop flashing.
8. SUBSET CODES
When you recognize that the DK-12 accepts multiple codes of different lengths it is possible that one code will be a subset of another. For example, suppose you programmed 1-3-3-5-8 and then programmed 3-3-5 as another code. When you try to enter 1-3-3-5-8 you can't complete the entry because when the unit sees the sequence 3-3-5 it will operate. A real problem could
occur if a user code was a subset of the program code. The unit could not be put into programming mode from the keypad.
The DK-12, however, avoids this problem by rejecting any code that is a subset of another code in memory. It signals this rejection by flashing the red light once instead of the double flash confirmation. You'll get the same error if you try to enter a duplicate code as well. If you are trying to enter a code and see it rejected by the error signal carefully check your list of other codes. You are probably attempting to enter a subset code. If the security procedures of the installation allow individuals to choose their own codes without reference to a list the users need to be advised that they may have to try alternate codes if the one they prefer is rejected as a subset.
9. INSTALLING A DK-12 IN PLACE OF A DK-11
If you are putting a DK-12 in an installation that is currently using a DK-11 the diagram below will assist you in converting the wiring from the DK-11 to the DK-12. The terminals of the DK-11 are not marked on the board so use the diagram below as a reference for the terminal numbers. Note that when looking at the DK-11 from the back the terminal block is on the lefthand side and the jumper terminal is at the top of the board.
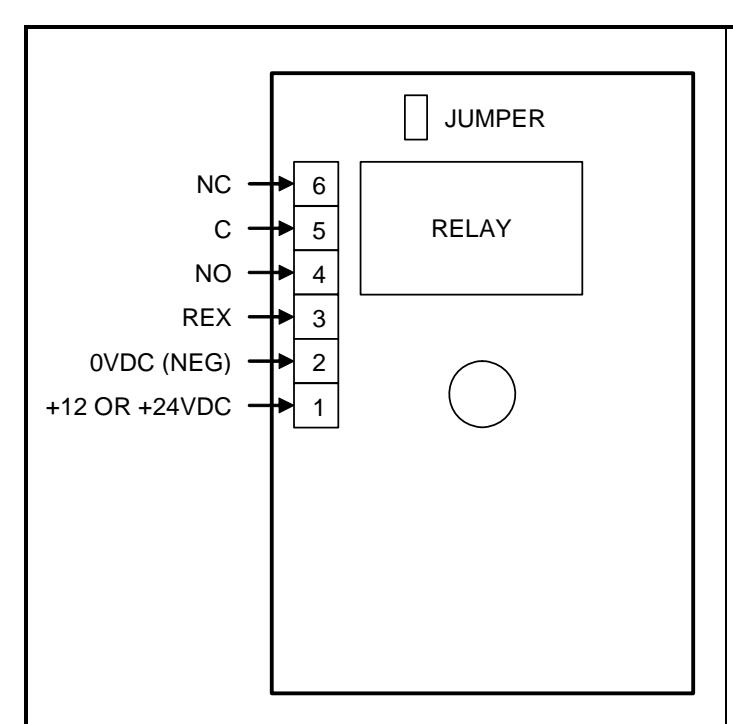
Converting a DK-11 Installation to a DK-12:
- Move lead from terminal 1 (DK-11) to terminal 'AC/DC+' (DK-12).
- Move lead from terminal 2 (DK-11) to terminal 'AC/DC-' (DK-12).
- Move switch lead from terminal 3 (DK-11) to terminal 'REX' (DK-12).
- Move other switch lead from terminal 1 (DK-11) to terminal 'SRC' (DK-12).
- Move lead from terminal 4 (DK-11) to terminal 'NO' (DK-12).
- Move lead from terminal 5 (DK-11) to terminal 'COM' (DK-12).
- Move lead from terminal 6 (DK-11) to terminal 'NC' (DK-12).
NOTE: Review Section 4 (REX Source and Input) for more details on wiring the REX of the DK-12 if used.
10. MAGNACARE® LIFETIME REPLACEMENT WARRANTY
For warranty information visit: www.securitron.com/en/site/securitron/About/MagnaCare-Warranty/