Securakey Radio Key 600 Quick Start Users Guide
Open the original PDF document
View PDFRADIO KE RADIO KEKEY® 600 QUICK-START USER GUIDE QUICK-START GUIDE
This guide contains keypad sequences for programming your Radio Key® 600, using the built-in programming keypad.
Radio Key® Transponders (Key Tags) are pre-encoded and engraved at the factory with unique Transponder ID numbers. Facility Codes (Site Codes) are not required. You may assign either a Transponder or a PIN code to each User Number (1-600) for programming purposes. Be sure to record the User Number, the Transponder ID Number or PIN code and the user's name on the User Log Form. A blank form has been included for this purpose. Do not write on this form; use it as a photocopy master.
A red light and three beeps at the end of a keypad sequence means that you have made an error. Refer to the appropriate section, and carefully re-enter the command in the proper sequence.
If you select a User Number for which a Transponder ID Number or PIN is already stored in memory, a red light and three beeps will occur. Select another User Number or void the User Number, which removes the previously stored Transponder ID or PIN Number from memory.
NOTE: User Number and ID Number Values in the following examples are for demonstration purposes only; enter the appropriate values for your system.
First, enter Program Mode: First, enter Program Mode: First, enter Program
Enter your 5-digit password, then press ENTER . (All new units are pre-programmed with the password 12345.) The LED will flash amber to show that the unit is in Program Mode. The unit will "time out" and return to Active (Normal) Mode in 15 seconds if no key is pressed.
1 + 2 + 3 + 4 + 5 + (Password) (ENTER)
Add a Transponder (Key Tag) to the System: Add a Transponder (Key Tag) to the System:Add a Transponder (Key Tag) the System:
Enter Password. Press ENTER. Press ADD . Enter a User Number (1- 600) and press ENTER. The example is for User #12. Hold the Transponder near the RK600 Unit. A green light and beep means the Transponder was accepted. A red light and three beeps means a Transponder or PIN has already been stored for the selected User Number. Delete the previously stored Transponder or PIN or select a new User Number.
+ 1 + 2 + (Hold Key Tag near unit) (User Number 12) (ADD) (ENTER)
Add a Transponder by Entering Transponder ID:
(RKCM-01 cards or RKKT-01 Tags Only)
Enter Password. Press ENTER . Press ADD , enter the User Number, press * , enter the ID number engraved on the Transponder, then press ENTER .
In either case, be sure to record the User Number and Name and Transponder ID Number in the User Log Form.
Add a Series of Transponders to the System:
Enter Password. Press ENTER . Press ADD. Enter the Starting User Number in the range. Press * , enter the Ending User Number, press * , then press ENTER . Present the Transponders to the reader in the desired order (making a careful record of which Transponders are assigned to which User Numbers.) If one or more Transponders are already entered into the User Number range you have selected, a red light and three beeps will occur, in which case, you must delete the entire range before proceeding.
Delete a Transponder from the System:
Enter Password. Press ENTER . Press VOID . Enter the User Number. Press ENTER . A green light and beep means that the Transponder was deleted.

Delete a Range of Transponders from System:
Enter Password. Press ENTER. Press VOID. Enter the Starting User Number in the range, press ★, enter the Ending User Number, then press ENTER. A green light and beep means the range of Transponders was deleted.
Delete a Transponder by Presenting to Reader:
Enter Password. Press ENTER. Press VOID , then press ENTER . Hold the Transponder near the RK600 Unit. A green light and beep means the Transponder was deleted.
Delete a Transponder by Entering Transponder ID:
(RKCM-01 cards or RKKT-01 Tags Only)
Enter Password. Press ENTER. Press VOID , Press * , enter the ID number engraved on the Transponder, then press ENTER . A green light and beep means the Transponder was deleted.
Add a PIN to the System:
Enter Password. Press ENTER. Press ADD , enter the User Number, press ADD , enter the 4-digit PIN Code, then Press ENTER .
Change your Password:
Enter your current Password. Press ENTER. Press * , then enter the new Password (exactly 5 digits). Press * again, then re-enter the new Password and press ENTER. A green light and beep means the Password was changed. Note that 12345 is the default (factory) password; use another number sequence for best security.
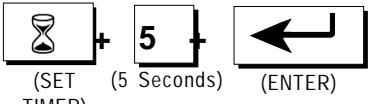
Set the Latch Timer:
Enter Password. Press ENTER. Press SET TIMER . Enter the number of seconds (0-30). Press ENTER . A green light and beep means the Latch Timer setting was changed.
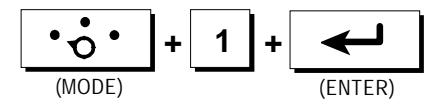
Set the Operating Mode:
Enter Password. Press ENTER. Press MODE , then press 1 , 2 or 3 and press ENTER. The Access Control Unit will exit Programming Mode and enter the selected Mode. Selections are:
- 1. Active (Normal) -- LED is Off
- 2. Inactive (Reader Disabled)-- LED blinks Red
- 3. Door <u>Unlocked</u> -- LED blinks Green
To Exit Programming Mode Immediately:
Press MODE , press 1 , then press ENTER . This returns the unit to normal mode immediately, bypassing the 15 second timeout.
PROGRAMMING HINTS
Password: If the password is lost or forgotten it can be restored to the factory default. Remove the RK600 unit from the mounting plate, disconnect power (unplug the connector from J1 or disconnect the DC power supply) Press and HOLD the reset switch (SW1, on the reader circuit board) restore power, then release the switch. Note that this will also reset the latch timer and reader mode to the factory default.
Latch Timer: The latch timer controls the latch/alarm shunt relay. The latch time can be changed to any value from 0.25-30 seconds. If the latch timer is set to 0 seconds, this pulses the latch relay for 0.25 second, sufficient for most electric turnstiles. The beeper and green LED are always fixed at one second.
Operating Mode: Three operating modes are possible. For normal operation select Mode 1; to temporarily lock all transponders out select Mode 2; to hold the door open continuously select Mode 3.
BASIC OPERATION
USING RADIO KEY® TRANSPONDERS
To use Radio Key® 600, simply hold your Radio Key® Transponder near the RK600 Unit or optional Auxiliary Reader. If the Transponder ID Number is stored in memory, the latch relay is activated, unlocking the controlled door or gate and shunting any external alarms. A green light and a beep indicates that access is granted. If the Transponder ID Number is not stored in memory, the door or gate remains locked and a red light and three rapid beeps indicate that access is denied. Otherwise the LED is normally off.
USING KEYPAD ENTRY
For PIN entry, enter your User Number, 4-digit PIN, then press *. Leading zeroes can be omitted for the user number, but can't be omitted for the PIN Code.

20447 NORDHOFF STREET • CHATSWORTH, CA 91311 PHONE (818) 882-0020 • FAX (818) 882-7052 TOLL-FREE (800) 891-0020
Website: www.securakey.com • E-mail: mail@securakey.com