Securakey Connecting an SK-ACP to a Local Area Network Using the SK-LAN-MOD
Open the original PDF document
View PDFCONNECTING AN SK-ACP TO A LOCAL AREA NETWORK USING THE SK-LAN-MOD
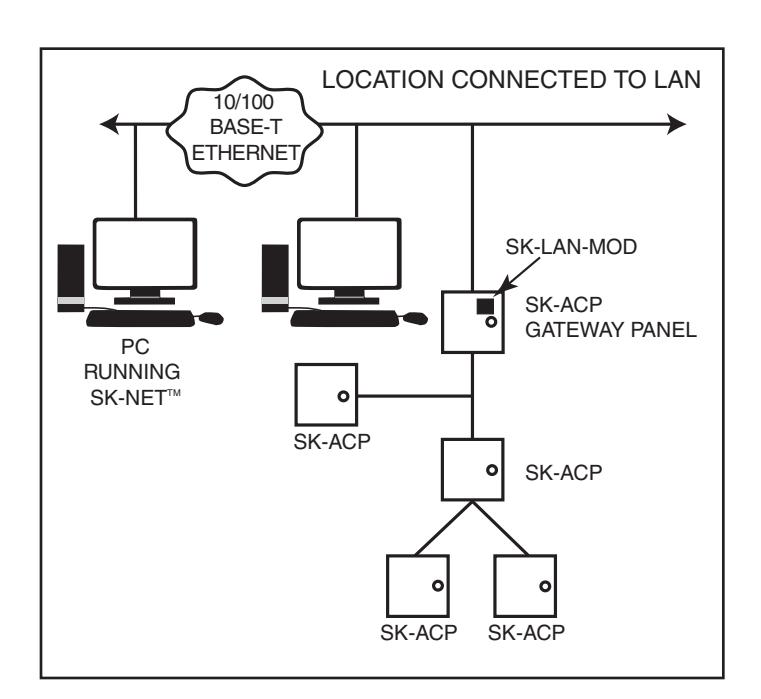
The SK-LAN-MOD is an embedded device server that works over a 10/100 BASE-T Local Area Network. The SK-LAN-MOD is connected directly to the board on the SK-ACP panel via the J9 connector.
To install the unit, complete the following steps in order - WITH THE POWER OFF.
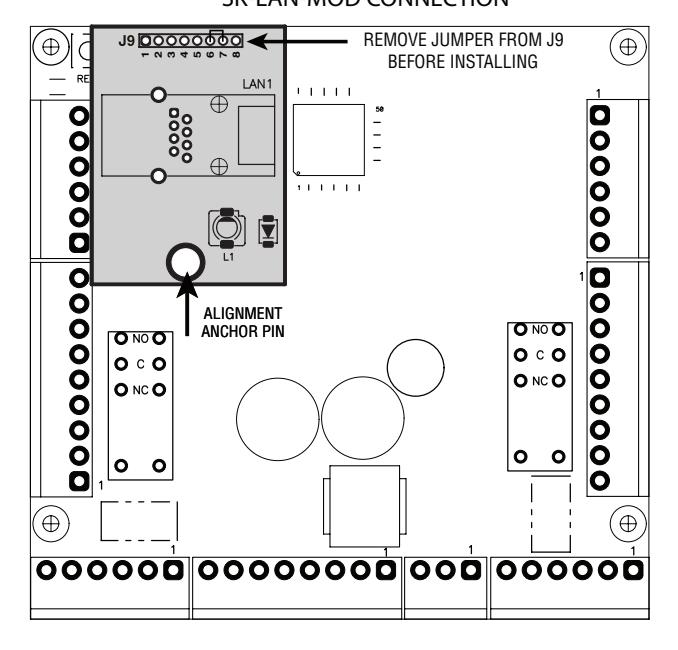
- 1. Remove the 2-pin jumper from the J9 connector (on pins 6 & 7).
- 2. Plug the SK-LAN-MOD into J9 on the SK-ACP Board, Firmware Vers. 2.43, Rev. H or newer ONLY!
- 3. Connect an Ethernet cable to the RJ45 port.
- 4. Supply power to the SK-ACP.
SK-LAN-MOD CONNECTION
Required Information
Before configuring the SK-LAN-MOD have the following information available:
Hardware Address
This is on the product label in the format: 00-20-4a -_____-_____-_____
IP Address
The SK-LAN-MOD must have a unique IP address on your network. This address references the specific unit. By default, the unit is DHCP-enabled and automatically assigned an IP address on DHCP-enabled networks. For use with SK-NET™, you must assign a static IP address manually. The systems administrator generally provides the IP address, subnet mask, and gateway.
Note: The factory default IP address is 0.0.0.0 to enable DHCP, BOOTP, and AutoIP. When the units boots, it sends a DHCP broadcast to try and get an IP address. If it receives no reply from a DHCP server, the SK-LAN tries BOOTP. If the unit does not receive a response from BOOTP, it reverts to an AutoIP address.
| IP Address: | ||
|---|---|---|
| Subnet Mask: | ||
| Gateway: |
You have several options for assigning an IP address and related network settings to your unit. These instructions provide information about using the DeviceInstaller (graphical user interface) and serial port login (command line interface) methods.
Installing DeviceInstaller
- 1. To use the DeviceInstaller utility, insert the SK-LAN-MOD mini CD in your disk drive, or download it from the Lantronix website at: http://www.lantronix.com/device-networking/utilities-tools/device-installer.html
- 2. Select "Run" and install in the appropriate directory.
- 3. Respond to the installation wizard prompts.
Assigning an IP Address
The unit's IP address must be configured before it can work correctly on a network. The unit's IP address is normally set to 0.0.0.0 at the factory. The hardware address is on the product label. The unit is DHCP enabled as the default.
To assign an IP address manually:
1. Click Start\Programs\Lantronix\DeviceInstaller\DeviceInstaller. If your PC has more than one network adapter, a message displays. Select an adapter and click OK.
Note: If the unit already has an IP address (e.g., DHCP has assigned an IP address), click the Search icon and select the unit from the list of device servers on the local network.
- 2. Click the Assign IP icon
- 3. If prompted, enter the hardware address (on the product label) and click Next.
- 4. Select Assign a specific IP address and click Next .
- 5. Enter the IP address. The Subnet mask displays automatically based on the IP address; if desired, you may change it. On a local network, you can leave the Default gateway blank (all zeros). Click Next .
- 6. Click the Assign button and wait several seconds until a confirmation message displays. Click Finish .
- 7. Select the device from the main window list and select Ping from the Tools menu. The Ping Device dialog box shows the IP address of the selected unit.
- 8. From the Tools menu, click the Ping button. The results display in the Status window. Click the Clear Status button to clear the window so you can ping the device again.
Note: If you do not receive "Reply" messages, make sure the unit is attached to the network properly and the IP address assigned is valid for the particular network segment you are working with. If you are not sure, check with your systems administrator.
9. Click the Close button to close the dialog box and return to the main window.
Adding the Unit to the Manage List
- 1. Now add the unit to the list of similar devices on the network so you can manage and configure it. To perform this step, click the Search icon
- 2. DeviceInstaller locates the unit and adds it to the list. Now you can manage (configure) the unit so it works with the serial device on the network.
Accessing the SK-LAN-MOD using DeviceInstaller to set the Baud rate:
- 1. Click Start\Programs\Lantronix\DeviceInstaller\DeviceInstaller.
- 2. Click the XPORT folder. The list of available XPORT devices displays.
- 3. Expand the list of XPORTs by clicking the + symbol next to the XPORT icon.
- 4. Select the XPORT unit by double clicking on its IP address to view its configuration.
- 5. Select the "Telnet Configuration" tab. Click on "connect", press "enter" for setup mode.
- 6. Select "1" for "Channel 1", set baud rate to 38400.
- 7. Press "enter" until you see the "change setup" menu.
- 8. Select "9" (save and exit).
DO NOT:
• Plug the Ethernet cable into a telephone jack.
NOTES:
1) Always close SK-NET™ before closing WINDOWS® to avoid LAN communications failures.

20301 Nordhoff Street, Chatsworth, CA 91311 Phone: (818) 882-0020 • Fax: (818) 882-7052 TOLL-FREE: (800) 891-0020