Sargent & Greenleaf Electronic Safe Lock Series S&G 6125 Status Indicator User Guide
Open the original PDF document
View PDFRed LED - Time Delay

Model 6215 Status Indicator User's Guide
Programming the Status Indicator
The Model 6215 Status Indicator shows the timing status of Sargent & Greenleaf electronic locks with the time delay feature. To operate properly, the timer on the status indicator must be programmed to match the timer settings on your electronic lock. Note that programming the status indicator does not affect the operation or settings of the lock, nor does programming or operation of the lock affect the status indicator.
- ① Check to make sure there is a 9-volt alkaline battery (Duracell® is recommended) in the battery compartment on the side of the status indicator.
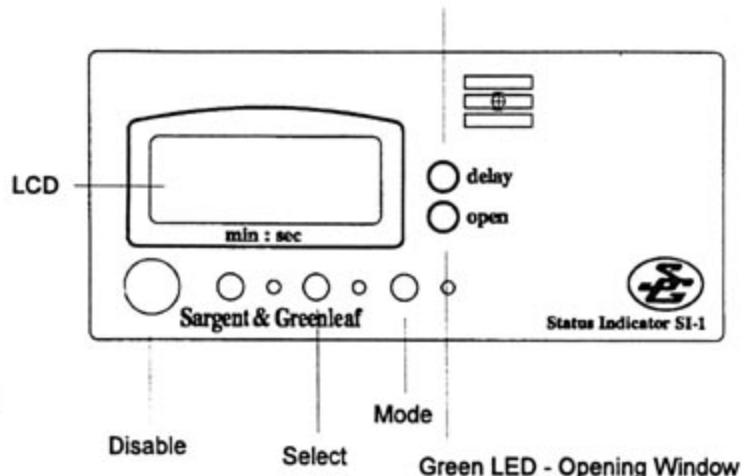
- ② In the figure below, note the position of the Mode and Select buttons. Hold down the Mode button, and watch the LCD as each programming mode displays in order: time delay value, opening window value, lock model, and count up/down. You will use the Select button to set the value in each mode. The LCD display and the delay/open LEDs show which mode you're in.
When you have set all values, wait 10 seconds for the status indicator to reset ("blank") before using your electronic lock.

1. Select the Time Delay mode. Press the Mode button once. The red "delay" LED and the far-right LCD position (seconds) will flash.
Select the digit.
Press and release the Mode button until the LCD digit you wish to change is flashing.
3. Modify the digit.
Press and release the Select button until the LCD position you want is flashing. (Each time the button is pressed, the value increments, and will wrap around as appropriate for each option.)
4. Repeat steps 2 and 3 until you have set the time delay to match the setting on your lock.

Note: The countdown for the opening window on a Model 6120 does not display on the LCD.
1. Select the Opening Window mode.
Press and hold the Mode button until the green "open" LED and the far-right position LCD (seconds) are flashing. Release the Mode button.
Select the digit.
Press and release the Mode button until the LCD position you wish to change is flashing.
3. Modify the digit.
Press and release the Select button until the digit you want is flashing. (Each time the button is pressed, the value increments, and will wrap around as appropriate for each option.)
4. Repeat steps 2 and 3 until you have set the opening window to match the setting on your lock.
C. Setting the Lock Model Number
1. Select the Lock Model mode.
Press and hold the Mode button until one of the following model numbers is displayed: 6218, 6219, 6120 or 6121. Release the Mode button.
2. Select the model number.
Press and release the Select button until the model number of your lock is flashing. For Models 6121 and 6123, set the Model Type to 6121.
D. Setting the Time Delay Count Mode
1. Select the Time Delay Count mode.
You have the option of setting the time delay to count either up or down. Press and hold the Mode button until "UP" or "dn" (down) displays. Release the Mode button.
2. Select Up or Down.
Press and release the Select button until the desired count method (UP or dn) displays.
E. Testing the Operation of Your Status Indicator
Make sure you have programmed your status indicator correctly by cycling through your lock's time delay and opening window. Remember that you need to change the settings in the status indicator whenever you change the corresponding settings on your electronic lock.
F. "Blanking" the Display During Operation
You can clear or "blank" the LCD display during a lock cycle by pressing the Disable button as indicated in the figure on Page 1. This suspends the status indicator's operation until either the lock is opened or the time delay has elapsed. Blanking the status indicator LCD does not stop the time delay on the lock.
G. Changing the Battery
The Model 6215 Status Indicator is powered by a 9-volt alkaline battery (Duracell® is recommended). To replace the battery, use the following steps:
- 1. Locate the battery compartment on the right side of the status indicator.
- 2. Release the compartment door and remove the old battery.
- Detach the connectors from the old battery and attach the new battery.
- 4. Place the new battery in the compartment, making sure the wires are tucked inside.
- 5. Close the compartment door and test the operation of your status indicator.

Sargent & Greenleaf, Inc.
Corporate Headquarters: One Security Drive Nicholasville, KY 40356 Tel. 606-885-9411 Fax 606-887-2057 European Headquarters 9 Ch. du Croset 1024 Ecublens Switzerland Tel. 41-21-691-9583 Fax 41-21-691-5349