STI 7550AC Enclosure Installation Instructions
Open the original PDF document
View PDF

Safety Technology International
2306 Airport Road • Waterford, Michigan 48327-1209 Phone: 248-673-9898 • Fax: 248-673-1246 Toll Free: 800-888-4784 • E-mail: info@sti-usa.com
Web: www.sti-usa.com
Safety Technology International Ltd
Taylor House • 34 Sherwood Road • Bromsgrove
Worcestershire • B60 3DR • England
Tel: +44 (0)1527 520 999 • Fax: +44 (0)1527 501 999 E-mail: info@sti-emea.com • Web: www.sti-emea.com
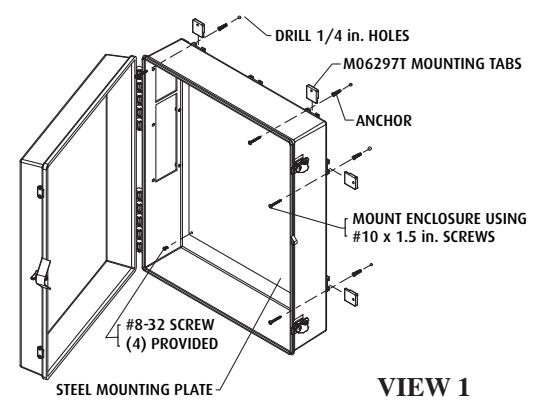
Install Cabinet
- 1. Install all Mounting Tabs
- 2. Place Enclosure in position
- 3. Mark and drill 1/4" diameter holes
- 4. Insert #10-12 anchors
- 5. Mount Enclosure using #10 x 1.5 screws
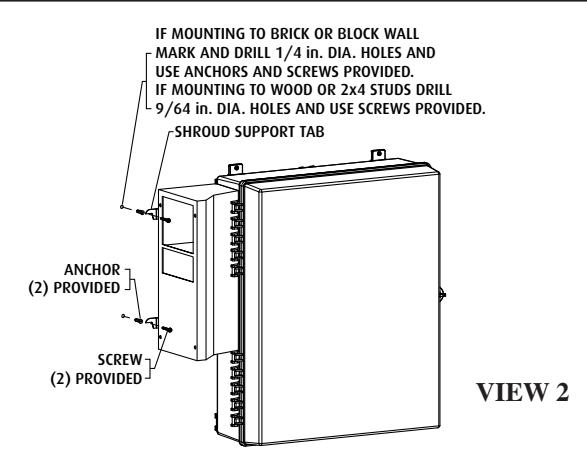
Locate and Mark Holes for Shroud Support Tabs
- Place shroud against enclosure cutouts and insert the two top 1/4-20 Socket Head Cap Screws. Hand tighten only.
- 2. Mark hole locations for the shroud support tabs as shown in View 2.
- Remove shroud from enclosure and drill holes for shroud support tabs. (See View 2 notes.)
- Insert anchors and screws. Thread screws in, leaving approximately 1/8" gap between mounting surface and screw head. The shroud support tabs should rest on the screws.
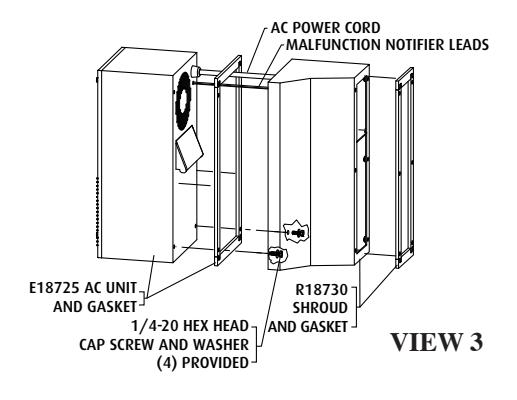
After 7550 Enslosure has been Mounted
- 1. Remove adhesive backing and apply AC gasket to AC unit.
- Place AC power cord and malfunction notifier leads through upper opening of shroud.
- Mount AC unit to shroud using the (4) 1/4-20 hex head screws and washers. Thread all four hex head screws into AC unit from inside shroud. Hand tighten only until all four screws are in place.
- 4. Tighten with 7/16 open end wrench.
(7mm) (165mm)
7.5 in.
5. Remove adhesive backing and apply shroud gasket to shroud.
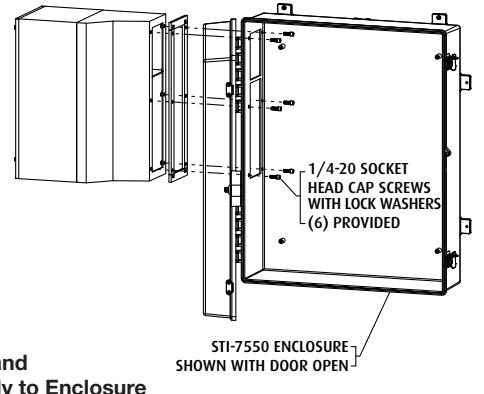
Mount AC Unit and Shroud Assembly to Enclosure
- 1. Insert AC power cord and malfunction notifier leads through top opening of enclosure cutout.
- Place AC unit and shroud assembly against enclosure cutouts and rest the shroud support tabs on the two screws previously placed. This will help support the weight of the AC unit.
- 3. Install all (6) 1/4-20 socket head cap screws and lock washers through enclosure into shroud. Hand tighten only.
VIEW 4
- 4. Now tighten using 3/16" Allen wrench.
- After AC unit and shroud assembly has been installed, install steel mounting plate to the back inside wall of enclosure using the (4) #8-32 screws provided. (Refer to View 1)
23.5 in. (167mm) (597mm) MARNING: This product can expose you to chemicals including Bisphenol A, which is known to
35.35 in
(898mm)
7.4 in.
(188mm)
the State of California to cause reproductive harm and Dichloromethane, which is known to the State of California to cause cancer. For more information go to www.P65Warnings.ca.gov .
6.59 in.
Three year warranty or a one year limited warranty (from date of purchase) on most products. See website for details. Electronic warranty form at www.sti-usa.com/wc14 .
INSTALLATION OF STI-7550AC ENCLOSURE
All specifications and information shown were current as of publication and are subject to change without notice.
7550IS FEB2011