SL21 Installation Instructions English
Open the original PDF document
View PDF


Full Surface Geared Continuous Hinges
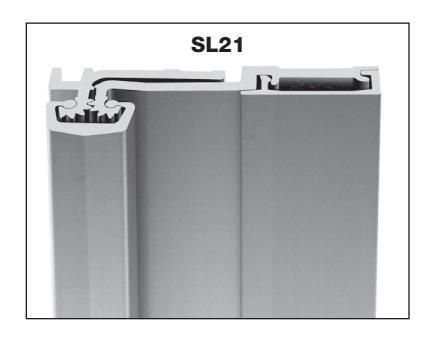
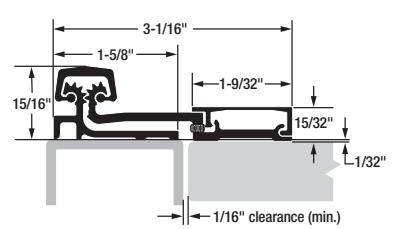
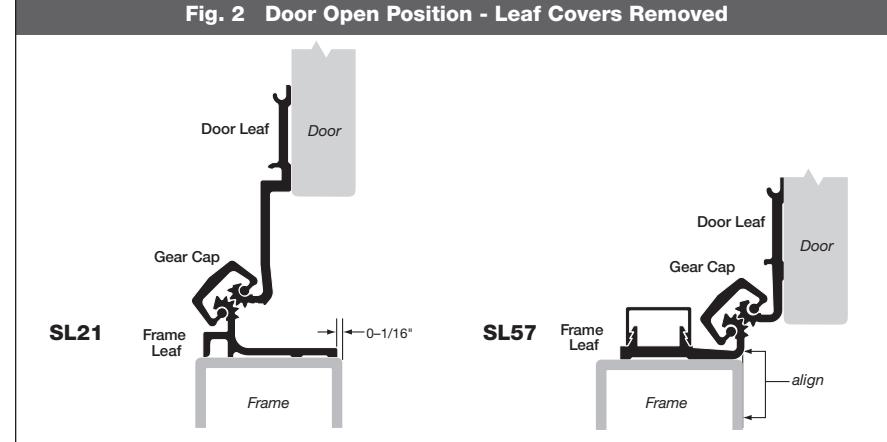
Model SL21 requires repositioning of existing overhead closer(s) to match the swing clear pivot point of the hinge. Failure to do so will prevent the door from opening more than 70 degrees. Attach hinge leaf cover <u>before</u> reinstalling closer(s).
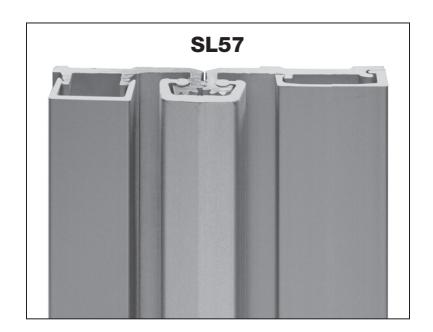
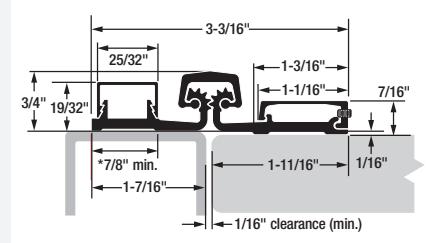
Model SL57 requires a minimum 7/8" frame face width for mounting. On wider frames, mark a line at 1" to 1-5/16" from center of clearance between frame and closed door. Align the edge of hinge frame leaf with mark.
Important Warranty Information:
The following actions will void any warranty, expressed or implied:
- Failure to install the hinge according to manufacturer's specifications and requirements. (For more information, visit selecthingerequirements.com.)
- Use of fasteners other than those supplied with the hinge.
- Unauthorized field modifications, including alteration or removal of the factory-applied lubricant, altering the original finish or painting the hinge.
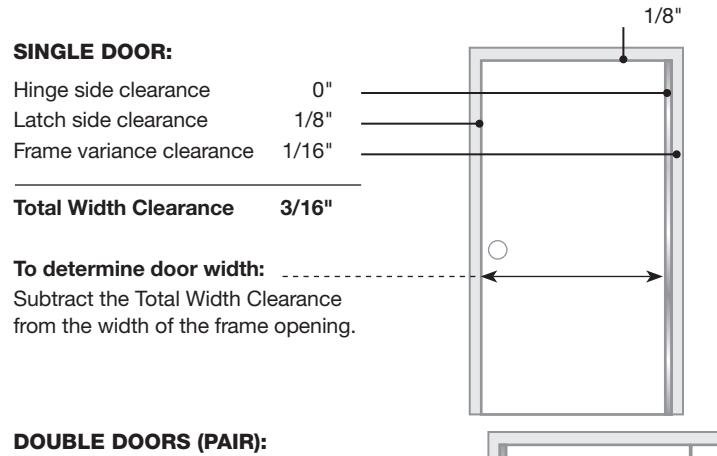
Calculating Required Door Clearances
For Square and Beveled-Edge Doors
IMPORTANT: All standard length SELECT hinges are supplied slightly shorter than nominal door height to avoid threshold or flooring clearance problems.
IMPORTANT: SL21 and SL57 are non-handed and templated, and remain non-handed after cutting. If door inset is required, install a continuous piece of shim under the door leaf.
IMPORTANT: Refer to NFPA 80 manual for clearance requirements on fire-rated entrances.
Reinforcing & Rivnuts®
No hinge reinforcement is necessary except on extremely high-frequency, extremely heavy or extrawide doors. Rivnuts are recommended for use in the frame when the door exceeds 450 lb. (max. 600 lb.)
NOTE: Only SELECT steel Rivnuts® are to be used with fire-rated SELECT hinges.
Grouted/Slushed-in Frames
For ease of installation, it is recommended some sort of mudguard be installed behind the frame. Do not use self-drilling, thread-forming (SDTF) screws to drill into grouted frames. If mudguards have not been used, carefully drill pilot holes through frame and remove grout for screw clearance. Do not oversize holes in frame.
Fire-Rated Hinges
All stock SELECT hinges are 90-minute UL-rated, without pins. Please contact SELECT for complete information about its fire-rated hinges.


For double-door entrances with a mullion between the pair of doors, calculate each door width using the Single Door clearances.
For double-door entrances with a mullion <u>behind</u> the pair of doors, calculate each door width using the Double Doors clearances.
Tools Needed
- Metal-cutting saw
- #13 or 3/16" drill bit & 3/8" drill bit
- 5/32" drill bit (wood frames only)
- #3 Phillips drive
- 5/64" Allen wrench
- Hammer
- Shims
Parts Supplied
- #12-24 self-drilling, thread-forming (SDTF) 410 SS Phillips undercut flathead screws
- #12-24 self-drilling, thread-forming (SDTF) 410 SS Phillips undercut panhead screws
- 1/4-20 barrel nuts (sexnuts)
- 1/4-20 shoulder screws
- 7/32" center punch
- 3/8" center punch
- Set screws
Optional Parts
- #12 410 SS Phillips undercut flathead wood screws
- #12-24 thread-forming (TF) 410 SS Phillips undercut flathead screws
- Long barrel nuts for 2" to 2-1/4" thick doors
- Protective gloves are recommended
How to Cut the Hinge to Fit
- A. Keep hinge in "door closed" position (Fig. 1).
- B. Using a metal-cutting saw, begin the cut through the gear cap first.
NOTE: DO NOT cut through a set screw bearing.
- C. Loosen set screw (if necessary) from side of door leaf cover with 5/64" Allen wrench (Fig 1).
- D. Remove door leaf cover by sliding it off uncut end of hinge.
- Reinstall any set screw bearing that may have been cut off.
A. Attach Hinge to Frame
NOTE: Remove leaf cover(s) if not already removed. See step C above for door cover.
- Shim hinge to 1/8" below the header to allow for door clearance.
- Hold hinge in "door open" position (Fig. and align frame leaf with inner edge of door frame or your alignment mark.
- 3. Mark (or centerpunch) two holes at top and two holes at bottom of frame leaf.
NOTE: TF screws and wood screws require pilot holes at marked locations. SDTF screws do not require pilot holes.
-
If using SDTF screws, go to Step 5. If using TF or wood screws, drill holes at marked locations.
- Metal frame: Use #13 (.185") bit or 3/16" (.188") bit
- Wood frame: Use 5/32" (.156") bit
- Fasten frame leaf to door frame using two screws at the top and two screws at the bottom.
Frame Door Leaf Frame Door Frame Door Frame Door Frame Door Frame Door
NOTE: For inswing applications, reverse position of barrel nut and shoulder screw so that the shoulder screw is on the secured side of the door.
- Metal frame: Use #12-24 TF flathead screws provided, or use #12-24 SDTF flathead screws (provided on request)
- Wood frame: Use #12 flathead wood screws (provided on request)
B. Prepare Door
Shim door into opening to provide required hinge clearances.
IMPORTANT: Top end of the hinge must be flush with the top of the door.
- Mark locations for the four SDTF panhead screws on the door using 7/32" center punch.
- With #3 Phillips drive, temporarily attach door leaf to door through the four locator holes with SDTF panhead screws provided.
- 9. Remove shims and check door clearances, alignment and operation.
NOTE: Door may sag slightly when shims are removed. Note the amount of adjustment needed to bring door back into alignment. DO NOT PROCEED UNTIL DOOR OPERATES PROPERLY.
10. Mark locations for barrel nuts on the door using 3/8" center punch.
11. Remove door and lay it flat. Use 3/8" drill bit to drill holes at marked locations.
NOTE: Be sure to drill squarely through door.
C. Attach Door to Hinge
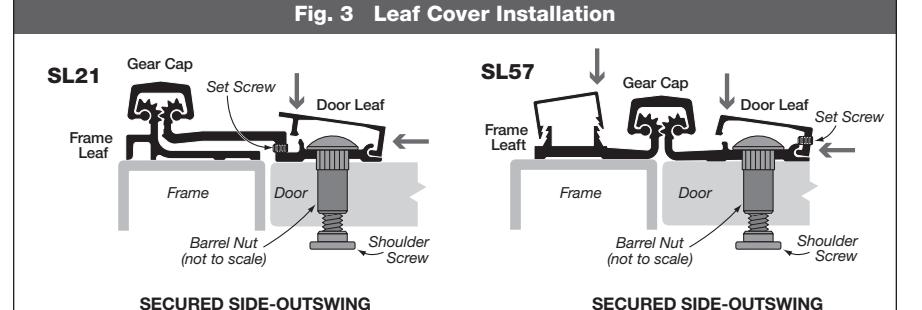
12. Fasten door to door leaf with the barrel nuts and 1/4-20 shoulder screws.
NOTE: Always install shoulder screws on the secured side of the door (Fig. 3).
- Mark (or centerpunch) remaining frame leaf hole locations. Drill holes in frame through the frame leaf and secure with flathead screws.
- 14. Secure door to door leaf with barrel nuts and 1/4-20 shoulder screws.
NOTE: Always install shoulder screws on the secured side of the door (Fig. 3).
D. Install Leaf Covers
- 15. Align leaf cover with top edge of hinge.
- Starting from the top and working downward, apply pressure to leaf cover to snap it into place (Fig. 3).
NOTE: If you use a hammer to tap cover into place, be sure to protect the surface of the cover from damage.
17. Tighten set screws with 5/64" Allen wrench