Pulse Pro Setup Software Instructions
Open the original PDF document
View PDFPULSE PRO SETUP SOFTWARE
REFERENCE MANUAL

www.tecnosicurezza.it
Contents
| 1 PulsePro setup software overview | 3 |
|---|---|
| 2 Using the software | 3 |
| 2.1 Using the software: PC configuration | 3 |
| 2.1.1 PC configuration main tollbar | 4 |
| 2.1.2 PC configuration screen: Configuration | 4 |
| 2.1.3 PC configuration screen: Users | 7 |
| 2.2 Using the software: Dallas key configuration | 9 |
| 2.2.1 Dallas key configuration main tollbar | 9 |
| 2.2.2 Dallas key configuration screen: Configuration | 10 |
| 2.2.3 PC configuration screen: Users | 12 |
| 3 Lock reset procedure | 14 |
| 4 Uploading the configurations | 15 |
| 4.1 Direct connection | 15 |
| 4.2 Dallas key | 16 |
| 5 Notes | 17 |
1 PulsePro setup software overview
PulsePro setup is a software to be used for the complete management of the configurations of the Pulse Pro safe lock system.
Pulse Pro has 80 pre-programmed configurations that can be selected from the keypad and 9 custom configurations (blank configurations) that have to be created and programmed by means of the PulsePro setup software.
In addition to being necessary for the creation of the custom configurations, the PulsePro setup software offers countless advantages even in the management of pre-programmed configurations. Through the software it is in fact possible in a very short time to set all the parameters that normally are set by keypad. It is also possible to program the users and associate the user Dallas key to them (this last feature only in PC configuration mode).
2 Using the software
PulsePro setup software can be used in two different ways:
- With a direct connection between the keypad and the computer (PC configuration).
- Through the use of a setup Dallas key (Dallas key configuration).
Depending on the mode chosen, the main toolbar and the settings screens are different. Through a tab you can choose with which connection to use the software (PC configuration or Dallas key configuration).

Through the use of a setup Dallas key is only possible to set and upload the "custom" configurations. In the next paragraphs we will see in detail these two modes
2.1 Using the software: PC configuration
The most complete use of the PulsePro setup software takes place with the direct connection between the Pulse Pro keypad and the computer.
In this mode it is possible to upload to the lock either a pre-configured configuration (from configuration 00 to configuration 79) or a "custom" configuration (from configuration 90 to configuration 98).
In both cases, when uploading of the configuration to the lock is finished, the configuration will be already set on the lock, therefore it will not be necessary to select the configuration through the keypad.
2.1.1 PC configuration main tollbar
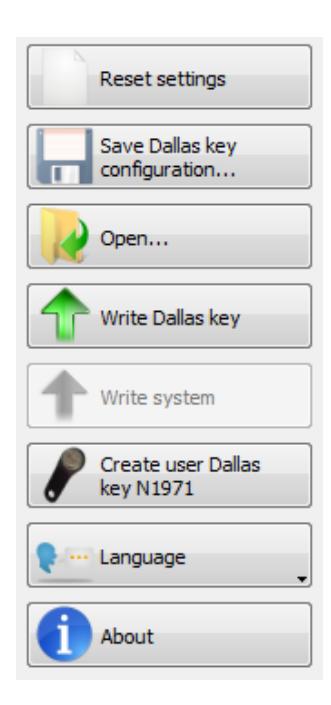
When the PulsePro setup software is in the PC configuration mode, there is a toolbar on the left side of the screen with the following commands:
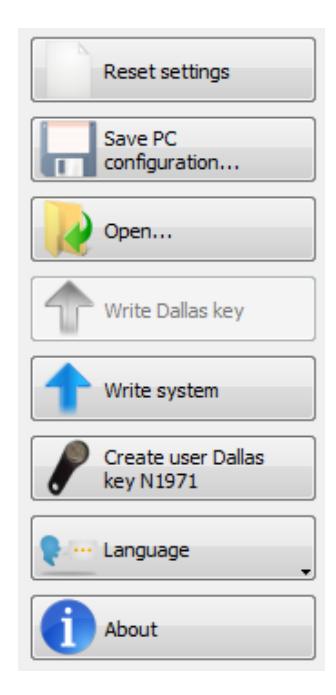
Reset settings: Clean all the settings that you set
Save PC configuration: Save the current PC configuration file.
Open: Open an existing PC configuration file.
Write system: Upload the configuration to the lock
Create user Dallas key N1971: Program the user Dallas Keys N1971 to be used with the Pulse
Pro lock system.
Language: Select the language for the PulsePro setup software.
About: Show the version of the PulsePro setup software.
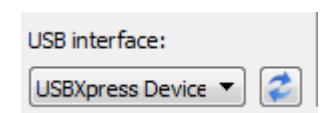
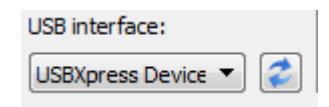
Below the main toolbar, at the bottom, there is a field where is indicated the Tecnosicurezza USB interfaces (N42180/T) connected to the computer. In case there are no interfaces plugged in (or in case of a problem with the USB interface driver), the field is blank. In case there are more interfaces connected, from the drop-down list you have to select which one to use.
If the Tecnosicurezza USB interface is not detected when you plug it in, you can press the refresh button at the right of the drop-down list.
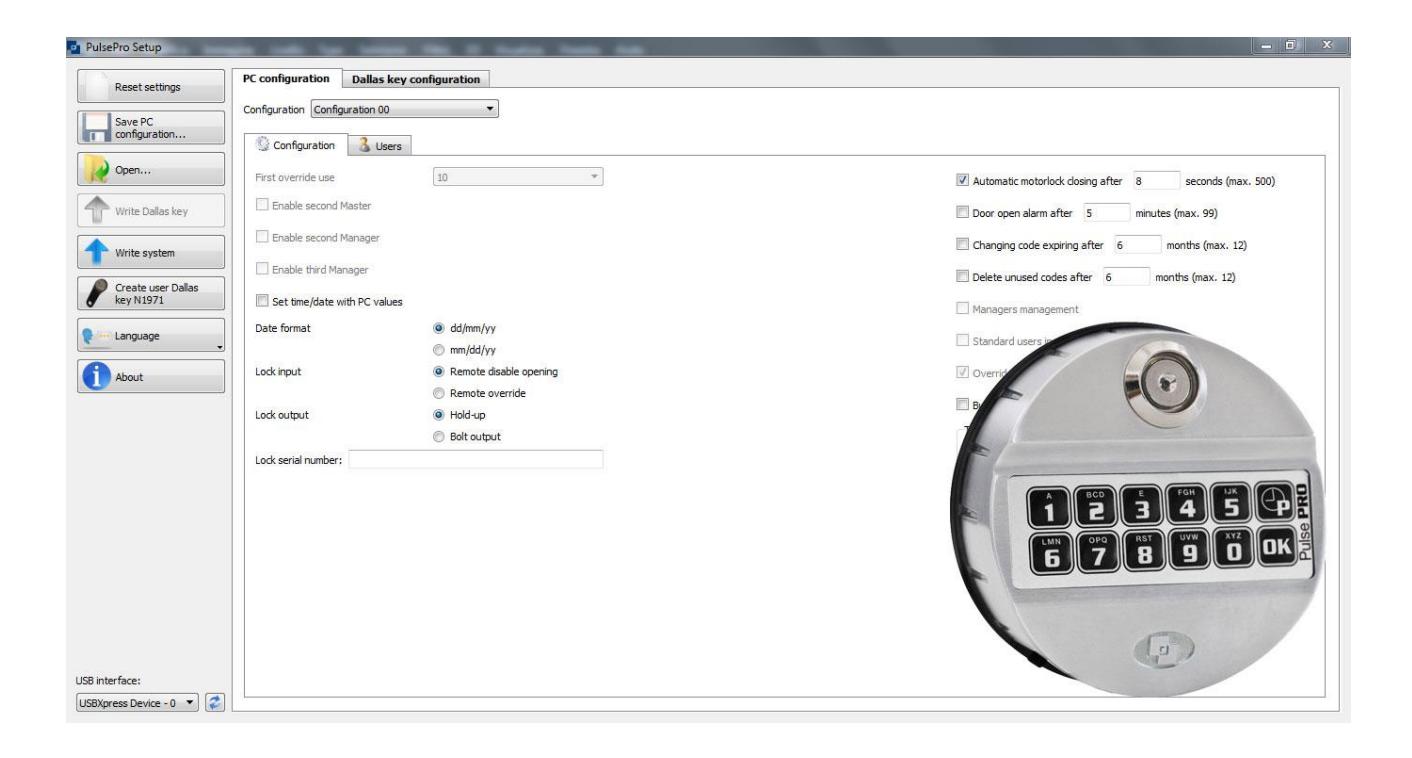
2.1.2 PC configuration screen: Configuration
At the top of the screen there is the drop-down list where you can select the configuration whose settings you want to change and that will be uploaded to the lock.
In the PC configuration mode you can choose every configuration from 00 to 98.
Depending on the configuration, some settings will not be available, only custom configurations (from 90 to 98) can be fully configurable.
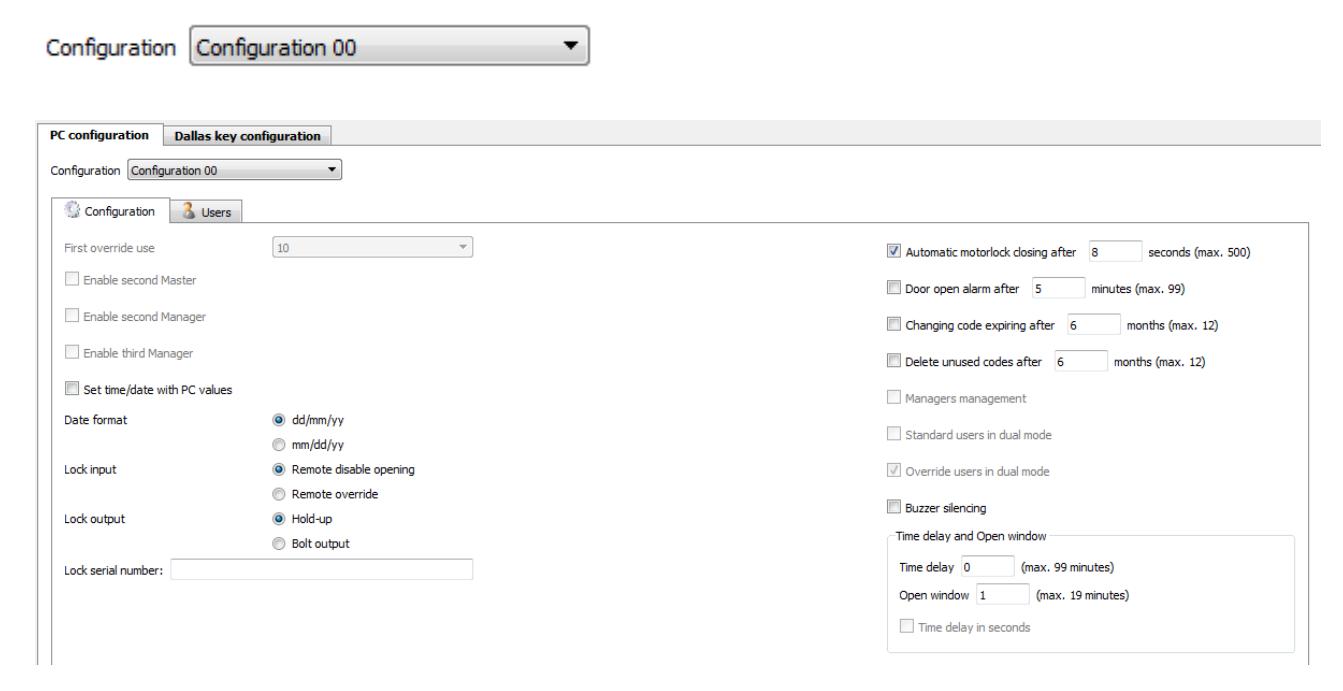
In the Configuration screen you will find the following settings:
First override user: Here you can set which is the first override user (users who override the time delay) among the users. If you select "None" there will not be override users. If you select 10, users from 10 onward will be override users.
Enable second Master: Here you can enable the second Master (user 81).
Enable second Manager: Here you can enable the second Manager (user 61).
Enable third Manager: Here you can enable the third Manager (user 62).
Set time/date with PC values: if selected, the time and date of the keypad is synchronized with the time and date of the PC during the uploading of the configuration.
Date format: Here you can set the format of the date: days, months, years (dd/mm/yy) or months, days, years (mm/dd/yy).
Lock input: Here you can set the function associated to the Input of the alarm interface (N077/A, T6005, T7005). It can be the Remote disabling opening or Remote override.
In the first case with a signal in the input the lock is blocked. In the second case with a signal in the input, all users open immediately even if a Time Delay is set.
Lock output: Here you can set the function associated to the Output of the alarm interface (N077/A, T6005, T7005). It can be Hold-up or Bolt output.
In the first case it is permitted the use of the duress code (which is equivalent to the traditional PIN code with the last digit increased by 1). When a duress code is entered, the lock will open and simultaneously the output of the alarm interface will activate.
In the second case when the bolt of the lock is open, the output of the alarm interface will activate.
Lock serial number: Here you can enter a 9 digits alphanumerical serial number that will be associated to the lock.
Automatic Motorlock closing after: If selected, if a MotorLock (T4800/M, T4800/M/S) is used, the motor lock will close automatically after seconds set (from 2 to 500 seconds).
If not selected, the the motor lock will stay open until you press and hold the button

Door open alarm after: If selected, when the bolt of the lock stays open for more than the minutes set (from 1 to 99 minutes), the buzzer is activated and the keypad starts beeping.
Changing code expiring after: If selected, all codes have to be changed after the period of time you set (from 1 to 12 months) and you will not be able to open the lock till you change the code. When you enter an expired code, you will hear a long beep and then 3 short beeps. You can change the expired code by means of the function 0 on the keypad (please read the user instructions for the complete procedure).
Delete unused codes after: If selected, the codes not used within the period of time you set (from 1 to 12 months) will be automatically deleted.
Managers management: If selected, Master codes can install/delete Manager codes.
Standard users in dual mode: If selected, the standard users can open only in dual mode (it is required 2 valid users codes to open the lock).
Override users in dual mode: If selected, the override users can open only in dual mode (it is required 2 valid users codes to open the lock).
Buzzer silencing: If selected, the buzzer is disabled.
Time delay: Here you can enter the value of the Time Delay, from 0 (no time delay) to 99 minutes (or 0 to 99 seconds if the option "Time delay in seconds" is activated)
Open window: Here you can enter the value of the Open Window, from 1 to 19 minutes.
Time delay in seconds: If selected, the Time Delay value will be considered in seconds instead of minutes.
2.1.3 PC configuration screen: Users
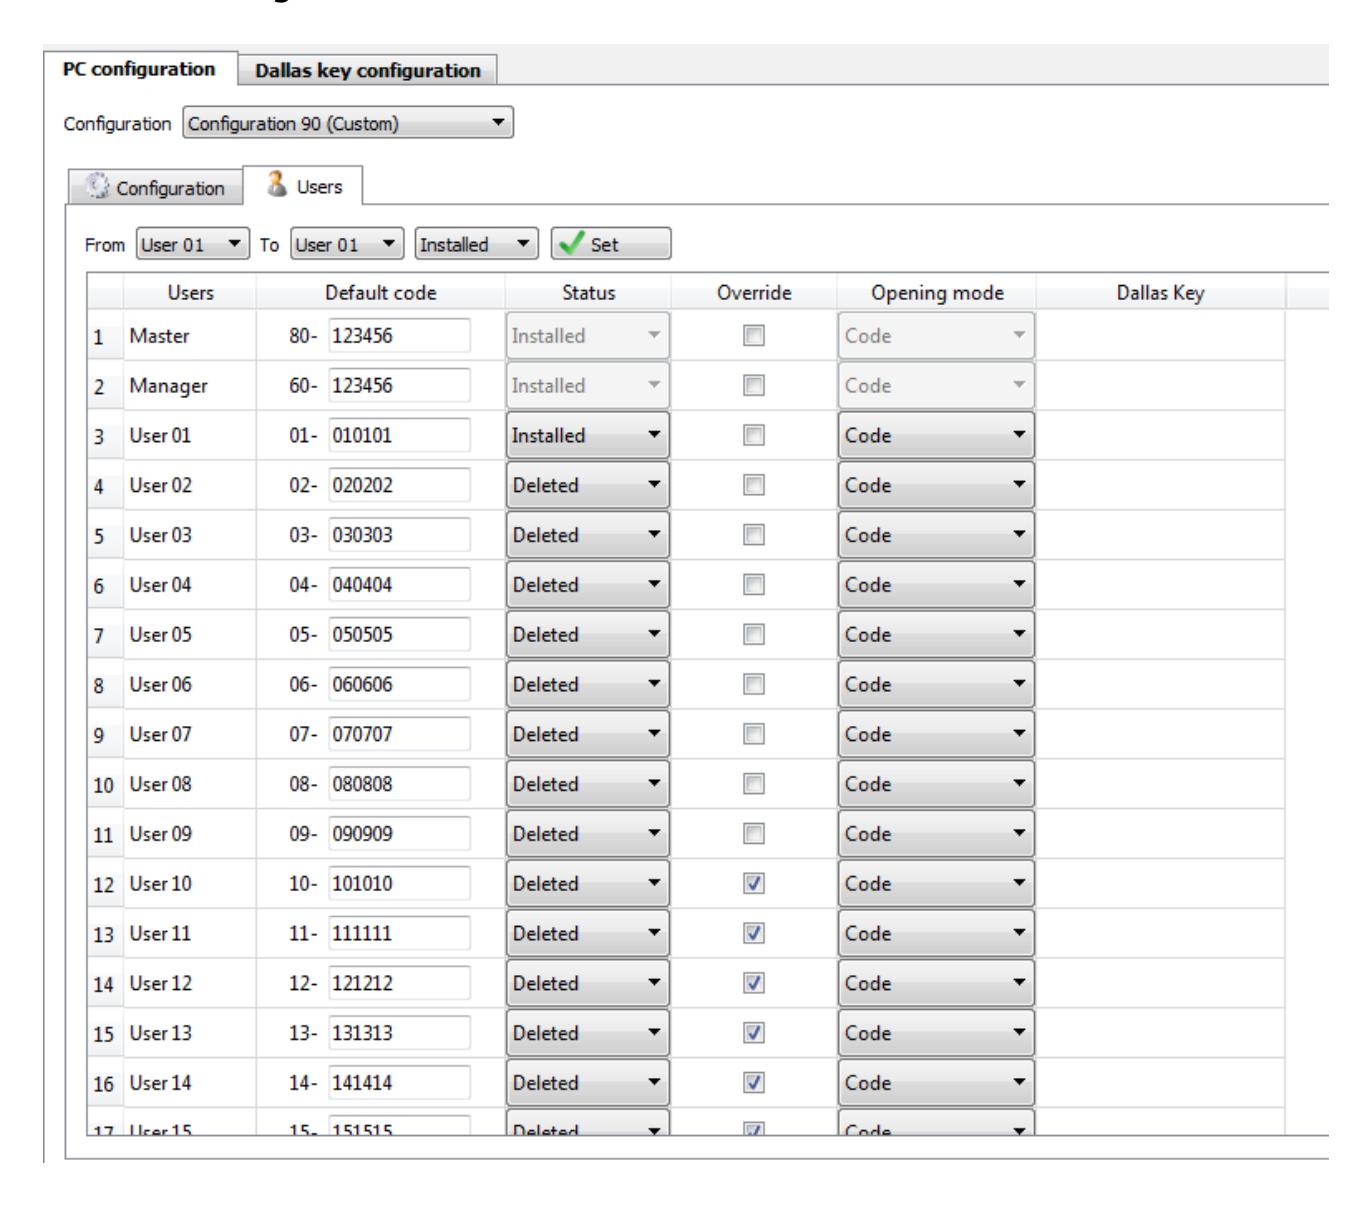
In the Users screen you will find the table with the list of users.
Above the users table there are several drop-down lists where you can set the status for a group of users.

The range of the users to whom assign the status can be set by the first two drop-down lists.
In the third drop-down list you set the status:
Installed: User programmed and installed (active).
Deleted: User programmed and not installed (not active), but can be installed (activated) from the keypad.
Blocked: User not programmed. It cannot be installed (activated) from the keypad.
The users list table is made of 6 columns.
In the first column there is the name of the user.
In the second column there is the default code for the user, including the user ID (two digits). While the user ID is fixed, the default six-digit user code can be changed.
In the third column there is the status of the user. Through the drop-down list you can choose among these three status:
Installed: User programmed and installed (active).
Deleted: User programmed and not installed (not active), but can be installed (activated) from the keypad.
Blocked: User not programmed. It cannot be installed (activated) from the keypad.
N.B. The Master and the Manager are always installed.
In the fourth column is indicated if the user is Override (check-box selected) or not. The choice of the number of override users can be made in the "Configuration" screen.
In the fifth column there is the opening mode related to the user. Through the drop-down list you can choose among these 3 opening modes:
Code: The user consists of a 6 digits code.
Dallas key: The user consists of Dallas Key.
Code + Dallas key: The user consists of a 6 digits code and a Dallas key.
N.B. Only users in dual mode can have the opening mode "Dallas key". Other users can be either "Code" or "Code + Dallas key".
In the sixth column is indicated the Dallas Key code if the opening mode of the code is Dallas Key or Code + Dallas Key.
To associate a Dallas key to the user, double-click the Dallas key code field and a new window will open.
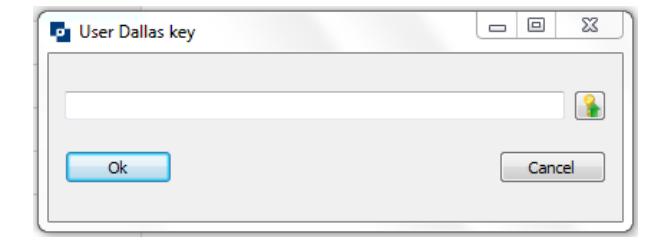
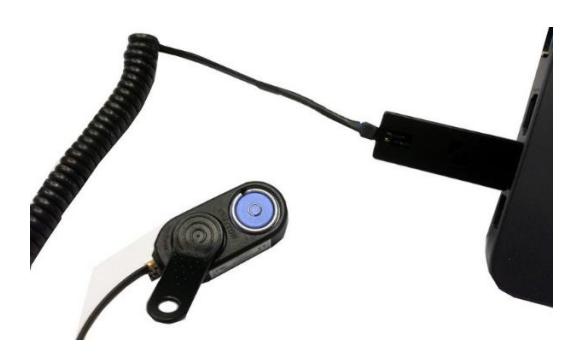
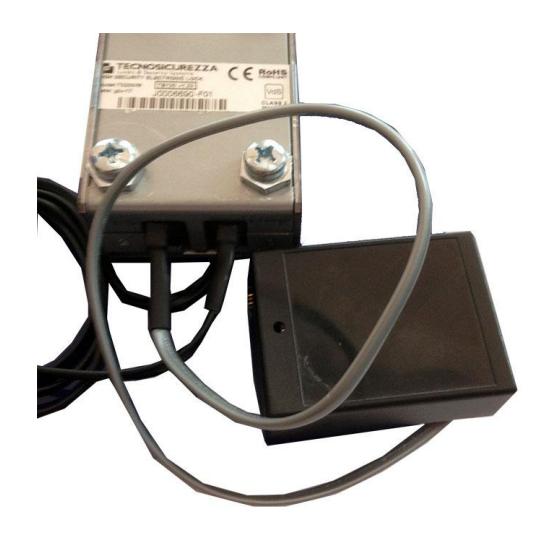
In this window you can either enter the Dallas key code manually or getting the Dallas key code
read by pressing the button . In the last case the Dallas key has to be placed in the Dallas key reader (USB interface N42180/T + Dallas key reader with molex connector N42170/D) connected to the computer (see picture below).
Once the Dallas key code is in the field, click OK to confirm.
2.2 Using the software: Dallas key configuration
By means of a Dallas key is possible to upload to the lock only the "custom" configurations (from configuration 90 to configuration 98) and gaming configuration.
Differently from the "PC configuration", with the Dallas key configuration once the uploading of the configuration to the lock is finished, the configuration will not be set on the lock.
In order to set the configuration in the lock, you have to use the keypad, function no. 8 (for more information please refer to the MiniTech user instructions).
2.2.1 Dallas key configuration main tollbar
When the PulsePro setup software is in the Dallas key configuration mode, there is a toolbar on the left side of the screen with the following commands:
Reset settings: Clean all the settings that you set
Save Dallas key configuration: Save the current Dallas key configuration file.
Open: Open an existing PC configuration file.
Write Dallas key: Write a Dallas key with the custom configurations to be uploaded to the lock. Create user Dallas key N1971: Program the user Dallas Keys N1971 to be used with the Pulse Pro lock system.
Language: Select the language for the PulsePro setup software.
About: Show the version of the PulsePro setup software.
Below the main toolbar, at the bottom, there is a field where is indicated the Tecnosicurezza USB interfaces (N42180/T) connected to the computer. In case there are no interfaces plugged in (or in case of a problem with the USB interface driver), the field is blank. In case there are more interfaces connected, from the drop-down list you have to select which one to use.
If the Tecnosicurezza USB interface is not detected when you plug it in, you can press the refresh button at the right of the drop-down list.
2.2.2 Dallas key configuration screen: Configuration
At the top of the screen there is the drop-down list where you can select the configuration whose settings you want to change and that will be uploaded to the lock.
In the Dallas key configuration mode you can choose only the configurations from 90 to 98 (custom configuration) and the "gambling" configuration.
Below the drop-down list there is the "Add" check-box.
After you choose the configuration from the drop-down list, you have to select the check-box "Add" to add the configuration on the list of configurations that will be written in the Dallas key by means of the button "Write Dallas key" in the main toolbar.
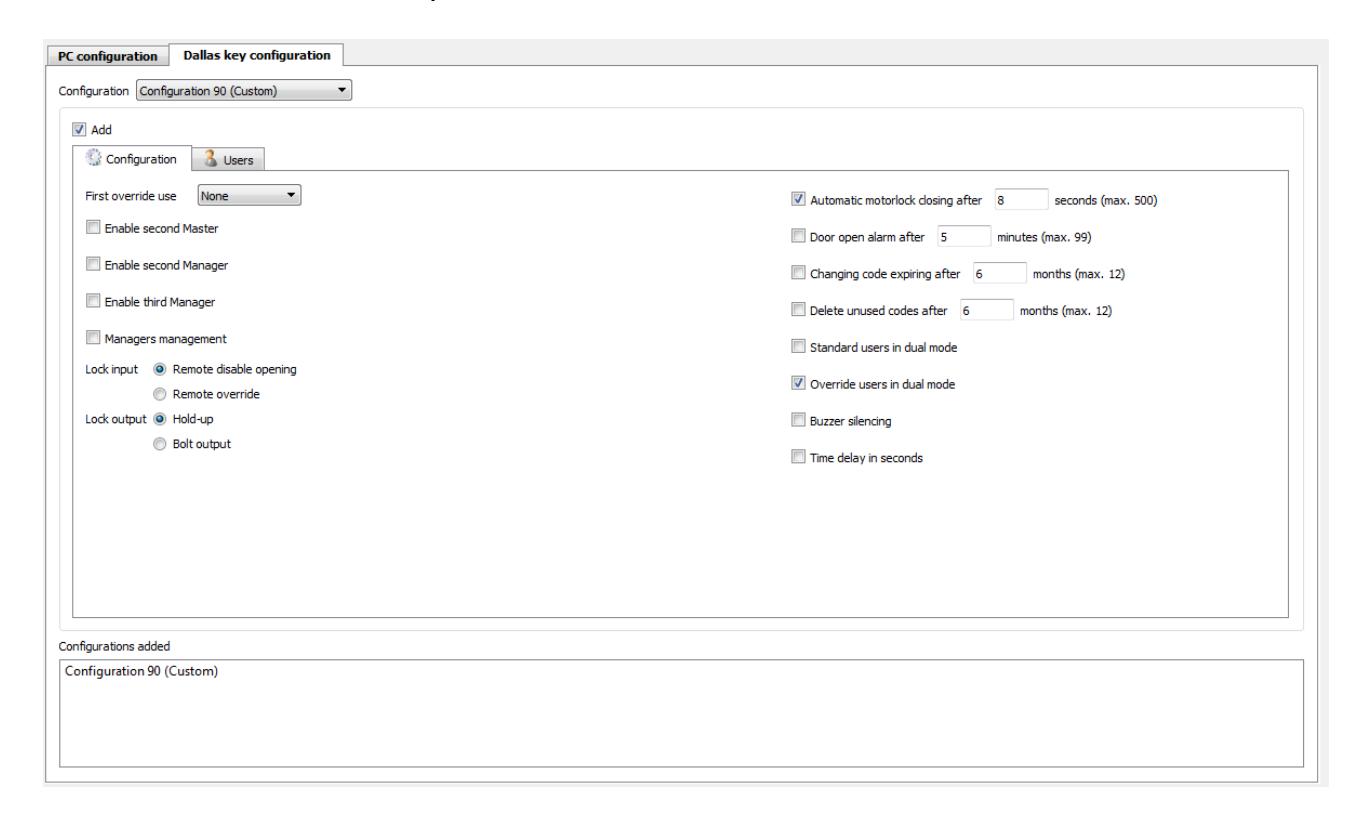
In the Configuration screen you will find the following settings:
First override user: Here you can set which is the first override user (users who override the time delay) among the users. If you select "None" there will not be override users. If you select 10, users from 10 onward will be override users.
Enable second Master: Here you can enable the second Master (user 81).
Enable second Manager: Here you can enable the second Manager (user 61).
Enable third Manager: Here you can enable the third Manager (user 62).
Date format: Here you can set the format of the date: days, months, years (dd/mm/yy) or months, days, years (mm/dd/yy).
Lock input: Here you can set the function associated to the Input of the alarm interface (N077/A, T6005, T7005). It can be the Remote disabling opening or Remote override.
In the first case with a signal in the input the lock is blocked. In the second case with a signal in the input, all users open immediately even if a Time Delay is set.
Lock output: Here you can set the function associated to the Output of the alarm interface (N077/A, T6005, T7005). It can be Hold-up or Bolt output.
In the first case it is permitted the use of the duress code (which is equivalent to the traditional PIN code with the last digit increased by 1). When a duress code is entered, the lock will open and simultaneously the output of the alarm interface will activate.
In the second case when the bolt of the lock is open, the output of the alarm interface will activate.
Automatic Motorlock closing after: If selected, if a MotorLock (T4800/M, T4800/M/S) is used, the motor lock will close automatically after seconds set (from 2 to 500 seconds).
If not selected, the the motor lock will stay open until you press and hold the button

Door open alarm after: If selected, when the bolt of the lock stays open for more than the minutes set (from 1 to 99 minutes), the buzzer is activated and the keypad starts beeping.
Changing code expiring after: If selected, all codes have to be changed after the period of time you set (from 1 to 12 months) and you will not be able to open the lock till you change the code. When you enter an expired code, you will hear a long beep and then 3 short beeps.
You can change the expired code by means of the function 0 on the keypad (please read the user instructions for the complete procedure).
Delete unused codes after: If selected, the codes not used within the period of time you set (from 1 to 12 months) will be automatically deleted.
Managers management: If selected, Master codes can install/delete Manager codes.
Standard users in dual mode: If selected, the standard users can open only in dual mode (it is required 2 valid users codes to open the lock).
Override users in dual mode: If selected, the override users can open only in dual mode (it is required 2 valid users codes to open the lock).
Buzzer silencing: If selected, the buzzer is disabled.
Time delay in seconds: If selected, the Time Delay value will be considered in seconds instead of minutes.
2.2.3 PC configuration screen: Users
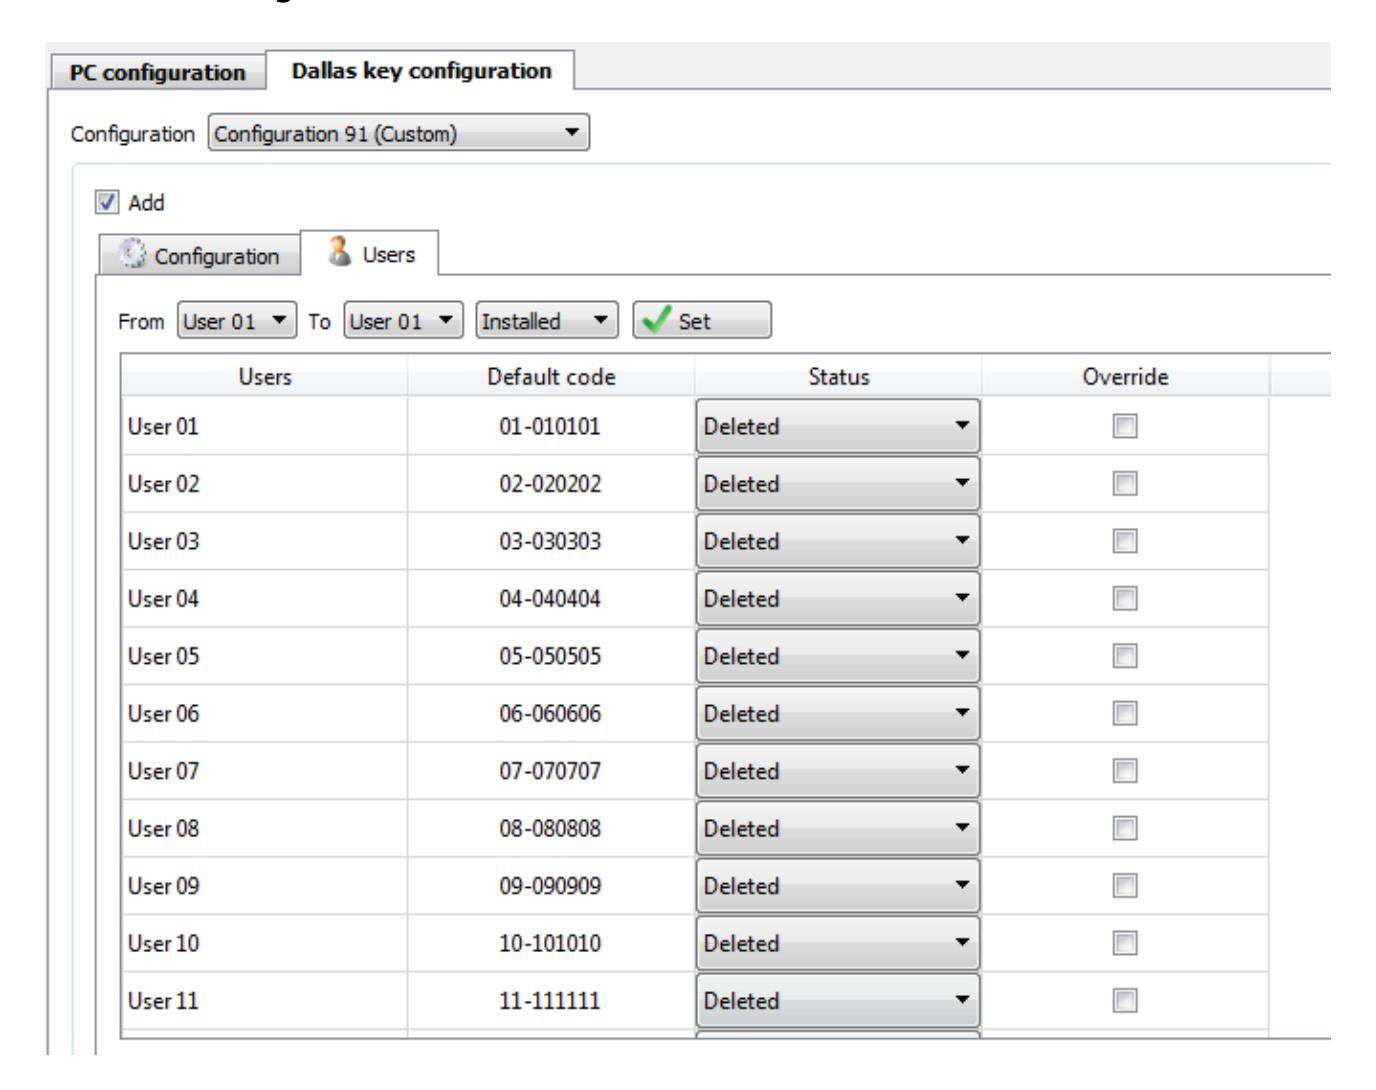
In the Users screen you will find the table with the list of users.
Above the users table there are several drop-down lists where you can set the status for a group of users.

The range of the users to whom assign the status can be set by the first two drop-down lists.
In the third drop-down list you set the status:
Installed: User programmed and installed (active).
Deleted: User programmed and not installed (not active), but can be installed (activated) from the keypad.
Blocked: User not programmed. It cannot be installed (activated) from the keypad.
The users list table is made of 4 columns.
In the first column there is the name of the user.
In the second column there is the default code for the user, including the user ID (two digits).
In the third column there is the status of the user. Through the drop-down list you can choose among these three status:
Installed: User programmed and installed (active).
Deleted: User programmed and not installed (not active), but can be installed (activated) from the keypad.
Blocked: User not programmed. It cannot be installed (activated) from the keypad.
N.B. The Master and the Manager are always installed.
In the fourth column is indicated if the user is Override (check-box selected) or not. The choice of the number of override users can be made in the "Configuration" screen.
3 Lock reset procedure
The reset of the system can be obtained through a reset box.
Connect the reset box to the "BAT" connector of the lock as shown in the picture below.
Press until double beep. LED quickly flashes:

Double beep and LED goes off after a few seconds.

The lock is reset and it is now in pre-setup mode. In pre-setup mode, you can open the lock simply pressing the button no. 1 on the keypad.
4 Uploading the configurations
The procedure to upload the configuration to the lock changes according to the mode used: PC configuration or Dallas key configuration.
In the next chapters you will find the procedures for both modes.
4.1 Direct connection
In order to upload the configuration with a direct connection between keypad and computer (PC configuration), follow these steps:
Lock must be in pre-setup mode (not programmed)
Lock must be open (press )
Press and hold until double beep. LED remains ON.

Press . LED flashing.

Connect the N42170/M magnetic Dallas key connection cable to the Dallas key reader (as shown in the picture below).


When the upload in progress, LED flashing

When the upload is finished, LED goes off, single beep.

4.2 Dallas key
In order to upload the configurations through the use of a setup (Dallas key configuration), follow these steps:
Lock must be open (use a valid code or just press if in pre-setup mode)
Press and hold until double beep. If in pre-setup mode, please skip the next two steps. LED remains ON.

Enter a Manager code. LED flashing.

Enter a Master code. LED remains ON.

Press . LED flashing.

Place on the Dallas key reader of the keypad, the setup Dallas key with the configuration/configurations to upload (as shown in the picture below).
When the upload starts, a double beep is heard.

When the upload in progress, a single beep every 3 seconds is heard.
When the upload is finished, a double beep is heard.

When the setup Dallas key is removed, a double beep is heard.
5 Notes

Before operating the lock, please read this manual thoroughly, and retain it for future reference.
Correct disposal of this product: (Waste Electrical & Electronic Equipment)
Applicable in the European Union and other European countries with separate collection systems.
This marking displayed on the product or its literature indicates that it should not be disposed with other wastes at the end of its working life. To prevent possible harm to the environment or human health from uncontrolled waste disposal, please separate this from other types of wastes and recycle it responsibly to promote the sustainable reuse of material resources.


Certified ISO 9001 : 2008
GLOBAL HEADQUARTERS
Tecnosicurezza Srl Via C. Battisti, 276 37057 S.Giovanni Lupatoto (VR) ITALY
Tel. +39 045 826 64 70 r.a. Fax +39 045 826 64 69 Email: info@tecnosicurezza.it www.tecnosicurezza.it
USA HEADQUARTERS
Tecnosicurezza Inc. 50, Thomas Lane Versailles, KY 40383 USA
Tel. +1 859 490 89 30 Email: info@usatecno.com www.usatecno.com
SPAIN HEADQUARTERS
Tecnosicurezza Sa C/Menor, 4 - Nave 10 Pol Ind. "La Mina" 28770 Colmenar Viejo SPAIN
Tel. +34 91 804 33 91 Fax +34 91 804 32 63
Email: info@tecnosicurezza.es www.tecnosicurezza.es