PROGRAMMING INSTRUCTIONS for the 400RC433 RECIEVER ONE CHANNEL
Open the original PDF document
View PDF

801 Avenida Acaso, Camarillo, Ca. 93012 • (805) 494-0622 • www.sdcsecurity.com • E-mail: service@sdcsecurity.com
PROGRAMMING INSTRUCTIONS for the 400RC433 RECEIVER, ONE CHANNEL
REC 1 CHAN 433
1 - DESCRIPTION
The Nano Receiver is designed to control automatic closing systems and anti-burglar systems, thanks to it's very high security coding system (KeeLoq Hopping code). R
The operating frequency is among European harmonized frequencies; the product fully complies with the EMC European Regulations (CA).
The code sent by the transmitter changes at every activation, avoiding any scanning and copying risk. A special algorithm allows for synchronization of transmitter and receiver.
The receiver has 1 output relay with NO contacts, and can be connected to many types of mechanics (gate, garage door, rolling shutters,, awnings, anti-burglar appliances, etc.).
All the receivers of this range can store into the EEPROM a serial number, a manufacturer key and a synchronization algorithm of more transmitters.
The programming can be done in a self-learning mode by means of one button.
The housing protection allows indoor installations. This appliance fully complies with the European Regulations89/336/EEC, 73/23/EEC, EN 60950-1 and FCC Part 15.
2 – TECHNICAL SPECIFICATIONS
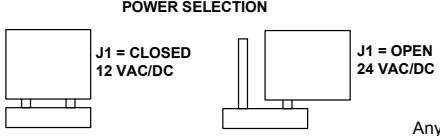
Receiver type Superheterodyne Carrier frequency 433.92 MHz Local oscillator frequency 6.6128 MHz Demodulation AM/ASK Local oscillator VCO / PLL Channel width > 25 KHz Intermediate frequency 10.7 MHz Input sensitivity -115 dBm Local oscillator spurious emissions < -57dBm Input load 50 Ohm Power supply 12 / 24 VAC/DC Max applicable power 12 VA Relay number 1 Contacts C-NO
Memory capacity 85 user codes TX security code Rolling code
Max code combination number 2
Operating Temperature -20 / +70 deg C
Housing protection IP2X
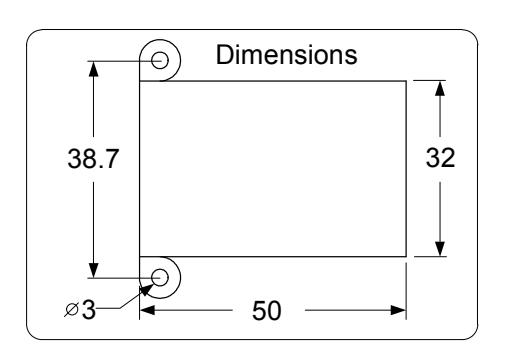
Overall dimensions (mm) 50 x 32 x 20
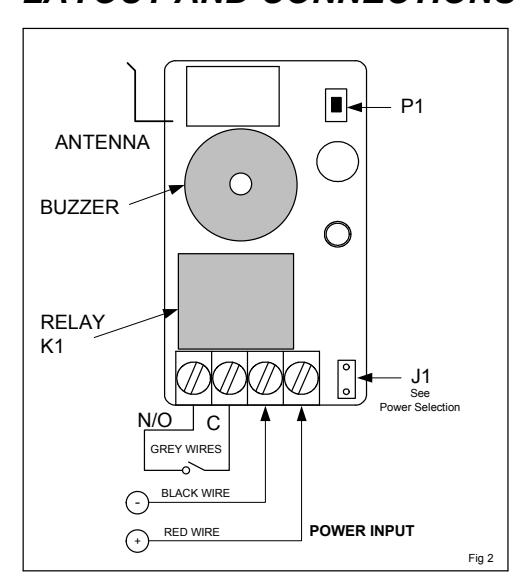
3 – LAYOUT AND CONNECTIONS
4 – TRANSMITTER PROGRAMMING
4.1 Using P1
- 1) Keep P1 pressed down until the buzzer emits a short beep (Fig 3);
- 2) Push the key of the transmitter to program, and very the beep of the receiver;
- 3) At this point, the receiver waits for more transmitters – 5 seconds after the last transmitter is programmed, the receiver makes a beep and the procedure ends.
4.1 Using P1
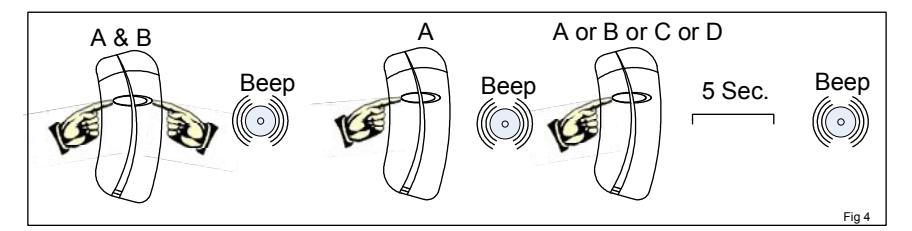
With this procedure it is possible to program the transmitters without accessing P1 (Fig 4)
- 1) Push simultaneously the keys A & B of the transmitter until it beeps.
- 2) Release and push the A key until the next beep of the buzzer (memory opening);
- 3) Release A and push the key of the transmitter to program (A or B) until the beep of the buzzer (memory closing).


If the memory is full when you try to program a new transmitter, the buzzer beeps three times.
6 – MEMORY ERASURE
6.1 Single Transmitter
- 1) Keep P1 pressed down until the buzzer beeps, then release it.
- 2) Push the key of the transmitter to delete until the buzzer beeps.
6.2 Full Memory Erasure
- 1) Push P1 until the buzzer beeps, then release it.
- 2) Release P1 and push it again until the buzzer beeps 3 times. At this point, the memory has been completely erased.
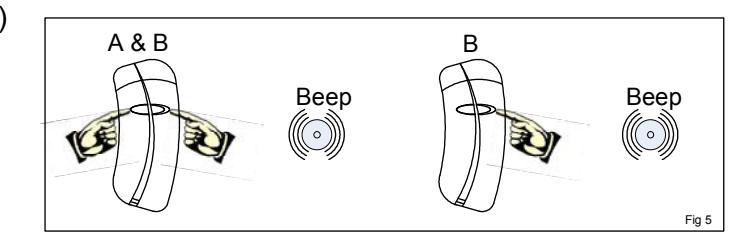
7 – ENABLING/DISABLING THE ACTIVATION BEEP
To program the receiver to make a beep
at each relay activation, follow this procedure: (Fig 5)
- 1) Simultaneously press the A & B keys of a previously programmed transmitter.
- 2) Release and press the B key of the transmitter to enable the beep. to disable the beep, repeat the above procedure.