Norton Rixson 7900 Series Overhead Concealed Closer, 7970DPS-B, 7970DPS-OP, Non-Hold Open Installation Instructi…_80-9379-1601-020
Open the original PDF document
View PDF

Installation Instructions
Overhead Concealed Security Door Closers with Door Position Switch
Series 7970DPS-B, & 7970DPS-OP ASSA ABLOY Non-Hold-Open Models
For wood or metal doors 1- ¾" to 2 -1/4" (45-57mm) thick hung in a hollow metal frame
standard butt hinges or offset pivots
Typical Installation
- •One track & closer position for all door opening angles
- •Easy arm attachment
- •Removable Frame Stop Required*-Not Shown
CAUTION
An incorrectly installed or improperly adjusted door closer can cause property damage or personal injury. These instructions should be followed to avoid the possibility of misapplication or misadjustment.
Template-Standard Butt Hinges
Norton
Security Door Closers With Door Position Switch

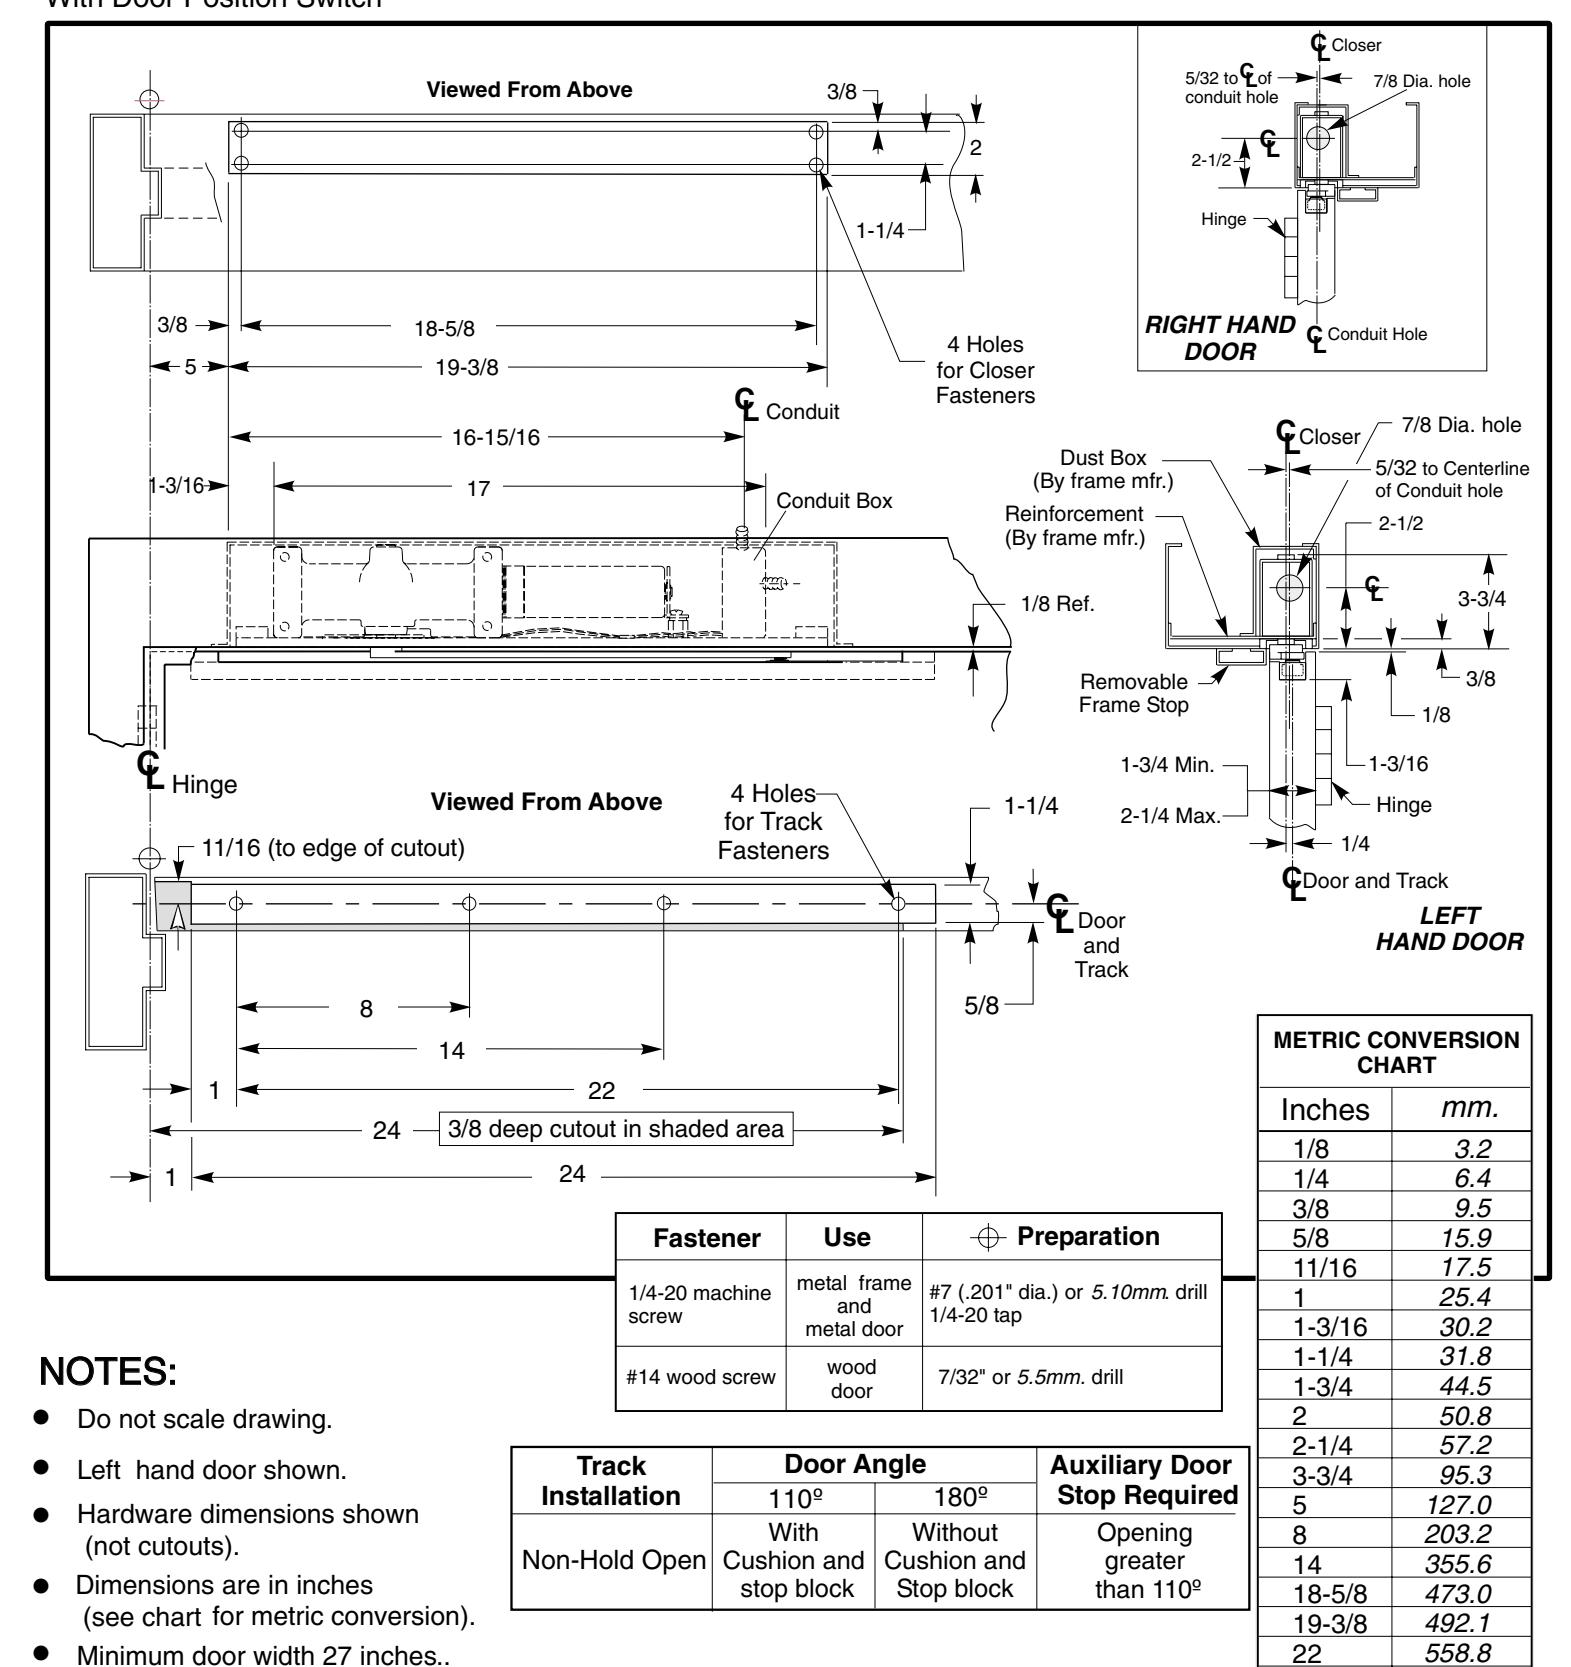
Track 24 inches long.
<u>24</u>
27
609.6
685.8
See installation sequence on page 5.
Series 7970DPS-OP Non-Hold Open
Overhead Concealed Security Door Closers With Door Position Switch
Template-Offset Pivots

ASSA ABLOY
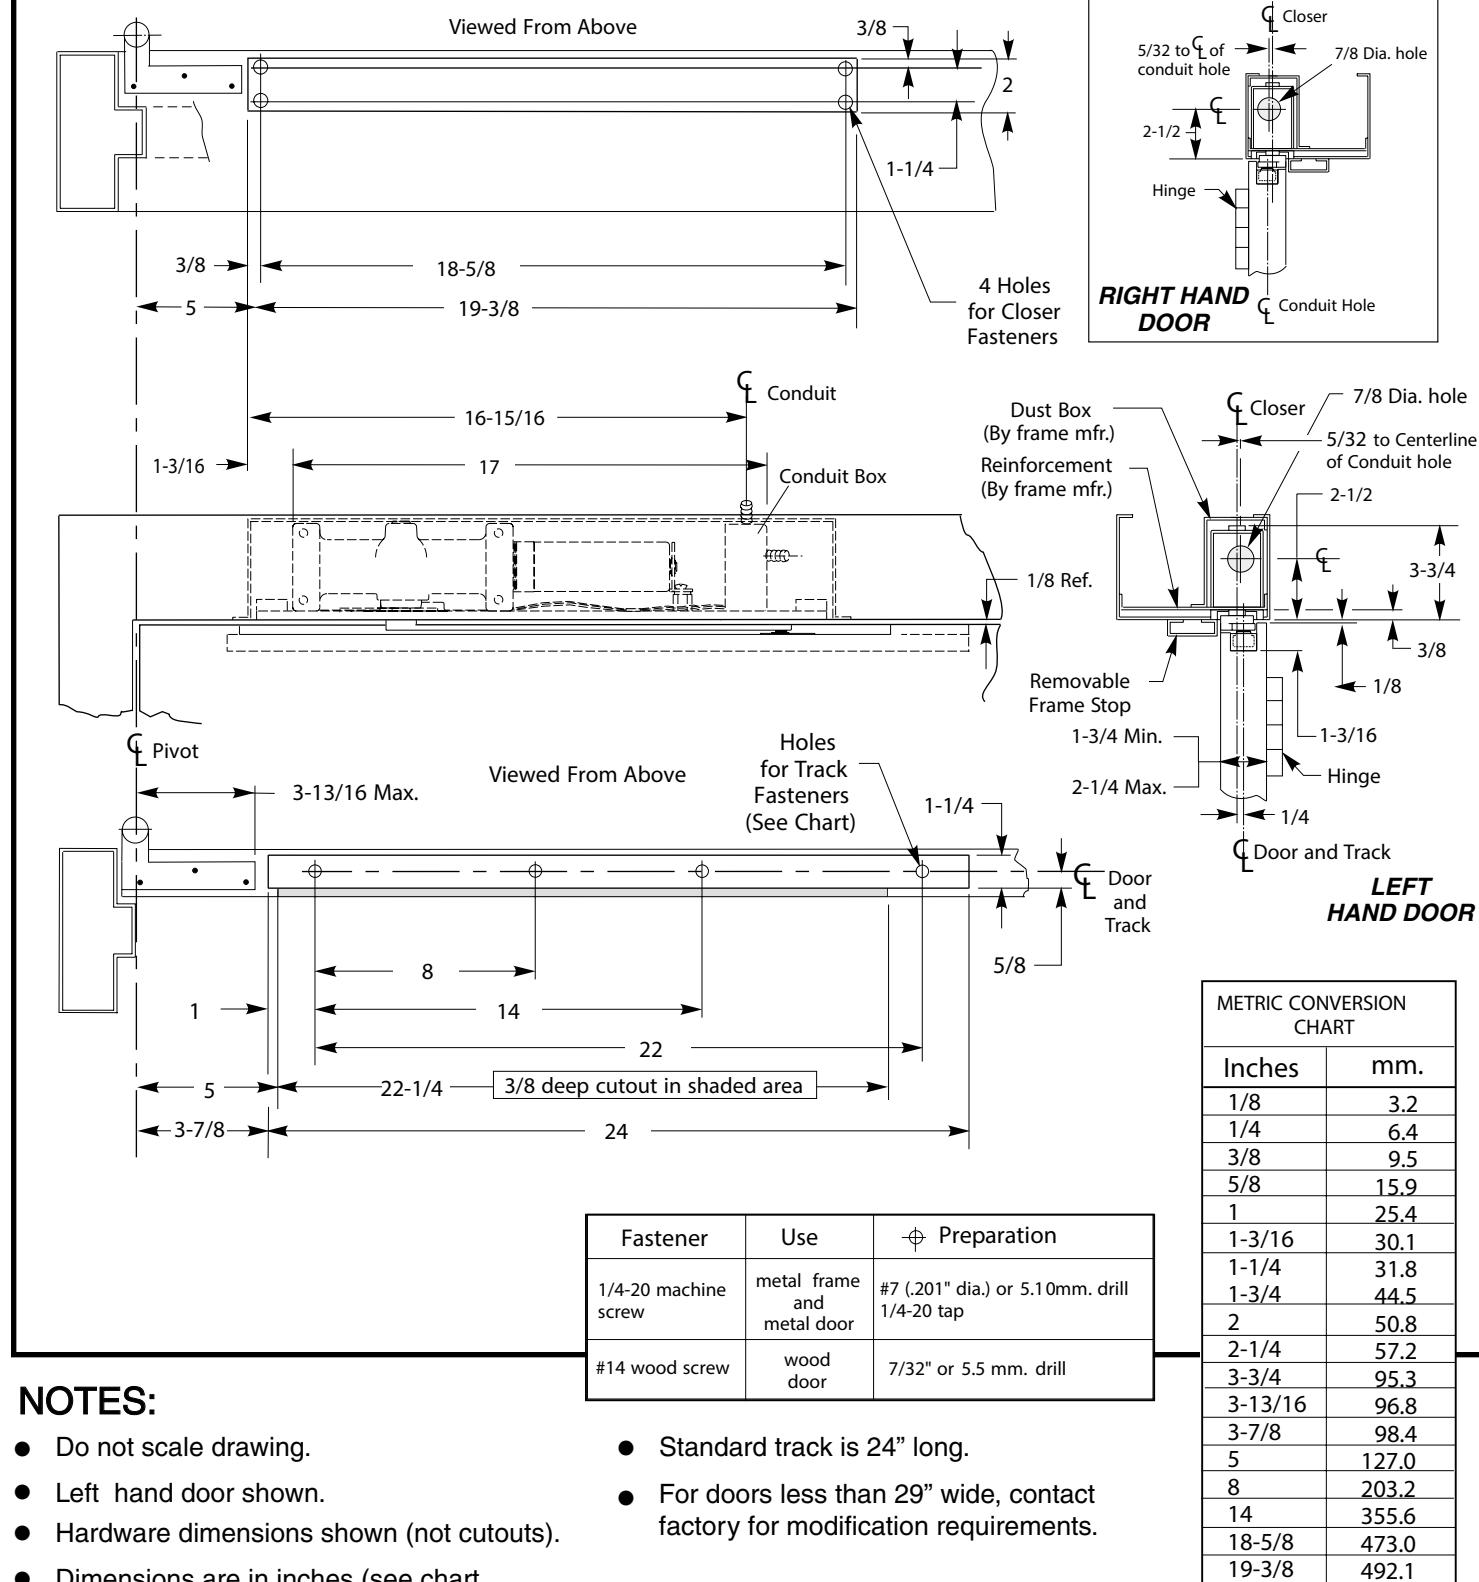
- Dimensions are in inches (see chart for metric conversion).
- Maximum door swing is 95 degrees. Auxiliary door stop(not supplied) is required for this application.
See installation sequence on page 5.
22
24
29
22-1/4
558.8
565.1
609.6
736.6

Installation Sequence
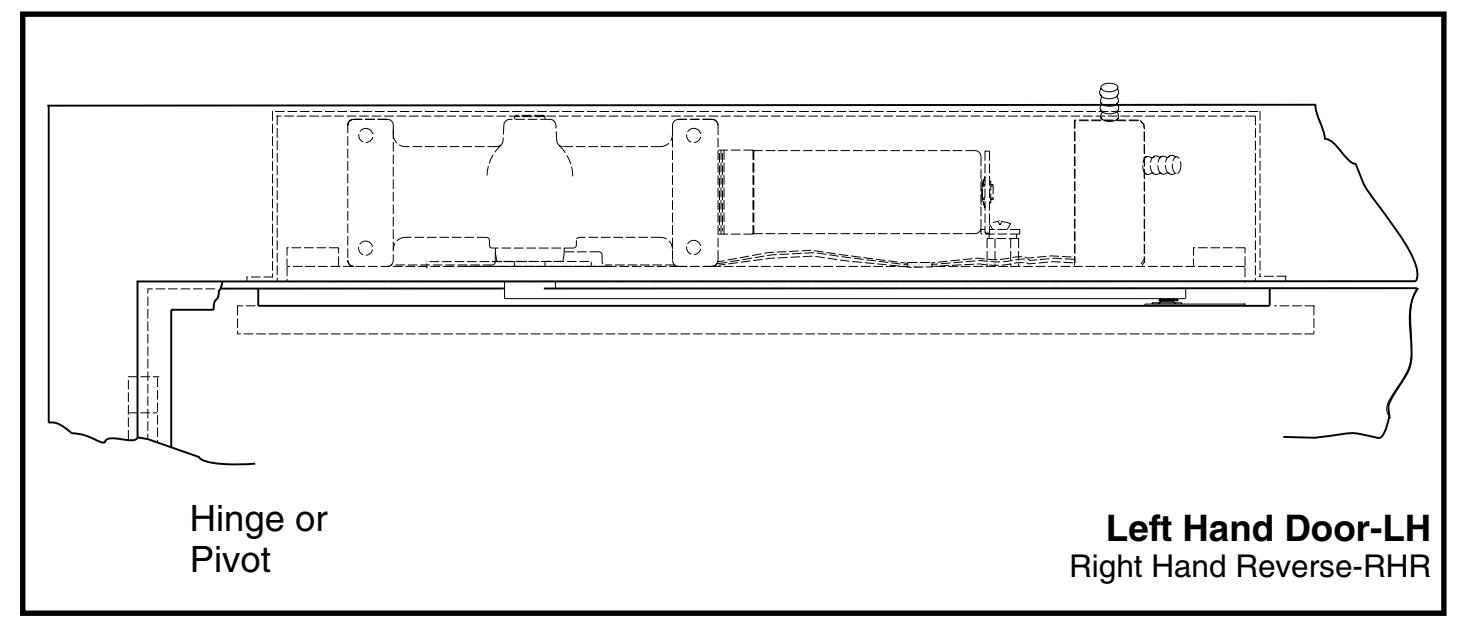
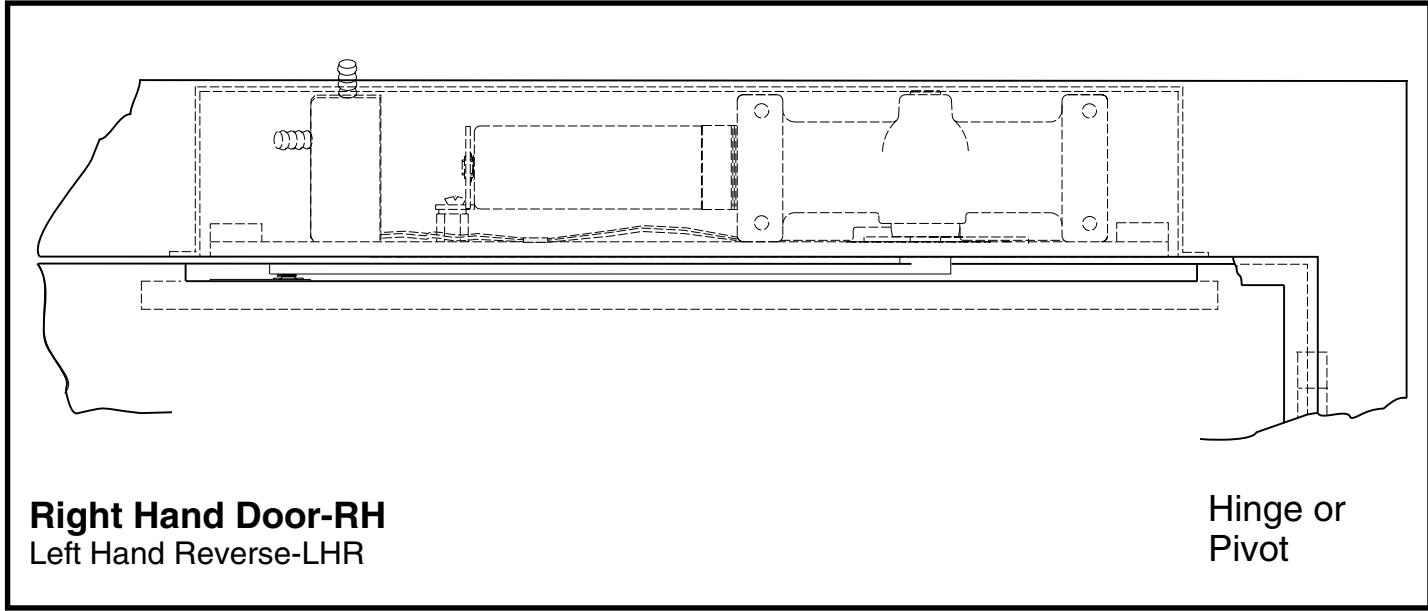
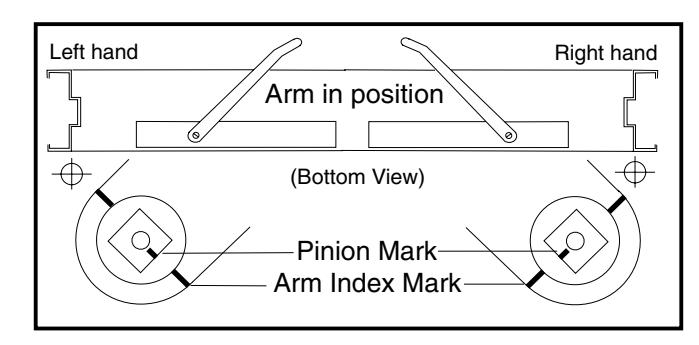
- nonoitartsullimorf page 1. Closers are handed. Hand of closer must match hand of door. Determine hand of door
- Using template dimensions ,3ro2egapno locate & prepare holes and cutouts in frame and door.
Door:
Prepare door for track. Drill and tap (4) holes for 1/4-20 machine screws.
Frame:
Prepare the frame for mounting closer. Drill and tap (4) holes for 1/4-20 machine screws.
Note: Generally on new construction hardware cutouts are made by suppliers at their shop.
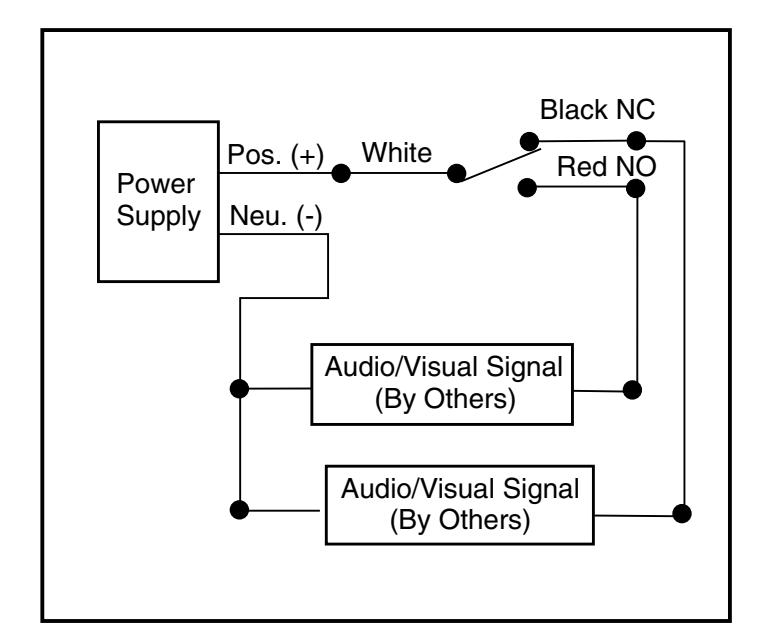
Wiring
- Wiring of switch must be in compliance with N.E.C. Class 2 wiring specifications.
- •Remove closer's conduit box cover.
- •Anchor conduit to closer's conduit box.
- •Make wire connections to terminal strip. Switch is momentary contact single pole double throw.
- a. Red lead from switch is open contact (Open circuit when door is closed).
- b. Black lead from switch is closed contact (Closed circuit when door is closed).
- c. White lead from switch connects to power input.
- •Replace conduit box cover.
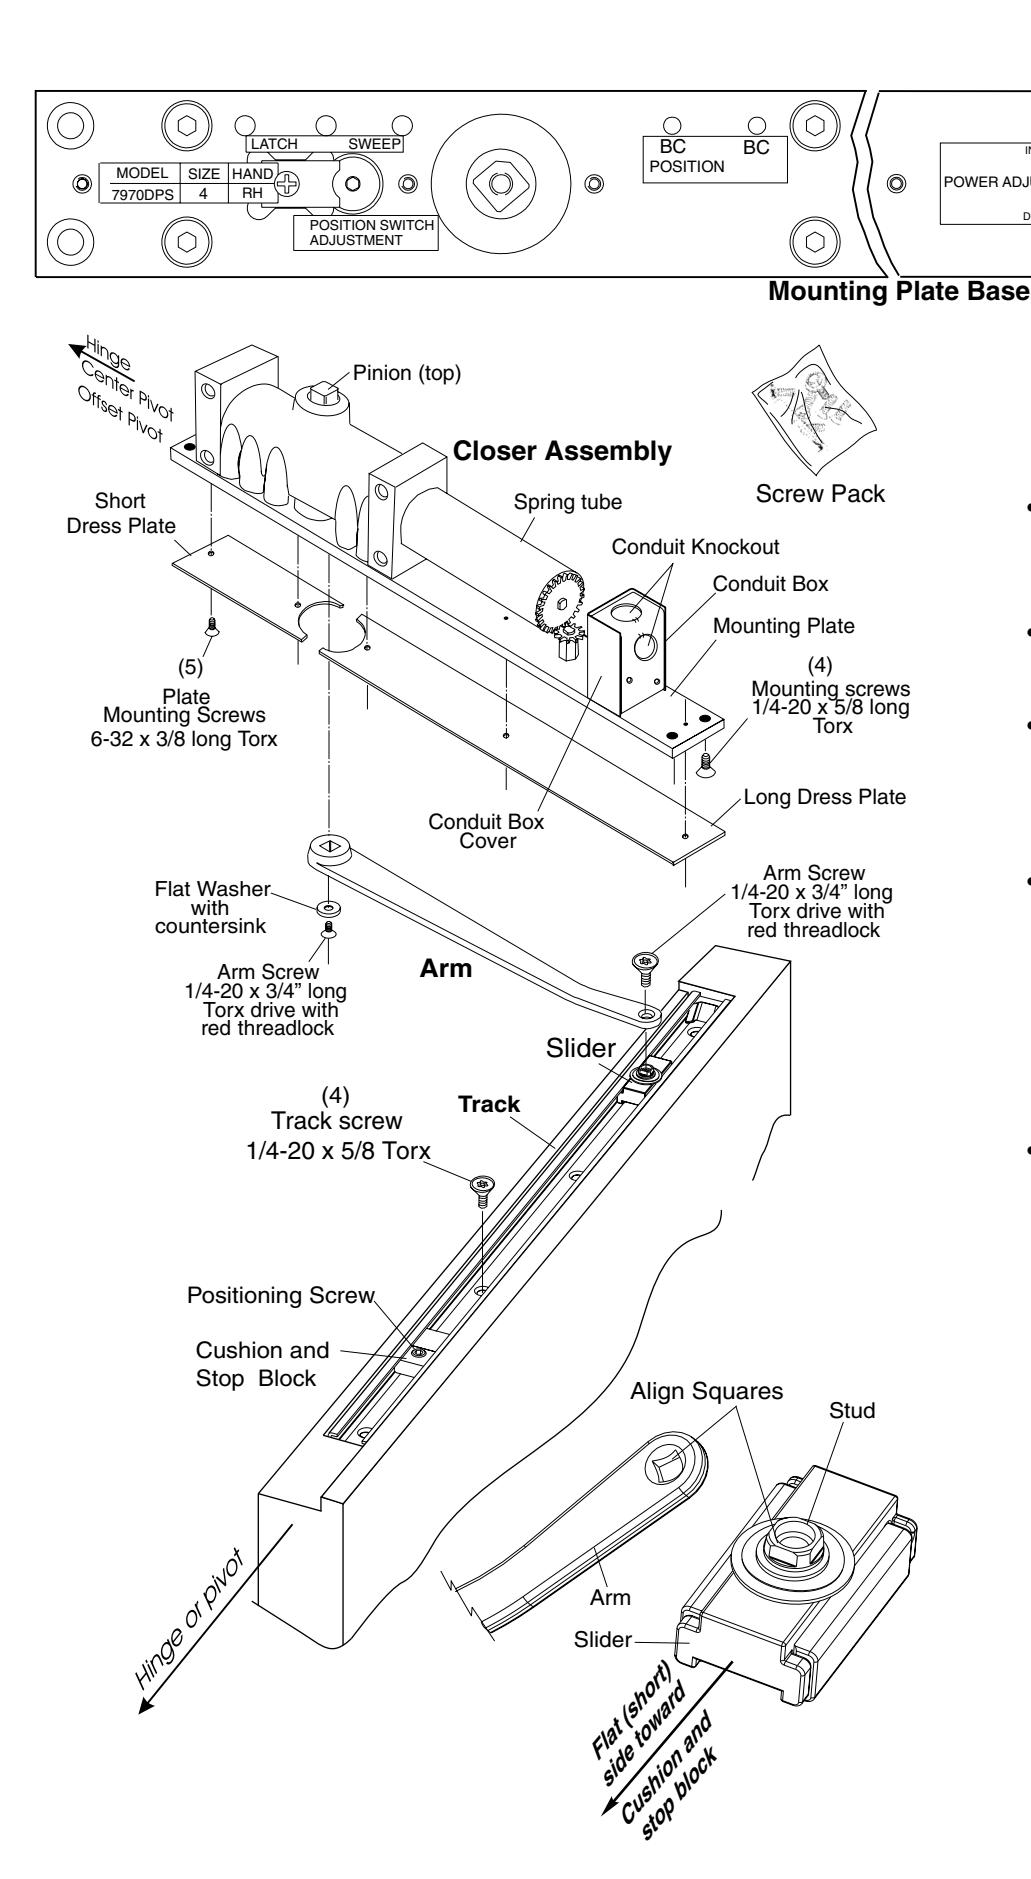
• Mount closer to frame.
Position spring tube away from hinge or pivot and mounting plate flush with frame rabbet. Secure with 1/4 -20 x 5/8 torx drive mounting screws.
• .)wolebnoitartsulliees( Position arm counterbore facing down with index mark aligned with pinion index mark. Install onto pinion. Secure with washer and 1/4-20 x 3/4" long flat head torx drive arm screw with red threadlock. Install arm on closer pinion
• Install track in door.
Place the assembled track into door cutout with open side up, cushion and block toward the hinge or pivot. Move slider to the opposite end of track (see illustration). Secure track with (4) 1/4-20 machine screws. stop
- yletamixorppaotroodnepO 5" ( ), rotate arm to slider and place end on stud. Use a screw driver to align the square on slider's stud with the arm square (see illustration to right). Push down on arm to seat stud and to prevent stud from rotating. Secure with arm screw, 1/4-20 x 3/4" long flat head torx drive with red threadlock. Connect arm to track. 127mm
- •Determine door opening angle. See pages 2 & 3.
- Set door opening angle. Open door to the angle you want the door to stop. With the door held at that location, slide cushion and block against slider. Tighten the stop position screw (large set screw) with 3/16" hex wrench (from screw pack) until secure. Release door. stop
- •Adjust Closer. See page 6...Install dress plates.

0
Door Position Switch Adjustment
- Remove tape holding white test socket into slot in base mounting plate. Snap test socket out of recess in plate.
- Close the door, being careful not to pinch test socket or test socket leads.
- Adjustments are made using only slight turning movements of the "Position Switch Adjustment" (Full adjustment range is within a 90° arc).
- NORMALLY OPEN CIRCUIT when door is closed: Insert test probes from volt meter into test switch sockets for Red and White leads from closer. NOW adjust "Position Switch Adjustment" with a 1/8" (3mm) hex wrench so that power is OFF when door is opened more than 1/4" (7mm).
- NORMALLY CLOSED CIRCUIT when door is closed: Insert test probes from volt meter into test switch sockets for Black and White leads from closer. NOW adjust "Position Switch Adjustment" with a 1/8" (3mm) hex wrench so that power is ON when door is in the fully closed position but power is OFF when door is opened more than 1/4" (7mm).
Closer Adjustment
Series 7970DPS-B & 7970DPS-OP
Overhead Concealed Security Door Closers Non-Hold Open
CAUTION:
Do not back valves out of closer or a leak will result.
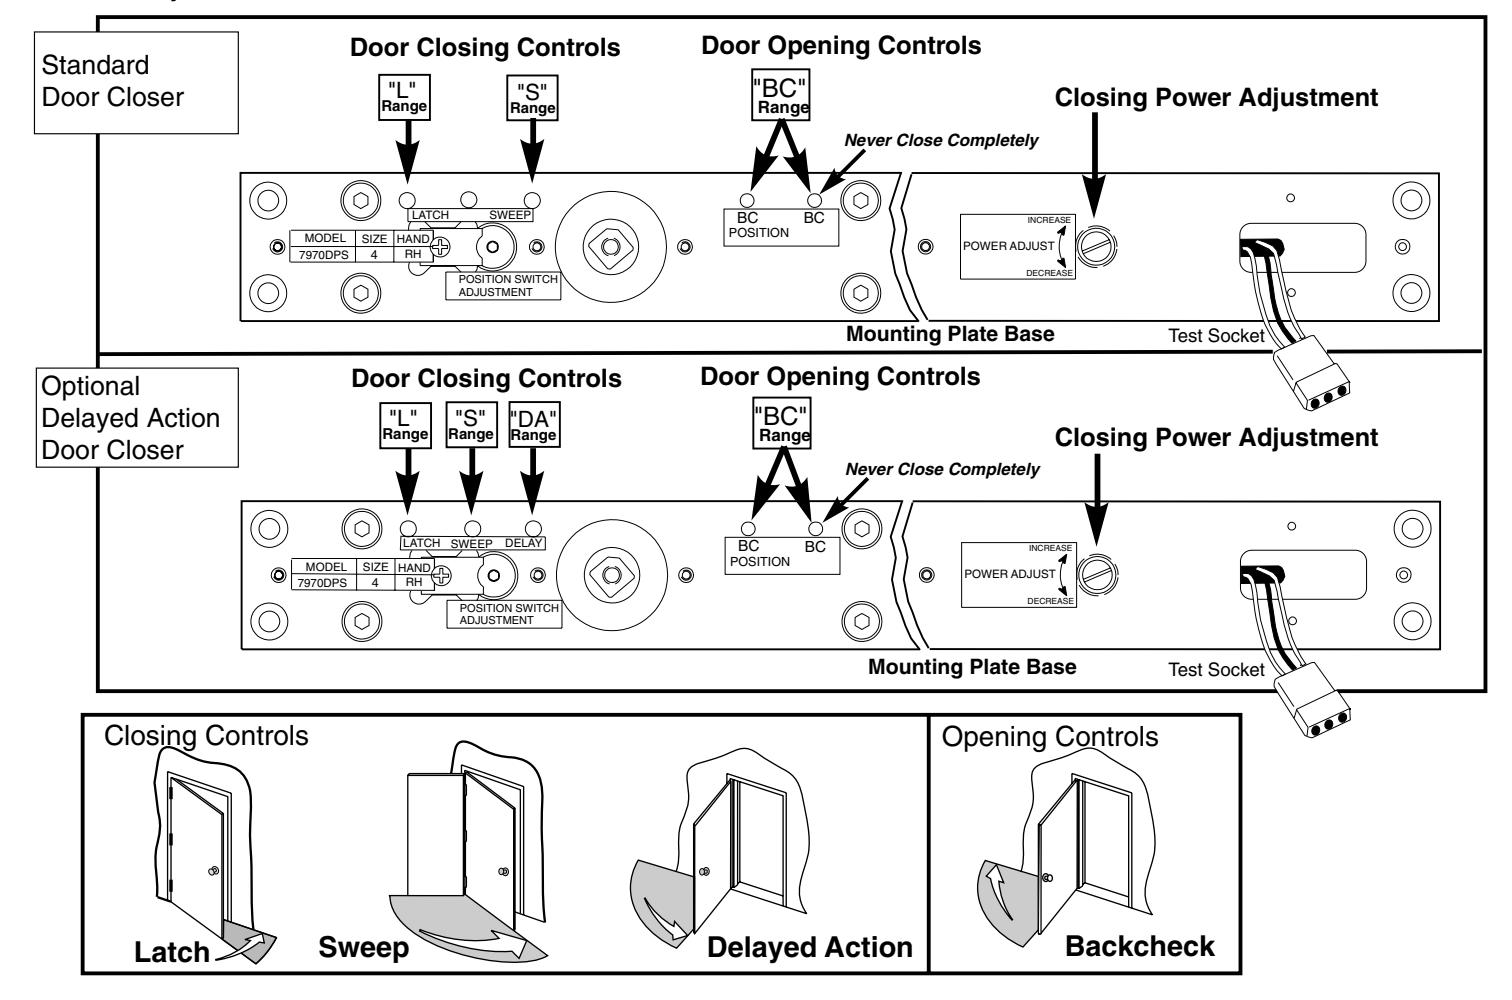
- • Closer Controls accessible through mounting plate for closer adjustment: Use 1/8" (3mm.) hex-key for valve adjustments. Use standard screwdriver for power adjustment.
- • Power Adjustment permits increasing door closing force. Controlled by slotted screw marked "P.A."
- • Closing Speed controlled by valves marked "SWEEP" and "LATCH". Attention: Adjust closing speed time to between 4 to 7 seconds from 90°. Use of the door by handicapped, elderly, or small children may require greater closing time.
- • Delayed Action option permits door to creep from fully open to about 70°. Creeping time controlled by valve marked "DELAY".
- • Backcheck cushions or slows the opening of a door that is forced to travel faster than conditions require. Backcheck controlled by valves marked (open for backcheck start at a greater door opening angle) and (for adjusting backcheck intensity). Never close valve completely. "BC POSITION" "BC" "BC"
- • Optional Enhanced Backcheck provides adjustable backcheck intensity beginning at approximately 15° of the door opening cycle. Backcheck positioning valve is omitted when this feature is provided.
- Install Dress Plates (see page 5).
