Marks USA i-Qwik Data Programming Manual
Open the original PDF document
View PDF


MARKS USA
365 Bayview Ave., Amityville, NY 11701 631-225-5400 • 1-800-526-0233 • Fax 631-225-6136 www.marksusa.com
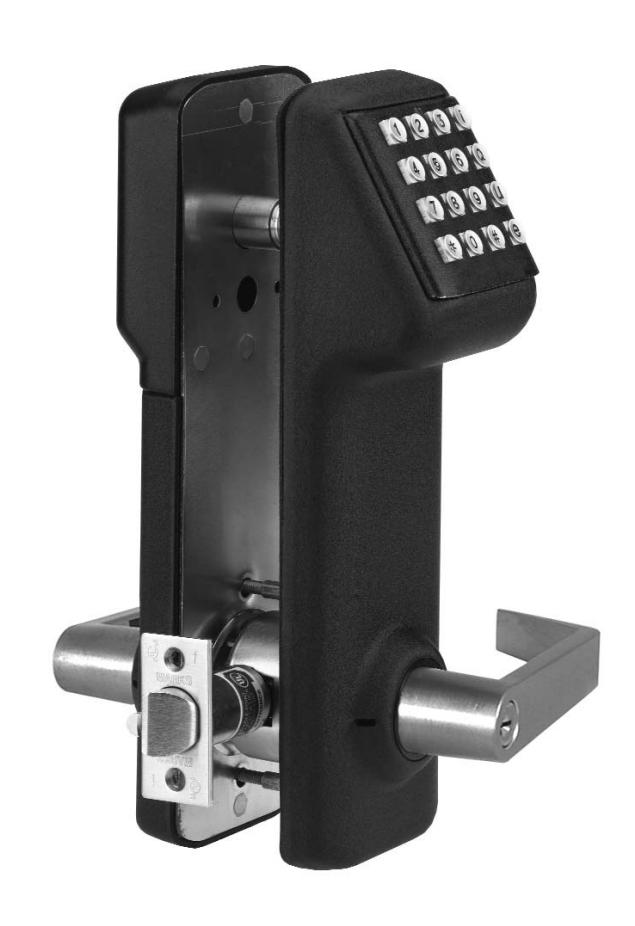
Congratulations, you have just purchased the i-Qwik DATA Series lockset from Marks USA. This lockset, designed for easy installation, will provide years of reliable service when properly installed and maintained.
This manual is designed to act as a guide through the many features & functions of your i-Qwik Data Series Stand-Alone Access Control System.
Please take the time to read it thoroughly and follow the instructions carefully so that your experience will be positive and trouble free.
Marks USA would like to thank you for selecting the i-Qwik Data Series for your access control needs.
365 Bayview Ave., Amityville, NY 11701
LIVE TECH SUPPORT 8am - 8pm EST Mon- Fri
Toll Free: 800 • 526 • 0233 In NY: 631 • 225 • 5400 Fax: 631 • 225 • 6136
E-mail: techsupport@marksusa.com
For more information about the i-Qwik Line, i-Que series, the Complete Marks USA Product line, templates & manuals visit our website @ www.marksusa.com
Table of Contents:
|
Section 1 - i-Qwik DATA Information
Function # |
Min. Required Group Number | Page |
|---|---|---|
|
Before You Start, Important Definitions Page 1
Important Definitions Page 1 |
||
|
Important Keys Page 1
LED Indicators Page 1 |
||
| Initialize Lock Page 1 | ||
|
Create Great Grand Master System Manager Page 2
Adding & Deleting User Codes Function 01 Master 03 Pages 2-3 |
||
| Section 2 - Lock Configuration | ||
| PIN Only Entry Function 32 Grand Master 02 Page 3 | ||
| Change User PIN Function 08 Groups 01 to 99 Page 3 | ||
| Deny/Restore Group Access Function 10 Master 03 Page 4 | ||
| Change Group Association Function 07 Master 03 Page 4 | ||
| Set Access Level Function 11 Master 03 Page 4 | ||
| Define Open Time Function 18 Master 03 Page 4 | ||
| Multiple Code Entry Function 33 Master 03 Page 4 | ||
| Manual Passage Mode Function 30 Master 03 Page 5 | ||
|
Lock Audio Function 34 Master 03 Page 5
Relay State Selection Function 35 Master 03 Page 5 |
||
| Fail Safe/Fail Secure Function 36 Master 03 Page 5 | ||
| Terminator On/Off Function 37 Master 03 Page 6 | ||
| Panic Alarm Function 38 Master 03 Page 6 | ||
| Privacy Mode/Secretary's Button Function 39 Master 03 Page 6 | ||
| Disable/Enable Three Strike Lockout Function 40 Grand Master 02 Page 6 | ||
| Section 3 - Scheduling | ||
| Overview: Programming the Schedule Functions, Delete Set Schedules, Day Codes, Open and Close times Page 7 | ||
| Set Time Function 12 Grand Master 02 Page 7 | ||
| Set Date Function 13 Grand Master 02 Page 7 | ||
| Basic Schedule Function 02 Master 03 Page 8 | ||
| Group Schedule Function 03 Master 03 Page 8 | ||
| User Schedule Function 04 Master 03 Page 8 | ||
| Passage Schedule Function 05 Master 03 Page 8 | ||
| Temporary User Function 06 Master 03 Page 9 | ||
| Holiday Maintenance Function 09 Master 03 Page 9 | ||
| First Supervisor to Arrive Function 31 Master 03 Page 9 | ||
|
Section 4 - Software Interface
Download Audit Trail Function 15 Security Guard 05 Page 9 |
||
| Upload Lock Information Function 14 Security Guard 05 Page 10 | ||
| Section 5 - Lock Maintenance | ||
| Clear Memory Function 16 Grand Master 02 Page 10 | ||
| Battery Status Check Function 17 Master 03 Page 10 | ||
| Memory Upgrade Function 20 Great Grand Master 01 Page 10 | ||
| Battery Information Page 11 | ||
| Connection Diagram Page 11 | ||
| Reset the i-Qwik DATA back to Factory Default Page 11 | ||
| Glossary Page 12 | ||
| Troubleshooting Page 12 |
SECTION 1; I-QWIK DATA INFORMATION
BEFORE YOU START! BEFORE YOU START! BEFORE YOU START!
IMPORTANT DEFINITIONS:
- 1. FACTORY CODE: is 9991234, and is used to initialize the lock for a new installation or full reset. This code must be entered to set the GREAT GRAND MASTER (GGM). After the GGM code is set, the FACTORY CODE will no longer be valid and is only re-enabled after a full reset, see page 11.
- 2. LOCK ID: A unique six digit number entered during initialization defining the specific lock.
- 3. USER IDENTIFICATION NUMBER (UID): A unique number assigned to each User with 2, 3 or 4 digits.
- 4. GROUP: One or several Users, all of whom have the same access to the locks, categorized by a two digit GROUP number.
- 5. PERSONAL IDENTIFICATION NUMBER (PIN): A unique combination of 3, 4, 5 or 6 keypad letters, numbers or both. (Letters or numbers may be used multiple times to increase the total number of combinations).
- 6. USER CODE: Unique combination of UID and PIN codes, in that order, having up to 10 total digits.
- 7. GREAT GRAND MASTER (GGM): Code required by the SYSTEM MANAGER to perform all programming functions. It replaces the FACTORY CODE. This code can also open the lock.
- 8. SYSTEM MANAGER: Person establishing the GGM and responsible for highest level of programming. Can establish lower levels of programming for other Users or Groups.
- 9. PROGRAM INSTRUCTION: Series of key strokes used to enter a function.
IMPORTANT KEYS:
- 1. TERMINATOR KEY (): Acts like the "Enter" key on a computer, and is used to add or confirm codes on the keypad.
- 2. PROGRAMMING KEY (#): After a valid MASTER CODE is entered, this key is depressed to enter the programming mode. This key can also be used as a time saving feature, allowing the entry of multiple functions. At the end of any PROGRAMMING INSTRUCTION, replace the last with a # to return to FUNCTION NUMBER input eliminating the need to re-enter MASTER CODE.
LED INDICATOR:
LED INDICATING GREEN (NORMAL MODE):
1. Denotes lock enabled to open. Will flash green after entering valid MASTER CODE and TERMINATOR KEY ().
LED INDICATING RED (NORMAL MODE):
- 1. Denotes a wrong MASTER CODE entry to open the lock.
- 2. Denotes wrong MASTER CODE entry 3 consecutive times and disables keypad for 20 seconds. If another wrong MASTER CODE is entered, the keypad is disabled for 40 seconds.
LED INDICATING RED (PROGRAMMING MODE):
- 1. Denotes incorrect entry or error and vacates programming mode.
- 2. Programming mode vacated if no key entry within 5 seconds.
1. INITIALIZE LOCK:
Initializing the lock with a unique 6 digit code assigns a LOCK ID # to each specific lock. Using keypad, enter the FACTORY CODE 9991234, the # key, and the 6 digit LOCK ID # (usually starting with 000001), and finally the # key.
|
9991234 #
Lock ID # |
THIS CODE WILL NOT OPEN THE LOCK |
|---|
2. CREATE GREAT GRAND MASTER (GGM):
This code is required by the SYSTEM MANAGER to perform all programming functions. In any lock system the number of digits used for the UID of each User must be the same as the GGM.
Example: If the GGM's code is 3 digits, all Users must have a 3 digit UID code.
Also, the number of digits used for the PIN of each User must be the same as the GGM.
Example: If the GGM's PIN is 5 digits, all Users must have a 5 digit PIN code.
Using keypad, enter the FACTORY CODE 9991234, the key, the UID of the system manager (either 2, 3 or 4 digits), the # key, the PIN of the system manager (either 3, 4, 5 or 6 digits), and finally, the # key.
FACTORY CODE UID # PIN #
|
9991234 |
UID # | PIN # |
|---|
The GGM is now established for the SYSTEM MANAGER only: A combination of their UID followed by their PIN.
Lock is now initialized.
SYSTEM MANAGERS ACCESS TO THE LOCK:
Enter UID plus PIN of the GGM, then the key. The lock will open!
| Enter to open lock | GGM |
|---|
GROUPS:
In order to organize the management of individual Users, they can be put into 98 different GROUPS. Users in the same GROUP will have the same access rights. Users in different GROUPS can have varied access rights from other GROUPS. Each GROUP is assigned a 2 digit GROUP NUMBER from 02 to 99.
ALL USER MUST BE ASSIGNED TO A GROUP .
Depending on your assigned GROUP, you may or may not be able to program the lock, and may also have restricted access. The SYSTEM MANAGER is automatically assigned to group 01, and can assign Users to all other groups. GROUPS 02 through 08 are management GROUPS, with 24/7 access to the locks, and can change various settings used during access by other User GROUPS. The Table of Contents (inside front cover) lists the minimum GROUP NUMBER required for rights to program EACH specific function. Higher GROUPS can override access functions of lower GROUPS.
Example: GROUP (02) can override access functions to GROUP (03), etc.
GROUP 09 is a special group that allows the lock to be placed in passage mode when the code is entered. The lockset will re-lock when code is entered again or at midnight of that day.
GROUPS 10 through 99 have no programming rights. Their access may be restricted by schedules or during holidays.
They may, however, change their own PIN when authorized by the SYSTEM MANAGER.
FUNCTION 01:
To Add Users:
Enter MASTER CODE (UID and PIN), the # key, FUNCTION NUMBER (01), the key, the Users UID you want to include in the GROUP, the key, the 2 digit GROUP NUMBER, the key, the User's PIN, the key twice.
|
MASTER UID & PIN #
01 |
UID
|
Group No. | PIN | |
|---|
| FUNCTION 01: Cont'dMin. Group Number: Master 03 | |||||
|---|---|---|---|---|---|
|
To Delete Users:
Enter MASTER CODE (UID and PIN), the # key, FUNCTION NUMBER (01), the the 0 key in place of the GROUP NO., the |
key twice. | key, the Users UID you want to delete, the | key, | ||
| MASTER UID & PIN # | 01 |
UID to be
Deleted |
0 | | |
| NOTE: GROUP NUMBERS ARE NOT USED TO ACCESS THE LOCK | |||||
|
Users Access the Lock:
Enter User's UID plus User's PIN then the |
key. The lock will open! | ||||
| UID | PIN | ||||
|
Users Entry to Programming Mode:
Enter User's UID plus User's PIN then the # key. |
|||||
| UID | PIN # | ||||
|
SECTION 2; LOCK CONFIGURATION
The code can not be shorter than the PIN. |
The PIN Only mode allows management to shorten the length of the code that the User must enter to gain access. | FUNCTION 32: PIN Only EntryMin. Group Number: Grand Master 02 | |||
| PIN Only Mode (for Access PIN Only) | |||||
| Master UID & PIN # | 32 | 0 | | ||
| UID & PIN Required - Default | |||||
| Master UID & PIN # | 32 | 1 | | ||
| NOTE: PROGRAM MODE REQUIRES THAT UID AND PIN BE ENTERED | |||||
| This function gives users the ability to change their PIN. (User must know their UID & PIN to perform this function) | FUNCTION 08: Change User PINMin. Group Number: Groups 01 - 99 | ||||
| UID & PIN # | 08 | New PIN | Verify PIN | |
To DENY Access To A Group MASTER UID & PIN # 10 Group to be Denied Access 1 To RESTORE Access To A Group MASTER UID & PIN # 10 Group to be Restored Access 0 One User Code Required - Default MASTER UID & PIN # 33 0 Two User Codes Required MASTER UID & PIN # 07 User UID of Existing User New Group Number MASTER UID & PIN # 11 Group Level MASTER UID & PIN # 18 Single Digit 1-9 Seconds FUNCTION 11: Set Access Level . . . . . . . . . . . . . . . . . . . . Min. Group Number: Master 03 Access can be denied to Users in Groups lower then the Group number entered. This function CANNOT deny access to Groups 03 (Master) , 02 (Grand Master) , or 01 (Great Grand Master) . To allow all Groups access the Group level setting must be set to "99". FUNCTION 18: Define Open Time . . . . . . . . . . . . . . . . . . . Min. Group Number: Master 03 This function will set the time delay. The lock will stay unlocked after a valid user code has been entered. The time delay can be set from 1 to 9 seconds. (Default setting is 3 seconds) FUNCTION 10: Deny/Restore Access . . . . . . . . . . . . . . . . Min. Group Number: Master 03 This function is used to temporarily deny access to User Groups (10-99) without removing them from the memory. FUNCTION 07: Change Group Association . . . . . . . . . . . Min. Group Number: Master 03 This function allows management to change the Group an existing User is assigned to. FUNCTION 33: Multiple Code Entry . . . . . . . . . . . . . . . . Min. Group Number: Master 03 For higher security the lock can be set to require two User codes be entered before access is granted. For even higher security it can be required for one of the Users to be in a Manager Group.
|
Two User Codes; One Must Be A Manager
MASTER UID & PIN # 33 2 |
|||||
|---|---|---|---|---|---|
MASTER UID & PIN # 33 1
FUNCTION 30: Manual Passage Mode . . . . . . . . . . . . . . . Min. Group Number: Master 03
This function puts the lock in an unlocked state, granting free access (no code required) to all Users, until lock is returned to the locked state. Returns to locked state at midnight.
| Closed - Locked - Default | |||||
|---|---|---|---|---|---|
|
MASTER UID & PIN #
30 0 |
|||||
| Open - Unlocked | |||||
|
MASTER UID & PIN #
30 1 |
|||||
FUNCTION 34: Lock Audio . . . . . . . . . . . . . . . . . . . . . . . . . Min. Group Number: Master 03
If the Audio is set to "ON" the lock will beep with each key pressed (on by default).
| Audio Off | |||||
|---|---|---|---|---|---|
|
MASTER UID & PIN #
34 0 |
|||||
| Audio On - DEFAULT | |||||
|
MASTER UID & PIN #
34 1 |
|||||
FUNCTION 35: Relay State Selection . . . . . . . . . . . . . . . . Min. Group Number: Master 03
The following function applies to the state of the relay as follows.
| For Normally Open (NO) | |||||
|---|---|---|---|---|---|
|
MASTER UID & PIN #
35 0 |
|||||
| For Normally Closed (NC) | |||||
|
MASTER UID & PIN #
35 1 |
|||||
FUNCTION 36: Fail Safe/Fail Secure . . . . . . . . . . . . . . . . . Min. Group Number: Master 03
Use this function to create a power reserve to ensure if the Low Battery Warning is not heeded, and the battery pack fails, the lock will fail in the selected state.
| Lock Fails In The Last State That It Was In When The Power Was Lost - Default | ||||||
|---|---|---|---|---|---|---|
| MASTER UID & PIN # | 36 | 0 | | |||
| Fail Safe - Lock Will Ensure That Power Is Reserved To Fail In The Unlocked Or Safe Position | ||||||
| MASTER UID & PIN # | 36 | 1 | | |||
| Fail Secure - Lock Will Ensure That Power Is Reserved To Fail In The Locked Or Secured Position | ||||||
| MASTER UID & PIN # | 36 | 2 | | |||
FUNCTION 37: Terminator On/Off . . . . . . . . . . . . . . . . . . . Min. Group Number: Master 03
This function will switch the "" terminator on or off. Selecting off automatically sets lock to PIN Only Mode. To gain access with Terminator Off, simply enter your PIN code. With Terminator On, you are required to enter "" after your code.
| Terminator OFF | ||||
|---|---|---|---|---|
| MASTER UID & PIN # | 37 | 0 | | |
| Terminator ON- Default | |||||
|---|---|---|---|---|---|
| MASTER UID & PIN # | 37 | 1 | | ||
NOTE: TO ENTER PROGRAM MODE WITH TERMINATOR OFF, YOU MUST FIRST PRESS THE "#" KEY BEFORE THE MASTER CODE!
FUNCTION 38: Panic Alarm . . . . . . . . . . . . . . . . . . . . . . . . Min. Group Number: Master 03
This function is intended to be wired to an alarm panel or siren. When enabled, any User can enter 911 and the lock will close a contact thus activating the alarm system.
| Disabled - Default | |||||
|---|---|---|---|---|---|
| MASTER UID & PIN # |
38
0 |
||||
| Enabled, Alarm Activated | ||||
|---|---|---|---|---|
| MASTER UID & PIN # | 38 | 1 | | |
FUNCTION 39: Privacy Mode/Secretary's Button . . . . . . . . . Min. Group Number: Master 03
Privacy Mode/Secretary's button (Secretary's button is default):
The Privacy Mode option will have a button installed on the inside housing. When pressed it will block out keypad entries (except the GGM, GM and Master codes). When the inside lever is pressed the request to exit switch will reset the keypad back to normal operating mode.
| Privacy Mode | |||||
|---|---|---|---|---|---|
| MASTER UID & PIN # | 39 | 1 | | ||
FUNCTION 40: Disable/Enable Three Strike Lockout . . Min. Group Number: Grand Master 02
The lock responds to three incorrect codes in a row by displaying a red light and shutting down the keypad for 20 seconds. Subsequent attempts with an incorrect code will increase the time to 40 seconds maximum. Disabling this feature allows an unlimited number of incorrect codes to be entered without a lockout.
| Disable | ||||
|---|---|---|---|---|
| MASTER UID & PIN # | 40 | 0 | | |
| Enable | ||||
|---|---|---|---|---|
| MASTER UID & PIN # | 40 | 1 | | |
SECTION 3; SCHEDULING
Programming the Schedule Functions:
The scheduled functions will allow you to customize your lock and grant/deny access to your Users by times and day/days of the week. The time and date should be set first before programming any schedules. If the time and date are incorrect in the lock, the schedules will not function correctly. See function 12; Set Time (see below) and Function 13; Set Date (see below)
Delete Set Schedules:
Enter "0" in place of the day code, then "" to exit. This will delete all set schedules for that function.
NOTE: Schedules do not affect Users in Groups 02-09. These User Groups are management levels and will override all set schedules and holidays. The schedule functions will affect Users in Groups 10-99 ONLY.
Day Codes:
Allows selection of the day/days of the week that schedule is active. The day code is a two digit number.
Day Codes:
-
01-07 Individual days of the week (example: Monday = 01)
- 08 Weekdays (Monday through Friday)
- 09 Weekends (Saturday and Sunday)
- 10 Even Days (Tuesday and Thursday)
- 11 Odd Days (Monday, Wednesday & Friday)
- 12 Override Preprogrammed Holidays
- 13 All Days
Open and Close Times:
Use the 24 hour Military Time format for entering Start and End times for schedules. See chart below.
FUNCTION 12: Set Time . . . . . . . . . . . . . . . . . . . . . . . . Min. Group Number: Grand Master 03
The time (HHMM) must be set prior to setting any holidays. See the Military time chart below for help.
Example: 3:30pm = 1530
Daylight savings time is enabled by default. To disable daylight savings add a "0" (zero) at the end of the time entry.
Example: 3:30pm = 15300 Daylight savings disabled
| Standard Time | Military Time | Standard Time | Military Time |
|---|---|---|---|
| 1:00 am | 0100 | 1:00 pm | 1300 |
| 2:00 am | 0200 | 2:00 pm | 1400 |
| 3:00 am | 0300 | 3:00 pm | 1500 |
| 4:00 am | 0400 | 4:00 pm | 1600 |
| 5:00 am | 0500 | 5:00 pm | 1700 |
| 6:00 am | 0600 | 6:00 pm | 1800 |
| 7:00 am | 0700 | 7:00 pm | 1900 |
| 8:00 am | 0800 | 8:00 pm | 2000 |
| 9:00 am | 0900 | 9:00 pm | 2100 |
| 10:00 am | 1000 | 10:00 pm | 2200 |
| 11:00 am | 1100 | 11:00 pm | 2300 |
| 12:00 am | 1200 | 12:00 pm | 2400 |
FUNCTION 13: Set Date . . . . . . . . . . . . . . . . . . . . . . . . . . . . . . . . . . Min. Group Number: Grand Master 03
The date must be set prior to setting any holidays. This function will set the Month, Day and Year and Day of the Week. There are 2 formats available: Standard (default: MM - DD - YY) or European (DD - MM - YY)
|
MASTER UID & PIN #
13 |
MMDDYY | |
|---|
NOTE: FOR EUROPEAN DATE FORMAT SET: DD MM YY "0" (zero)
FUNCTION 02: Basic Schedule . . . . . . . . . . . . . . . . . . . . . . . . . . . . . Min. Group Number: Master 03
This function is used to simplify scheduling by creating one schedule for all Users (in Groups 10-99). May be used in conjunction with Passage and Holiday Schedules. Time entered in military time format (HHMM).
|
MASTER UID & PIN #
02 Day Code |
HHMM (Open Time)
HHMM (Close Time) |
|
|---|
NOTE: The Basic Schedule cannot be used with the Group Schedule (03) or User Schedules (04).
TIME MUST BE ENTERED IN MILITARY TIME FORMAT!
Day Codes:
-
01-07 Individual days of the week (example: Monday = 01)
- 08 Weekdays (Monday through Friday)
- 09 Weekends (Saturday and Sunday)
- 10 Even Days (Tuesday and Thursday)
- 11 Odd Days (Monday, Wednesday & Friday)
- 13 All Days
FUNCTION 03: Group Schedule . . . . . . . . . . . . . . . . . . . . . . . . . . . . Min. Group Number: Master 03
This schedule will apply to all the Users in the specified Group (10-99). Time entered in military time format (HHMM).
| MASTER UID & PIN # | 03 | Day Code | Group No. | HHMM (Open Time) HHMM (Close Time) | |
|---|
TIME MUST BE ENTERED IN MILITARY TIME FORMAT!
Day Codes:
-
01-07 Individual days of the week (example: Monday = 01)
- 08 Weekdays (Monday through Friday)
- 09 Weekends (Saturday and Sunday)
- 10 Even Days (Tuesday and Thursday)
- 11 Odd Days (Monday, Wednesday & Friday)
- 12 Override Preprogrammed Holidays
- 13 All Days
FUNCTION 04: User Schedule . . . . . . . . . . . . . . . . . . . . . . . . . . . . . Min. Group Number: Master 03
The User schedule gives additional access rights to a specific User. Time entered in Military time format (HHMM).
|
MASTER UID & PIN #
03 Day Code UID HHMM (Open Time) HHMM (Close Time) |
|---|
The UID is the User ID of the User to be scheduled.
TIME MUST BE ENTERED IN MILITARY FORMAT!
Day Codes:
-
01-07 Individual days of the week (example: Monday = 01)
- 08 Weekdays (Monday through Friday)
- 09 Weekends (Saturday and Sunday)
- 10 Even Days (Tuesday and Thursday)
- 11 Odd Days (Monday, Wednesday & Friday)
- 12 Override Preprogrammed Holidays
- 13 All Days
FUNCTION 05: Passage Schedule . . . . . . . . . . . . . . . . . . . . . . . . . Min. Group Number: Master 03
This function allows the lock to be placed in an unlocked state automatically for a predetermined time period. Time entered in Military time format (HHMM).
| MASTER UID & PIN # | 05 | Day Code | HHMM (Open Time) HHMM (Close Time) | |
|---|
NOTE: If needed, Manual Passage Mode (Function 30, page 5) or a User assigned to Group 9 will override this schedule until midnight.
TIME MUST BE ENTERED IN MILITARY FORMAT!
Day Codes:
-
01-07 Individual days of the week (example: Monday = 01)
- 08 Weekdays (Monday through Friday)
- 09 Weekends (Saturday and Sunday)
- 10 Even Days (Tuesday and Thursday)
- 11 Odd Days (Monday, Wednesday & Friday)
- 13 All Days
FUNCTION 06: Temporary User Schedule . . . . . . . . . . . . Min. Group Number: Master 03
This function allows you to restrict an existing Users access by a date range.
Temporary User Schedules do not delete and must be maintained or access repeats annually.
|
MASTER UID & PIN #
06 |
UID |
MMDD
(Start Date) |
MMDD
(End Date) |
|
|---|
FUNCTION 09: Holiday Maintenance
Setting holidays will block access to Users in Groups 10 - 99 during these periods.
NOTE: Dates are set by month/day (MMDD) format. The i-Qwik DATA does not track the year of the holiday, so holidays that occur on different dates each year will have to be manually adjusted each year. Holidays are not automatically removed from memory. It is suggested to maintain the holiday schedule yearly.
Example = 1225 = Christmas Day. This holiday recurs each year.
Holidays (such as Thanksgiving) that fall on different dates each year must be manually adjusted each year.
Also, you may enter a shutdown as one event by entering the start date and end date.
Example: Christmas / New Year week Start = 1225 End = 0101 is an eight day period.
| To SET A Holiday | ||||||
|---|---|---|---|---|---|---|
| MASTER UID & PIN # |
MMDD
MMDD 09 (Start Date) (End Date) |
|||||
| To DELETE ALL Set Holidays | ||||||
| MASTER UID & PIN # | 09 | 0 | | |||
FUNCTION 31: First Supervisor To Arrive . . . . . . . . . . . . Min. Group Number: Master 03
When enabled, this function will delay scheduled access until a management code has been entered. Once a managers code (Groups 1-4) has been entered access is granted according to set schedules. NOTE: Time must be set for this function to work!
| DISABLED, Users Will Have Access - Default | ||||||
|---|---|---|---|---|---|---|
|
MASTER UID & PIN #
31 0 |
||||||
| ENABLED, Users Will Be Denied Access Until A Manager Enters Their Code | ||||||
| ENABLED, Users Will Be Denied Access Until A Manager Enters Their Code | |||
|---|---|---|---|
| MASTER UID & PIN # | 31 | 1 | |
SECTION 4; SOFTWARE INTERFACE
FUNCTION 15: Download Audit Trail . . . . . . . . . . . . . . . . . . . Min. Group Number: Security Guard 05
This function downloads the locks history of events to the i-Dat. For more information on the i-Dat and software see the i-Dat software manual.
|
MASTER UID & PIN #
15 |
Enter number of
events to be downloaded |
|
Shows # of
events received |
|
|---|
NOTE: The Memory Upgrade Level will determine the number of events available for audit. The i-Dat must be in proper alignment with the IR ports (resting centered on handle).
FUNCTION 14: Upload Lock Information . . . . . . . . . . . . . . . Min. Group Number: Security Guard 05
This function uploads information from the i-Dat to the lock.
| MASTER UID & PIN # | 14 |
Shows # of records
uploaded |
|
|---|
NOTE: The Memory Upgrade Level will determine the number of users that my be uploaded. The i-Dat must be in proper alignment with the IR ports (resting centered on the handle).
SECTION 5; LOCK MAINTENANCE
FUNCTION 16: Clear Memory . . . . . . . . . . . . . . . . . . . . Min. Group Number: Grand Master 02
If it becomes necessary to reset the memory of the i-Qwik DATA, there are two options instead of the Full Reset Option.
| Delete ALL the Users, Schedules and Holidays. See also "Resetting the i-Qwik DATA" at the bottom of page 11. | |||||
|---|---|---|---|---|---|
|
MASTER UID & PIN #
UID & PIN # 16 16 0 |
|||||
| Delete ONLY Schedules and Holidays | |||||
| MASTER UID & PIN # | UID & PIN # | 16 | 16 | 1 | |
FUNCTION 17: Battery Check Status . . . . . . . . . . . . . . . . Min. Group Number: Master 03
This function manually checks the battery status of the i-Qwik DATA. The LED on the keypad will display visual indicator.
|
MASTER UID & PIN #
17 Watch LED |
|---|
Green Two Yellow LED flashes indicate full power
Red Yellow then Red LED flashes indicate half power
Red - Red Two Red LED flashes indicate that the batteries need to be changed
NOTE: IF THE VOLTAGE OF THE BATTERY PACK FALLS TO 4.2v DC, THE I-QWIK DATA WILL BEEP EVERY HOUR INDICATING LOW BATTERY STATUS.
FUNCTION 20: Memory Upgrade . . . . . . . . . . . . . . . . . . . . Min. Group Number: Great Grand Master 01
The standard i-Qwik DATA has a 320 User and 1600 Event Audit Trail but can be upgraded as follows:
| Memory Upgrade | Part # |
|---|---|
| 512 Users / 2208 Event Audit Trail | U3 |
| 864 Users / 3124 Event Audit Trail | U4 |
| 1504 Users / 2520 Event Audit Trail | U5 |
| 3008 Users / 1180 Event Audit Trail | U6 |
This function permanently upgrades the i-Qwik DATA's memory. The upgrade code is obtained from the factory. The upgrade code is an eight digit number specifically assigned for the serial number of the lock being upgraded and WILL NOT upgrade any other serial number.
NOTE: Upon entering the upgrade code, ALL DATA IN THE LOCK WILL BE LOST. Be sure your important information is recorded in your computer so that the saved data can be uploaded to the lock after the upgrade. Follow these easy steps to perform the memory upgrade.
| MASTER UID & PIN # | 20 |
(8 Digit Code) |
|
|---|
NOTE: The LED glows red for several seconds before flashing green and the lock will beep. Now perform the steps outlined on page 2 for initializing the lock with LOCK ID and GREAT GRAND MASTER, then re-enter your information either by keypad or i-Dat upload (Function 14, top of page).
Battery Information:
THE i-Qwik DATA IS SHIPPED WITH 4 "AA" ALKALINE BATTERIES. The life span of the batteries has been tested in two different ways. The first test was performed to see how many operations could be performed repeatedly before a failure. The test averaged 150 thousand operations. The second test was performed over time for normal operations. This test revealed that the i-Qwik DATA batteries would last approximately 4 years at 80-90 thousand operations. Using the factory settings, the lockset is set for optimized power usage.
CHANGING THE BATTERIES: When the batteries need to be changed, you will have 10 minutes to remove the old batteries and install the four new "AA" batteries before memory is affected. IT IS RECOMMENDED TO USE ONLY ALKALINE BATTERIES due to the predetermined power settings in the lock. The alkaline battery has a gradual curve in the drop off voltage. This curve determines the power settings for the two stages of battery warnings and the Fail Secure settings. A lithium battery differs from an alkaline battery in the life cycle of the battery cell. A lithium battery has a very sharp drop off voltage, going from fully charged to a dead cell quickly. This makes monitoring the voltage settings impossible.
TWO STAGE LOW BATTERY WARNING: The i-Qwik DATA has a two-stage low battery warning. The first warning stage will add a double beep and Red LED when the user enters their code. The second warning stage will be a double beep every hour . BATTERIES SHOULD BE CHANGED IMMEDIATELY. Double beeps will occur until the batteries fail. To ensure the lock fails in a locked or unlocked mode, use Function 36 Fail Secure (page 5) or the lock will fail in the last state, either open or closed. The batteries can also be checked manually using Function 17 Battery Status Check (page 10).
CONNECTION DIAGRAM
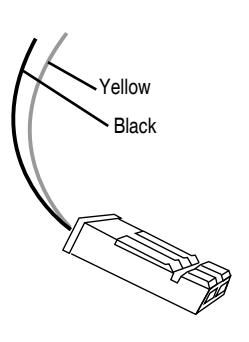
Reset The i-Qwik DATA Back To Factory Default:
- Open battery cover (top of housing on inside of door)
- Disconnect the batteries
- Locate the Yellow and Black cable (behind battery pack)
- Insert both ends of the reset wire (or paper clip) into the holes of the connector on the yellow and black cable.
- With the reset wire in place, reconnect the batteries. (The LED will go GREEN)
- Press the # key (The LED will go RED and then back to GREEN)
- Remove the reset wire
- The lock is now reset
Glossary:
Access Code: Numeric or alphanumeric data which when correctly entered into a keypad, allows authorized entry into
a controlled area without causing an alarm condition.
Access Control: The control of persons, vehicles and materials through entrance and exit of a protected area utilizing
hardware systems specialized to control and monitor the movement into, out of, or within the protected area.
Audit Trail: A historical record sequentially accounting for all activities with an access control system.
Such a records allows reconstruction and analysis of events during a given time period.
ESD: Electro Static Discharge.
Fail safe lockset: A type of lockset that unlocks when a power failure occurs.
Fail secure lockset: A type of lockset that locks when a power failure occurs.
Infrared (IR): Light waves that are too low frequency to be seen by the unaided eye.
Keypad: A device for inputting information into a computer controlled system for the purposes of arming and
disarming an alarm system or operating an access control system.
Multiple Key Depressions: The pressing of more than one key simultaneously.
PIN: This is the Personal Identification Number. This number can be a combination of digits and letters,
increasing the overall number of code possibilities.
Tailgating: In access control, tailgating is the act of one or more individuals entering a controlled area by using a
single code. Also known as piggybacking.
UID: This is the User Identification Number. A unique number assigned to each User.
The UID has a length of 2 to 4 digits.
Terminator: The "" key acts as the terminator which functions similar to the "enter" key on a standard computer
keyboard. It is also pressed after a code is entered to gain access.
Programming Key: The "#" key is the programming key. Note that the "#" key is used during the initialization process for
the lock GGM and to enter program mode.
TROUBLESHOOTING GUIDE FOR THE i-Qwik DATA LOCKSET:
Set Up:
Q The factory code will not open the lock.
A The factory code will not give you access to the lock at any time. This code is only used to set up the lock, the first code that will open the lock is your GGM code.
Adding Users:
- Q I have installed Users and some of them do not have access.
- A You may have exceeded the maximum users.
- Q My GGM code is set to 3 digits for UID and the PIN is 3 digits. Can I set my Users up to have a PIN of 4 digits?
- A No, the Great Grand Master code length sets up the format for all other Users in the system.
- Q I am trying to add a User but when I enter the Group number, I get a red LED.
- A This indicates that the Users UID is already in memory. Each UID must be unique.
Programming / Scheduling:
- Q I have entered a Group or User schedule between 9 a.m. and 5 p.m. and now my other Users don't have access.
- A If no schedules are set everyone has 24 hour access with their valid code. Once any schedules have been set the rules of the lock are changed and schedules must be set to give Users access.
- Q When I try to enter in a User or Group schedule I get a red light.
- A The User and Group schedules will not work with a basic schedule. If a basic schedule us currently set you will receive an error. You will also receive an error if you are not at the minimum security level required to program that function.
| INDEX | H |
|---|---|
| A | Holiday Maintenance Function 09 9 |
| Access, Deny/Restore Groups Function 10 4 | I |
| Access Level, Set Function 11 4 | Initialize Lock ID 2 |
| Audio, Lock Function 34 5 | Initialize Great Grand Master 2 |
| Audit Trail, Download Function 15 9 | K |
| B | Keypad Information 1 |
| Basic Schedule Function 02 8 | L |
| Battery Information 11 | Lockout, Three Strike, Disable/Enable Function 40 6 |
| Battery Status Check Function 17 10 | M |
| C | Manual Passage Mode Function 30 5 |
| Connection Diagram 11 | Memory Upgrades Function 20 10 |
| D | Memory, Clear Function 16 10 |
| Date/Format, Set, Function 13 7 | Multiple Code Entry Function 33 4 |
| Deny Access to Selected Groups Function 10 4 | Multiple Key Depressions 12 |
| Disable/Enable Three Strike Lockout Function 40 6 | O |
| Download Audit Trail Function 15 9 | Open Time, Define Function 18 4 |
| E | P |
| Entry, Multiple Codes Function 33 4 | Panic Alarm Function 38 6 |
| Enable/Disable Three Strike Lockout Function 40 6 | Passage Mode, Manual Function 30 5 |
| F | PIN Number 2-3 |
| Fail Safe/Secure Function 36 5 | PIN, Change User Function 08 3 |
| Factory Code 1 | PIN Only Entry, Function 32 3 |
| Function 01, Adding/Deleting User Codes 2-3 | Privacy Mode Function 39 6 |
| Function 02, Basic Schedule 8 | Programming Key 2 |
| Function 03, Group Schedule 8 | R |
| Function 04, User Schedule 8 | Relay State Selection Function 35 5 |
| Function 05, Passage Schedule 8 | Resetting the i-Qwik DATA back to Factory Default 11 |
| Function 06, Temporary User Schedule 9 | Restore/Deny Group Access Function 10 4 |
| Function 07, Change Group Association 4 | S |
| Function 08, Change User PIN 3 | Schedule (Passage Mode) Function 05 8 |
| Function 09, Holiday Maintenance 9 | Schedule (Basic) Function 02 8 |
| Function 10, Deny/Restore Group Access 4 | Schedule (Group) Function 03 8 |
| Function 11, Set Access Level 4 | Schedule (Temporary User) Function 06 9 |
| Function 12, Set Time 7 | Schedule (User) Function 04 8 |
| Function 13, Set Date 7 | Secretary's Button Function 39 6 |
| Function 14, Upload Lock Information 10 | Supervisor To Arrive, First, Function 31 9 |
| Function 15, Download Audit Trail 9 | T |
| Function 16, Clear Memory 10 | Temporary User Schedule, Function 06 8 |
| Function 17, Battery Status Check 10 | Terminator Key 1 |
| Function 18, Define Open Time 4 | Terminator On/Off Function 37 6 |
| Function 20, Memory Upgrade 10 | Three Strike Lockout, Disable/Enable Function 40 6 |
| Function 30, Manual Passage Mode 5 | Time, Define Open Function 18 4 |
| Function 31, First Supervisor to Arrive 9 | Time, Set Function 12 7 |
| Function 32, PIN Only Entry 3 | Troubleshooting 12 |
| Function 33, Multiple Code Entry 4 | U |
| Function 34, Lock Audio 5 | Upgrade Memory Function 20 10 |
| Function 35, Relay State Selection 5 | Upload Lock Information Function 14 10 |
| Function 36, Fail Safe/Fail Secure 5 | User Identification Code (UID) 1 |
| Function 37, Terminator On/Off 6 | User PIN, Change Function 08 3 |
| Function 38, Panic Alarm 6 | User Schedule Function 04 8 |
| Function 39, Privacy Mode 6 | Users, Adding Function 01 2-3 |
| G | User Code Definitions 1 |
| GGM Code 2 | |
| Group Association, Change Function 07 4 | |
| Group Numbers 2 | |
| Group Security Levels 2 | |
| Group Schedule Function 03 8 |
For more information about the i-Qwik Line, the i-Que series, the complete Marks USA product line, templates and manuals
visit our website @ www.marksusa.com
| Distributed by: | ||
|---|---|---|
For i-Qwik/i-Que Tech Support Call:
Toll Free: 800 • 526 • 0233
In N.Y.: 631 • 225 • 5400
Fax: 631 • 225 • 6136
LIVE TECH SUPPORT 8am to 8pm EST Mon - Fri
Email: techsupport@marksusa.com
