Marks USA i-Dat Software V4 Programming Manual
Open the original PDF document
View PDF


SOFTWARE Version IV
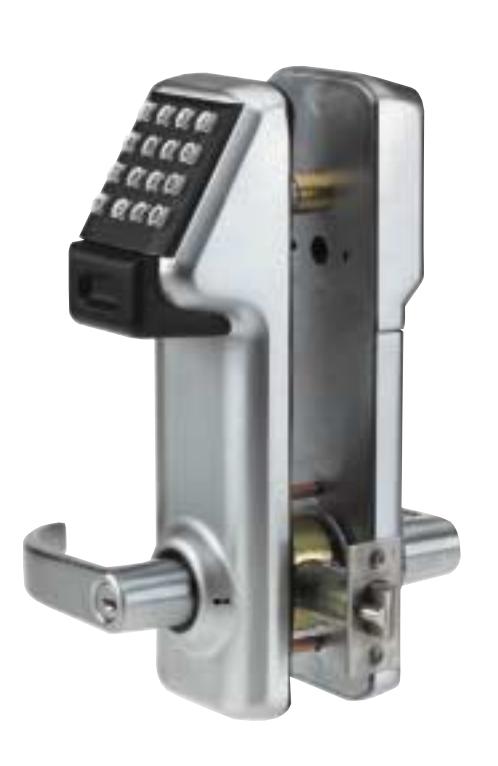
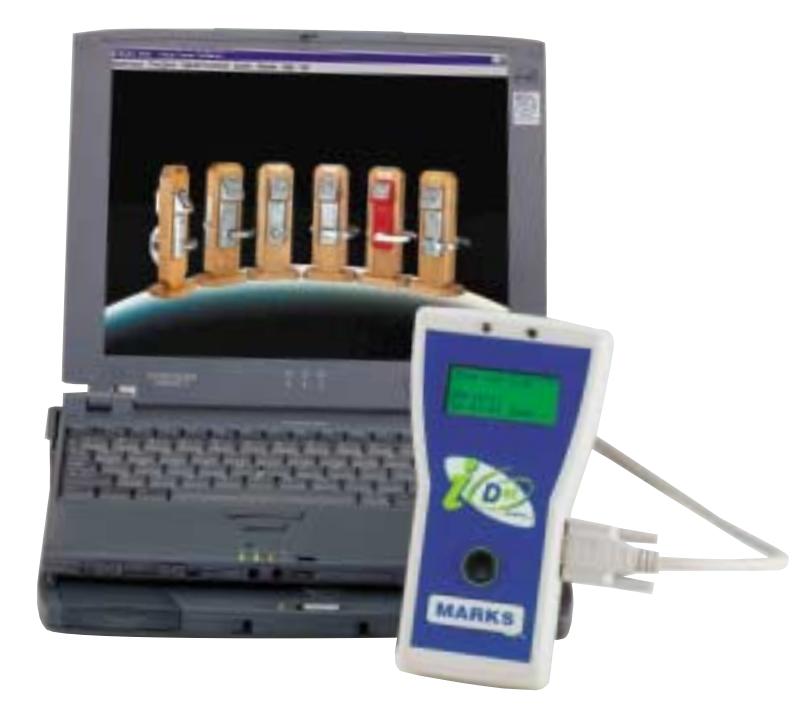
Table of Contents
|
Installation
Page 1 |
|
|---|---|
|
Change Software Password
Page 1 |
|
|
Lock Maintenance
Page 2 |
|
|
Group Maintenance
Page 3 |
|
| User MaintenancePages 4-6 | |
|
Batch User Transfer
Page 5 |
|
| PC Prox Module Setting Up Prox Card Enroller | Page 5 |
|
Card Maintenance
Page 7 |
|
|
Holiday Maintenance
Page 8 |
|
| Time Zone | |
|
Management
Page 9 |
|
|
Assigning Locks
Page 10 |
|
|
Assigning Users
Page 11 |
|
|
Temporary Users
Page 12 |
|
|
Groups Denied
Page 13 |
|
|
Lock Configuration
Pages 14-15 |
|
|
Lock Schedules
Page 16 |
|
| Configure Serial Port / i-DatPage 17 | |
| Uploading Time ZonesPage 18 | |
| Downloading Audit Trails from i-DatPage 19 | |
|
Reports
Page 19 |
|
|
Users
Page 19 |
|
|
Temporary User
Page 19 |
|
|
Holiday
Page 19 |
|
|
Viewing Audit Trail
Page 20 |
|
|
Time Zone Detail
Page 21 |
|
|
Frequently Asked Questions
Page 22 |
|
|
Programming Lock at Lock
Pages 23-24 |
For technical assistance please contact Marks USA i-Que Technical Support at www.marksusa.com Live technical support at 1-800-526-0233 Mon. - Fri., 8 a.m. to 8 p.m. EST OR email your questions or comments to ique@marksusa.com
Software Requirements: The i-Dat Version IV is a stand-alone application for controlling the i-Que line of locksets manufactured by Marks USA. The minimum computer requirements to run the software are as follows:
- Pentium II and above 133 MHz and above 64 MB Ram and above 100 MB Hard Disk
- Windows 95, 98, ME, NT, 2000 & XP (with their updates)
Marks USA i-Dat Version 4 software is a stand alone application for controlling i-Que electronic locksets manufactured by Marks USA. All user codes, groups, access or denial, lock configuration and schedules can be maintained into he application. This application manages multiple time zones, which are uploaded into user specified locks. The application controls the Standard, Next Generation and Prox version locksets. A downloaded lock history can be imported into the application and user selectable reports can be generated.
Installation:
To install the software, place the CD in your computers CD ROM drive. Following the directions on the screen, you will be asked to enter a password before the installation takes place. Enter marksusa (one word lowercase). The installation wizard will automatically start the installation process.
The application has 2 different versions:
- Basic Version
- This simpler version is for use with one Time Zone only.
-
Customized Version
- This is the default installation mode for use with up to 25 Time Zones.
Password:
Before you can enter the program you are asked for a password.
The default password is "marksusa" all lowercase letters. The password is case sensitive.

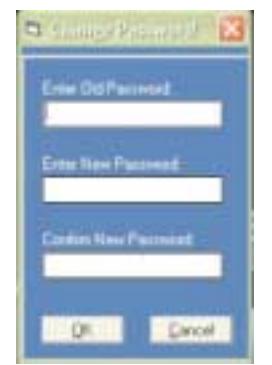
To Change the Password:
- System from the main tool bar.
- From the drop down menu select change password (shown above).
- Enter the old password.
- Enter the new password. (The password should be 4 to 10 characters in length)
- Confirm the new password and select OK.
Before using the software, the locks will need to be initialized at the keypad. (See the Programming Guide) When using the software for the first time, there will be no information in the database.
Follow these guidelines to add data:
- Enter all the lock information (Page 2).
- Create all the Groups that will be needed (Page 3).
- Create all Users starting with the Great Grand Master Code (Page 4).
- Once you have entered this information into the database you can now create the Time Zones and assign the locks, Users and configure the locks as needed (Page 8).
- If you are using Prox card locks, see the information on page 6.
Lock Maintenance:
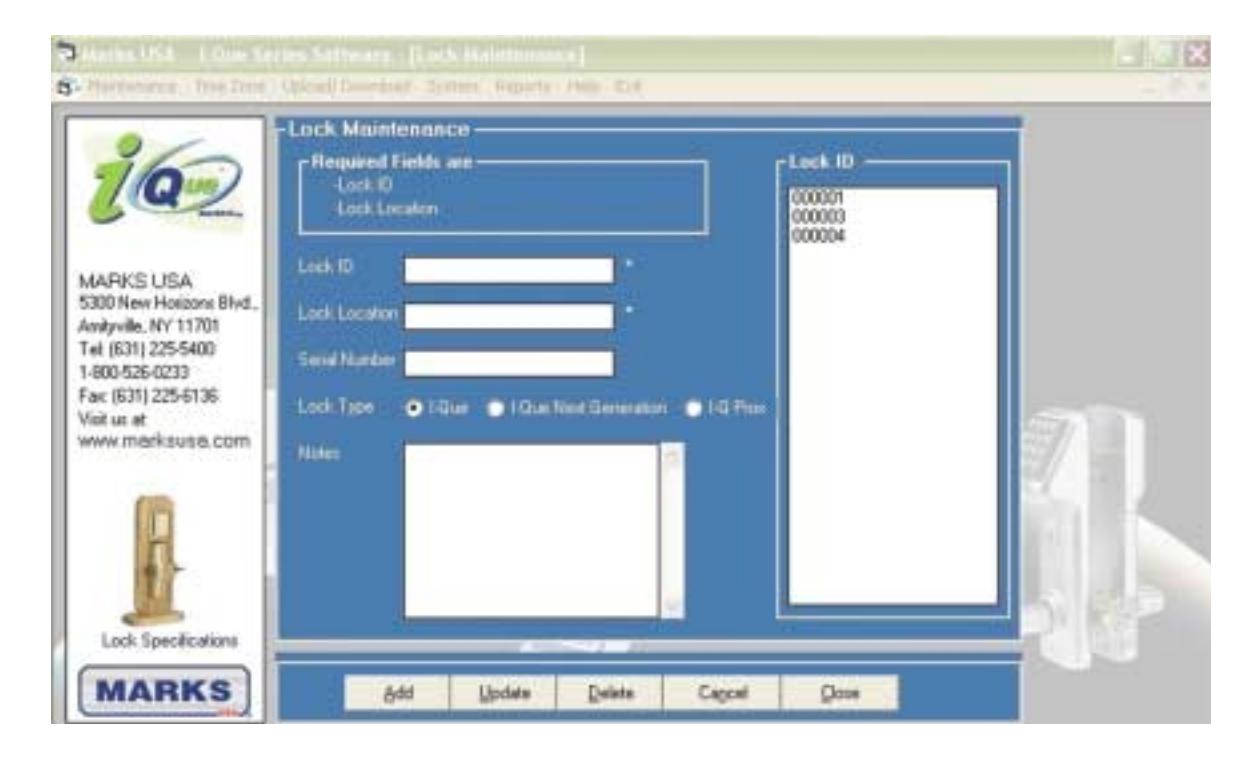
To open the Lock Maintenance Form from the top tool bar select:
- Maintenance.
- Select Locks from drop down list.
Remember: You must initialize the Lock ID at the keypad.
The Lock ID you installed must also be entered into the software.
The Lock ID will be used as the address or name of the lock. When you upload information to the lock, the software refers to the Lock ID to determine what information is uploaded to that particular lock.
Add a Lock (Lock ID, lock location and lock type are required fields).
To add a lock enter:
Lock ID Note: Must be 6 digits. The software will add zeros to the front of any number that has less than six digits. Lock location can be a name, location or reference.
- Select the lock type
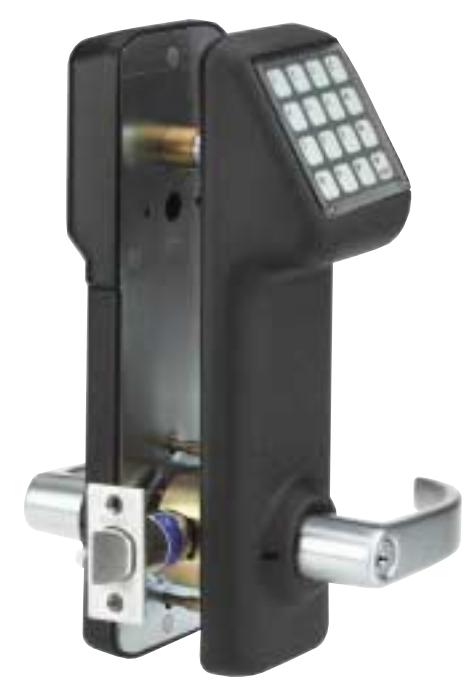
- i-Que: The original i-Que, identified by 4 digit serial number. This number is written on the outside backplate under the gasket.
- i-Que Next Generation: New lock design with increased features. If your i-Que lockset has a six digit serial number, you have a Next Generation i-Que. This number can be found on the outside backplate under the gasket.
- i-Que Prox: Lockset with HID proximity capability. Easily identified by the antenna on the front housing.
- Click Add.
- The lock will appear on the list of locks ID's on the right side.
Removing/Editing a Lock:
To remove or edit a lock:
- Select the lock from the Lock ID list.
- Update the information and select Update or Delete .
- Select Close when finished.
Group Maintenance:
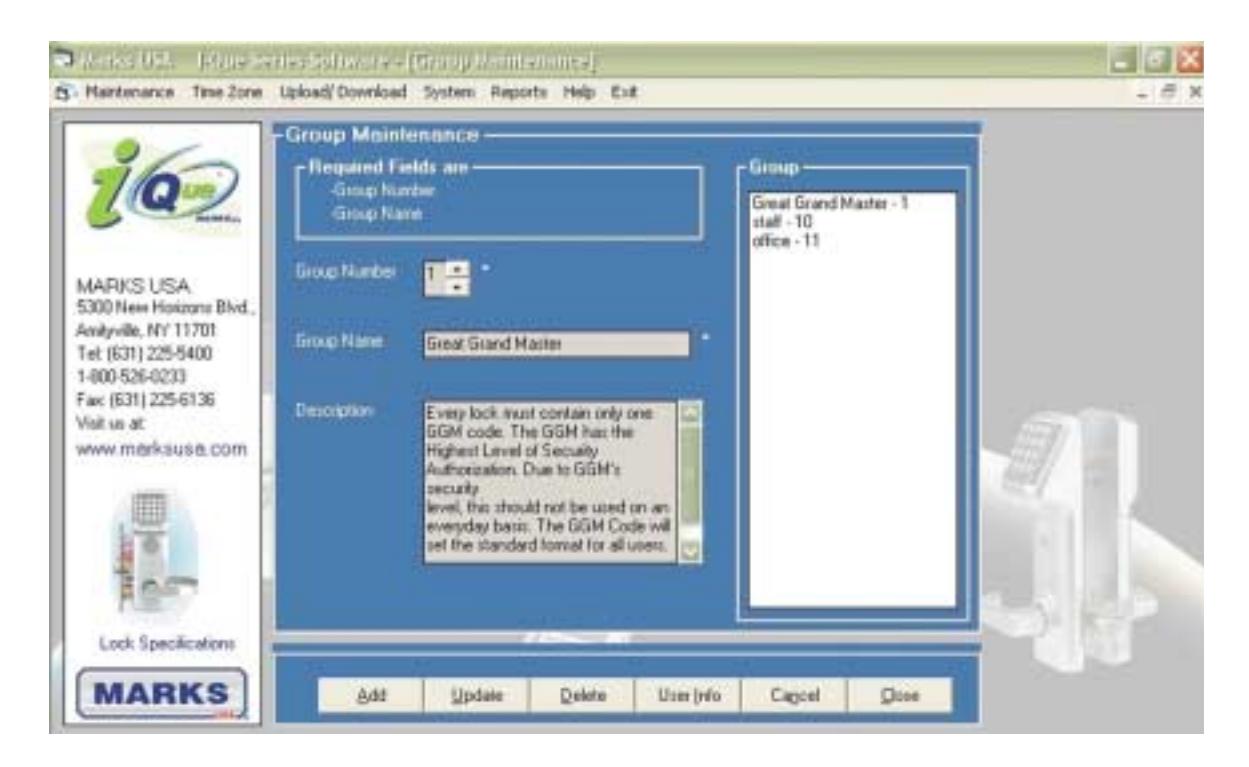
To open the Group Maintenance Form , select the menu option Maintenance > Group . Group number range from 1-99. Groups 1-9 are for management. Management Group names are shown in yellow when being created. Group 09 on the i-Que Next Generation and i-Que Prox will toggle the lock in and out of passage mode . The remaining Groups (10-99) have no name assigned to them, you must assign a name. Group Name is a required field. Groups must have a unique name.
Add Group:
To create new Groups:
- Select a number (1-99) you want to assign to the new Group. The Groups number already assigned will be colored gray. Enter a unique name for the Group.
- Click Add button. The description field is for entering the comments pertaining to that Group and is not a required field.
Edit Group:
- To update a Group, select a Group from the Group list.
- Make your changes and then click Update button.
Delete Group:
- To remove a Group, select a group from the Group list.
- Click Delete button. This will permanently remove that Group. Note: you cannot delete a Group that has users assigned to it.
User Info:
- Select a Group from the Group list.
- Click User Info button. This will show all users assigned to that Group.
User Maintenance:
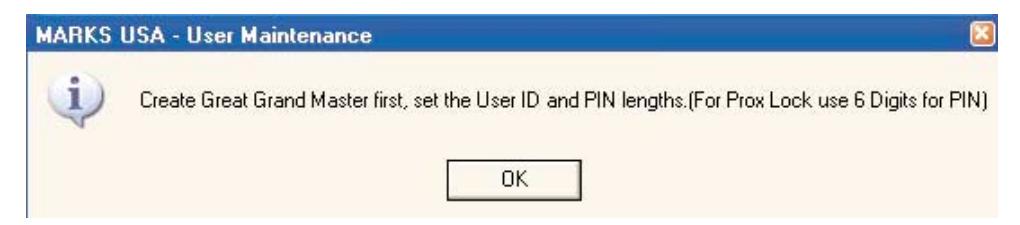
Before any User is created, the system will prompt you to create the GGM . It is also indicated that the GGM for i-Que Prox should have 6 digits PIN. Click OK and proceed.
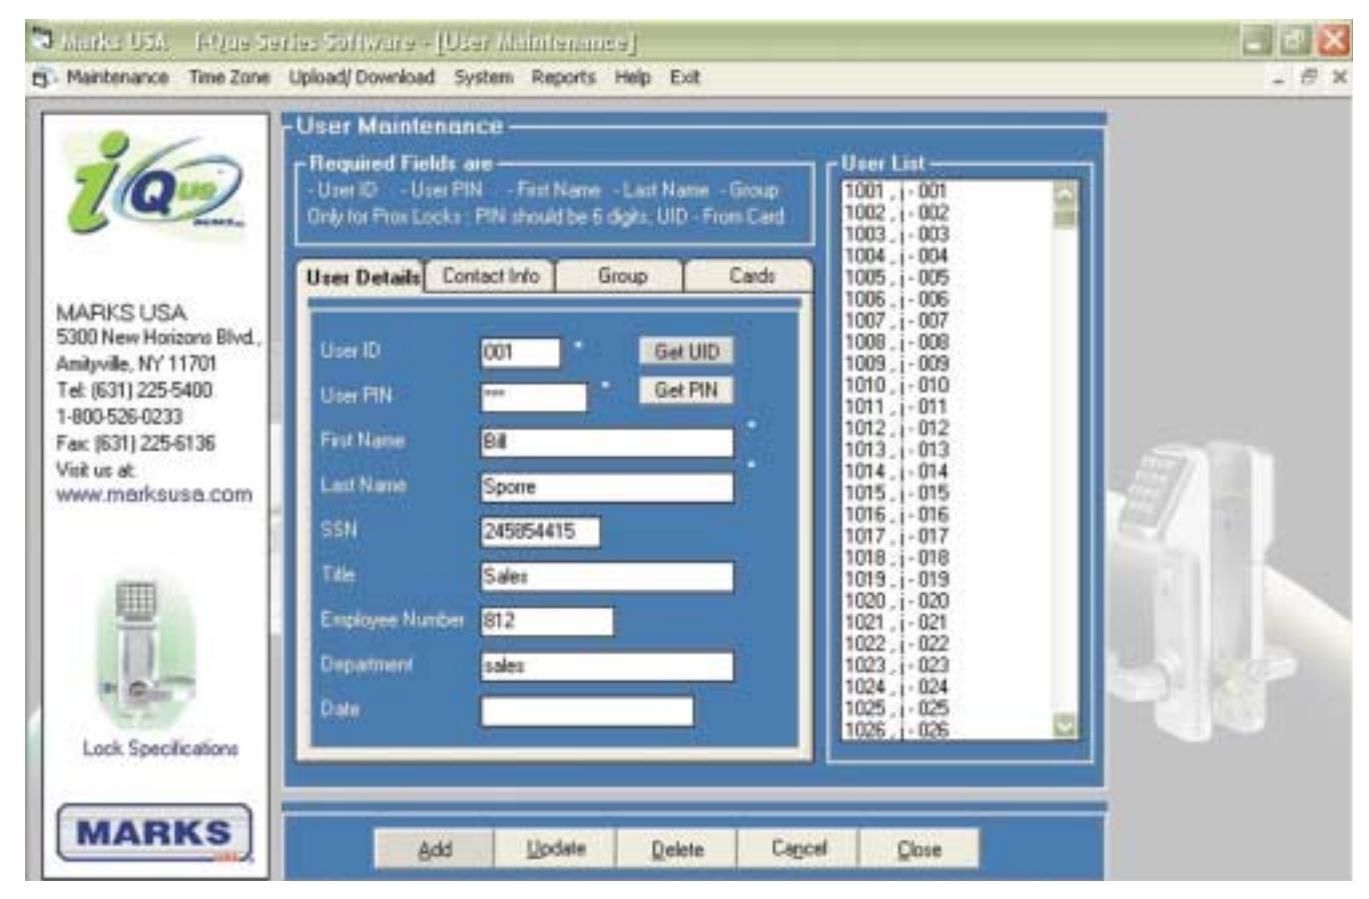
To open the User Maintenance Form, select the menu option Maintenance > User .
This screen is where all the Users are created and maintained. Required fields are User ID , PIN Number , First Name , Last Name and Group Level . The UID and PIN numbers must follow the same structure as the GGM code. UID and PIN's can be randomly generated by clicking on the Get UID and Get PIN buttons or they can be entered manually .
Adding Users:
User ID:
The User ID can be added manually with the number of your choice (must be unique) or can be randomly generated by the software. Simply type the desired code in the User ID field or use the Get UID button. This number will remain visible during both Add and Update functions. It also appears next to it's associated name on the list of Users to the right. This is the UID number that will appear in the audit trail next to an event.
PIN Number:
The PIN number can also be added manually, or generated randomly using the Get PIN button. When creating the User PIN number using the Get PIN button, the PIN number will appear in the PIN Number field of the pop-up box. Copy the PIN number to your records. After you accept the PIN, check yes . The box will close . This PIN number will NOT be shown again and does not appear in the box on the User Form or on the User list to the right and will only appear as stars (ie: "*****").
Batch User Transfer:
Under the system drop down menu, click Batch User Transfer . The Batch User Transfer module assists in appending multiple users. This allows importing User details from existing systems to i-Dat software. A batch.xls file is installed by default. It contains the required fields for performing the transfer.
User ID* User PIN* First Name* Last Name* Assigned Group*
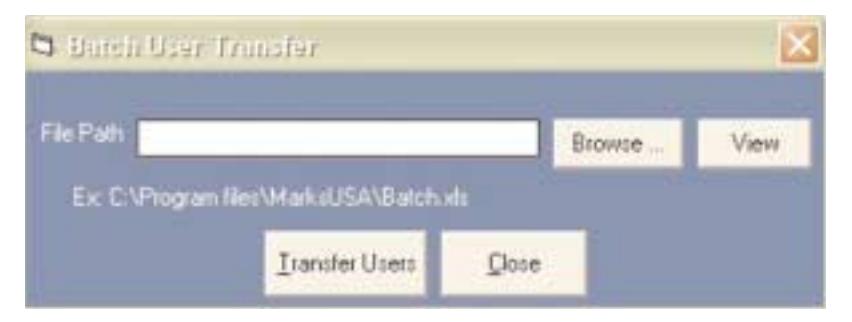
- Click browse button.
- Highlight Batch.xls .
- Click Get File .
- Press View button to open the Excel file.
- This will map data to the application fields. Ensure that Microsoft Excel is installed in the computer to open the Batch.xls file.
- Do NOT rename the file name. In the Excel file, the fields marked with a star are required. If these fields are blank, the system will give an error message. Ensure that the UID and PIN match GGM settings. Do not change the field lengths .
- After entering the data or cut / pasting the data from the source file, click Transfer User button. Then click Yes .
Note: You must have GGM and all required groups installed in software to run this utility.
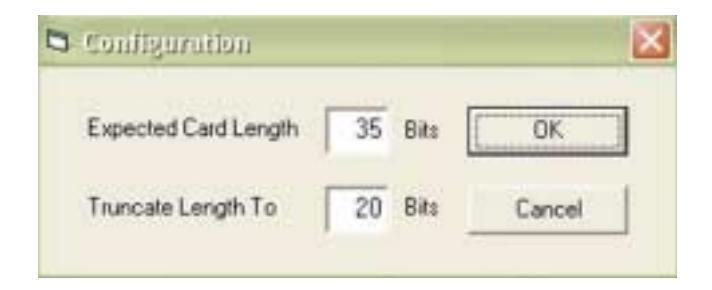
PC Prox Module - Setting up the software for the Prox Enroller:
The connectivity can be tested by going to Main Menu System - PC Prox Device - Test . For Configuration on the Prox card enroller.
Ensure that the correct settings are present
Main Menu Systems - PC Prox Device - Configure
For 26 bit HID card, the expected card length should be 24.
For 37 bit HID card, the expected card length should be 37.
To test the reader, connect the reader to the computer and then press the Test button. If the reader is not connected, the following message will be displayed. The software supports USB and serial type readers.
Assigning Users to a Group:
Each user must be assigned to a Group. Click Group file tab. Select a Group from the list shown then select the right arrow > button to move the Group name to the Assigned Group list.
Note: If the Group you want to use is not in the list, then that Group must be created.
(See Group Maintenance for more information.)
Once you have filled out the User's information, select Add button to complete.
Edit User Details:
The User's can be searched by name. From the list on the right, click on the User you wish to edit. Edit the details of the User and then click Update button.
Delete a User:
Select the User to be removed from the system by clicking on the name. Click Delete button.
Note: You cannot delete a User if they are assigned to a Time Zone. You must first un-assign the User from the Time Zone, then delete the User.
Contact Info: Ensure that the telephone number has numeric value and the format does not include spaces.
Example: 18003332222
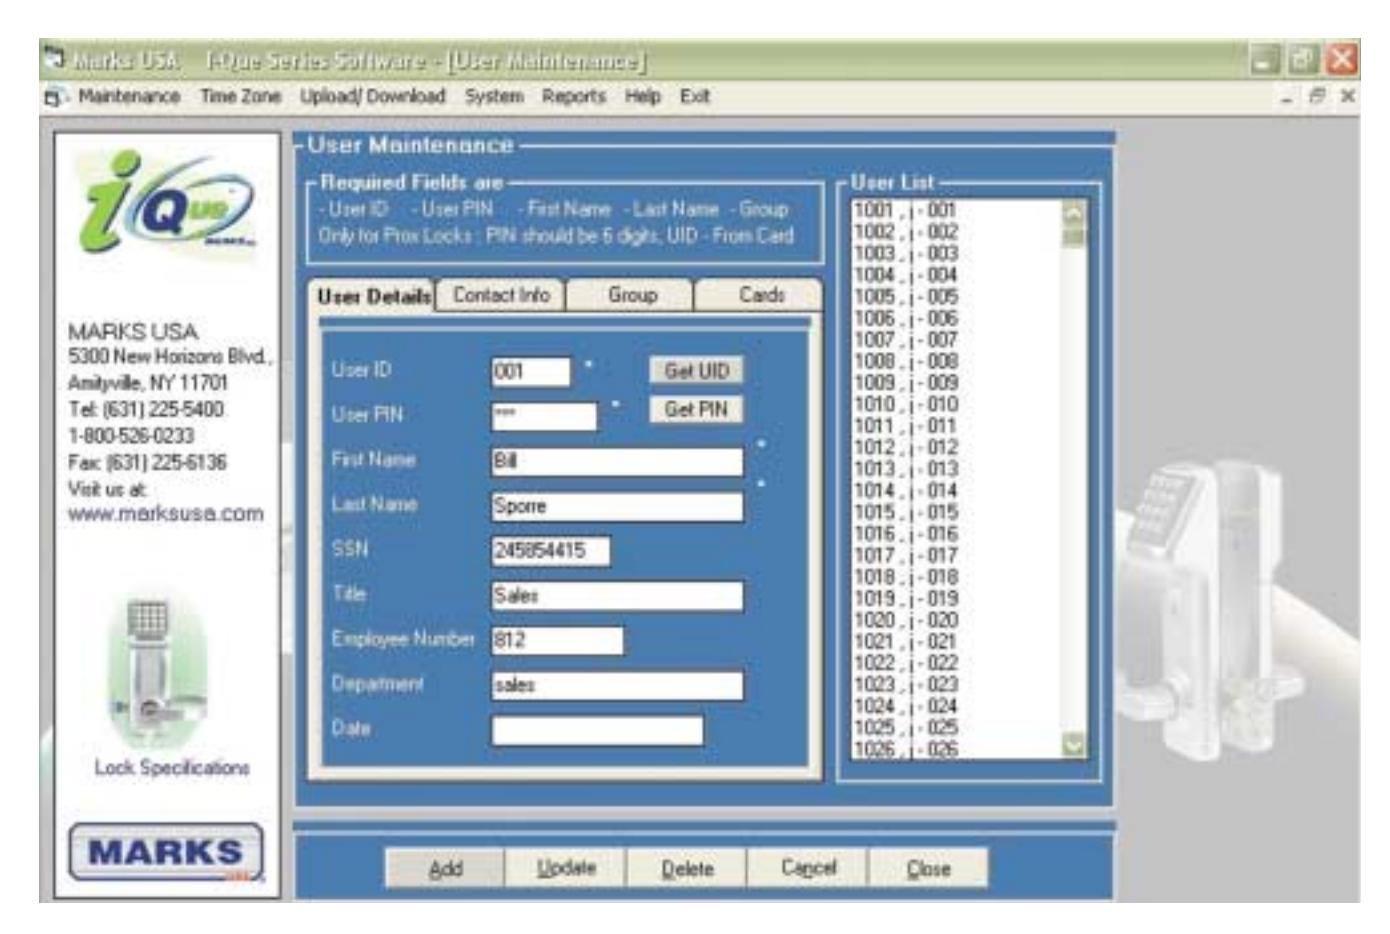
For i-Que Prox locks, the user has to be assigned to one of the available cards. Use the > arrow key to assign the card to the User. To make cards available, go to Maintenance - Card . (Refer to Maintenance - Card section for details)
Card Maintenance:
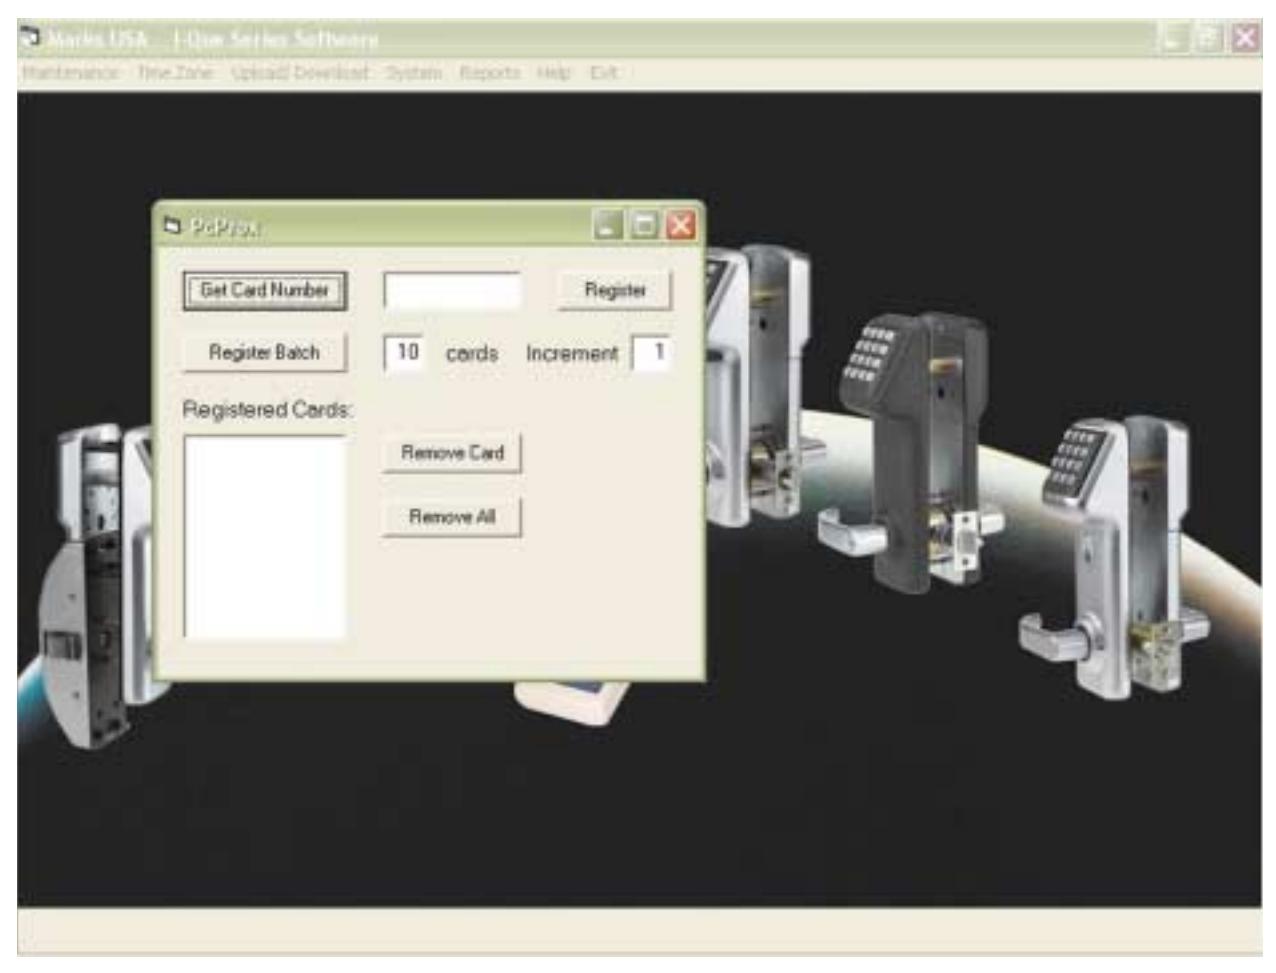
This section is only applicable for i-Que Prox locks.
This module is used to register the cards to the system to ensure only authorized cards are recognized. First, check that the card reader is connected to the appropriate port. Make sure you have the 26 or 37 bit HID formatted cards.
- Place the card on the reader
- The red light on the reader will turn green, indicating acceptance of the card.
- Click Get Card Number .
- The card number will be shown.
- Press Register button. The Register button will add the card number to the available list. If a series of cards is being enrolled, the Register Batch button can be used.
To Use Register Batch:
- The first card must be registered by using Get Card Number , then Register button.
- Indicate the number of cards that you want to register, and select the increment number. Make sure all cards are available before registering.
To Remove Card:
- Select the card number from the Registered Cards List .
- Press Remove Card button.
Be sure no User is assigned to the card or an error message will be received. You can un-assign the User by: Maintenance - User - Card - Un-assign . Once all Users are un-assigned, the Remove All button can be used to remove all the registered cards from the system. If you press the Remove All button, only cards which are un-assigned from the User will be removed. Cards which are assigned to a User will not be removed. To exit from this screen, click X on the right hand top corner of the window.
Holiday Maintenance:
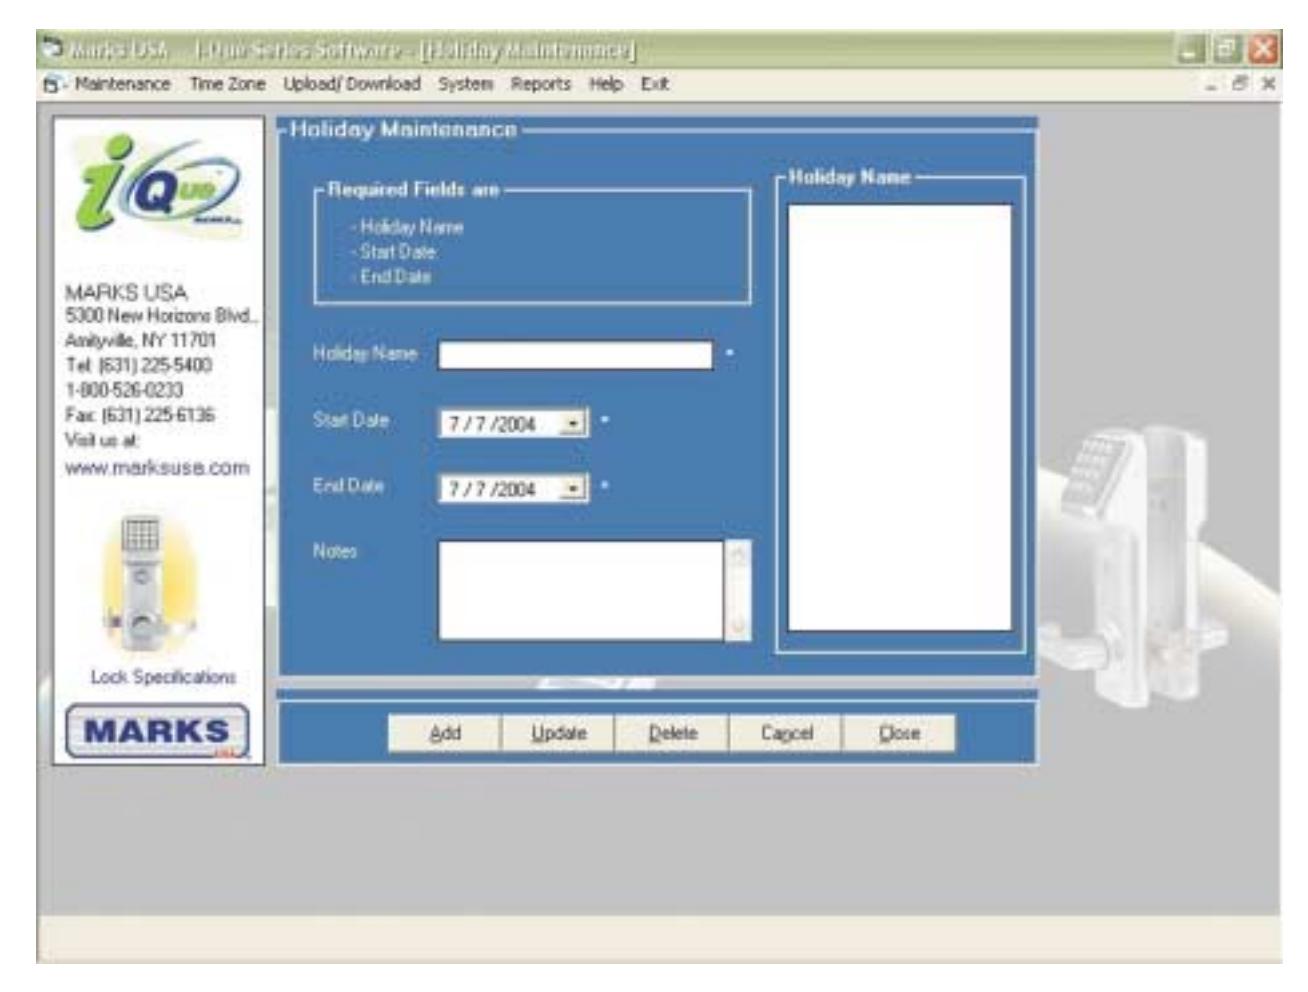
To open the Holiday Maintenance Form , select the menu option Maintenance - Holiday .
This allows you to set all the company holidays in advance. Once the holidays are set, they will automatically override the set schedules, denying access to Users (Groups 10-99) on those days. Holiday scheduling must be maintained yearly. Past holidays do not delete automatically or adjust for day/date.
Note: Each holiday must have a unique name assigned to it. There MUST be at least one holiday added in order for the software to run correctly.
A block of time with a start date and end date is considered one holiday. The default date shown is the current date. The end date must be greater than or equal to the start date.
Adding a Holiday:
To add a holiday, enter the Holiday name.
- Start date. (Required field)
- End date. (Required field)
- Click Add button.
Removing/Editing a Holiday:
- Select the holiday from the Holiday list.
- Click Delete or change the desired information.
- Click Update button.
Time Zone Management:
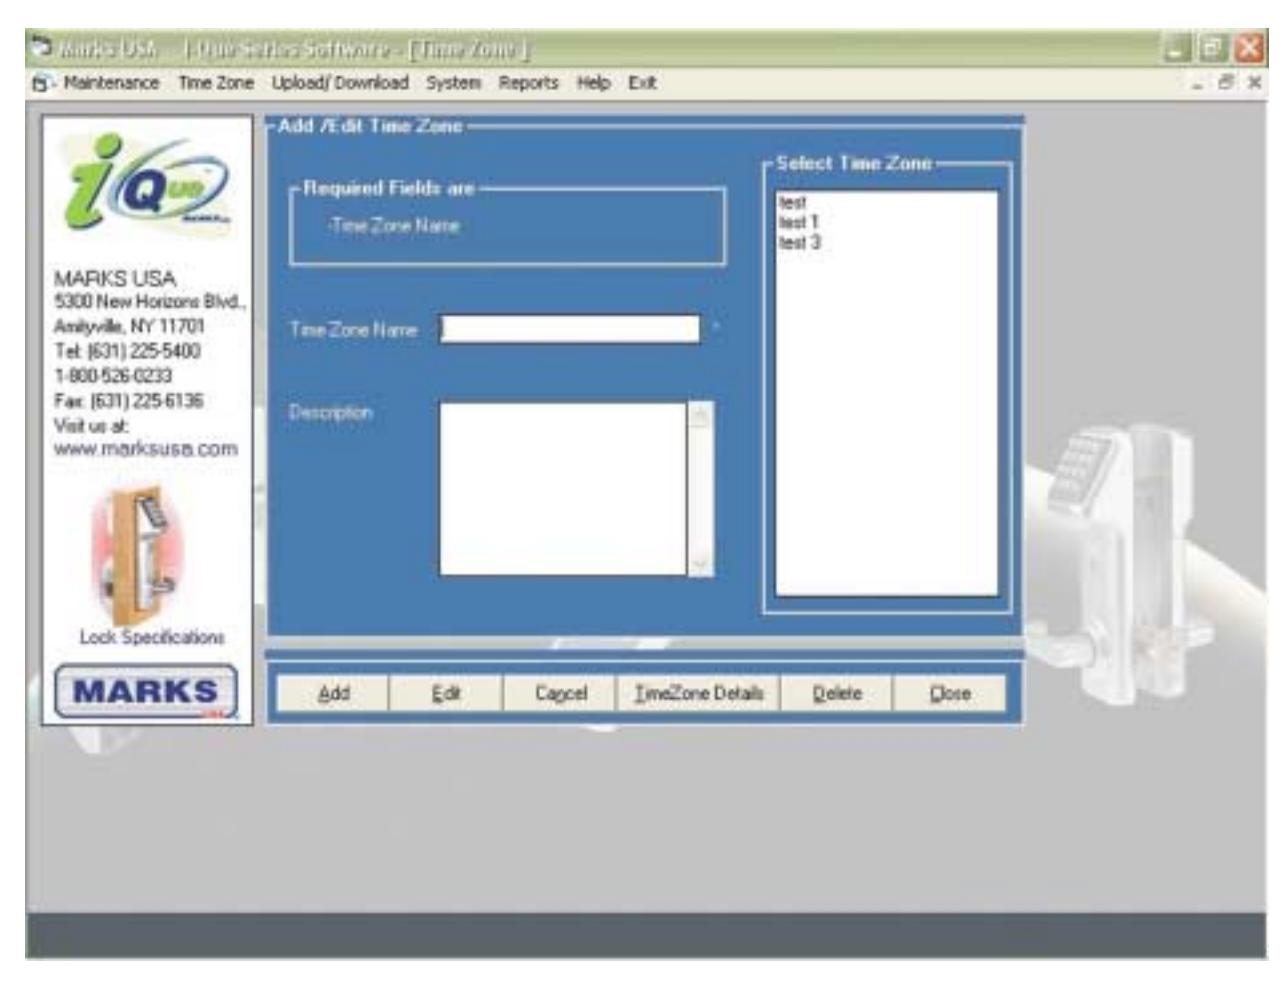
To open the Add/Edit Time Zone Form , select the menu option Time Zone > Manage .
A Time Zone gives you the ability to manage a group of locks at one time. The locks assigned to a Time Zone should have the same Users and settings.
For Example: A building with four floors and twenty-five locks on each floor can be programmed as four Time Zones, one for each floor, by using the Time Zone screen. The Time Zone screens will allow you to change the locks configuration, create temporary Users and create schedules for Users and Groups that are assigned to that Time Zone.
Passage Schedules:
Note: Each Time Zone must contain only one lock type (Example: i-Que, i-Que Next Generation or Prox).
Adding a Time Zone:
- Enter the new Time Zone's name (required) and optional description. Note: Time Zone Names cannot contain these characters: @ ^ # ( ) ; \ ? /
- Click Add button. Click OK on the confirmation message. The new Time Zone will appear on the list.
To Manage a Time Zone:
- Select the Time Zone from the list.
- Click on the Time Zone Details button.
This will bring you directly to the Time Zone page for the selected Time Zone. This screen is where you can manage:
- Locks assigned Users assigned
- Temporary Users Groups denied
- Lock configuration Scheduling
Time Zone - Assign Lock:
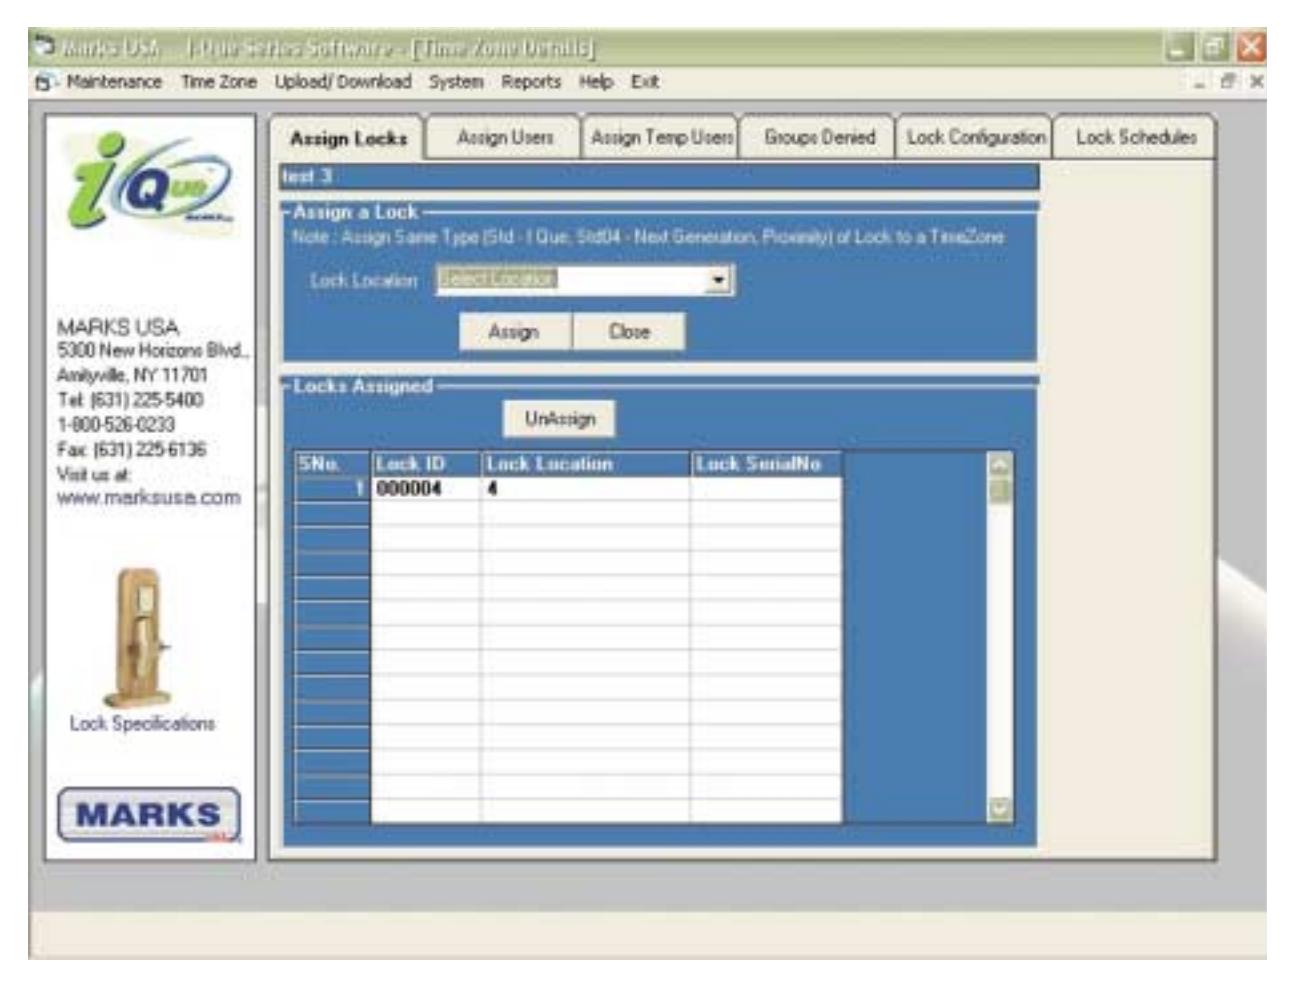
Assigning Locks to a Time Zone:
Click Assign Locks tab in the Time Zone details section.
To Assign a Lock (locks must be added in the Lock Maintenance section).
- Choose a lock from the Lock Location pull down menu. Next to each location, the type of lock code is displayed. This is to ensure that a Time Zone must have the same lock type. The type codes are:
- Std for i-Que locks.
- Std04 for i-Que Next Generation.
- Proximity for i-Que Prox.
Once you have selected the lock, click Assign button. Now the lock will appear in the Locks Assigned list.
Note: Each lock can only be assigned to one Time Zone. Once that lock is assigned to the desired Time Zone, the lock will be removed from the available lock list.
Un-Assigning a Lock:
- Select a lock from Locks Assigned list.
- Click Un-Assign button.
- Click YES to remove the lock from that Time Zone.
Time Zone - Assign User:
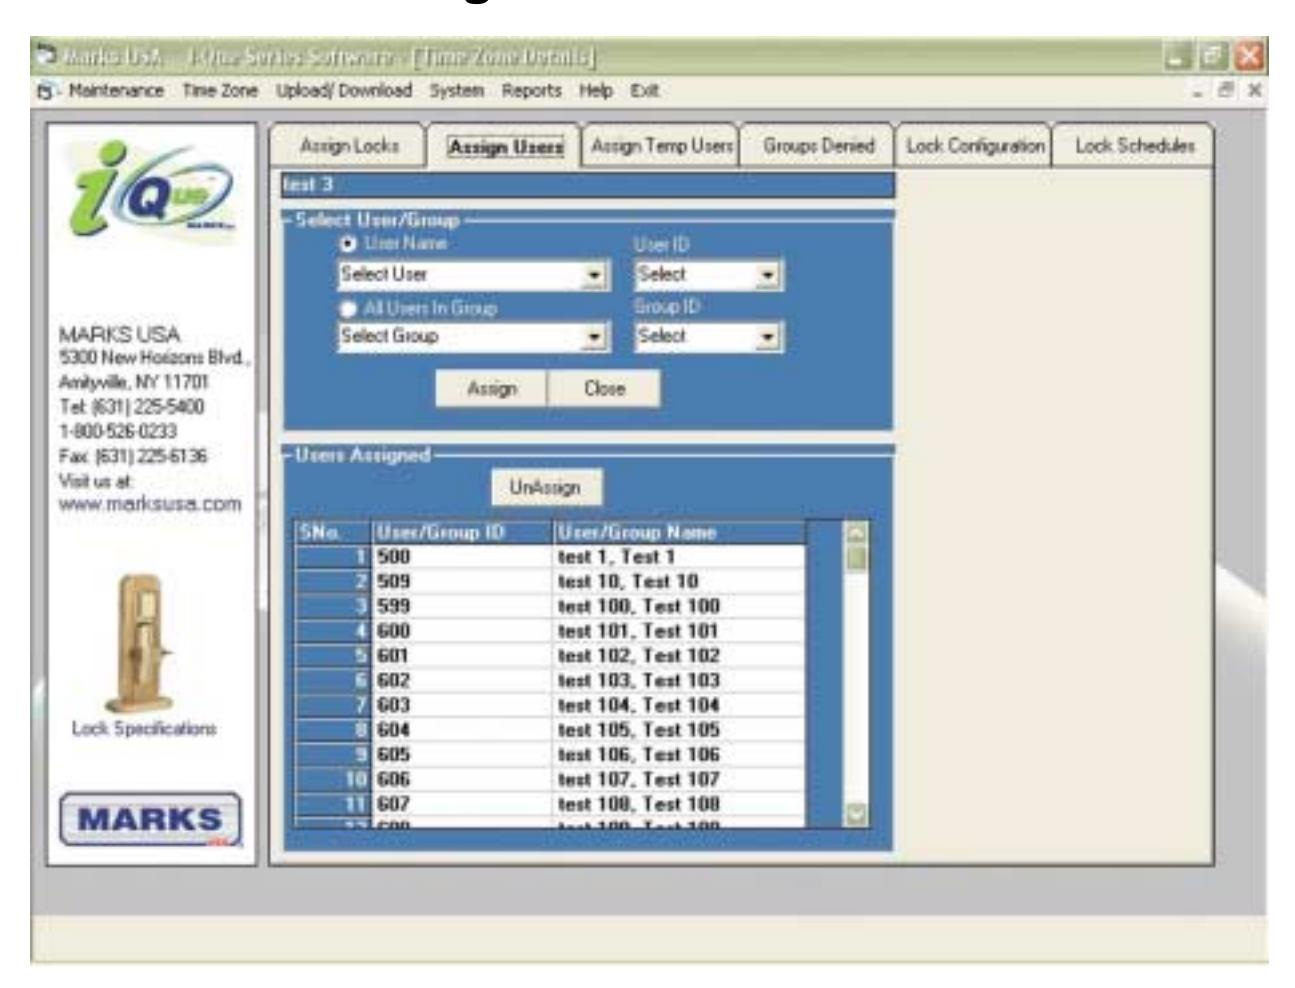
Click Assign Users tab in the Time Zone details section. This screen will show all Users that are currently assigned to the Time Zone you are working on.
To Assign a User by name to the Time Zone:
- Select the option User Name.
- Choose the User from the drop down menu, enter the User UID or User Name in the appropriate field. You can also assign Users by their Groups.
- Select the check box marked All Users in Groups , select the desired Group from the available Groups pull down menu. This will assign all the Users in that selected Group to the Time Zone.
- When using the drop down arrows, Groups can be selected by Group Name or by Group ID number by using the corresponding field.
- After clicking your selection, click Assign button.
- Click OK on the confirmation message box.
Note: Great Grand Master (GGM) is automatically added to all Time Zones. All locks managed by the software must have the same GGM.
Un-Assign User:
- Highlight the name on the list.
- Click Un-Assign button.
- Click YES on the confirmation message box. The User will be un-assigned from that Time Zone.
Time Zone - Temporary User:
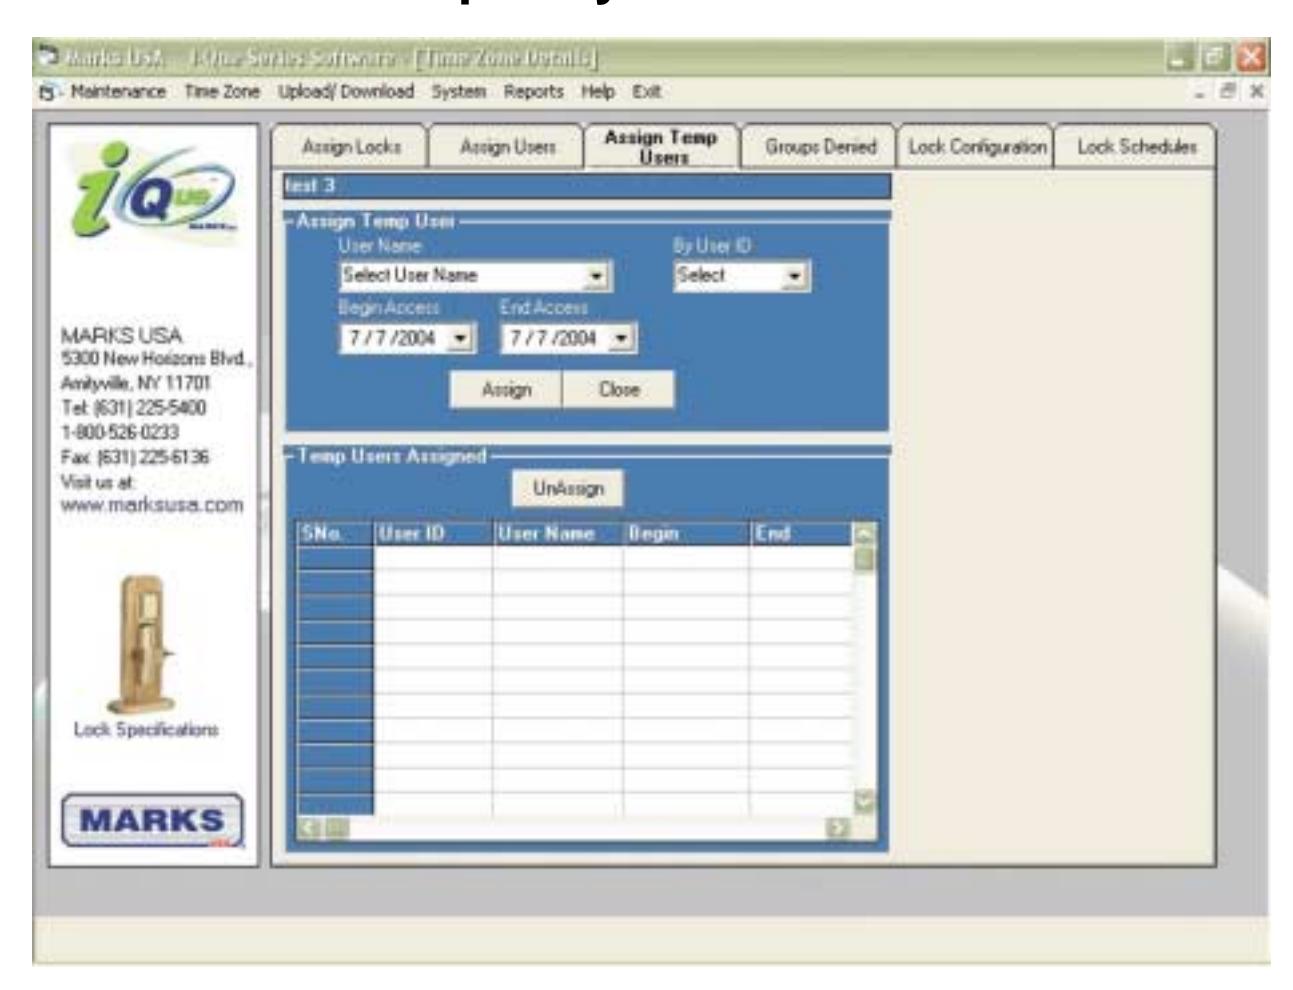
This allows you to make an existing User a Temporary User for a specified period of time. ( If the User does not exist create the User as outlined in the User Maintenance Section ).
- Click Temporary Users tab.
- Select User Name or User ID from the pull down menu.
- Assign that User Begin Access date for this User with the drop down calendar.
- Assign that User End Access date for this User with the drop down calendars.
The User will now be added to a Temporary User List. Temporary Users are not given any time of day constraints. In order to limit access of your Temporary Users to a specific time frame, you must create a Group Schedule for Temporary Users.
Note: It is recommended that you create separate groups for Temporary Users to make managing them easier. Temporary Users will remain in the system, ( even after temporary schedule has expired ) unless deleted, and when Temporary Status expires, will be denied entrance until new access dates are granted or the User is returned to Non-Temporary User Status. You can assign multiple dates to a temporary User.
Time Zone - Groups Denied:

This restricts access of a Group to the lock.
This will remain in effect until Group access is restored.
- Select the Groups Denied tab.
- Select the Group that you wish to deny by selecting the Group Name or the Group Number .
- Click the Deny Group Access button.
- The Group will appear on the Groups Denied list below. This is a list of all Groups currently denied access.
To Restore Access to a Group:
- Click on the name of the Group from the Groups Denied list.
- Click the Allow Group Access button.
Note: Groups Denied via the software are not uploaded and therefore, denied due to exclusion of their codes in the lock. This makes it necessary to include the Group in an upload at a later time when you wish to restore access of that Group. Another option is to upload that Group but deny it at the lock ( See Function 10 in the Programming Guide ). Denying access in this way can be reversed at the lock by performing a Function 10 to restore that Groups access
Time Zone - Lock Configuration:
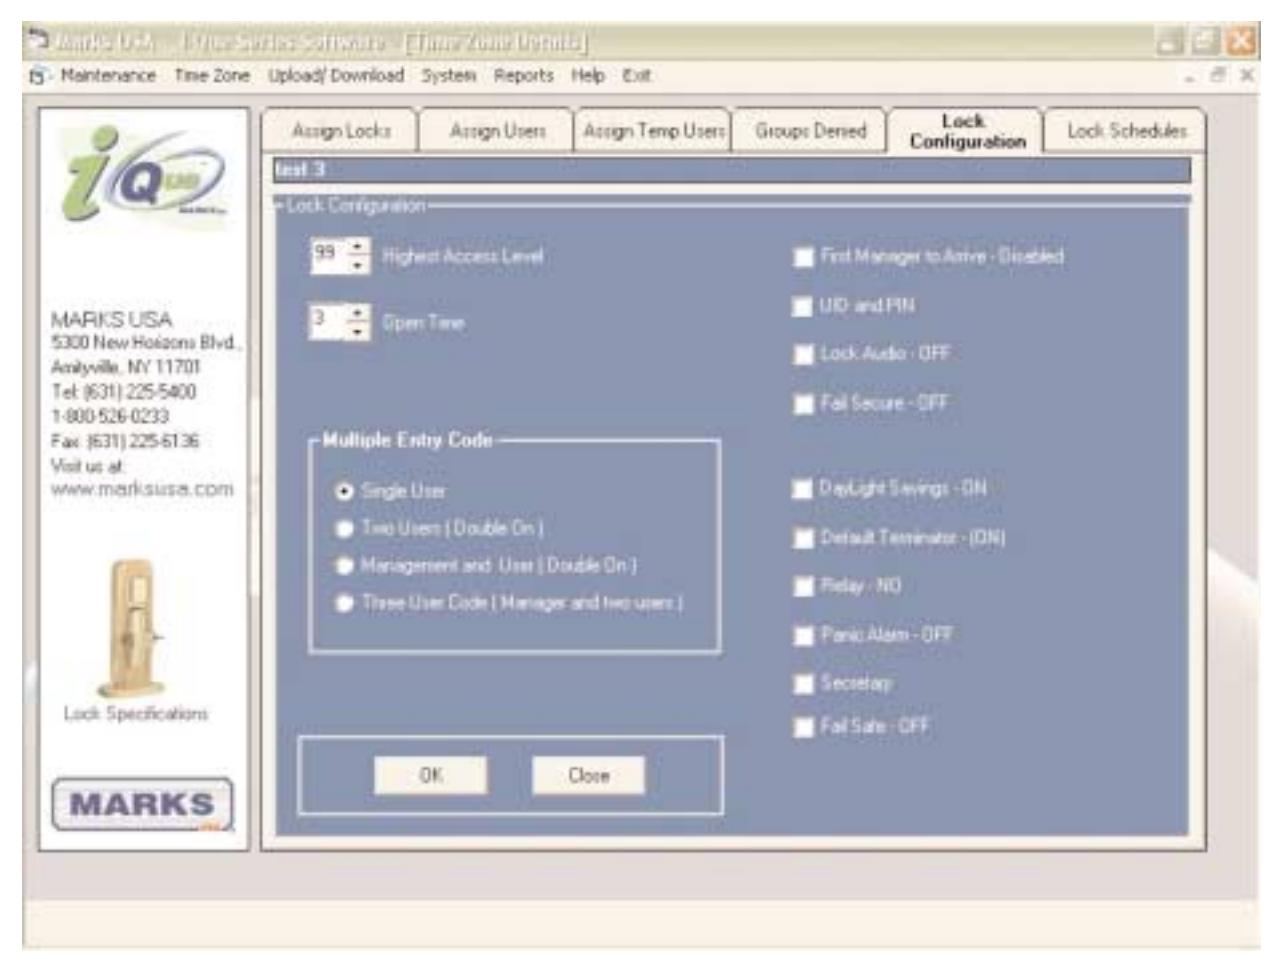
This section lets you enable or disable features as well as set parameters such as open time and access level. To change the state of a feature, click the box or bullet and the function will be toggled on or off. When you are finished be sure to click OK to save the changes.
Note: All locks assigned to the same Time Zone will have the same lock configuration, which is transferred to th locks during an upload. The configuration displayed is based on the Lock type selected. The software supports i-Que Lock, i-Que Next Generation and i-Que Prox locks.
These feature definitions are provided with their default values listed.
Highest Access Level: The highest Group level that will have access to the lock
Default = 99 ( all Group levels allowed ).
Open Time: The amount of time the lock will remain in the open state after the code is entered.
1 - 9 seconds. Default = 3 seconds.
IR Interrupt: (For i-Que locks ONLY) This is to prevent future infrared devices from
communicating with the ports. Leaving this feature set to disabled does not restrict
the use of the i-Dat. Default = Disabled.
Fail Secure: When the batteries fail, the lock will shut down in the last state the lock was in at
the time of battery failure be it locked or unlocked. Turning this function on will monitor the batteries and save enough power to relock itself before shutting down
due to dead batteries. Default = Off.
Fail Safe: When the batteries fail, the lock will shut down in the last state the lock was in at
the time of battery failure. ( Locked or unlocked ) Turning this function on will monitor the batteries and save enough power to unlock itself before shutting down
due to dead batteries. Default = Off.
Lock Audio: When enabled gives an audible "beep" when keys are depressed. To conserve
power this function's default is off.
Daylight Savings: Enables automatic Daylight Savings Time correction.
Default = On. (See also Function 12, Page 3 in the Programming Guide).
UID & PIN Required: By default Users are required to enter both User ID and PIN for access. To shorten
the code length, change this setting to PIN only, the Users need only enter their
PIN to gain access.
First Manager to Arrive: When enabled this function overrides the set schedule until a Management level
code is entered for access. The set schedule will then resume allowing access
of scheduled User codes. Default = Off.
Panic Alarm: ( See i-Que wiring instruction ) When enabled, 911* sends alarm output.
Relay: ( See i-Que wiring instruction ) Normally Closed may be selected.
Default = Normally Open.
Secretary/Private Mode: Selectable Privacy mode is factory installed option.
Default Terminator: Switches the function of the "*" and the "#" key. ( Default is "*" . ) This function is
to add another layer of security to your system. The Terminator On only available
on Next Generation i-Que's may be turned off.
Double Code Entry: This function requires an additional User to enter his/her code to gain access to the
door. This function has four options.
Single User - Requires only one valid User code. (Default setting)
Two User - (Double On) Requires two User codes.
Manager and One User (Double On) - Requires two User codes. One must be
management Group level 4 or higher.
Three User Code - Requires one manager and 2 Users.
Note: Once the first User enters their code the second User must start entering
their code within five seconds or they will be timed out.
For information on performing these functions at the keypad, see the Programming Guide .
Note: All locks assigned to the same Time Zone will have the same lock configuration, which is transferred to the locks during an upload.
Time Zone - Lock Schedules:
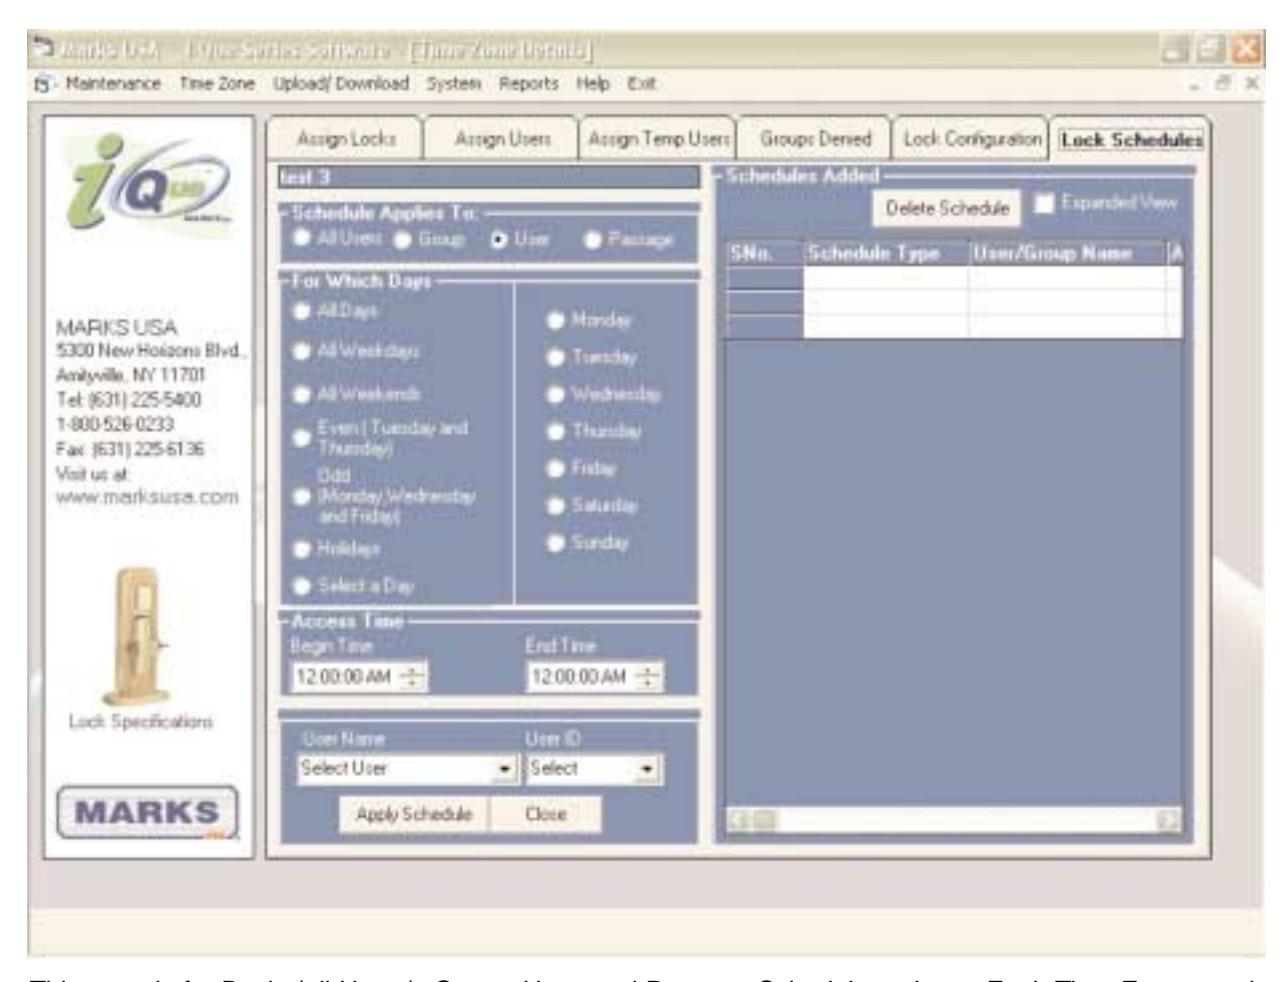
This page is for Basic (all Users), Group, User, and Passage Schedule options. Each Time Zone may have multiple schedules to create the security needed for your organization.
Notes on Scheduling Options:
Basic Schedule:
- Designed for systems in which all Users (Groups 10-99) have the same access rights.
- Can create schedules defined by times of day and/or days of the week.
Group Schedule:
- Allows you to define the schedule for different Groups of Users.
- The Group name or Group number in pull down menus selects groups.
- Groups can have multiple schedules.
- Allows the ability to restrict access by time of day and/or day of week.
User Schedule:
• Is intended for Users that fit into a Group but have a few exceptions or additional requirements. Permits access according to set days and time.
Passage Schedule:
Allows you to schedule the lock to unlock itself (passage mode) giving unrestricted access for the scheduled period of time.
Note: The Basic (all Users) schedule cannot be used in conjunction with Group schedule of User schedules. Once you have selected the schedule that fits your needs, select Day or Days the schedule will be in effect for. Select the Start Time and End Time for the schedule. If you are working with the User or Group schedule, select the User or Group that the schedule will be affecting.
Configure Serial Port:
Connecting the i-Dat:
The first step is to connect the i-Dat to your computer via a serial cable ( included ). Press the button on the i-Dat front panel once and ensure that the LCD screen is showing the version, date and time.
Note: This screen must be showing in order for the i-Dat to go into the battery saving mode when not in use. The i-Dat will go into battery save mode after 4 minutes.
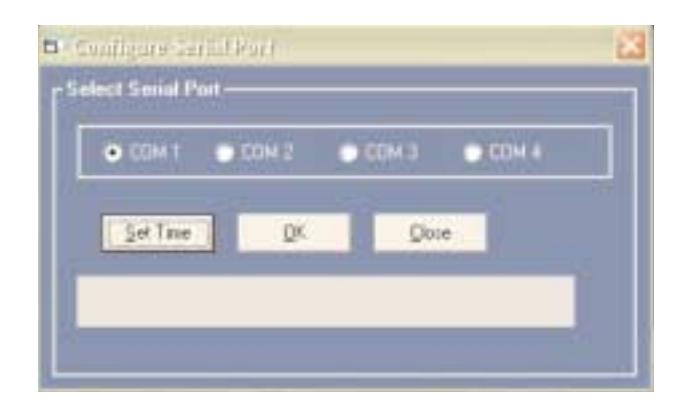
From the top menu select Upload/Download then Configure Serial Port . The Screen above will be displayed . COM 1 is the default setting. If this is not the correct port, select the correct one. If you are not sure which port is correct, select one, then select Set Time button.
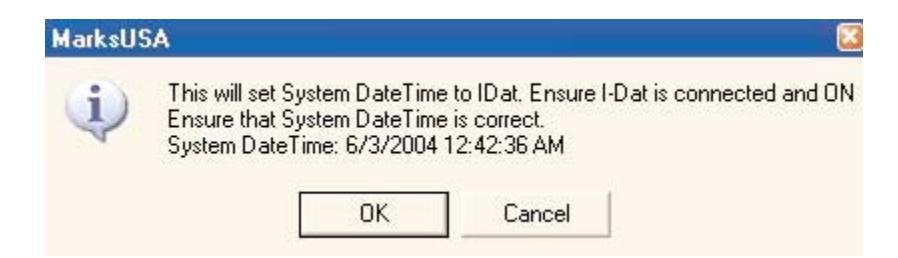
This will reset the i-Dat time and day stamp to match your computer. If you receive the error Upload i-Dat Sync - Failed , press the button on the i-Dat and select another COM Port. When the connection is working properly, the command box will state, "The date and time successfully set" . To clear the memory of the i-Dat, click Upload/Download from the top menu and click Reset i-Dat Module .
CAUTION: Always confirm that the date and time on the i-Dat are correct before performing upload or download at the lock or date and time errors will occur.
Resetting the i-Dat Module:
The i-Dat must be reset with each new operation, whether it is downloading an audit trail or uploading Time Zones.
With the i-Dat connected, select the button that states "Reset the i-Dat Module" . When you receive the message "Reset Completed" , the memory is cleared . This prevents obsolete data from being uploaded and maximizes memory storage space.
Upload Time Zone:

To Upload a TIme Zone to the i-Dat:
- Select the Time Zone you wish to upload from the Available Time Zones list.
- Click right arrow > button to move the selected Time Zone to the list on the right.
- Select the Upload button.
The system will prompt you that the time will be set to match your PC's date and time.
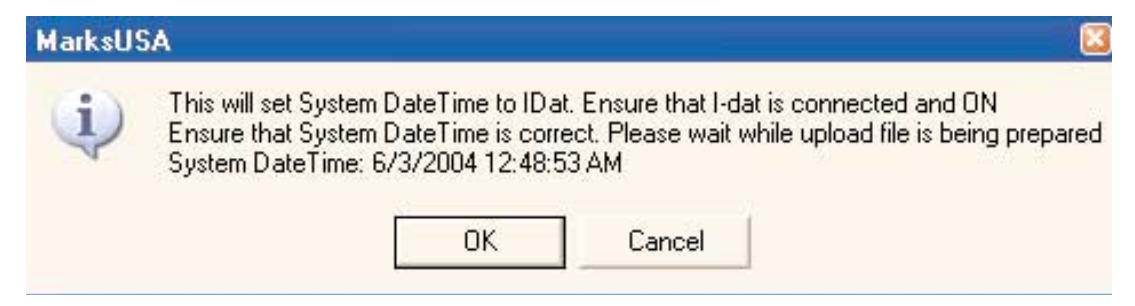
Check that the date and time on your system are correct or scheduling and audit trail errors will occur. Please note that at the time of upload the i-Dat version screen should be on by pressing the button on the i-Dat once. Click OK . The software will move the selected Time Zone information to the i-Dat. On successful upload User is prompted with Upload Successful message and the screen disappears. The i-Dat is now ready to transfer data to the lock.
If the i-Dat is not connected to the port properly or if you have not selected the correct port, an error message will tell you to connect the device to the proper port. Refer to Programming Guide for Uploading data from i-Dat device to the lock. (Function 14 - Page 26)
Download Audit Trail:
See Programming Guide, FUnction 15, for downloading the Audit Trail from the lock. Remember: You must download Audit Trails from the locks you want to Audit.
- Connect the i-Dat device to the computer.
- Press the button on the i-Dat once to show version screen.
- On the top menu, select Upload/Download .
- Download Audit File .
- Click Download button.
- The Audit Trail data will be imported into the application.
Refer to the Reports Sections for instructions on viewing the Audit Trail information.
Report Section:
The Report Wizard Option in the Software enables you to view the Data in the Application and print it. From the top menu select Reports > Report Wizard. Then select the report type you wish to view by using the pull down arrow.
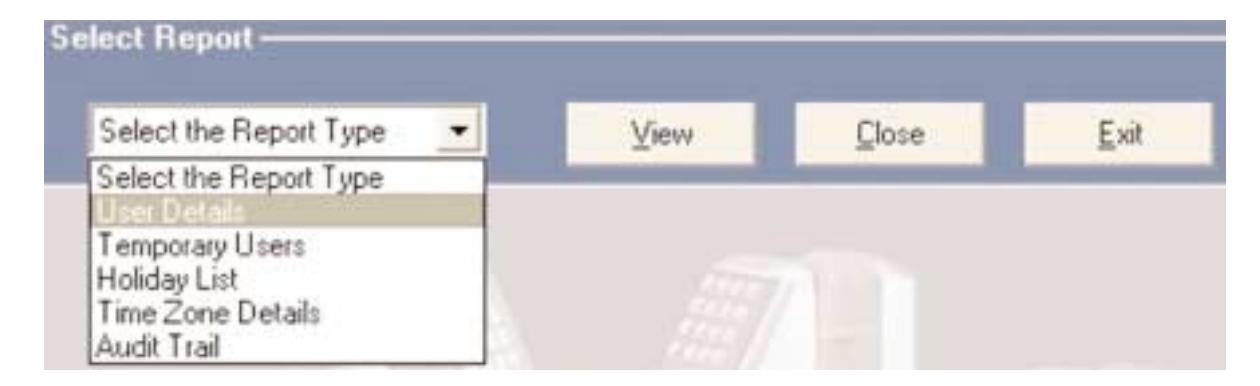
The Report Wizard offers the following options:
User Details Report:
Choose User Details option and click View . This will generate a report with a list of Users in the system. In this Report, you can navigate by Group in the preview column and the scroll bar to see the assigned Users.
Temporary Users Report:
Choose Temporary Users option and click View . This will generate a report with the list of the Temporary Users with their permitted dates and the Time Zone they have access to.
Holiday Report:
Choose the Holiday option and click View . This will generate a report with the list of Holidays with their Start date and End date , and Yes or No indicating if the particular holiday has passed or is still active.
Viewing the Audit Trail:
Choose the Audit Trail option. select the search criteria that best matches your requirements then click the Generate Report button for that option. Those options are described below.
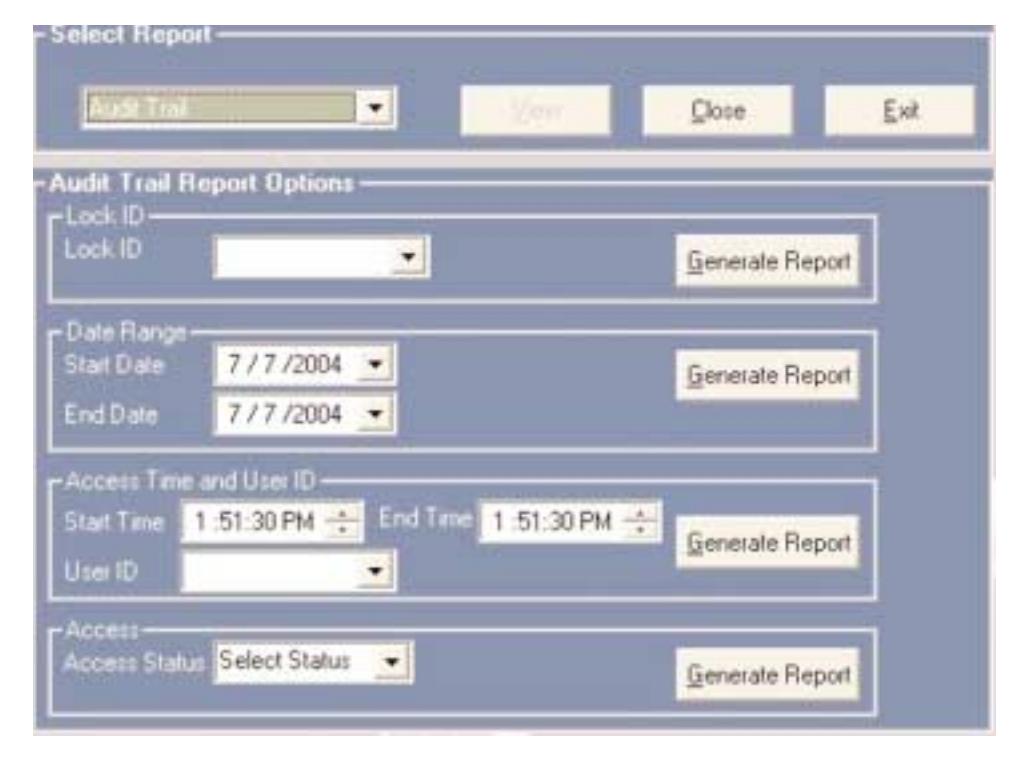
- If you select the Lock ID from the drop down list and click Generate Report , it will display the Audit Trail* for that particular Lock ID only.
- If you select the Date Range by giving the Start Date and the End Date and click Generate Report , it will display the Audit Trail of all of the Locks* for the specified date range.
- If you select the Access Time and click Generate Report , it will display Users who have accessed the Locks* at that particular time . To restrict the report to a particular User, select that User from the list.
- If you select the Access Type* ( Error or Good ), click Generate Report to view the report.
Note: Audit Trail Data must be retrieved from the locks that you want to view.
( See Programming Guide Function 15 )
The Audit Trail information is limited to the amount of events that the locks memory can hold. ( See Programming Guide for information on lock memory maximums. )

Note: Use the refresh button (lightning bolt) to ensure that you are viewing all of the available data.
Time Zone Details Report:
Select Time Zone Details from the report wizard. Select a Time Zone Name from the list. Then choose a report option. Choose the option Select All to view the data of all of the Time Zones in the system. Options are described below.
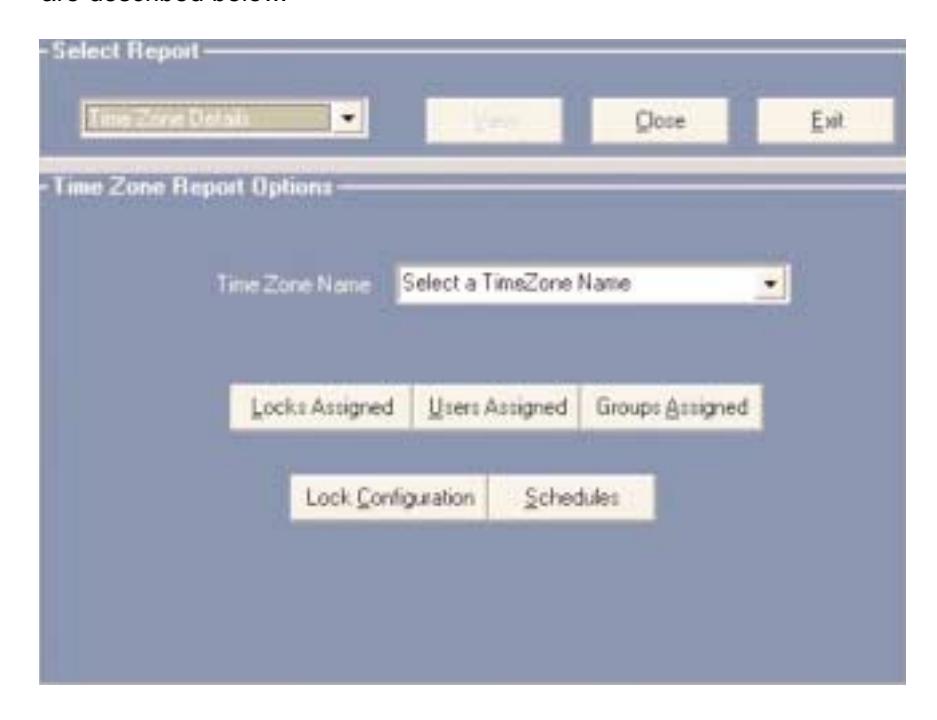
Locks Assigned: Will display all Locks Assigned to the selected Time Zones.
Users Assigned: Will display all Users Assigned to the selected Time Zones.
Groups Assigned: Will display all Groups Assigned to the selected Time Zones.
Lock Configuration: Will display the lock configuration of all locks in the selected Time Zones.
Scroll down in this report to view the Settings Legend.
Schedules: Will display all of the Schedules for the selected Time Zones.

Note: Use the refresh button (lightning bolt) to ensure that you are viewing all of the available data.
Frequently Asked Questions:
Q: When I try to upload the lock, I get an error "Not Found" on the i-Dat display.
A: The error "Not Found" indicates that the Lock ID is not in the Time Zone you are uploading and/or not entered into the software. Make sure the Lock ID is assigned in the software to the Time Zone you are trying to upload.
Q: Each time I try to upload or download , I get an error on the i-Dat.
A: The position of the i-Dat to the lock is critical and the infrared ports must be aligned correctly. Hold the i-Dat level just above the lever and centered left to right.
Q: I have entered in a Passage Schedule , now only managers have access.
A: Once you have implemented any scheduling you will need to grant non-management Users access times. Implementing an All-User, User or Group Schedule will solve this problem.
Q: I have uploaded a large number of Users and only some of the codes work.
A: You may have exceeded the maximum User capacity of the lock. The basic unit will allow 320 Users to be entered. For information on memory upgrades contact your distributor or Marks USA. ( Contact information on back cover )
Q: If I add a User at the door, will the software be updated?
A: No, for security reasons the information in the lock is overwritten by an i-Dat upload. Therefore, anything entered at the lock that is not present in the software database will be overwritten.
Q: I'm trying to assign a lock to a new Time Zone and I don't see the Lock ID in the available lock list.
A: This indicates that the lock is already assigned to a different Time Zone. The easiest way to find out what Time Zone that lock is assigned to is to run a report on Time Zone locks assigned. This will show you which locks are assigned to each Time Zone.
Q: The i-Dat batteries aren't lasting very long. Is the i-Dat defective?
A: No, the batteries in the i-Dat will last for about thirty hours of use, however their life is much shorter if the i-Dat is not allowed to go into battery saving mode. Press the button on the i-Dat so the "i-Dat version", date and time are showing. The i-Dat will (after 4 minutes) go into battery saving mode from this screen only.
Programming the Lock at the Keypad:
Important Definitions on the i-Que Lock
Factory Code: The factory code is 9991234. It is used to initialize the lock for a new installation or full reset. This code must be entered to set the Lock ID and the Great Grand Master ( GGM ). After the GGM code is set, the Factory Code will no longer be valid and is only re-enabled after a full reset.
Lock ID: A unique six digit number entered during initialization defining the specific lock. Used by i-Dat software to identify a specific lock when uploading user data or downloading audit trail data.
User Identification Number (UID): A unique number assigned to each User with 2, 3 or 4 digits.
Group: One or several Users, all of whom have the same access to the locks categorized by a 2 digit Group Number.
Personal Identification Number (PIN): A unique combination of 3, 4, 5 or 6 keypad letters, numbers or both. (Letters or numbers may be used multiple times to increase the total number of combinations.)
Your Code: Your unique combination of UID and PIN codes, in that order, having up to 10 digits.
Great Grand Master (GGM): Code required by the System Manager to perform all programming functions. It replaces the Factory Code . This code can also open the lock.
System Manager: Person establishing the GGM and responsible for highest level of programming. Can establish lower levels of programming for other Users or Groups.
Program Instruction: Series of key strokes used to enter a function.
Important Keys
Terminator Key(*): Acts like the "Enter" key on a computer, and is used to add or confirm codes on the keypad. This key is usually depressed after entering Your Code to unlock the i-Que , but can be disabled for this purpose as an option, see page 7.
Programming Key (#): After a valid "Your Code" is entered, this key is depressed to enter the programming mode. This key can also be used as a time saving feature, allowing the entry of multiple functions. At the end of any Programming Instruction , replace the last S with a # to return to Function Number input, eliminating the need to re-enter Your Code.
LED Indicator:
-
LED Indicating Green (Normal Mode):
- Denotes lock enabled to open. Will flash green after entering valid "Your Code" and Terminator Key (*)
• LED Indicating Red (Normal Mode):
- Denotes a wrong "Your Code" entry to open the lock.
- Denotes wrong "Your Code" entry 3 consecutive times and disables keypad for 20 seconds. If another wrong "Your Code" is entered, the keypad is disabled for 40 seconds.
• LED Indicating Red (Programming Mode):
- Denotes incorrect entry or error and vacates programming mode.
- Programming mode vacated if no key entry within 5 seconds.
Initialize Lock: Initializing the lock with a unique 6 digit code assigns a Lock ID number to each specific lock. Using keypad, enter the Factory Code (9991234) , the # key and the 6 digit Lock ID (usually starting with 000001), and finally the # key. This number will NOT open the lock.
Create Great Grand Master (GGM): This code is required by the System Manager to perform all programming functions. In any lock system, the number of digits used for the UID of each User must be the same. Example: If the UID is 3 digits, all Users must have a 3 digit PIN code.
Also, the number of digits used for the PIN of each User must be the same. Example: If the PIN is 5 digits, All Users must have a 5 digit PIN.
Using keypad, enter the Factory Code (9991234) , the * key and the UID of the System Manager (either 2, 3 or 4 digits), the # key, the PIN of the System Manager (either 3, 4, 5 or 6 digits), and finally, the # key.
Factory Code * UID # PIN #
The GGM is now established for the System Manager Only:
A combination of their UID followed by their PIN.
Lock is now initialized.
System Manager's Access to the Lock:
Enter UID plus PIN, then the * key.
NOTES:
| _ | |
|
|
|
|
|
|
Visit us on the web at:

For Information On Additional Product Lines, Templates And Manuals.
| Distributed by: | ||||
|---|---|---|---|---|
For IQ Tech Support Call:
1-800-526-0233
LIVE TECH SUPPORT: 8 a.m. to 8 p.m. EST
On Line Tech Support 24/7 at www.marksusa.com
Email: ique@marksusa.com