Marks USA BIO Manager Software Programming Guide
Open the original PDF document
View PDF

BIO Manager Software Guide
365 Bayview Ave., Amityville, NY 11701 631-225-5400 • 800-526-0233 • Fax: 631-225-6136 www.marksusa.com

Table of Contents:
| System Requirements |
|---|
| Optional USB Fingerprint Enroller |
| Create Facility |
| Edit Facility |
| Add GGM |
| Note |
| Adding New Users To Software |
| Edit User |
| Delete User |
| Add Holidays |
| Edit Holidays |
| Edit Group |
| Delete Group |
| Change Group |
| Add Lock |
| Edit Lock |
| Delete Lock |
| Lock Settings |
| 1 | Add Group To Lock | 4 |
|---|---|---|
| F | Remove Group From Lock | 4 |
| l | Lock Management | 5-6 |
| , | Schedules | 6 |
| 1 | Add Basic Schedule | 7 |
| 1 | Add Group Schedule | 7 |
| 1 | Add User Schedule | 7 |
| F | Fingerprint Enrollment Via The Optional USB Fingerprint Enroller | 7 |
| ( | Changing An Existing Users Fingerprint Using The Optional | |
| Į | USB Fingerprint Enroller | 8 |
| - | Three Strikes Alarm | 8 |
| l | Low Battery Warning | 8 |
| ( | Group Descriptions | 8 |
| 1 | About Fingerprint Registration | 8 |
| Correct Fingerprint Placement | 8 | |
| Cautions About Fingerprint Condition | 9 | |
| Reg. Level | 9 | |
| Matching Level | 9 |
SYSTEM REQUIREMENTS -
| ITEM | Minimum Requirements | Recommended Requirements |
|---|---|---|
| CPU | P3 400MHz or higher | P4 1GHz or higher |
| RAM | 128MB or higher | 256MB or higher |
| OS | Windows 98/ME/2000/XP/2003 | Windows 2000 Server or higher |
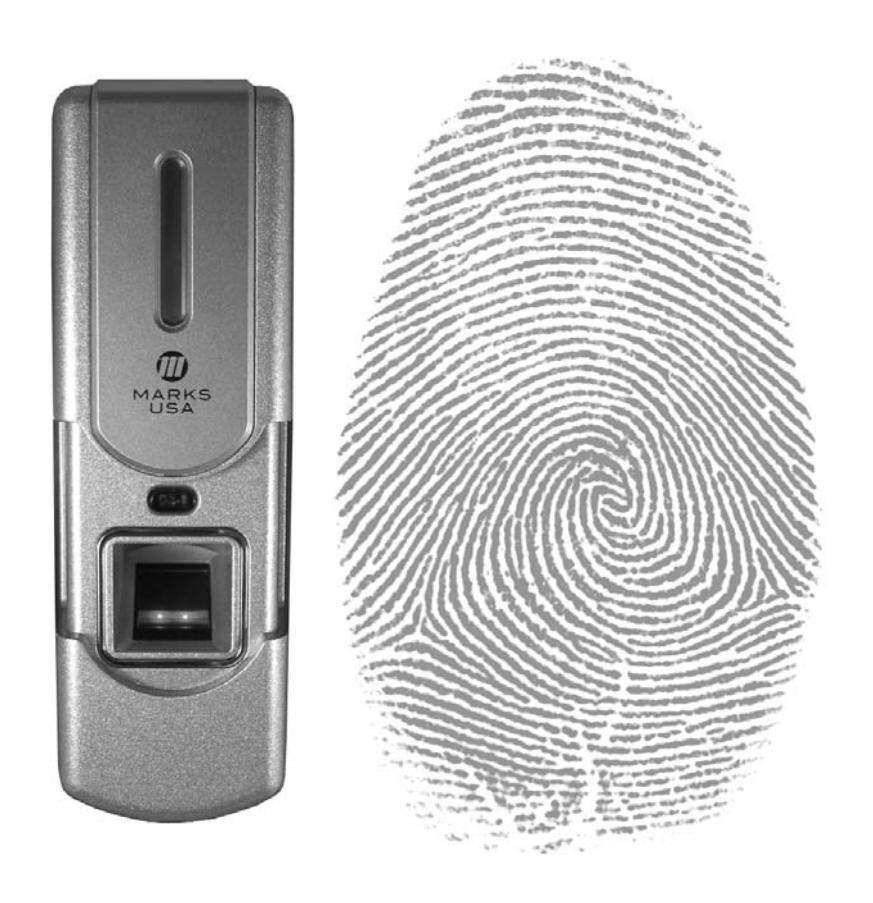
Optional USB Fingerprint Enroller
The USB Enroller (sold separately) allows you to enroll the fingerprints of new Users and change the enrolled fingerprint of existing ones instead of having to download this information from the lock. (See pages 7-8)
CREATE FACILITY
-
Enter the facility information
- * Indicates required field
- Maximum password length: 20 Characters
- Click "OK" to create the facility
EDIT FACILITY
- Right click on the facility name
- Select "Edit Facility"
- Edit the facility name and/or the password
- Click "OK"
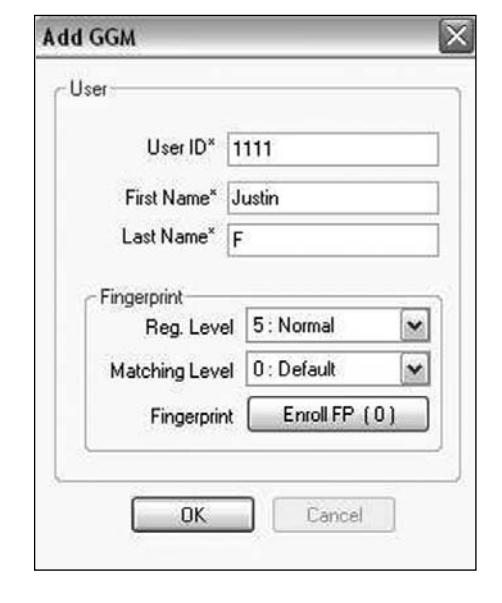
ADD GGM
-
Enter the GGM information (
*
Indicates required field)
- User ID is auto filled but can be entered manually (User ID is the four digit number that identifies each User in the system. This number can be used to manually delete the User from the lock.)
- Enter first and last name
- Click "Enroll FP" to register a fingerprint for the GGM using the optional USB enroller (See pages 7-8)

NOTE
With the BIO Manager Software you can enroll users at the door and then download their User ID's and fingerprints to the software. Once your Users are downloaded, your facility can be maintained on your PC. (See Lock Management on pages 5-6)
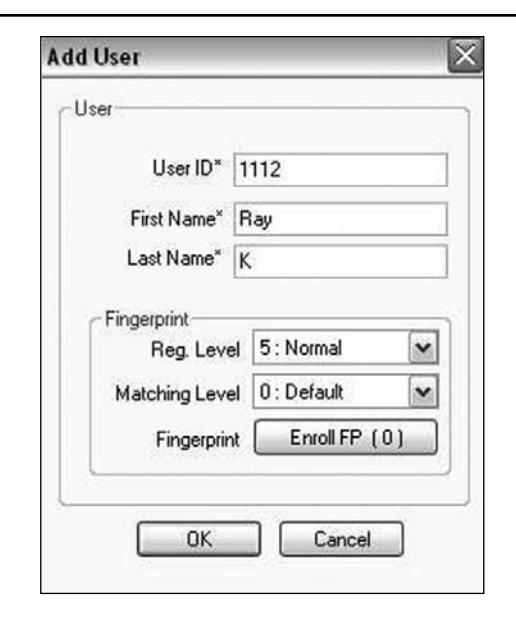
ADDING NEW USERS TO SOFTWARE
- Right click on "User & Group Maintenance" or right click on an existing group (GGM group is NOT a valid option)
- Select "Add User"
-
Enter the User information (
*
Indicates required field)
- First and last name
- User ID is auto filled but can be changed
- Select the registration and matching levels
- Click "Enroll FP" to register a fingerprint using the optional USB fingerprint enroller
EDIT USER
- Click on the group containing the User to be edited
- Check the box next to the User to be edited
- Click the "Edit User" button
- Click "OK" to confirm
DELETE USER
- Click on the group containing the User(s) to be deleted
- Check the box next to the User(s) to be deleted
- Click the "Delete User" button
- Click "OK" to confirm and delete the User(s)
ADD HOLIDAYS
Users in groups 4 and 5 will be denied access on the day(s) set for the holiday. These Users can be granted access on a holiday by setting a holiday schedule.
- Right click on "Holidays"
- Select "Add Holiday"
- Enter the name of the holiday
- Choose the start and end dates from the drop down menus
- Click "OK" to add the holiday
EDIT HOLIDAYS
- Click on "Holidays"
- Check the box next to the holiday to be edited
- Click "Edit Holiday"
- Change the name, start date and/or end date
- Click "OK"
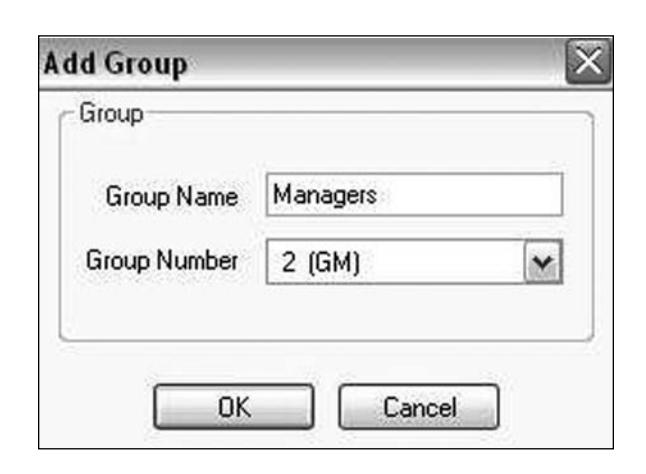
ADD GROUP (See Group Descriptions on Page 8)
- Right click on "User & Group Maintenance"
- Select "Add Group"
- Enter the group name
- Select the group number from the drop down menu
EDIT GROUP
- Right click on on the group to be edited
- Select "Edit Group"
- Change the group name and/or group number
- Click "OK"
DELETE GROUP
- Right click on on the group to be deleted
- Select "Delete Group"
-
Click "OK" to delete the group
- If there are Users assigned to the group you will be prompted with the following; "There are Users assigned to this group. Do you want to keep them in the system?"
-
Click "Yes" to keep the users in the system
- Users will be placed in the unassigned group
- Click "No" to delete the Users along with the group
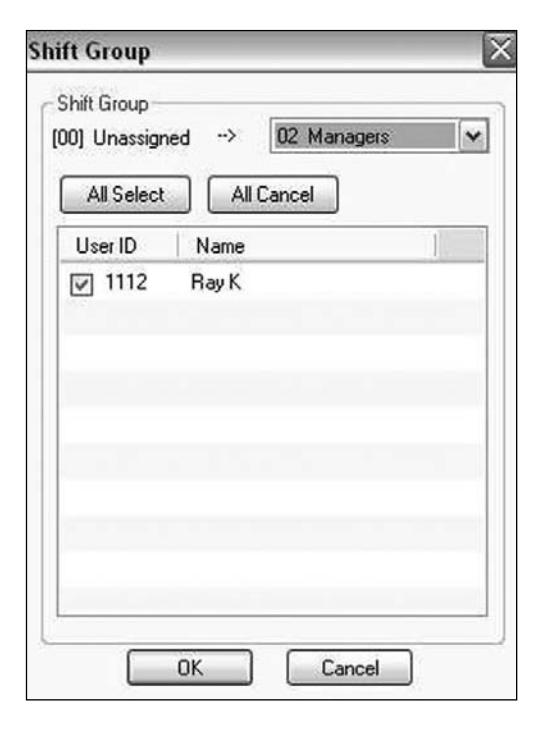
CHANGE GROUP
Users can be shifted from one group to another group.
- Click on the group containing the User(s) to be moved
- Click the "Change Group" button
- Check the box next to the User(s) to be moved
- Select the desired group from the drop down menu
- Click "OK" to complete the move
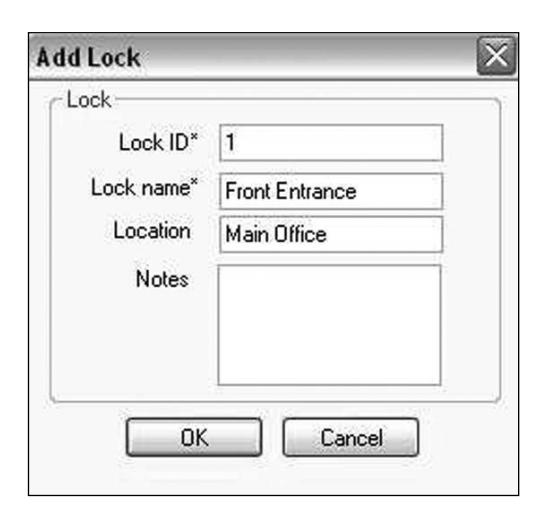
ADD LOCK
- Right click on the facility name
- Select "New Lock"
-
The Lock ID is auto filled
- This number can be changed
- User can enter up to a four digit ID
- Enter the lock name
- "Location" and "Notes" fields are optional
- Click "OK" to add the lock to the system
EDIT LOCK
- Right click on the lock name
- Select "Edit Lock"
- Enter the new information
DELETE LOCK
- Right click on the lock name
- Select "Delete Lock"
- Click "OK" to confirm deletion
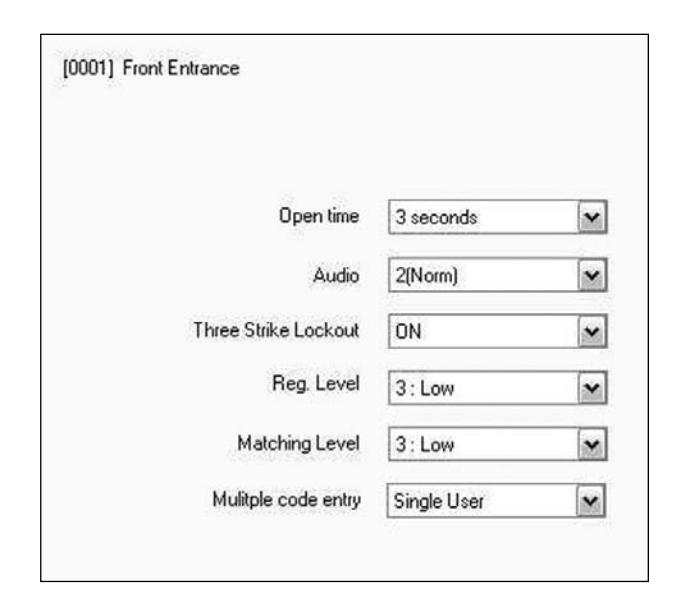
LOCK SETTINGS
-
Click on a lock name to display the settings for that lock
- Open Time: Sets the amount of time that the door will allow egress after a fingerprint has been accepted (1-5 seconds)
- Audio: Allows the User to control the volume of the lock's audible feedback (1 = Mute, 2 = Norm, 3 = High)
- Three Strike Lockout: This will enable or disable the lockout feature that puts the lock into a "time out" mode when a fingerprint is rejected three times (ON or OFF)
-
Reg. Level: Sets the registration level of all Users assigned to the lock (1 = Lowest - 9 = Highest)
- This setting is overridden by the Reg. Level set during the "Add User" process
-
Matching Level: Sets the matching level of all Users assigned to the lock (0 = Default - 9 = Highest)
- This setting is overridden but the Matching Level set during the "Add User" process
- Multiple Code Entry: Allows the User to increase security by requiring more than one finger to be authenticated before the lock will allow egress (Single User, Two Users, User and Manager, Two Users and Manager)
ADD GROUP TO LOCK
- Right click on the lock name
- Select "Add Group"
-
Check the box next to the group(s) that will be added to the lock
- Select or De-select all the groups with the "All Select" and "All Cancel" buttons
- Click "OK" to add the group(s) to the lock
REMOVE GROUP FROM LOCK
- Right click on the group to be removed
- Select "Remove from Lock"

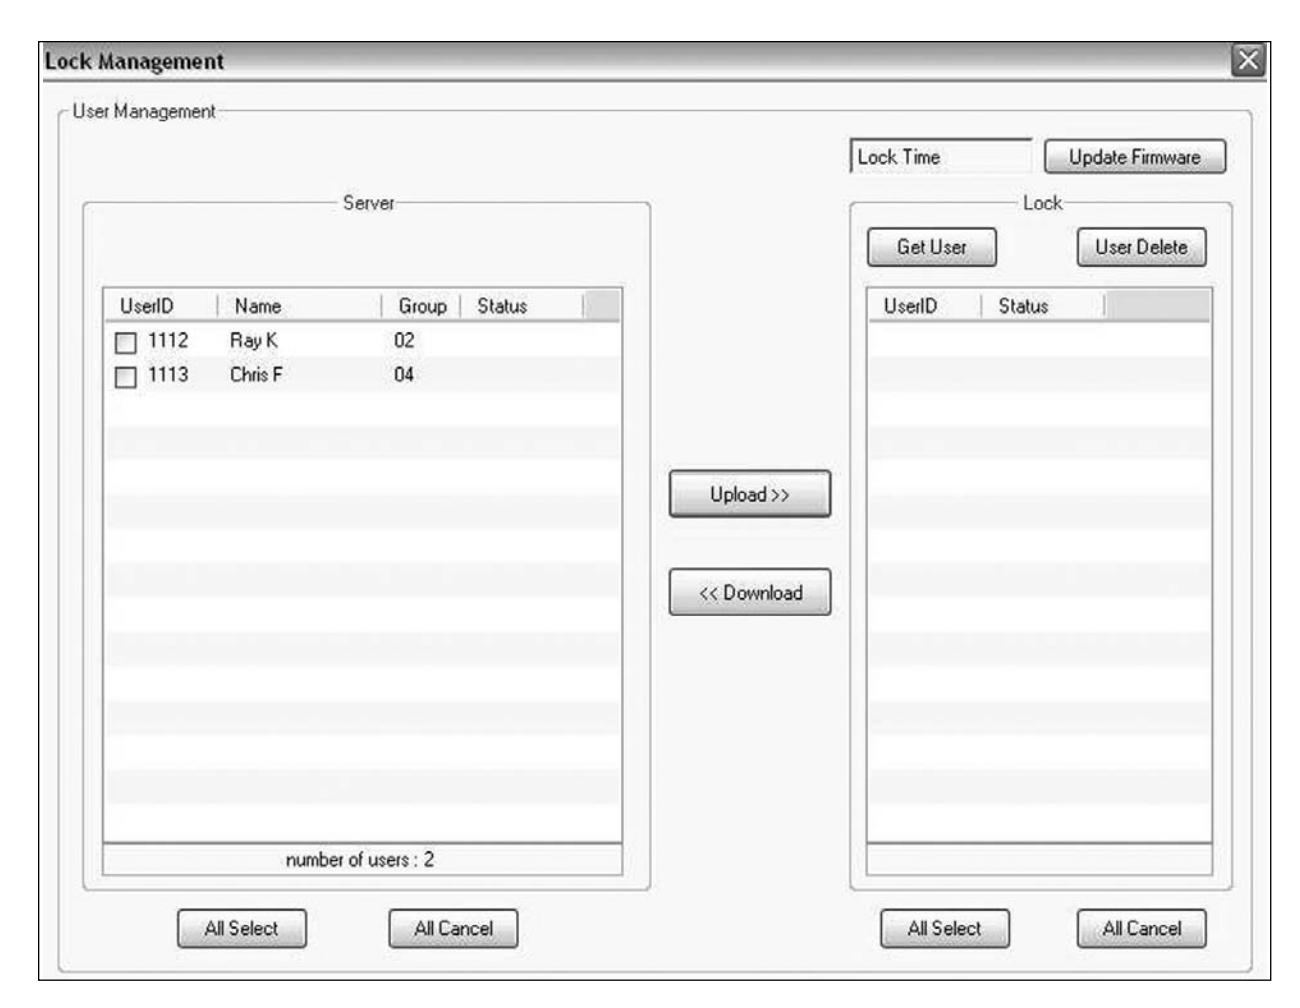
- Right click on the lock name
-
Select "Lock Management"
-
Upload the lock (Date and time is updated in the lock during upload. USB cable must be connected to the lock and the lock must be in communication mode. Refer to the User's Guide.)
-
Check the box next to the User(s) in the "Server" window that will have access to the lock
- Use the "All Select" and "All Cancel" to select and de-select all the Users
- Note: Changes made to the software (i.e. changes to schedules) will not affect a User unless that User is selected and uploaded to the lock(s)
- Click the "Upload" button
- The word "Success" will display next to the User names to confirm the upload
-
Check the box next to the User(s) in the "Server" window that will have access to the lock
-
Download from lock
- Click the "Get User" button
- The User ID's currently enrolled in the lock will display in the "Lock" window
-
Check the box next to the User(s) that will be downloaded
- Use the "All Select" and "All Cancel" to select and de-select all the Users
- Click the "Download" button
- The word "Success" will display next to the User ID's to confirm the download
-
Upload the lock (Date and time is updated in the lock during upload. USB cable must be connected to the lock and the lock must be in communication mode. Refer to the User's Guide.)
NOTE: User ID's not existing in software before download are placed in the "unassigned" group.
LOCK MANAGEMENT
-
Delete users from lock
- Click the "Get User" button
- The User ID's currently assigned to the lock will display in the "Lock" window
-
Check the box next to the user(s) that will be deleted
- Use the "All Select" and "All Cancel" to select and de-select all the users
- Click the "User Delete" button
- The word "Delete" will display next to the User ID's to confirm that they have been deleted
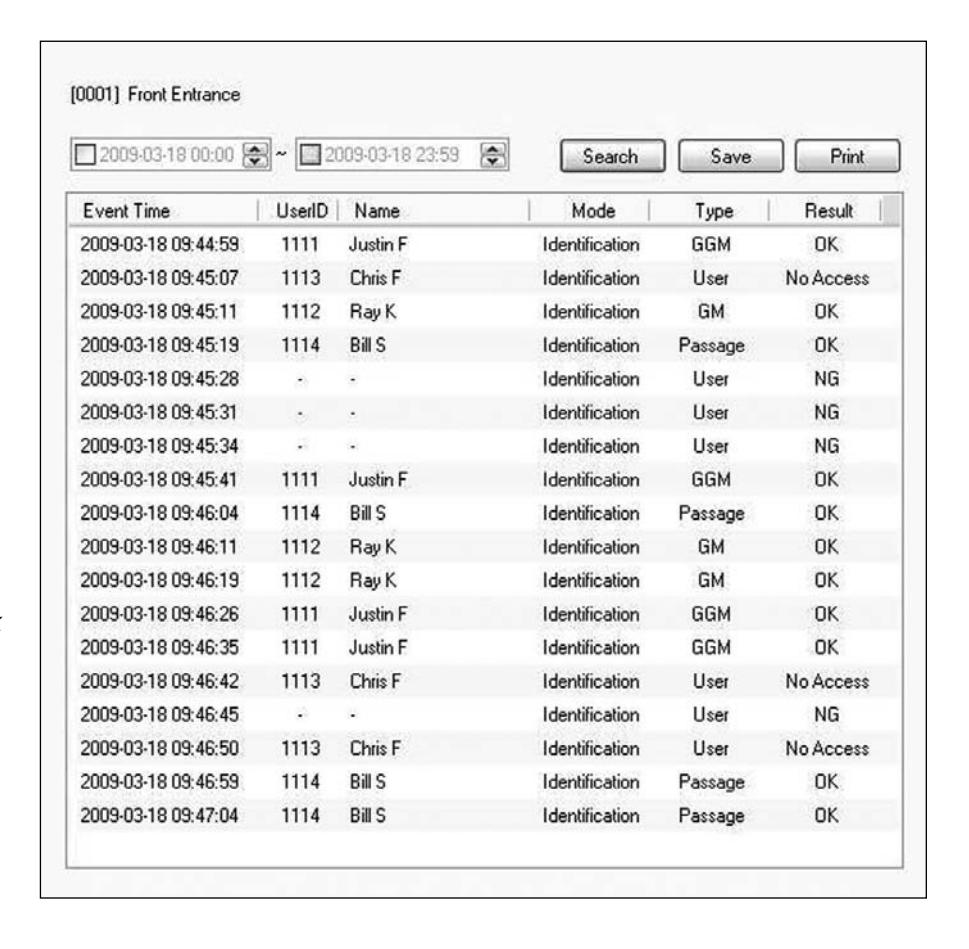
- Audit Trail
(USB cable must be connected to the lock and the lock must be in communication mode. Refer to the Users Guide.)
- Right click on the lock name
- Select "Lock Audit Trail"
- Click "Search" to display all of the event information from the lock
- Select a date range and then click "Search" to display information from the selected range
- The audit trail can be saved or printed by clicking "Save" or "Print"
SCHEDULES
Note:
All schedule times are entered in 24 hour format
-
Basic Schedule: Can be used to control the access of all Users (in groups 4 and 5) by granting them access for a set amount of time
- This does not affect the access of groups GGM, GM, and Passage
- Example: Users are granted Weekdays from 9am until 5pm
-
Group Schedule: Can be used to control the access of group 4 and/or group 5 individually by granting the group access for a set amount of time.
- This does not affect the access of groups GGM, GM, and Passage
-
Examples:
- Group 4 is granted access weekdays from 9am until 5pm
- Group 5 is granted access weekends from 8am until 4pm
Groups Schedules can not be used in conjunction with a Basic Schedule
-
User Schedule: Can be used to control the access of an individual User by granting the User access for a set amount of time
- This does not affect the access of groups GGM, GM, and Passage
-
Examples:
- John Doe is granted access on weekdays from 9am until 5pm
- Jane Doe is granted access on weekends from 8am until 4 pm
User Schedules can not be used in conjunction with a Basic Schedule
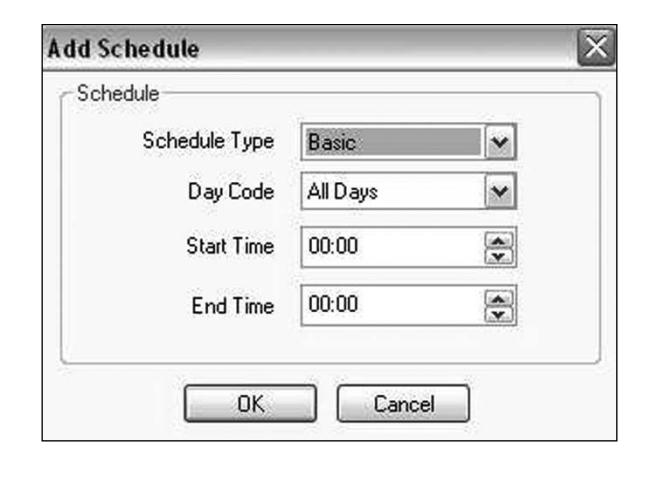
ADD BASIC SCHEDULE
- Expand the lock to which the schedule will be applied
- Right click on "Schedules" beneath the lock name
- Select schedule type "Basic" from the drop down menu
- Select the day code from the drop down menu
- Select the start time and end time for the schedule (24 hour format)
- Click "OK"
ADD GROUP SCHEDULE
- Expand the lock to which the schedule will be applied
- Right click on "Schedules" beneath the lock name
- Select "Group 4 or Group 5" from the drop down menu
- Select the day code from the drop down menu
- Select the start time and end time for the schedule (24 hour format)
- Click "OK"
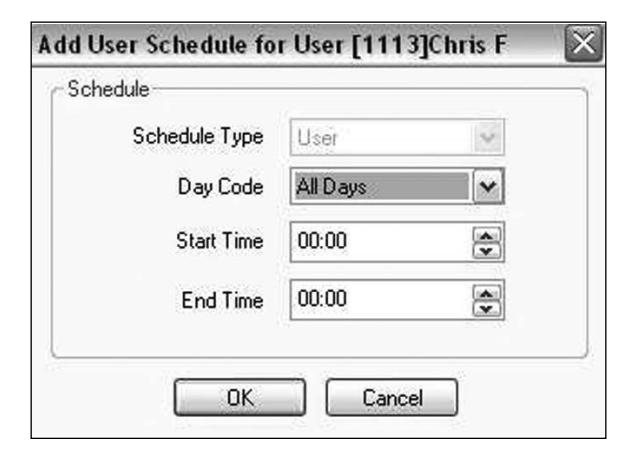
ADD USER SCHEDULE
- Expand the lock to which the schedule will be applied
- Click on "Schedules" beneath the lock name
- Select "Group 4 or Group 5" from the drop down menu
- Select the day code from the drop down menu
- Select the start time and end time for the schedule (24 hour format)
- Click "OK"
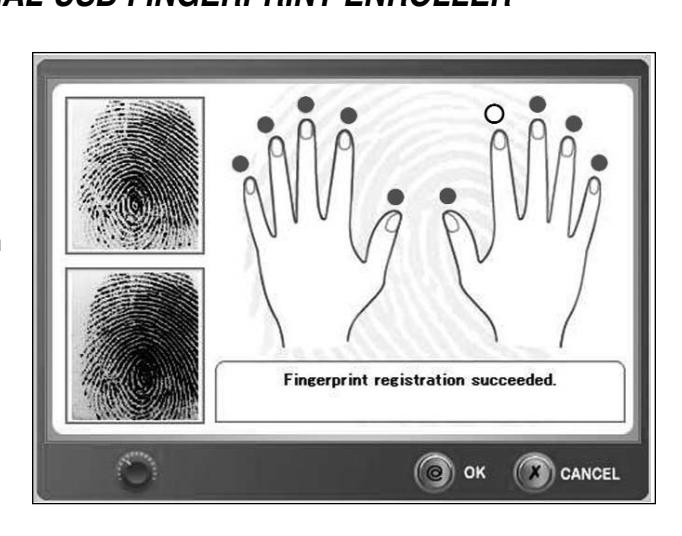
FINGERPRINT ENROLLMENT VIA THE OPTIONAL USB FINGERPRINT ENROLLER
In the "Add User" window click on the "Enroll FP" button. The fingerprint registration screen (shown right) will appear.
-
Click the circle that corresponds with the finger that will be enrolled
- Index finger is recommended
- When prompted, place your finger on the reader
- Wait for the fingerprint image to appear then remove your finger from the reader
-
When prompted, place your finger on the reader once more
- Try to position your finger the same way as the first time
-
The second fingerprint image will appear and one of the following messages is displayed
- "Fingerprint Registration Succeeded"
- "Registration Failed"
- After a successful enrollment, click "OK" to close the registration window
- Click "OK" in the "Add User" window to finish adding the user to the system
CHANGING AN EXISTING USERS FINGERPRINT USING THE OPTIONAL USB FINGERPRINT ENROLLER
In the "Edit User" window click on the "Enroll FP" button. The fingerprint registration screen will appear.
- On the fingerprint registration screen click the circle above the finger that is currently enrolled
-
You will be prompted with the following message:
- "Are you sure you want to remove the registered fingerprint?"
- Click "Yes" to confirm
- Click the circle that corresponds with the new finger that will be enrolled
- When prompted, place your finger on the reader
-
Wait for the fingerprint image to appear then remove your finger from the reader
- Try to position your finger the same way as the first time
-
The second fingerprint image will appear and this message will display
- "Fingerprint Registration Succeeded"
- Click "OK" to close the registration window
- Click "OK" in the "Add User" window to complete the change
THREE STRIKES ALARM
• When a User is denied entry three times in a row (three strikes), the lock will sound an alarm for 30 seconds
LOW BATTERY WARNING
• When the battery power decreases to approximately 4.2 volts the lock will play music after a fingerprint is scanned. This indicates that the batteries are getting low and should be replaced.
GROUP DESCRIPTIONS
- Group 1 (Great Grand Master GGM): Considered the system manager. Will have full programming rights and 24/7 access. There can be only one GGM in the system.
- Group 2 (Grand Master GM): Users in this group will have full programming rights and 24/7 access. This is the only group besides the GGM that has programming abilities.
- Group 3 (Passage): Special group. Users have the ability to toggle the passage mode. When a Passage group user scans their fingerprint the lock will go into passage mode, allowing egress until another fingerprint from this group is scanned. (The GGM or GM can toggle the passage mode manually.)
- Groups 4 and 5 (User Groups): User access in this group can be controlled by schedules and holiday settings. No programming rights. Have 24/7 access in the absence of schedules.
ABOUT FINGERPRINT REGISTRATION
Correct Fingerprint Placement: Place your index finger on the window just as you do with a finger stamp. Fingertip touching is not an appropriate registration or input method. Make sure the center of your finger touches the window.
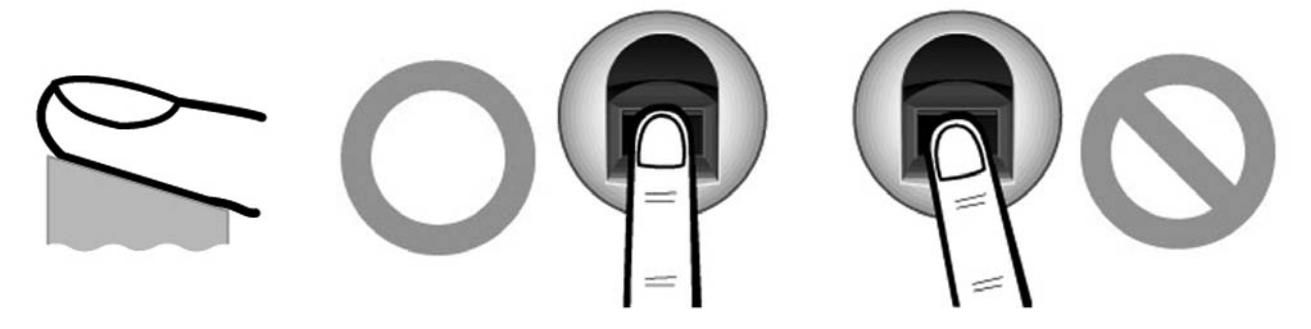
Use your index finger whenever possible. The index finger guarantees an accurate and stable fingerprint input.
Check if your fingerprint for clarity or damage. It is difficult to recognize fingerprints that are too dry, wet, unclear or damaged. Use another finger in this case.

Cautions About Fingerprint Condition: Depending on the User's fingerprint condition, some fingerprints may not be used or may cause an inconvenience.
- If the fingerprint is damaged or very unclear, then it cannot be recognized. Please use a different finger or if needed issue the User a key.
- When a finger is dry, breathe on the tip to moisten it before attempting authentication.
- For children, it may be difficult or impossible to use the unit because their fingerprints are too small or very unclear. If a child will be using the unit it is recommended to register their fingerprints every six months.
- For the elderly, it may not be possible to register their fingerprints because there are too many fine lines on the fingerprints.
- If fingerprints are very unclear, it may be convenient to register more than one finger for a particular user.
Reg. Level: Indicates the level of fingerprint discrimination applied during fingerprint enrollment. The higher the value you select, the more accurately fingerprints will be stored during enrollment
Matching Level: Indicates the level of fingerprint identification applied in authentication of a fingerprint.
- Lower Value = Higher Authentication Rate
- Higher Value = Lower Authentication Rate = Higher Security Level
If you set the Recognition Level for a particular User to zero (0), the level set in the unit will be used.
For more information on additional product lines, templates and manuals, visit our website @ www.marksusa.com
| Distributed by: | |||||
|---|---|---|---|---|---|
For BIO Management Tech Support Call:
Toll Free: 800 • 526 • 0233
In N.Y.: 631 • 225 • 5400
Fax: 631 • 225 • 6136
LIVE TECH SUPPORT 8am to 8pm EST Mon - Fri
Email: techsupport@marksusa.com
