Marks USA 175BIO User’s Programming Guide
Open the original PDF document
View PDF

175 BIO
BIOMETRIC FINGERPRINT READER WITH LEVERSET USER'S GUIDE


TABLE OF CONTENTS
| User Identification Numbers | .3 |
|---|---|
| User Groups Group 1 (Great Grand Master) Group 2 (Grand Master) | .3 |
| Group 3 (Passage) Groups 4 & 5 (User Groups) | |
| User Access By Fingerprint | .3 |
| Getting Started | |
| Fingerprint Enrollment Group #1 - GGM Group #2 - GM Group #3 - Passage Groups #4 & #5 - Regular User Groups |
.3
.4 .4 |
| Fingerprint Deletion Delete User By ID Delete User By Fingerprint | .4 |
| Lock Settings Sound Setting Open Time Setting Three Strike Lockout On/Off Clear Memory Clear All Schedules Clear Audit Trail USB Connection |
.4
.5 .5 |
| Manual Passage Mode Enable Disable |
.5
.5 |
| Low Battery Warning | .6 |
| Transfer GGM | .6 |
| About Fingerprint Registration Correct Fingerprint Placement Use Your Index Finger Whenever Possible Check Your Fingerprint For Clarity Or Damage |
.6
.6 |
| Cautions About Fingerprint Condition | .6 |
| _ |
User Identification Numbers
Each user will be assigned a 4 digit UID that will correspond with their enrolled fingerprint. This UID will be used to delete users in the event that the user is not present at the time of deletion.
User Groups
Each user will be assigned to a group based upon their access and programming rights.
- Group 1 (Great Grand Master): Considered the system manager. Will have full programming rights, and 24/7 access. There can be only one GGM in the system.
- Group 2 (Grand Master): Users in this group will have full programming rights and 24/7 access. This is the only group besides the GGM that has programming abilities.
- Group 3 (Passage): Special group. Users have the ability to toggle the passage mode. When a Passage group user scans their fingerprint the lock will go into passage mode, allowing egress until another fingerprint from this group is scanned. The GGM or GM can toggle the passage mode manually (see page 5).
- Groups 4 and 5 (User Groups): User access in this group can be controlled by schedules and holiday settings. No programming rights. 24/7 access in the absence of schedules.
User Access By Fingerprint
Press the blue button above the fingerprint reader surface. The unit will beep and the surface will light up red indicating that it is ready to read a fingerprint. Place your finger on the reader's surface. If accepted a ring will be heard, and the LED in the button will flicker blue. If denied a single beep will be heard and the unit will attempt to read the fingerprint again. The unit will attempt to read the fingerprint three times. This three attempt series is equal to one strike in regards to the "Three Strike Lockout" (see page 5).
Getting Started
Once the lockset is installed it should be initialized. Initializing the lock will clear the memory of everything except the audit trail. This process can also be used in the event that the lock needs to be returned to its factory default state.
Initialization Of Lockset (Log data will not be deleted):

Refer to page 5 for more features that allow for the management of the lock's memory such as:
Clear Memory - Removes all users and schedules.
Clear All Schedules* - Removes all set schedules.
Clear Audit Trail* - Removes Audit Trail information.
Fingerprint Enrollment
Note: A long single beep indicates that an error has been made. The sequence must be re-entered from the beginning.
Group #1 - GGM:
First fingerprint enrolled into the system and is considered the system manager (One user maximum in this group). Full programming rights. 24/7 Access.

Fingerprint Enrollment (cont'd) Note: A long single beep indicates that an error has been made. The sequence must be re-entered from the beginning. Group #2 - GM: Full programming rights. 24/7 Access. # # (ADD) CHIRP RING-CHIRP New 4 digit ID CHIRP Scan GGM fingerprint Re-scan new fingerprint CHIRP Scan new fingerprint CHIRP RING Group #3 - Passage: This group places the lock in passage mode when a Group 3 fingerprint is scanned. The lock is returned to the locked state by scanning a Group 3 fingerprint a second time. No programming rights. ADD CHIRP 3 RING-CHIRP # CHIRP Scan GGM fingerprint New 4 digit ID CHIRP CHIRP Scan new fingerprint Re-scan new fingerprint RING Groups #4 and #5 Regular User Groups: No programming rights. Access can be restricted by schedule and/or holiday setting. Note: Schedules and Holidays can only be added and maintained by using the optional software kit*. # (ADD) CHIRP 4 or 5 CHIRP Scan GGM fingerprint RING-CHIRP New 4 digit ID CHIRP Scan new fingerprint CHIRP Re-scan new fingerprint RING Fingerprint Deletion -Delete User By ID: BEEP # RING DEL Scan GGM or GM fingerprint RING-CHIRP 4 digit ID to be deleted Delete User By Fingerprint: 2 BEEP RING-CHIRP RING DEL Scan GGM or GM fingerprint Scan fingerprint to be deleted Lock Settings Sound Setting: Adjustment of volume (Only identification sound can be muted). SET CHIRP Scan GGM or GM fingerprint RING-CHIRP RING 1 (mute), 2 (normal) or 3 (high) Open Time Setting:
Adjustment of egress time after successful authentication (1-5 seconds).

Lock Settings (cont'd)
Three Strike Lockout On/Off:
The three strike lockout will sound an alarm for 30 seconds when authentication fails 3 times in a row. Default setting: <u>ON</u>

Clear Memory:
Clears all users & schedules (including GGM).

Clear All Schedules:

Clear Audit Trail:
Clears Audit Trail information from the lock's memory.

USB Connection:

To disconnect the USB communication, press ENTER button or close BIO-Manager program.
Note: Always disconnect the USB communication after use to conserve the batteries in the lock.
Manual Passage Mode


Disable:

Low Battery Warning
When the batteries in the 175BIO decrease to approximately 4.2 volts, the unit will play music after a fingerprint is authenticated. This indicates that batteries should be replaced.
Transfer GGM -
The Transfer GGM feature allows the GGM rights to be shifted from one user to another in the event that the GGM is leaving or has left the facility. This eliminates the need to re-initialize the unit as long as the GGM or GM is present.

Note: The GGM or GM must be authenticated to initiate USB communication with the lock.
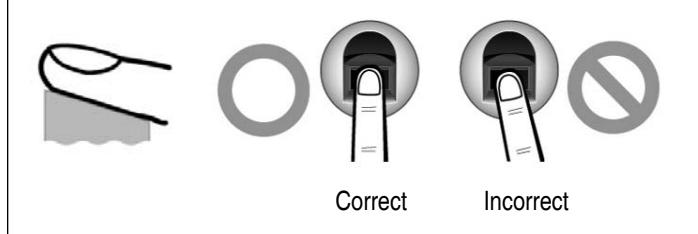
About Fingerprint Registration
Correct Fingerprint Placement:
Place your index finger on the window just as you do with a finger stamp.
Fingertip touching is not an appropriate registration or input method. Make sure the center of your finger touches the window.
Use Your Index Finger Whenever Possible:
The index finger guarantees an accurate and stable fingerprint input.
Check Your Fingerprint For Clarity Or Damage:
It is difficult to recognize fingerprints that are too dry, wet, unclear, or damaged. Clean the finger or use another finger in this case.
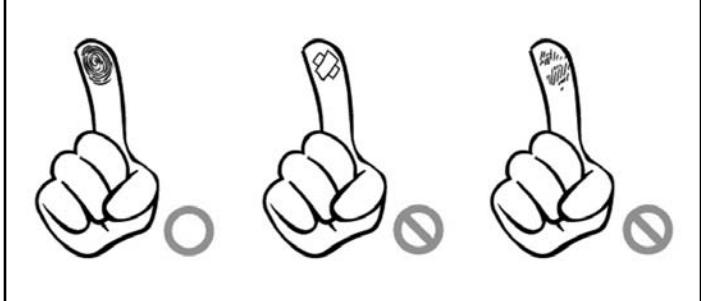
Cautions About Fingerprint Condition -
Depending on the user's fingerprint condition, some fingerprints may not be used or may cause an inconvenience.
- If the fingerprint is damaged or very unclear, then it may not be recognized. Please use a different finger or if needed issue the user a key.
- If a fingerprint is too dry, breathe on the fingertip to moisten it before attempting authentication.
- For children, it may be tricky or impossible to use the unit because their fingerprints are too small or very unclear. If a child will be using the unit, it is recommended to register their fingerprints every six months.
- For the elderly, it may not be possible to register their fingerprints because there are too many fine lines on the fingerprints.
- If the fingerprints are very unclear, it may be convenient to register more than one fingerprint for a particular user.
| First Name | Last Name | User ID | Group # |
|---|---|---|---|
For more information about the complete Marks USA product line, templates and manuals visit our website @ www.marksusa.com
| Distributed by: | ||
|---|---|---|
For 175 BIO Tech Support Call:
Toll Free: 800 • 526 • 0233
In N.Y.: 631 • 225 • 5400
Fax: 631 • 225 • 6136
LIVE TECH SUPPORT 8am to 8pm EST Mon - Fri
Email: techsupport@marksusa.com
