Major HIT-102 Installation Tool Alarm Lock Trilogy T2 & T3 Instructions
Open the original PDF document
View PDF

714-772-5202 / fax 714-772-2302 www.majormfg.com mail@majormfg.com
INSTRUCTIONS FOR USE WITH HIT-102 INSTALLATION TOOL ALARM LOCK TRILOGY T2 & T3
General Instructions:
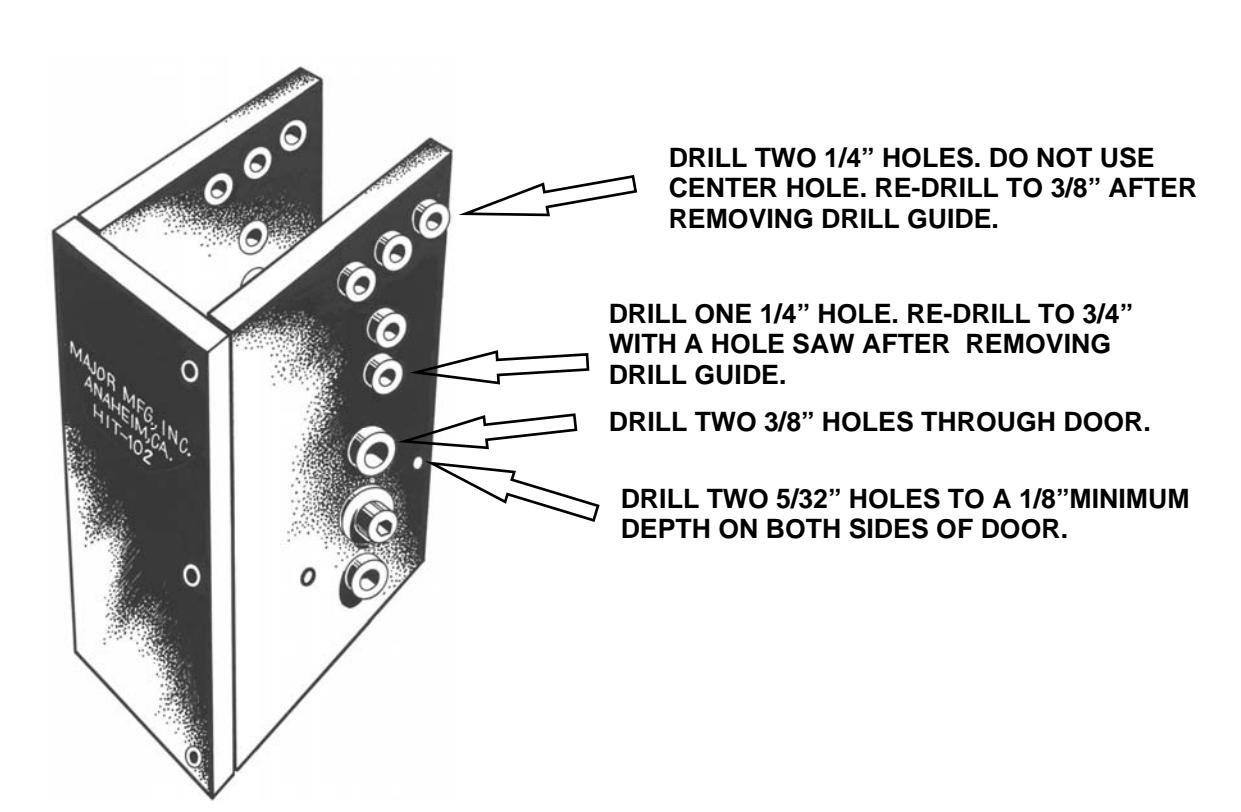
Remove allen bolt and back plate. Place HIT-102 drill guide on door with aligning washers in the 2-1/8" crossbore. HIT-102 should be placed on door so the writing on the front plate is in the up right position. Replace back plate and tighten allen bolt until snug. Do not over tighten. HIT-102 is now ready to retrofit either Unican 1000 series or Alarm Lock Trilogy. All through bolt holes may be drilled in one operation through the door, or half way from both sides.
ALARM LOCK TRILOGY T2
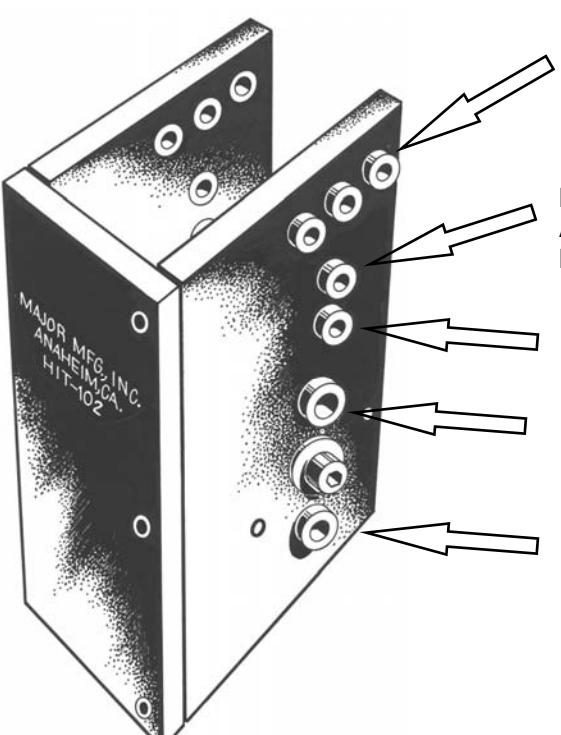
- 1. Drill two 1/4" holes through door using outer bushings as shown in drawing indicated by the number 1. Note: The center bushing is not used for Alarm Lock, it is used for Simplex only. After all holes are drilled and HIT-102 has been removed from door, re-drill these two holes to 3/8". The ¼" pilot holes make this step easier if installing on a steel door.
- 2. Drill a 1/4" hole through the door using the bottom of the two center bushings as indicated by arrow #2. After all holes are drilled and HIT-102 has been removed from door, re-drill this hole to 1" with the use of a hole saw.
- 3. Drill two 3/8" holes through door using the bushings as shown in the drawing numbered 3, located at the top and bottom of the lever handle. At the same time drill two 5/32" holes to a depth of 1/8" minimum using the bushings located at the 3 and 9 o'clock positions around the lever handle as shown by arrow #4. These bushings need to be drilled on both sides of the door.
- 4. All pilot holes are now completed. Remove drill guide from the door and re-drill holes to size as noted above.
- 5. Install lock per manufacturer's directions. Check for proper operation when installation has been completed.

714-772-5202 FAX 714-772-2302
INSTRUCTIONS FOR USE WITH HIT-102 INSTALLATION TOOL SIMPLEX / UNICAN 1000 SERIES
General Instructions:
Remove allen bolt and back plate. Place HIT-102 drill guide on door with aligning washers in the 2-1/8" crossbore. HIT-102 should be placed on door so the writing on the front plate is in the up right position. Replace back plate and tighten allen bolt until snug. Do not over tighten. HIT-102 is now ready to retrofit either Unican 1000 series or Alarm Lock Trilogy. All through bolt holes may be drilled in one operation through the door, or half way from both sides.
SIMPLEX 1000-1 AND -2 (WITHOUT PASSAGE SET)
Drill three 1/4" holes through door using the top three bushings as shown in drawing indicated by the number 1. The center hole is used for the combination change plug and must be enlarged to a 1" diameter. Remove HIT-102 from the door, ( if installing a 1000-3,4,5 or 6, drill bottom hole before removing drill guide. See directions below.) and re-drill the top center hole to 1" with a standard hole saw. Drill this hole half way from both sides of the door. Install lock per manufacturers directions. Check lock for proper operation when installation is complete.
SIMPLEX 1000-3,4,5 and 6 (WITH PASSAGE SET)
Prep door as per instructions for 1000-1 and 2 above. Drill one more 1/4" hole through the door using the top bushing located in the center of the drill guide as indicated by arrow #2 in the drawing below. This hole is for the passage set actuator and must be enlarged to a 1" diameter. Remove HIT-102 from the door, and re-drill this pilot hole to 1" with a standard hole saw. Drill this hole half way from both sides of the door. Install lock per manufacturers directions. Check lock for proper operation when installation is complete.
NOTE: The two 3/8" bushings and two 5/32" bushings located around the allen bolt at the bottom of the drill guide is used for Alarm Lock only and not for Simplex.
DRILL THREE 1/4" HOLES THROUGH DOOR. RE-DRILL CENTER HOLE TO 1" AFTER REMOVING DRILL GUIDE.
DRILL ONE 1/4" HOLE THROUGH DOOR FOR 1000-3,4,5 AND 6 ONLY. RE-DRILL HOLE TO 1" AFTER REMOVING DRILL GUIDE.
THE LOWER 1/4" BUSHING , TWO 3/8" BUSHINGS AND TWO 5/32" BUSHINGS ARE NOT USED FOR SIMPLEX INSTALLATIONS.