LockeyUSA Keyless Panic Trim SP Series Mechanical Lock Instructions Updated 3
Open the original PDF document
View PDF

Lockey P-Series Installation Instructions for Keyless Panic Trims 310-P | 230-P | 285-P | 115-P | 160-P
| Parts List | 310-P | 230-P | 285-P | 115-P | 160-P |
|---|---|---|---|---|---|
| Outside Body | 1 | 1 | 1 | 1 | 1 |
| Rubber Escutcheon | 1 | 1 | 1 | 1 | 1 |
| Hex Bolts | 2 | 2 | 2 | 4 | 4 |
| Flat Spindle | 1 | 1 | N/A | N/A | 1 |
|
Twisted Spindle (35o
) (R/L) |
2 | 2 | N/A | 2 | N/A |
|
Twisted Spindle (45o
) (R/L) |
N/A | N/A | 2 | N/A | N/A |
| 30 mm. Screws | 2 | 2 | 2 | 4 | 4 |
| 40 mm. Screws | 2 | 2 | 2 | 4 | 4 |
| Non-Combination Tumblers (Blue) | 2 | 2 | 2 | 2 | 2 |
| Combination Tumblers (Red) | 2 | 2 | 2 | 2 | 2 |
| Finish Washers | 2 | 2 | 2 | 4 | 4 |
| Tweezers | 1 | 1 | 1 | 1 | 1 |
Lockey P-Series Keyless Locks are designed to replace the keyed cylinder on panic exits. P-Series locks are compatible with MOST panic bars requiring a turn radius of 90 degrees or less. Modifications may be required for the locks to operate with some panic bars.
1.) SET CODE/COMBINATION (310-P, 285-P, 115-P, 160-P)
Before installing the lock on the door, set the combination to your desired code. Use the How to Change Code instructions (included) to change the code.
IMPORTANT FOR CHANGING CODE
When removing and inserting Tumblers, ALWAYS PRESS AND HOLD the "C" Button (clear).
PASSAGE FUNCTION
The 115-P and 285-P are equipped with a Passage Function. To use the Passage Function, push "C" to clear the lock and then "R" (115-P) or "Y" (285-P), followed by your User Code. To clear the Passage Mode, press "Y" or "R" followed by "C".
To disable the Passage Function, remove the "R" (115-P) or "Y" (285-P) Tumbler, leaving the slot empty.
2.) INSTALLATION
- 1.) After the panic bar is installed on the door, determine the center of the tailpiece hole on the outside of the door.
- 2.) Place the template (included) over the center hole. Mark the top and bottom mounting holes to mount the lock body on the door.
-
3.) Drill mounting holes.
- a. NEW INSTALLATION Drill 3/8" mounting holes at the top and bottom, and a ½" ( minimum ) hole to accommodate the tailpiece.
- b. RETRO-FITTING If the existing hole is 2" or less, proceed with Step 4. If the existing hole is larger than 2" you may need to purchase a Lockey T-Metal or T-Cover plate to accommodate the lock.
- 4.) Place the rubber escutcheon on the back of the lock body and mount the lock on the door using the supplied Finish Washers and Screws.
- 5.) After the lock is mounted on the door, place the proper spindle into the center (spindle) hole. You may need to use the right or left twist depending on the knob/lever turn direction.
IMPORTANT:
Some panic bars, including DETEX, require the use of the U-Shaped Clip (included) to restrict the tailpiece from extending through the tailpiece receiver ( see instructions on reverse side ).
Lockey P-Series - U-Shaped Clip Instructions
To properly install Lockey P-Series systems, you may need to use the supplied U-Shaped Clip in order to restrict the tailpiece from extending through the cross-shaped tailpiece acceptor. If the tailpiece extends beyond the tailpiece acceptor into the panic bar, the system may not function. The U-Shaped Clip is not needed on all panic devices, but is recommended for DETEX.
- Place U-Shaped Clip into the cross-shaped tailpiece acceptor ensuring that the clip sits flush inside the tailpiece acceptor.
- Insert supplied tailpiece into the tailpiece acceptor ensuring that the U-Shaped Clip restricts the tailpiece from extending through the tailpiece acceptor.
Note: You may need to cut the tailpiece to ensure that it is the proper length for the lock. DO NOT cut the twisted end of the tailpiece. In some cases, you may also need to modify the tailpiece to create additional twist so that the tailpiece fully engages the panic device.
Proceed with standard installation instructions.
Note: The U-Shaped Clip is included with all Lockey P-Series systems, but is not needed on all panic devices. However, the U-Shaped Clip is highly recommended to ensure proper operation on DETEX devices.
*IMPORTANT
After installation, if you wish to change the code, you must first remove the panic bar, and then remove the lock.
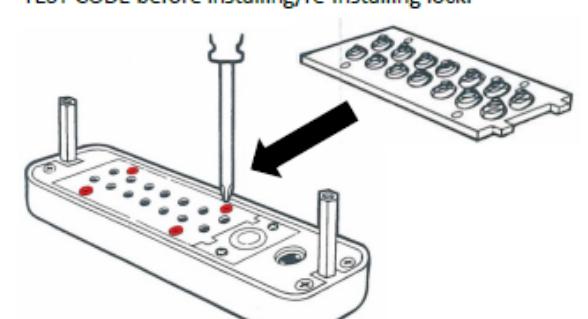
LOCKEY P-SERIES HOW TO CHANGE CODE

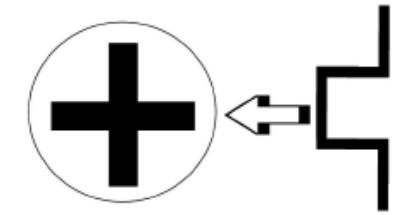
Using a #2 screwdriver, remove the four (4) Red Screws.
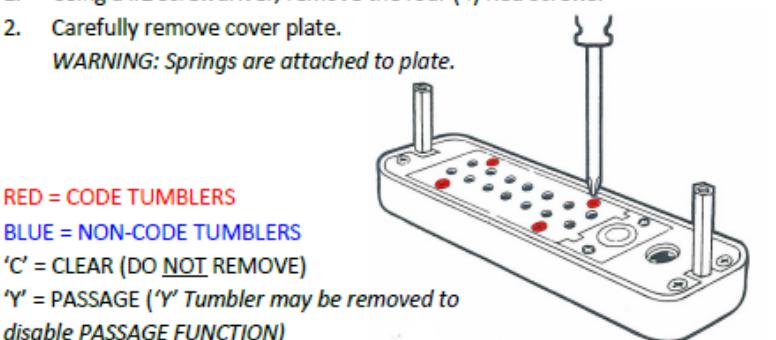
PRESS & HOLD 'C' BUTTON to release tumblers. IMPORTANT: 'C' Button must be pressed and held down when removing and inserting tumblers. Failure to do so will damage the lock and void
WARNING:
Do NOT force tumblers into position!
the warranty.
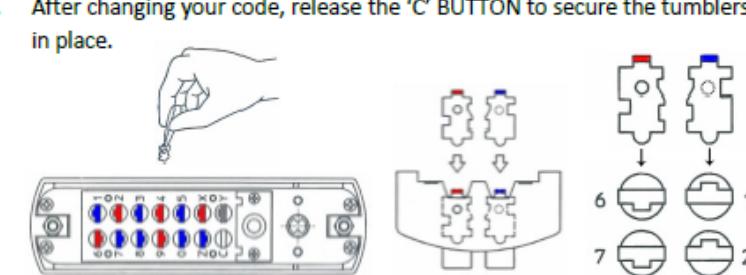
While holding the 'C' BUTTON, remove/add CODE (Red) and NON-CODE (Blue) Tumblers to create your desired code. Ex: 3 Red = 3-Digit Code / 6 Red = 6-Digit Code
IMPORTANT: Ensure notched side of tumbler fits into slot. (Below - Far Right).
After changing your code, release the 'C' BUTTON to secure the tumblers in place.
- Replace the cover plate and secure with four (4) Red Screws, using a #2 screwdriver.
- TEST CODE before installing/re-installing lock.