La Garg 5750K User Operating Instructions
Open the original PDF document
View PDFLA GARD 5750-K
Electronic Entry Device
USER OPERATING INSTRUCTIONS
Keypad models 5715, 5750, 5750-K are compatible with all LA GARD electronic locks manufactured by dormakaba. The eKeyII function is not verified by UL.
FEATURES
See Manager Instructions for additional features.
USER COMBINATION
- Open Lock
- Change Combination
KEYPAD BACKLIGHTING
• Press either lightbulb icon to illuminate panel keys
eKEY AND AUDITING CAPABILITY
- eKEY is a 48 bit encrypted unique serialized dual token device
- AuditGard auditing software, AuditView or LGView, and a LA GARD interface Adapter are required.
WRONG TRY PENALTY
• Four (4) consecutive invalid combination initiates five (5) minute delay period.
LOW BATTERY WARNING
• Repeated LED flashing and beeping during opening indicates battery is low and needs immediate replacement.
AUDIO AND VISUAL SIGNAL
- Double signal two (2) LED flashes and two (2) beeps indicates entry is valid or accepted.
- Triple signal three (3) LED flashes and three (3) beeps indicates invalid or not accepted.
OPENING THE LOCK
- 1. Enter valid combination (insert eKEY, if set up, then remove key).
- 2. The lock will confirm a valid combination entry with a double signal.
- 3. Within four (4) seconds, turn the keypad to the open position (clock-wise) if using a deadbolt style lock, or turn the handle to the open position if using a swingbolt style lock.
-
4.Pull door open.
- Invalid Combination Entry Lock will signal three (3) times.
IMPORTANT NOTE: Change the combination before putting the lock into operation.
IMPORTANT NOTE: Keep eKey and combinations secure and separated from each other to minimize opportunity of compromise and/or security breach.
WRONG TRY PENALTY
-
Entry of four (4) consecutive invalid combinations starts a five (5) minute delay period.
- LED flashes red at ten (10) second intervals.
- At the end of the delay period, two (2) more consecutive invalid combinations will restart the five (5) minute delay period. During delay period, any keystroke will give a triple signal.
CHANGING YOUR COMBINATION
IMPORTANT NOTE: When using eKey in initialization and combination change, this must be performed by an authorized person in a secure environment.
1. Enter existing combination and hold down last digit until unit double signals and LED stays on. Observe that the unit will double signal indicating a correct combination is entered, and then, as the last digit is held down, it will double signal 2-4 seconds later and the LED will remain on indicating the unit is now ready to receive change commands.
If eKey is enabled, the eKey behaves as if it were the last digit in a combination. So, if eKey is enabled, enter existing combination and insert eKey. The unit will double signal indicating a correct combination + eKey is entered, and then, as the eKey remains inserted, the unit will double signal 2-4 seconds later and the LED will remain on indicating the unit is now ready to receive change commands. Then REMOVE eKey to proceed.]
WARNING: The port for the eKey is a data port only. Connecting power to this port will damage the system.
IMPORTANT NOTE: Never use this electronic token in applications other than this HSL Model.
- 2. Press the "0" key
- 3. Enter your NEW combination two times (plus eKey, if enabled). You must insert and remove eKey each time, if enabled.
- 4. If a mistake is made, wait thirty (30) seconds and repeat steps 1-3.
- 5. Test lock operation using new combination (+ eKey) several times before closing the door.
CAUTION: When selecting a combination, do not use birthday or other predictable data that could give correlation between user and combination. Once the new combination has been set, do not share the combination. It is a secret
- Valid Combination Entry Double signal after valid combination is entered.
- Invalid Combination Entry Triple signal indicates the old combination is still valid.
KEYPAD BACKLIGHT
- Press either lightbulb icon.
- Panel keys will remain backlighted for approximately 8 seconds.
- The backlight feature will not adversely affect battery life if done in conjunction with normal anticipated keypad usage.
BATTERY LOW WARNING
- Repeated LED flashing and beeping during an opening indicates that the battery is low and needs immediate replacement.
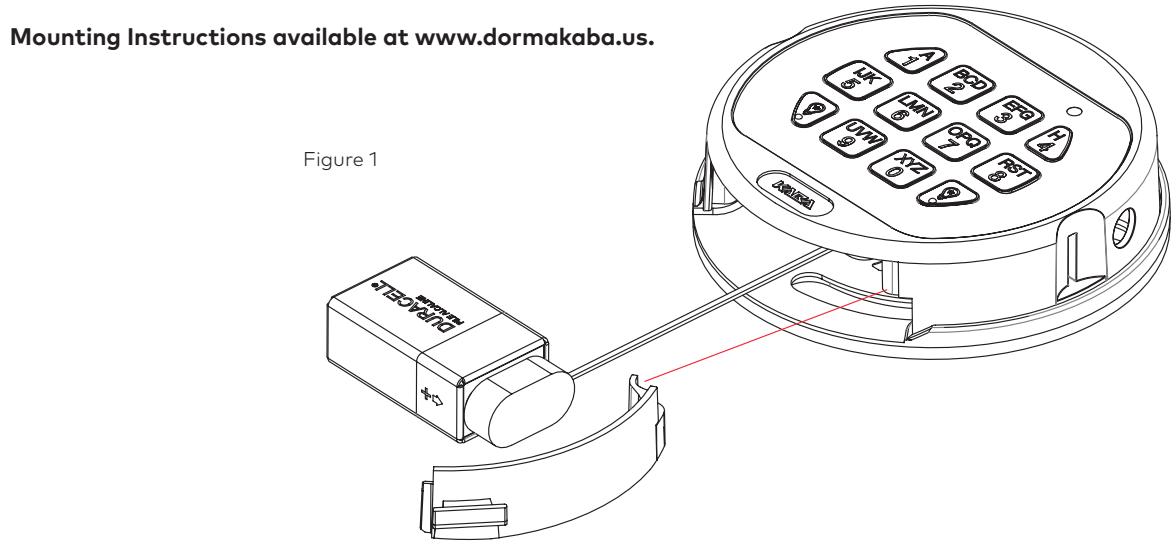
- Uses one (1) 9-Volt alkaline battery. (Recommended: Duracell™ or Eveready™ alkaline batteries.) It is recommended that batteries be replaced at least once a year.
If battery is depleted and will not allow lock to open, follow instructions below. Lock contains a non-volatile memory. Even with batteries removed, the lock will retain all programming.
CHANGING YOUR BATTERY
1. Open the battery door (black plastic compartment cover located at the bottom of the keypad) by gently pulling the tab down and to the right.
NOTE: If the battery door as permanently installed using the hinge pin, the battery door will swing open but stay attached to the Entry Device. If the battery door was installed without the hinge pin, it will detach from the Entry Device when it is opened.
- 2. Allow the battery and its attached leads to drop down and out of the battery compartment. If it does not drop, gently pull on the battery until it drops out.
- 3. Remove the connector by unsnapping it from the two terminals on the top of the battery.
CAUTION! Hold on to battery terminal connector to avoid pulling the wires out of the housing.
- 4.Press and hold the zero (0) key for ten (10) seconds before installing a battery.
- 5. Connect a new 9-Volt Alkaline battery to the battery clip.
- 6. Gently push the battery and the leads completely into the battery compartment.
- 7. If the battery door is permanently attached, simply swing the battery door closed ensuring the handle is secured inside the left edge of the battery opening of the keypad housing. If the battery door is detached, reinstall the battery door by orienting the hinge hook to the right, place the hinge hook onto the battery door post of the keypad, and rotate clockwise to the left until the handle is secured inside the left edge of the battery opening of the keypad housing. See Figure 1.
NOTE: The audit features, the software features, features associated with peripheral devices and systems, optional interconnect devices and their associated features, features involving the use of user keys, the duress feature, monitoring features, remote features, and other additional features have not been evaluated by UL. Models 8130 and 3190 keypads are not certified by UL, are not UL listed, and not approved for UL applications."