LA-GARD-COMBOGARD-PRO-39E-Electronic-Combination-Locks-Manager-Instructions-732_018_Rev-P_web.pdf_619770
Open the original PDF document
View PDFLA GARD COMBOGARD PRO
39E Electronic Combination Locks
MANAGER INSTRUCTIONS
LOCKS
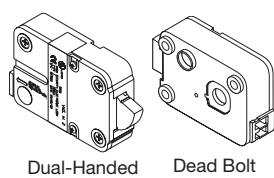
Dual-Handed Swing Bolt
The ComboGard Pro Lock has three states of operation: Factory Default, Manual Setup, and Active. ComboGard Pro locks are shipped from LA GARD in Factory Default state without Users or features enabled. Refer to the ComboGard Pro Setup Instructions (731.018) if Lock settings have not already been programmed.
Factory Default: The Lock must be in the Factory Default state to be programmed by the PC software. Factory mode functions as follows:
- 1 key When pressed, will open the Lock.
- 0 key When pressed, prompts the ComboGard Pro Setup software to send the configuration settings to the Lock. OR if pressed and held, places the Lock into Manual Setup.
- · All other keys perform no function.
Setup: The lock can be configured using ComboGard Pro Setup software or by using the keypad only.
Active: To activate the Lock and freeze the configuration, the Manager combination MUST be changed.
PROGRAMMABLE LOCK FEATURES
MODES (Multiple Modes may be selected.)
- Silent Alarm (Alarm Box Required P/N 2789NC) If enabled, this option will send a signal to an outside alarm system through the LA GARD Alarm Box.
- · Dual Mode
If enabled, two combinations are required to open the lock. All other manager functions can be performed using the Manager combination alone.
Dual Mode and [User + Manager] to access Manager Menu
If enabled, two combinations are required to perform all lock functions and is only available on locks with 39E code level .669 or higher. Selection of "Dual Mode and [User + Manager] to access Manager Menu" can only be done using the ComboGard Pro Setup Software v.5.2.0.116 or higher. If this mode is selected in the software but sent to a lock with incompatible (older) firmware code, the user will receive an error message and the lock will not be programmed.
ENTRY DEVICE OPTIONS
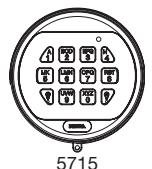
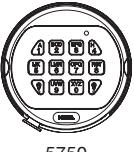
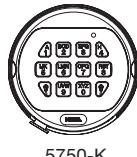
5750 Round Entry
5750-K Round Entry
3125 Round Entr
· Time Delay Override
If enabled, User 9 can override delay period. User 9 must be active.
EXTERNAL SIGNALS (Alarm Box Required - P/N 2789NC. Only one External Signal type may be selected.) An external input signal to the Alarm Box will either disable the Lock from opening, override the time delay, or enable the remote override depending on the selection programmed for External Signals.
- External Signal disables Lock opening with valid combination.
- OR External Signal overrides Time Delay. (This option is ONLY available if enabled using Setup software.)
- OR External Signal enables the Remote Override. (This option is ONLY available if enabled using Setup software, and with Lock code level 39E v1.09 or higher.)
TIME DELAY
- Delay Period 1 99 minutes
- Open Period 1 19 minutes
COMBINATION LENGTH
A combination length from six (6) to nine (9) digits may be selected
NOTE: To maintain the VdS Class 2 and EN 1300 Class B certification when the duress alarm feature is used, a combination length of 7 digits or longer must be selected.
LOCK USERS
Super Master Reset - Resets Lock to Factory State Manager
- Open Lock
- Change Combination
- · Enable/Disable Users
- · Delete Users
- Set Time Delay Values
- Audit Lock
Up to 9 Users
- · Open Lock
- Change Combination
STANDARD LOCK FEATURES Wrong Try Penalty
-
Entry of four (4) consecutive invalid combinations initiates a five (5) minute delay penalty.
- Lock responses during the penalty period are as follows:
- The LED will flash every ten (10) seconds.
- If any key is pressed, the Lock will flash the LED and beep three times.
- Once the penalty period has ended, two (2) consecutive invalid combinations will initiate another five (5) minute penalty period.
Low Battery Warning
- Repeated audio/visual signals (LED flashes/beeps) during Lock opening indicate the battery is low and should be replaced immediately.
- If the battery level becomes too low to safely operate the Lock, pressing any key will initiate the low battery warning. The battery must be replaced before the Lock will operate.
Audit Records
- Lock records the last 63 events in non-volatile memory.
- Audit file cannot be deleted from the Lock.
- Only the Manager can audit the Lock.
- ComboGard Pro auditing software and an Interface Adapter are required to retrieve a Lock audit.
LOCK OPERATING CONVENTIONS
- If a mistake is made while entering keystrokes, wait thirty (30) seconds and repeat operation.
- To access lock commands, enter combination and hold down the last digit until Lock double signals release and the LED stays on.
- In Dual Mode, two combinations are required to operate the Lock.
NOTE:
- In Dual Mode, two combinations are required to open the lock. Manager Commands 1,2,3,7 and 9 can be performed using the Manager combination alone.
- In Dual Mode and [User + Manager], two combinations are required for all lock functions except to Change Combination. A valid User combination must be entered first, followed by the Manager combination to access Manager Commands 1,2,3,7 and 9.
- Lock must be opened within 4 seconds once a valid combination has been entered.
- To open a container with a Swing Bolt Lock, turn the container handle to the open position and open the door.
- To open a container with a Dead or Spring Bolt Lock, turn the keypad or dial to retract the bolt and open the door.
- When closing a container, verify that it has been secured.
LOCK RESPONSES
Standard Operations
Entry Devices with LEDs respond with both LED flashes and beeps.
• Single signal - one (1) LED flash and one (1) beep indicate the operation is complete.
- Double signal two (2) LED flashes and two (2) beeps indicate entry is valid or accepted.
- Triple signal three (3) LED flashes and three (3) beeps indicate invalid or not accepted.
NOTE: The 8130 Entry Device (no LED) responds with beeps only.
Additional Operations
- Delay Period The LED will flash once every second.
- Open Period The LED will flash twice a second, and the Entry Device will beep every 10 seconds.
- If any key is pressed, the Lock will flash the LED and beep three times.
- Penalty Period The LED will flash every ten (10) seconds.
- Low Battery Warning During a Lock opening, the LED will flash and Entry Device will beep repeatedly.
SUPER MASTER RESET
SMR will reset the lock back to factory state, but the SM code remains unchanged. The default code of 5-5-5-5-5-5- 5-5 must be changed before the Manager default code is changed or the Super Master Reset function will be permanently lost.
Process is as follows:
- Action Press and hold [0] key for 3 seconds
- Result Lock beeps twice and the LED remains ON throughout the entire process.
- Action Enter default code of 5-5-5-5-5-5-5-5. Press and hold last digit until the unit gives a double beep.
- Result Command Menu access is granted.
SMR has only 2 Command options available:
- If press [0] = Change Code , (1 time use)
- Enter current default Super Master code of 5-5-5-5-5-5-5-5
- Enter new Super Master code (ex. 8-8-8-8-8-8-8-8) then double beep.
- Enter new Super Master code again to confirm (ex. 8-8-8-8-8-8-8-8) then double beep the SMR code is set.
NOTE: Once the default code is changed to a new code the code can never be changed. A reset box must be used to reset.
- If press [8] = Reset the Lock
- Lock will signal a long beep to indicate it was reset
- If any other key is pressed then the lock beeps 3 times and the operation is ended.
MANAGER COMMANDS
NOTE: If "Dual Mode and [User + Manager] to access Manager Menu" was selected during lock set-up, each command below requires entering User combination followed by the Manager combination and hold down last digit of Manager combination until Lock double beeps. Then release and the LED stays on.
COMMAND 1
Activate User
NOTE: Only Users added during Lock Setup will be available to the Manager for activation.
- 1. Enter Manager combination and hold down last digit of combination until Lock double signals release and the LED stays on .
- 2. PRESS 1 .
- 3. Enter User number (1- 9).
- 4.Enter the NEW User combination.
- 5. Re-enter the NEW User combination to confirm. User combination is now active.
Reinstate User
- 1. Enter Manager combination and hold down last digit of combination until Lock double signals release and the LED stays on .
- 2. PRESS 1 .
- 3. Enter User number (1- 9). User is reinstated.
COMMAND 2
Disable User
- 1. Enter Manager combination and hold down last digit of combination until Lock double signals release and the LED stays on .
- 2. PRESS 2 .
- 3. Enter User number (1- 9). User is temporarily disabled. The User combination is saved and will be valid once reinstated.
COMMAND 3
Delete User
- 1. Enter Manager combination and hold down last digit of combination until Lock double signals release and the LED stays on .
- 2. PRESS 3 .
- 3. Enter User number (1- 9). User is deleted.
COMMAND 7
Audit Lock (ComboGard Pro auditing software, AuditView or LgView3X, and a LA GARD Interface Adapter are required)
To audit the Lock using ComboGard Pro AuditView Software, you can also refer to ComboGard Pro AuditView User Instructions (786.0310) .
Start the Auditing Software Program:
- 1. Plug the USB or Serial Interface Adapter into an available port on the PC.
- 2. Plug the appropriate audit cable for the Entry Device into the USB or Serial Interface Adapter.
- 3. Start auditing software program.
- 4. From the auditing software, select the Configuration menu on the Menu bar.
- 5.Select the appropriate COM port from the list
Audit the Lock:
- 1. Connect the audit cable to the Entry Device.
- 2. Enter Manager combination and hold down last digit of combination until Lock double signals release and the LED stays on .
- 3. Click the safe icon button or select Start Acquisition from the Actions menu on the Menu bar.
- 4. PRESS 7 . The Entry Device will beep once and the audit records will be transmitted to the PC for display on the screen.
- 5. Once the audit is complete, disconnect the audit cable from the Entry Device.
Check User Status
- 1. Enter Manager combination and hold down last digit of combination until Lock double signals release and the LED stays on .
- 2. PRESS AND HOLD 7 until double signals twice.
- 3. Enter the User ID number (1 to 9)
Lock response:
- One beep User is active
- Two beeps User is disabled
- Three beeps User is deleted
- One long beep User is blocked
- 4.To exit PRESS 0
COMMAND 9
Set or Change Time Delay Values
NOTE: If Time Delay is active, it may only be deactivated or the Delay value "decreased" during an Open Period.
- 1. Enter Manager combination and hold down last digit of combination until Lock double signals release and the LED stays on .
- 2. PRESS 9 .
- 3. Enter two-digit Delay Period value (00 to 99 minutes) followed by the two-digit Open Period value (00 to 19 minutes).
NOTE: Entering "0000" will deactivate the Time Delay Feature.
4.Re-enter the Delay and Open Period values to confirm.
LOCK OPERATIONS CHANGE COMBINATION
NOTE: Each combination must be changed independently at the Lock. New combination will not be accepted if it varies from the current combination by only one digit (+/-). When selecting a combination, do not use a birthday or other predictable information that could give correlation between the user and the combination.
CAUTION: Always perform this operation with the door open, and test the opening of the Lock with the new combination several times before closing the door.
- 1. Enter existing combination and hold down last digit of combination until Lock double signals release and the LED stays on .
- 2. Press 0 .
- 3. Enter the NEW combination.
- 4. Re-enter the NEW combination to confirm. The NEW combination is now active.
OPEN LOCK
- 1. Enter a valid combination (or, if in Dual Mode, enter a User combination followed by the Manager combination within 30 seconds)
- 2. Open the Lock within four (4) seconds.
OPEN LOCK WITH TIME DELAY SET
- 1. Enter a valid combination (or, if in Dual Mode, enter a User combination followed by the Manager combination within 30 seconds) and wait for Delay Period to expire.
- 2. Once the Open Period begins, enter any valid combination.
- 3. Open the Lock within four (4) seconds.
TIME DELAY OVERRIDE (If feature is enabled and User 9 is Activated.)
Entry of the Override combination during the Delay Period will open the Lock.
NOTE: If Time Delay is active, User 9 can only be added during an Open Period.
INITIATE SILENT ALARM (Alarm Box Required - P/N 2789-NC)
• To initiate Silent Alarm signal using a Motor Blocking Lock (code level v1.07 or higher) , add or subtract (+/-) 1 to the last digit of the combination(s).
Example:
Combination: 1-2-3-4-5-6
Duress Combination: 1-2-3-4-5-5 or 1-2-3-4-5-7
• To initiate Silent Alarm signal using a Solenoid Lock , add (+) or (-) 1 to the last digit of the combination(s).
dormakaba USA Inc. 749 W. Short St. Lexington KY 40508 T: 859 253 4744 F: 859 255 2655 Toll-free: 877 522 2627
The Lock will open without any indication that the alarm signal has been sent.
BATTERY MAINTENANCE & REPLACEMENT
- It is recommended that batteries be replaced at least once a year.
- The use of a high quality, name brand alkaline battery (Energizer® or Duracell®) is recommended.
- If the battery is depleted, follow the battery changing instructions for the Entry Device you are using. Battery changing instructions can be found in either the Electronic Entry Device Installation Instructions (762.128) or in the respective Entry Device User Instructions for the Entry in operation.
NOTE: The audit features, the software features, features associated with peripheral devices and systems, optional interconnect devices and their associated features, features involving the use of user keys, the duress feature, monitoring features, remote features, and other additional features have not been evaluated by UL. Models 8130 and 3190 keypads are not certified by UL, are not UL listed, and not approved for UL applications."
The latest versions of LA GARD documentation are available for download at www.kaba-mas.com.