Keypad Programming Instructions for the v.G1 Profile Series
Open the original PDF document
View PDF
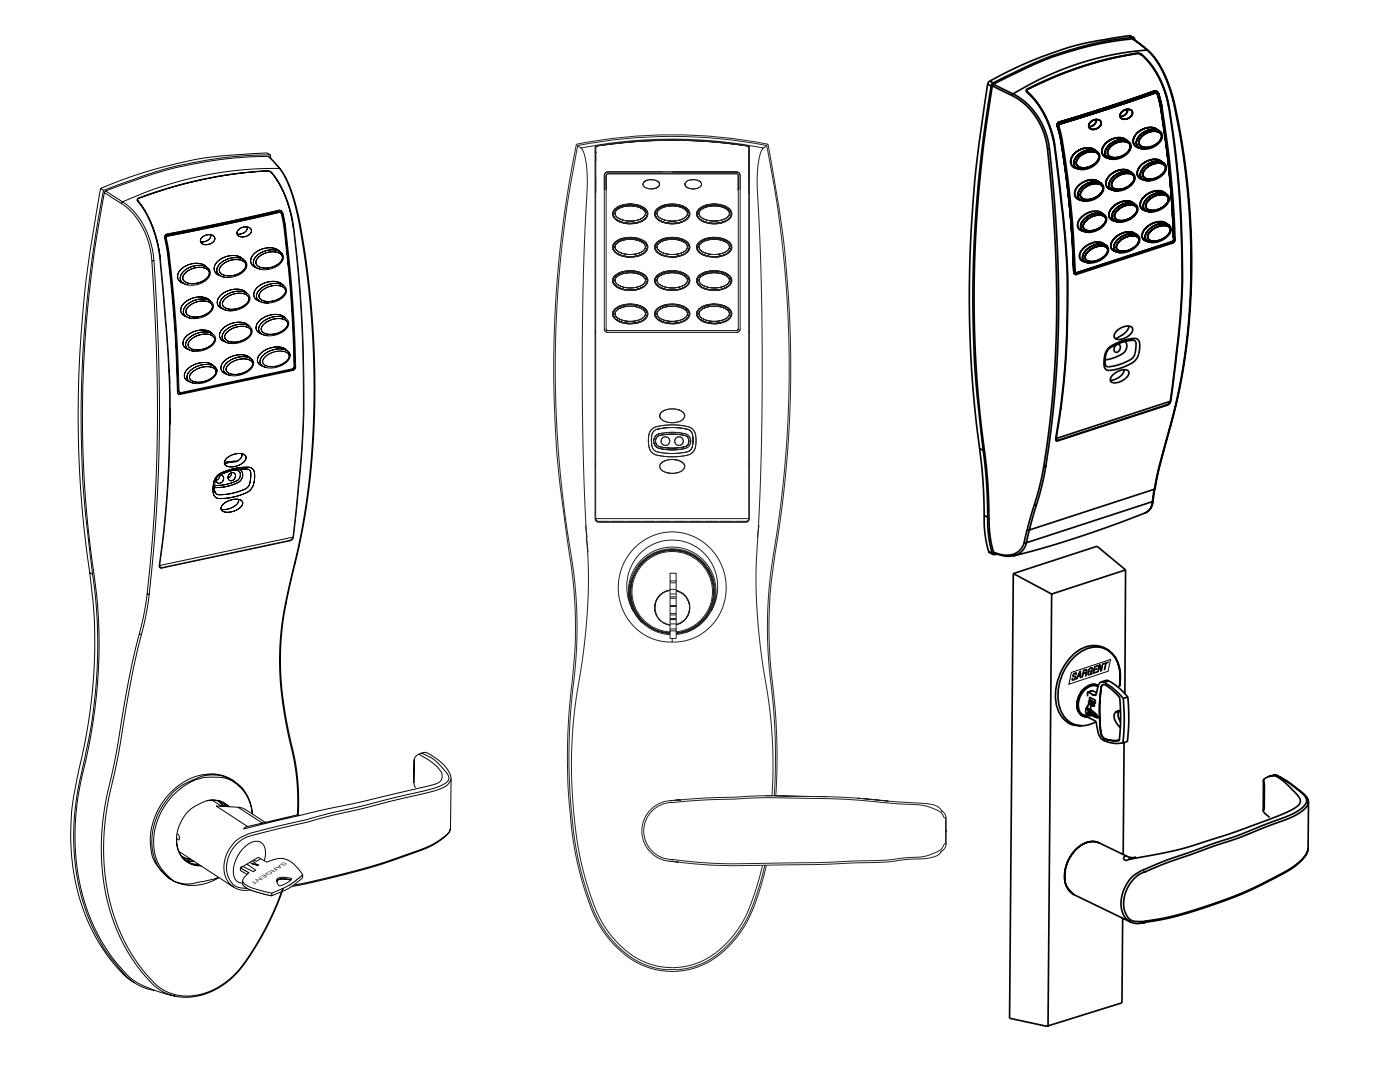
Table of Contents
| Page | ||
|---|---|---|
| 1 |
LK Programming
1-4 |
|
| 2 |
Transaction Log for LK
4 |
|
| 3 | G1-LU, G1-PA, G1-PK, G1-TU, G1-TA, G1-TP Programming5-8 | |
| 4 | G1-PA and G1-TA Programming8 | |
| 5 | Chain Programming9 | |
| 6 |
Log Sheet for Keypad Programming
Back Cover |
The Keypad Lock can support 100 (LK) / 2000 (G1-LU, G1-PK, G1-PA, G1-TU, G1-TP, G1-TA) users. Each user is assigned a User Number in addition to the code used for entry.
Example for v. G1:
| USER TYPE | USER NUMBER |
|---|---|
|
Master
Supervisor |
01
02 |
| Standard | 04-97 (LK) 04-2000 (G1-LU, G1-PK, G1-PA, G1-TU, G1-TP, G1-TA) |
- SofLink™ Plus applications software must be used with (G1-PA & G1-TA) controller for programming
- The Master Code is always User "01". The Master Code assigns the Emergency and Supervisory Codes. It is also used for programming. Users are deleted through the Master Programming Code only
- Emergency code is a 10 second unlock time and will override a thrown deadbolt on a mortise lock
- The Supervisory Code is always User "02". The Supervisory Code allows temporary lock out of selected users, changes duration of unlock time, requests infrared interrogation output, and may add additional User Codes
Note: For LK Emergency Code is at User location "02"
The Supervisory Code is at User location "03"
- The User Codes are entered at user location "04" or higher. User numbers do not have to be used or entered sequentially
- The "Lock Out" user is location dependent. To ensure that all users are locked out of the keypad, program this user at location "04"
- The "Passage" user has precedence over all users except the "Panic" user. The lock must be toggled back into a locked state for other users to function
To Begin Programming:
The Lock Controller is preset at the factory with Master Code "1234".
Entering 1234 * will unlock the lock allowing the lever handle to retract the latchbolt.
Initial Set-Up Procedures:
- The following are typical procedures to be used when setting up your Profile Series v. G1 lock
- If a mistake is made during any of the procedures, depress the "*" key several times until the yellow LED goes out
- If no keystroke is made in a 30 sec. timeframe, the programming up to that point will default and you will have to start over
LK Programming (100 Users)
To determine programming steps for your lock:
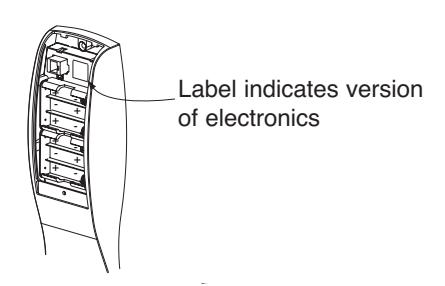
If your label has an LK, use the programming below. If your label has a G1-LU, G1-PK, G1-PA, G1-TU, G1-TP or G1-TA, turn to programming in Section 3.
Change the Master Code
99# 1234* Yellow LED blinks 50# 1# Yellow LED blinks New Master Code* Yellow LED blinks quickly Yellow LED blinks slowly
Yellow LED goes out (If solid, see note)
This example uses the Factory Default 1234*
It is recommended not to use the factory default master code.
To Enter the Emergency Code
99# Master Code* Yellow LED blinks 50# 02# Yellow LED blinks
Emergency (1-6 digits)* Yellow LED blinks quickly
Emergency (1-6 digits)* Yellow LED blinks slowly (If solid, see note)
* Yellow LED goes out
Emergency Code defaults to a 10 second unlock time and will override a thrown deadbolt on a mortise lock.
• Factory Emergency Code is 4321
To Enter or Change the Supervisor Code
99# Master Code* Yellow LED blinks 50# 1# 03# Yellow LED blinks
Supervisory (1-6 digits)* Yellow LED blinks quickly
Supervisory (1-6 digits)* Yellow LED blinks Slowly (If solid, see note)
* Yellow LED goes out
Enter A User Code
99# Master Code* or Supervisory Code* Yellow LED blinks 50# 1# (User Number 04-100)# Yellow LED blinks
User Code (1-6 digits)* Yellow LED blinks quickly
User Code (1-6 digits)* Yellow LED blinks slowly (If solid, see note)
* Yellow LED goes out
Enter A Passage (Maintained) Code
99# Master Code* Yellow LED blinks 50# 0# (User Number 04-100)# Yellow LED blinks
User Code (1-6 digits)* Yellow LED blinks quickly
User Code (1-6 digits)* Yellow LED blinks slowly (If solid, see note)
* Yellow LED goes out
Enter A One Time User Code
99# Master Code* or Supervisory Code* Yellow LED blinks 50# 5# (User Number 04-100)# Yellow LED blinks
User Code (1-6 digits)* Yellow LED blinks quickly
User Code (1-6 digits)* Yellow LED blinks slowly (If solid, see note)
* Yellow LED goes out
To Deactivate/Reactivate "Beep" With Key Stroke
99# Supervisory or Master Code* Yellow LED blinks 30# 0# 0# (Off) (1# = On) Yellow LED blinks
* Yellow LED blinks quickly
* Yellow LED blinks slowly (If solid, see note)
* Yellow LED goes out
Note: If turning beep off, not audible on last two steps.
To Clear the Entire Memory
99# Master Code* Yellow LED blinks 46# 00000# 00000# Yellow LED blinks
* Yellow LED blinks quickly
* Yellow LED goes solid and begins to blink * Yellow LED goes out (If solid, see note)
This deletes ALL Codes, including Master, Emergency and Supervisory. The Master Code is set back to 1234*, Door Number to 0001 and Unlock Time to 5 seconds. If the Master Code is not known, factory assistance will be required to clear the memory. Call 1-800-810-9473.
To Program Door Name into Keypad
99# Master Code* Yellow LED blinks
43# Door Name (up to 5 digits)# Yellow LED blinks
To Interrogate Transaction Log
99# Supervisory or Master Code* Yellow LED blinks
0# Yellow LED blinks quickly
* Yellow LED blinks slowly (If solid, see note)
* Yellow LED goes out
70# 0# 0# Yellow LED blinks
* Yellow LED blinks quickly
* Yellow LED goes out (If solid, see note)
For additional information, see "Transaction Log".
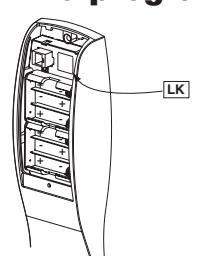
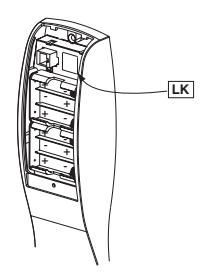
Hold an infrared printer up to the infrared LED (as shown). An HP82240B Infrared Printer can be used to download information from the keypad to a printout.
Note: Seq. # 0 is the programming request to output the entries. Sequence numbers 1-9 are the actual entries.

When done printing, the green LED will turn off
and the yellow LED will blink slowly. * Yellow LED goes out
To Reset/Clear Transaction Log
99# Master Code* Yellow LED blinks
76# 00000# 00000# Yellow LED blinks
* Yellow LED blinks quickly * Yellow LED blinks slowly
* Yellow LED goes out (If solid, see note)
To Delete A User
99# Master Code* Yellow LED blinks 50# 1# (User Number 04-100)# Yellow LED blinks
* Yellow LED blinks quickly
* Yellow LED blinks slowly (If solid, see note)
* Yellow LED goes out
To Enable/Disable A User
56# 0# (Enable) or 1# (Disable)
(User No. 04-100)# Yellow LED blinks
99# Master Code* Yellow LED blinks
* Yellow LED blinks quickly
* Yellow LED blinks slowly (If solid, see note)
* Yellow LED goes out
To Set Unlock Time
99# Master Code* Yellow LED blinks 11# (1-99 sec)# 0# Yellow LED blinks
Yellow LED blinks quickly Yellow LED blinks slowly (If solid, see note)
Yellow LED goes out
The Unlock Time is adjustable for Momentary Operation. A 5 second unlock time is recommended to extend battery life. Once the unlock time is entered, it is the same for ALL users except 02.
Status Indicators
No Green LED after code is entered once, but flashes after 3 consecutive entries- Invalid Code 4 Long beeps after code is entered - Low Battery.
4 long beeps after code is entered, 4 more long beeps - Voltage (batteries) too low to operate Enter Emergency Code to gain 1 entry.
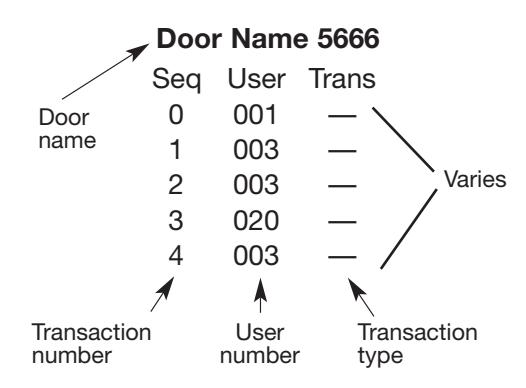
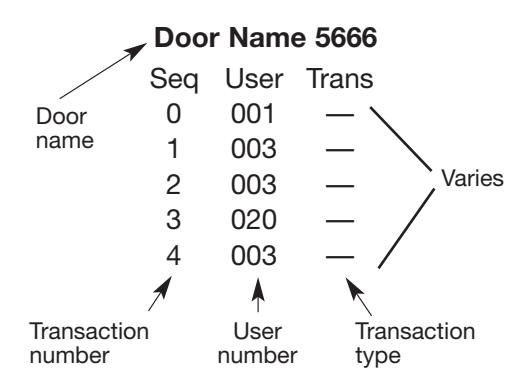
Transaction Log (LK Only)
To output the last 15 transactions, enter 99# Supervisory or Master Code 70 # 0 # 0 # .
• Examples on this page are for the 100 user, 15 transaction unit
Sequence Number
- Single digit 0-9
- Latest transaction 0
- Oldest transaction 9
User Number
- Three digits 001 through 099
- User numbers assigned at time of programming
Transaction Descriptions
Will vary
Optional Equipment
- Printer Paper (6 Rolls) 52-0034 used for infrared printers
- Infrared Printer 52-2069 used to download the user and transaction type.
- Remote Unlocking 52-2071 used for remote unlocking of Profile mortise lock. When the deadbolt is thrown and the remote unlocking feature is used, both the latchbolt and deadbolt can be retracted by turning the lever handle.
Note: Seq. # 0 is the programming request to output the entries. Sequence numbers 1-9 are the actual entries.
Hold an infrared printer up to the infrared LED (as shown). An HP82240B Infrared Printer can be used to download information from the keypad to a printout.

G1-LU, G1-PK, G1-TU and G1-TP Programming (2000 Users)
To determine programming steps for your lock:
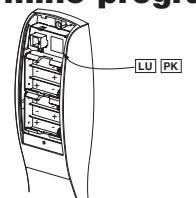
If your label has a G1-LU, G1-PK, G1-PA, G1-TU, G1-TP, G1-TA, then use the programming below. If your label has an LK, turn to LK programming in Section 1.
For RF Technology products (G1-TU, G1-TP, G1-TA), please take note of the following advisories:
Advisory 1: There is a time delay period between initially depressing the RF FOB button and the actuation of the lock. In some cases, the RF FOB will have to be depressed (and held for 3 seconds) multiple times to successfully actuate the lock.
Advisory 2: In the event that there are co-located RF Technology locks using individual RF FOBs that are depressed simultaneously, the locks may not actuate due to cross interference between the locks and the RF FOBs. The "User" should repeatedly depress (and hold for 3 seconds) the RF FOB button until actuation of the lock occurs.
Change the Master Code
99# 1234* Yellow LED blinks 50# 1# 1# Yellow LED blinks
New Master Code* Yellow LED blinks quickly
New Master Code* Yellow LED blinks slowly (If solid, see note)
Yellow LED goes out
This example uses the Factory Default 1234*
It is recommended not to use the factory default master code.
Change the Supervisor Code
99# Master Code* Yellow LED blinks Yellow LED blinks 50# 1# 2#
Supervisor (1-6 Digits)* Yellow LED blinks quickly
Supervisor (1-6 Digits)* Yellow LED blinks slowly (If solid, see note)
Yellow LED goes out
Enter A User Code
99# Master Code* Yellow LED blinks 50# 1# (User Number 04-2000)# Yellow LED blinks User Code (1-6 digits)* Yellow LED blinks quickly
User Code (1-6 digits)*
Yellow LED blinks slowly (If solid, see note)
Yellow LED goes out
Enter A Panic User Code
99# Master Code* Yellow LED blinks 50# 9# (User Number 04-2000)# Yellow LED blinks User Code (1-6 digits)* Yellow LED blinks quickly
User Code (1-6 digits)* Yellow LED blinks slowly (If solid, see note)
Yellow LED goes out
Enter A Passage (Maintained) Code
99# Master Code* Yellow LED blinks 50# 0# (User Number 04-2000) # Yellow LED blinks User Code (1-6 digits)* Yellow LED blinks quickly
User Code (1-6 digits)* Yellow LED blinks slowly (If solid, see note)
Yellow LED goes out
Note: The "Passage" user has precedence over all users except the "Panic" user. The lock must toggled back into a locked state for other users to function.
To Enter the Emergency Code
Yellow LED blinks 99# Master Code* 50# 7# (User Number 4-2000)# Yellow LED blinks Emergency Code (1-6 digits)* Yellow LED blinks quickly
Emergency Code (1-6 digits)* Yellow LED blinks slowly (If solid, see note)
Yellow LED goes out
Enter a Lock Out User Code
99# Master Code* Yellow LED blinks 50# 3# (User Location 04-2000)# Yellow LED blinks
User Code* Yellow LED blinks quickly
User Code* Yellow LED blinks slowly (If solid, see note)
* Yellow LED goes out
Note: The "lock out" user is location dependent. To ensure that all users are locked out of the keypad, program this user at "user location" #4.
Enter A One Time User Code
99# Master Code* Yellow LED blinks 50# 5# (User Number 04-2000)# Yellow LED blinks
User Code (1-6 Digits)* Yellow LED blinks quickly
User Code (1-6 Digits)* Yellow LED blinks slowly (If solid, see note)
* Yellow LED goes out
Enter An Extended Unlock User Code
99# Master Code* Yellow LED blinks 50# 4# (User Location 04-2000)# Yellow LED blinks
User Code (1-6 digits)* Yellow LED blinks quickly
User Code (1-6 digits)* Yellow LED blinks slowly (If solid, see note)
* Yellow LED goes out
Enter a Card, Tag, Fob and RF Fob User
99# Master Code* Yellow LED blinks 50# Yellow LED blinks
(Select only one number below, end it with a #, ie 4#)
0= Passage Code; 1= Standard User; 3= Lockout Code; 4= Extended Unlock User; 5= One Time User; 7= Emergency
Code; 8= Communications Enable; 9= Panic User (Yellow LED blinks) (User Number 04-2000)# Yellow LED blinks
* Yellow LED blinks Quickly
* Yellow LED blinks Slowly (if Solid See Note)
Present Card, Tag or RF Fob Beep / Yellow LED blinks * Yellow LED blinks Slowly * Yellow LED Goes Out
Enter a User Code + Card, Tag, FOB and RF Fob
99# Master Code* Yellow LED blinks 50# 1# (User Number 04-2000)# Yellow LED blinks
User Code (1-6 digits)* Yellow LED blinks quickly
User Code (1-6 digits)* Yellow LED blinks slowly (If solid, see note)
Present Card, Tag, Fob or RF Fob BEEP / Yellow LED blinks * Yellow LED blinks slowly * Yellow LED goes out
To Activate The RF FOB Function
Note: Press the button on the RF FOB. If the controller beeps and LEDs flash, this procedure does not have to be done. RF enabled will shorten the battery life of the unit.
Press the reset button located in the battery compartment and any front key at the same time for 1 second, then release buttons.
Yellow LED blinks slowly Enter code 1030# Yellow LED blinks slowly 1# Yellow LED blinks slowly 1# Or (0# to disable The RF Function) Yellow LED blinks slowly * Yellow LED blinks faster * Yellow LED blinks slowly
* Yellow LED out
To Clear the Entire Memory
99# Master Code* Yellow LED blinks 46# 00000# 00000# Yellow LED blinks
* Yellow LED blinks quickly
* Yellow LED blinks very fast for 10 sec., then slow
* Yellow LED goes out
Turn OFF Audio Beep verification on every Key Depression
99# Master Code* Yellow LED blinks 30# 0# 0# (Off) (1# = On) Yellow LED blinks
* Yellow LED blinks quickly
* Yellow LED blinks slowly (If solid, see note)
* Yellow LED goes out
Turn ON Yellow LED verification on every Key Depression
99# Master Code* Yellow LED blinks 30# 1# 1# (On) (0# = Off) Yellow LED blinks
* Yellow LED blinks quickly
* Yellow LED blinks slowly (If solid, see note)
* Yellow LED goes out
Set Time
99# Master Code* Yellow LED blinks 41# hh:mm# (24hr Format) 0# Yellow LED blinks
* Yellow LED blinks quickly
* Yellow LED blinks slowly (If solid, see note)
* Yellow LED goes out
24Hr Format = 1PM = 13, 2PM = 14.......10PM = 22, Midnight = 00 Example 13:15 = 1:15PM
Daylight Savings Time
99# Master Code* Yellow LED blinks 30# 13# 1# (On) (0# = Off) Yellow LED blinks
* Yellow LED blinks quickly
* Yellow LED blinks slowly (If solid, see note)
* Yellow LED goes out
Set Date (Today's Date)
99# Master Code* Yellow LED blinks 42# mmddyy# D.O.W.# (Sunday=1) Yellow LED blinks
* Yellow LED blinks quickly
* Yellow LED blinks slowly (If solid, see note)
* Yellow LED goes out
D.O.W. = Day of week
Set Unlock Time
99# Master Code* Yellow LED blinks 11# (1-99 sec.)# 0# Yellow LED blinks
* Yellow LED blinks quickly
* Yellow LED blinks slowly (If solid, see note)
* Yellow LED goes out
The Unlock Time is adjustable for momentary operation. A 5 second unlock time is recommended to extend battery life. Once the unlock time is entered, it is the same for ALL users except 02.
To Enable/Disable A User
99# Master Code* Yellow LED blinks 56# 0# (Enable) or 1# (Disable)
(User No. 04-500)# Yellow LED blinks
* Yellow LED blinks quickly
* Yellow LED blinks slowly (If solid, see note)
* Yellow LED goes out
To Delete A User
99# Master Code* Yellow LED blinks 50# 1# (User Number 04-500)# Yellow LED blinks
* Yellow LED blinks quickly
* Yellow LED blinks slowly (If solid, see note)
* Yellow LED goes out
Status Indicators
- 3 very rapid beeps after User Code entered Invalid User Code
- 4 long beeps after User Code entered Low Battery Indication
- 4 long beeps after User Code entered, 4 more long beeps Voltage too low to operate. Enter Master or Emergency Code to gain 1 entry
- 1 beep after User Code entered Disabled user
- 4 beeps after User Code entered Deadbolt thrown
- 3 beeps after User Code entered User lockout
Alternating red/green LED — Awaiting second entry of Code/Card, Tag or Fob user
4 G1-PA & G1-TA Programming
To determine programming steps for your lock:
If your label has a G1-PA or G1-TA and no keypad, then use the programming below.
If your label has an LK, turn to LK Programming. If your label has a G1-LU, G1-PK, G1-TU or G1-TP, turn to programming instructions in previous section
In a Prox Only (PA) or RF Technology & Prox (G1-TA) configuration, all programming must be completed using SofLink™ Plus Software. The Software includes a convenient Software User's Manual (A7720A), to be used as a programming guide.
To program the lock for the first time (only) the following steps are required.
- 1. Using SofLink Plus software, Hotsync door information to PDA.
- 2. On PDA select "Imp/Exp" "Do NOT click OK at this point"
PDA Response: "Please enter your communications code at the door"
3. Wake up the G1-PA or G1-TA lock by presenting an HID Credential (or by depressing an RF Fob).
Lock Response: Audible beep
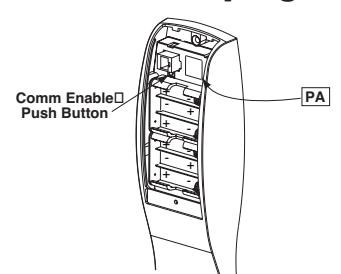
- 4. Within a couple of seconds, press and hold the PA controller CommEnable push button (below batteries) for 2 seconds, then release the button.
- 5. On the PDA, click "OK".
The PDA will begin transferring (0-100%) of the door data to the lock.
6. If there was an error, check connections and repeat process starting at Step 2.
Note: *The Card will NOT actuate the lock for 45 seconds from the start of the downloading process. After this time expires, the card will function as defined by its User Type.
Reprogramming
Note 1: With a proximity card, fob, tag or RF Fob Card selected as a "CommEnable" User, presenting the "CommEnable" card to the lock will initiate communications after performing Step 2 (above) without the need to press the CommEnable button.
Note 2: After performing "first time programming" procedure, create a CommEnable card to facilitate communications from then on.
6 Chain Programming
When programming multiple User Numbers and Codes into the LK, G1-LU, G1-PK, G1-TU and G1 TP Lock, it is not necessary to leave and re-enter the programming Mode (50) for each entry. Multiple entries may be chained together and the three different types of user codes (Standard, Passage and One Time) may be mixed.
The format to be used is as follows:
"T" is the Type of user code with "1" Standard, "2" Passage and "3" One Time.
"UN_" is U ser N umber (04-99)
"UC_" is User Code (2 to 6 digits) which correlates with the User Number
99# Master or Supervisor Code* 50# Type# User Number a# User Code a* User Code a* T# UNb# UCb* UCb* T# UNc# UCc* UCc* ...... T# UN_# UC_* UC_**
An example with four user codes is shown below:
| Type | User Number | User Code | |
|---|---|---|---|
| 1 | 05 | 875 | |
| 3 | 12 | 2226 | |
| 2 | 08 | 5444 | |
| 1 | 50 | 3367 | |
Using Master Code 4732 and above information, the lock would be programmed as follows:
99# 4732* 50# 1# 05# 875* 875* 3# 12# 2226* 2226* 2# 08# 5444* 5444* 1# 50# 3367* 3367*
If all user codes are type 1, it is not necessary to enter the type number with each entry.
The format now simplifies to:
99# Master or Supervisor Code* User Number a# User code a* User Code a* UNb# UCb* UCc* UCc*...... UN_# UC_* UC_**
An example with three user codes is shown below:
| Type | User Number | User Code | |
|---|---|---|---|
| 1 | 07 | 77 | |
| 1 | 15 | 67832 | |
| 1 | 91 | 7568 | |
Using Master Code 45988 and above information, the lock would be programmed as follows:
99# 45988* 07# 77* 77* 15# 67832* 67832* 91# 7568* 7568**
To chain the User Number delete procedure:
99# Master Code* User Number a#** UNb#** UNc#**...... UN #****
Using the information from the above example:
99# 45988* 07#** 15#** 91#****
| 6 | Supplemental – Individual "Door" Log Sheet for keypad programming |
|---|---|
| Lock Model: |
| Table 1: Main Codes - User Programmed "Door" Log | |||
|---|---|---|---|
| Function | User Number | Default Code | User Programmed Code |
| Master Code | 01 | 1234* | |
| Supervisory Code | 02 | ||
*Note: If memory is cleared, you must reprogram Emergency code. The Master code resets back to 1234*.
| Table 2: User Programmed "Door" Log | ||||
|---|---|---|---|---|
| User Name | User Type | User Number | User Code | Card/Fob#, Notes |
Door Name:
Location: