Isonas Pure Access Active Directory Installation Guide
Open the original PDF document
View PDF

Pure Access Active Directory Integration Guide
April 25, 2018
SUMMARY
The integration between Pure Access and Active Directory allows for the management of users and credentials in Pure Access via Active Directory.
Functionality includes:
- Creating, updating, or deactivating users in Pure Access based on changes made in Active Directory.
- Adding or removing users from a Pure Access group based on adding or removing users from groups in Active Directory.
- Badge or Keypad credential management in Pure Access based on adding Badge ID's or Keypad numbers to a user in Active Directory.
TERMS
ADC – Active Directory Connect windows service
AD – Active Directory
PA – Pure Access
REQUIREMENTS
- Active Directory running on Windows Server 2008 R2 or later.
-
PC\Server\VM with Windows OS to install the AD Bridge windows service on.
- o .NET 4.5 framework is required on this OS.
-
Pure Access user with the Administrator user role.
- o Only users with the Pure Access "Active Directory Modify" role will be able to see and modify the Active Directory configuration in Pure Access.
- Active Directory user with Administrator level privileges.
-
A Pure Access tenant with one of the below license types:
- o PA-C-51-100, PA-C-101-250, PA-C-251, PA-MANAGER
ARCHITECTURE

The Active Directory Connect (ADC) windows service is the key component to the AD integration. The ADC is installed on site on a computer that is within the same domain as Active Directory. For network security purposes, this ADC serves as a communication connection between AD and Pure Access.
The ADC communicates internally with AD and makes outbound (external) requests to Pure Access. For Pure Access Cloud customers, this means that no inbound connections through the firewall are required for Pure Access to communicate with AD.
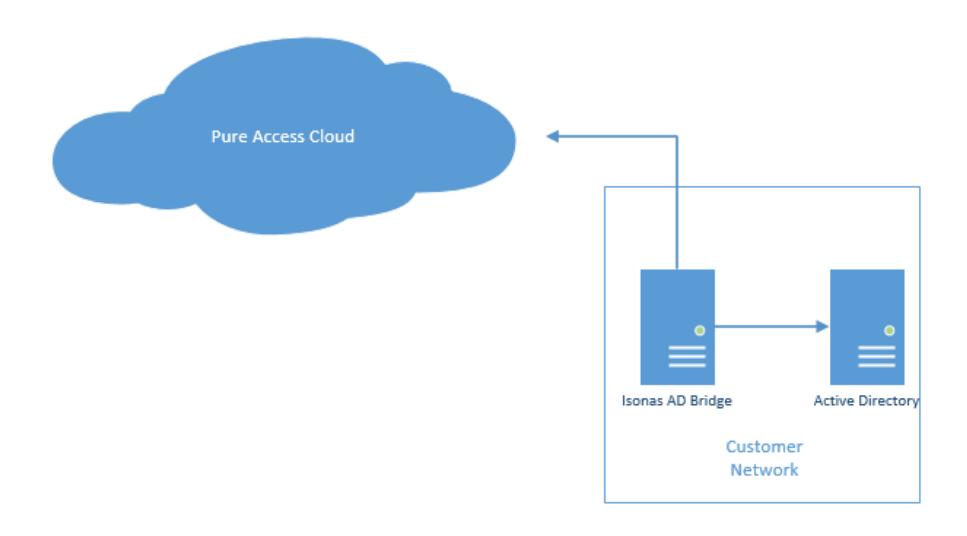
The ADC uses the following communication protocols:
- HTTPS to Pure Access Cloud (may be http or https for Pure Access Manager).
- LDAP to Active Directory.
The ADC communicates to Pure Access in order to:
- Refresh a list of AD user attributes used for mapping to Pure Access user fields.
- Refresh a list of AD groups that can be mapped to Pure Access user groups.
- Synchronize mapped AD users and groups
- Report errors that it encountered to Pure Access.
The ADC communicates with AD in order to:
- Get a list of available user attributes that are sent to PA for mapping.
- Get a list of available groups that are sent to PA for mapping.
- Query AD for changes made since the last time AD was queried (partial sync).

Query AD for all users and groups that have been mapped in PA (full sync).
HOW IT WORKS
OVERVIEW
The Active Directory integration with PA is best understood as a mapping between groups in AD and user groups in PA.
Once group mappings have been established you will add user field mappings to control the user values in AD that are synchronized with user fields in PA.
Once these mappings have been established and the ADC has been configured, the ADC will perform Full and Partial Synchronizations with AD and PA.
The high level flow looks like this:
- 1. Install the ADC windows service on a machine that is on the same domain as the customer's Active Directory.
- 2. Start the ADC windows service.
- 3. In Pure Access, define 1:1 mappings between a Pure Access user field and an Active Directory user attribute (first name -> sn, last name -> givenName, etc).
- 4. In Pure Access, define 1:1 mappings between a Pure Access user group and an Active Directory group.
- 5. Initiate the initial full sync from Pure Access.
- 6. After the full sync is complete you will see that users who exist in AD under the groups mapped in step 3 now exist and belong to the mapped PA group.
- 7. The ADC now waits until it is time to do a partial sync or a full sync.
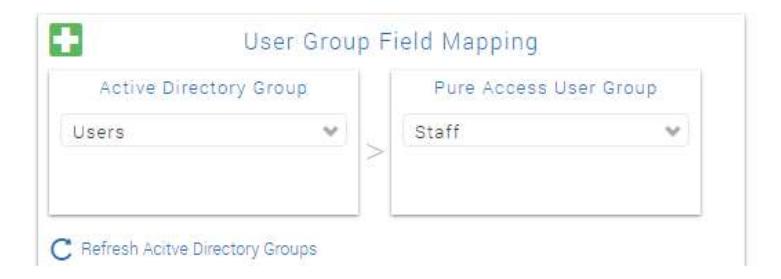
GROUP MAPPINGS
Group mappings refer to the process of mapping a PA group to an AD group. Once you have associated a PA group to an AD group, all users in the AD group will be imported into PA and assigned to the PA group.
In the image below, the AD group Users has been mapped to the PA group Staff . When synchronized, all AD users in the Users group will be imported into PA and assigned to the Staff group.
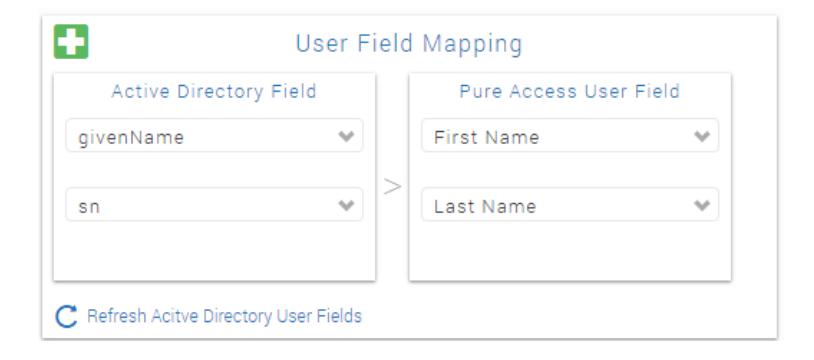
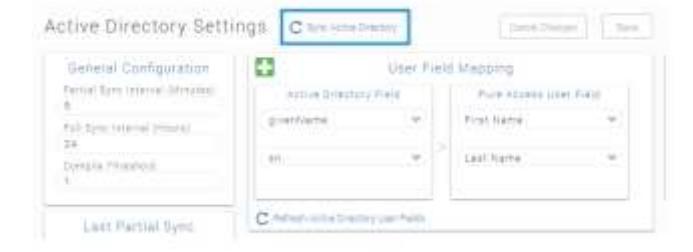
USER FIELD MAPPINGS

User field mappings refer to the user properties in AD that will be kept in sync with user properties in PA.
When users are imported into PA from AD, only the mapped user fields will be imported.
In the below image, givenName and sn in AD are mapped to First Name and Last Name in PA.
If the givenName of a user in AD is changed, those changes will be also made to the user in PA.
AVAILABLE USER FIELDS
The following fields are available to be mapped to a user in PA.
- First Name
- Last Name
- Middle Initial
- Employee ID
- Notification Email Address
-
Badge Credential
- o Numeric badge id.
-
Keypad Entry Credential
- o Numeric keypad value.
-
Primary Area
- o Name of the primary area that the user belongs to. Only use this if you are using multiple areas.
FULL SYNC
During a full sync the following happens:
- The ADC asks Pure Access for the list of mapped user fields and mapped groups.
- The ADC queries AD for all users in the mapped groups that have been mapped in Pure Access.
-
The ADC builds a list of users and the groups they belong to and sends those users to Pure Access.
- a. Only the user attributes that have been mapped in PA will be sent.
- Pure Access inspects each user it receives and either creates, updates, or deactivates the user.

Note :
- If you are configuring the ADC for the first time you must manually initiate a full sync from Pure Access. After this initial full sync is done the ADC will do a full sync every X hours (24 hours is the default).
- First Name and Last Name must be mapped in order to perform a full sync. A full sync will not be done until these fields are mapped in Pure Access.
-
During the first full sync, users are matched against existing users in the tenant by
first name
and
last name
.
- o If an exact first name\last name match is found then the user is updated and assigned the AD objectGUID of the AD user.
- o If an exact first name\last name match is not found, then a new user is created and assigned the AD objectGUID of the AD user.
- o **Please note: if there is not an exact match of first and last name, you may end up with a duplicate user. Please ensure names are the same in AD and PA before syncing the data.
- After the initial full sync, users in Pure Access are matched to the AD users objectGUID property.
- The full sync time can be configured to happen from every 1 hour to every 65536 hours. The default is every 24 hours.
- A full sync will synchronize users that have been deleted in AD and deactivate that user in Pure Access.
PARTIAL SYNC
Because a full sync is time consuming and often unnecessary, the ADC performs a partial synch more frequently than a full sync.
During a partial synch the following happens:
- 1. The ADC asks Pure Access for the list of mapped user fields and mapped groups.
- 2. The ADC queries the AD DirSync control for all changes that have happened since the last time the ADC queried the AD DirSync control.
- 3. The ADC inspects the query results for changes that were made to a user that belongs to a group that is mapped in Pure Access.
- 4. If a user(s) is found then that user(s) is sent to Pure Access.
- 5. Pure Access inspects each user it received and either creates or updates the user.
Note :
- A partial sync is never performed until the first full sync is performed.
- A partial sync will not report that a user has been deleted. Deleted users in AD are only deactivated in PA during a full sync.
- **Please Note: Best Practice is to disable users in AD, which a partial sync will pick up and send to PA and disable that user's access in PA.

INSTALLATION AND CONFIGURATION
The steps below will walk you through installing and configuration the AD integration for the first time.
BEFORE YOU START
Before beginning the installation and configuration you should have the following:
-
1. Active Directory authentication information:
- a. Username and password of a user with Administrator privileges.
- b. AD domain.
-
2. Pure Access authentication information:
- a. URL, username and password of a user with the Administrator role.
- 3. The IsonasADConnect.msi installer. (this can be found at on our website)
- 4. For Pure Access Cloud customers, ensure that outgoing requests are allowed on port 443.
CONFIGURE THE ADC WINDOWS SERVICE
The first step is to install the ADC windows service and configuration using a standalone configuration utility.
-
1. Run the
IsonasADConnect.msi
on the customer site.
- a. The installer installs a windows service called ISONAS AD Connect as well as the ADConnect Configuration utility
- 2. Navigate to the install location and run the ADConnectConfiguration.exe utility.
- 3. In the Pure Access section, enter URL and authentication info.
- 4. Click "Test Pure Access" and ensure that you receive a success message.
-
5. In the Active Directory section, enter the Domain, Username, and Password of the AD user.
- a. The Hostname and IP fields are used for debugging purposes.
- 6. Click "Test Active Directory" and ensure that you receive a success message.
- 7. Click "Save" to save you changes.
- 8. See Troubleshooting if you were not able to complete the steps.
STARTING ADC
- 1. Open the Services mmc console by going to Start -> Run and typing "services.msc".
- 2. In the Services console, select the ISONAS AD Connect service and click start.
- 3. Navigate to the ADC installation directory and open the adpod.log file.
- 4. Ensure the following messages are displayed at the beginning of the file.
5. See Troubleshooting if you were not able to complete the steps.
a.

CONFIGURING PURE ACCESS
- 1. Log in to Pure Access using the credentials that were used to configure the ADC.
- 2. Navigate to "Settings -> General Settings -> Active Directory".
-
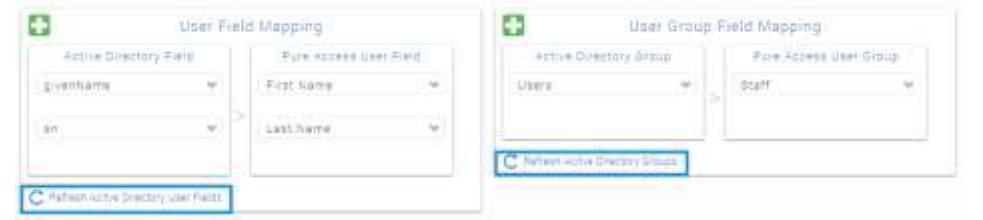
3. Click the "Refresh Active Directory User Fields" and "Refresh Active Directory Groups" buttons
- a. "Refresh Active Directory User Fields" loads the available AD user fields for mapping.
- b. "Refresh Active Directory Groups" loads the available AD groups for mapping.
-
4. Map groups by selecting an AD group from the "Active Directory Group" drop down and a corresponding PA user group from the "Pure Access User Group" drop down.
- a. Users in the Active Directory group will be associated with the Pure Access group when they are imported during a full or partial sync.
-
5. Map user fields by selecting a value from the Active Directory field drop down and a corresponding user field from the "Pure Access User Field" drop down.
- a. Note: First Name and Last Name are required to be mapped in Pure Access. A full sync will not run until First Name and Last Name are mapped.
- b. When a user is synchronized in from AD to PA, only the AD fields that are mapped will be used to populated or update the PA user.
- 6. Click "Save" to save you changes.
Initial Full Sync
Now that the ADC and PA have been configured you are ready to perform an initial full sync.
1. Click the "Sync Active Directory" link to initiate a full sync.
- a. Note: An initial full sync will match AD users by first name\last name. If a user in PA has a name that is spelled differently in AD the user will be duplicated in PA.
- b. Note: Depending on how many users exist in AD, the full sync may take some time.
-
2. You can check the status of the initial full sync by
- a. Inspecting the adpod.log file located in the installation directory of the ADC.

b. Looking at the value for Last Full Sync in the Active Directory tab in PA.
NEXT STEPS
After the initial full sync is complete the ADC will run until it is time to do a Partial or Full sync.
You can change the default intervals that these occur by changing the Next Partial Sync Time or Next Full Sync Time values in PA.
If you wish to do an immediate full sync simply click the "Sync Active Directory" link.
TROUBLESHOOTING
-
Q
: When I try to save the ADC configuration I get an error message.
- A : Give the windows "Users" group full permissions to the root folder that the ADC was installed at.
-
Q
: When I try to start the ADB service I get an error message.
- A : Give the windows "Users" group full permissions to the root folder that the ADC was installed at.
- A : Configure the ADC windows service to run under a user account with higher privileges than the default System account.
-
Q
: I clicked "Sync Active Directory" but nothing happened.
- A: Check the adpod.log file for exception messages and get in touch with ISONAS tech support at support@isonas.com
FACTS
- The first time a Full Sync is performed, users from AD are matched against users in PA by first name\last name.
-
If a user is deleted in AD the corresponding user in PA will only be deactivated during a full sync.
- o **Best Practice when a user needs to be removed is to disable the user from AD, a partial sync will send that change to PA and disable the user.
- All user management must happen in AD. If a user is modified through PA the changes will be overridden by the AD values when the next Full Sync occurs.