Installation Instructions for 988-988CR-988Y Surface Bolt
Open the original PDF document
View PDFBOTTOM OF
Installation Instructions
FRAME STOP
MOUNTING
(PUSH SIDE)
WINDSTORM
Hole
(prepared by
door mfg.)
Grommet
Nut
INSTALLATION PROCEDURE
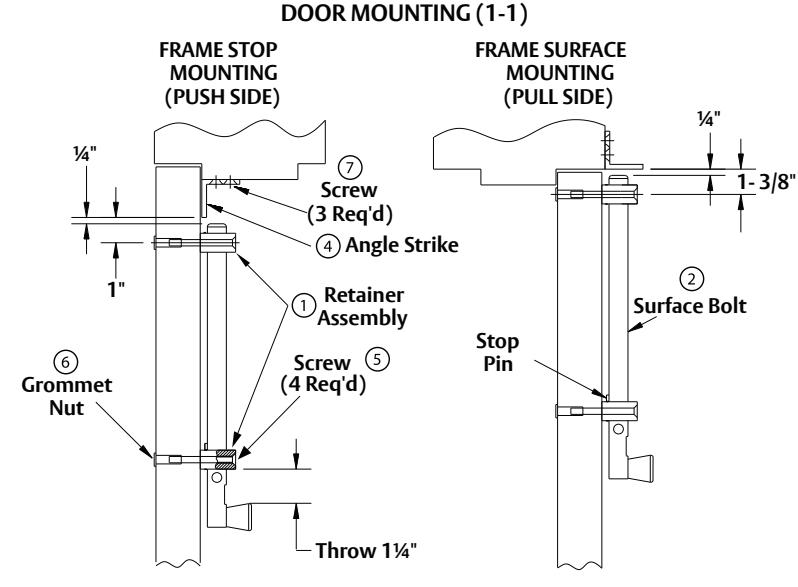
1. Strike Mounting:
- Determine if bolt is to be mounted at top (1-1) or bottom (1-2) of door.
- A 2¾" backset is recommended.
1-1. Top of Door (frame mounted strike):
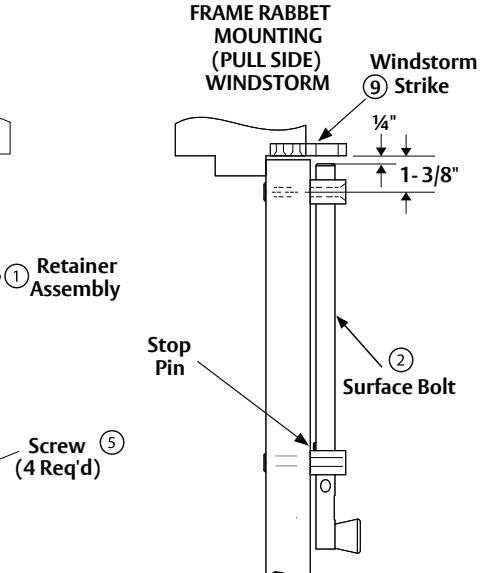
- Locate strike on frame as shown and mark hole locations. For Windstorm Strike, factory frame preparation is supplied.
- Drill and tap for 1/4" 20 machine screws (#8 drill and 1/4" - 20 tap are required).
- Secure strike with three (3) 1/4"- 20 x 3/4" screws (supplied).
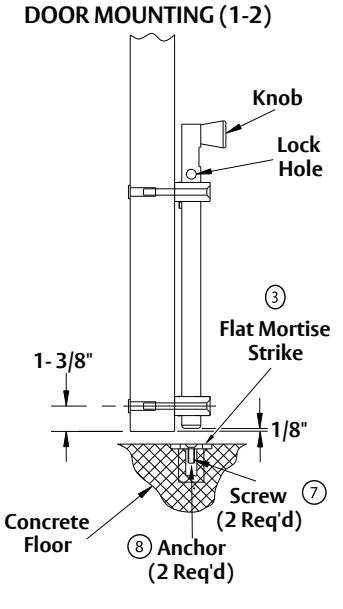
1-2. Bottom of Door (floor mounted strike):
- 1-1/8" dia. x 1½" deep hole required in floor to accept surface bolt.
- Mark and drill two (2) 7/16 dia. x 11/4 " deep holes for strike anchors.
- Secure strike with two (2) anchors and 1/4" 20 x ¾ " screws (supplied).
2. Surface Bolt Mounting:
- Slide knob end retainer to stop pin.
- Locate surface bolt and retainers on door as shown. Mark location of through-bolts.
- Check bolt alignment in strike before drilling holes.
- Drill four (4) 9/32 dia. holes through door.
- Open holes for grommet nuts on opposite side of door using "V" size drill.
- Secure retainers to door using grommet nuts and – 20 x 2-3/4 "screws (supplied).
- Check for proper operation.
🕰 WARNING
This product can expose you to lead which is known to the state of California to cause cancer and birth defects or other reproductive harm. For more information go to www.P65warnings.ca.gov.
(4 Reg'd)
TOP OF
| ltem | Description | Qty. | |
| 1 | Retainer | 2 | |
| 2 | Surface Bolt | 1 | |
| 3 | Flat Mortise Strike | 1 | |
| 4 | Angle Strike | 1 | |
| 5 | Screw, ¼–20 x 2-3/4" | 4 | |
| 6 | Grommet Nut | 4 | |
| 7 | Screw, ¼–20 x ¾" | 3 | |
| 8 | Anchor | 2 | |
| 9 | Windstorm Strike | 1 | |
| NOTE: | NOTE: Parts used depend on mounting application. | ||