HID-iCLASS-SE-Biometric-iCLASS-SE-Display-Reader-Alternate-Reader-Assembly-Installation-Guide
Open the original PDF document
View PDF

PLT-02969 Rev. A.2
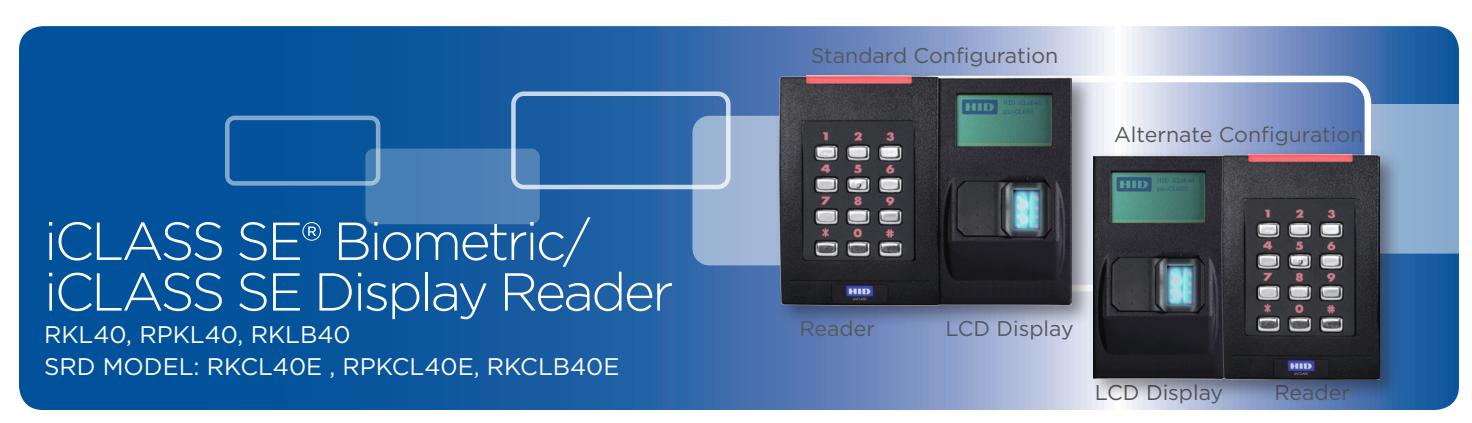
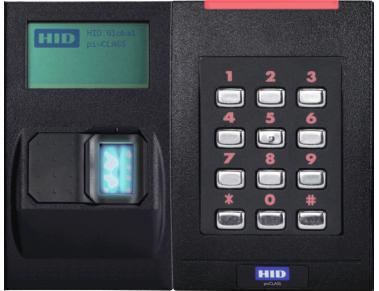
Alternate Reader Assembly
The following steps reconfigure the reader assembly to position the LCD Display component on the left side of the assembly.
-
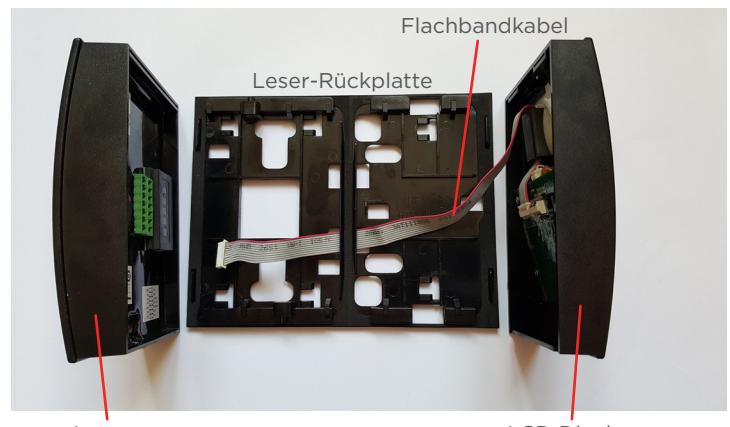
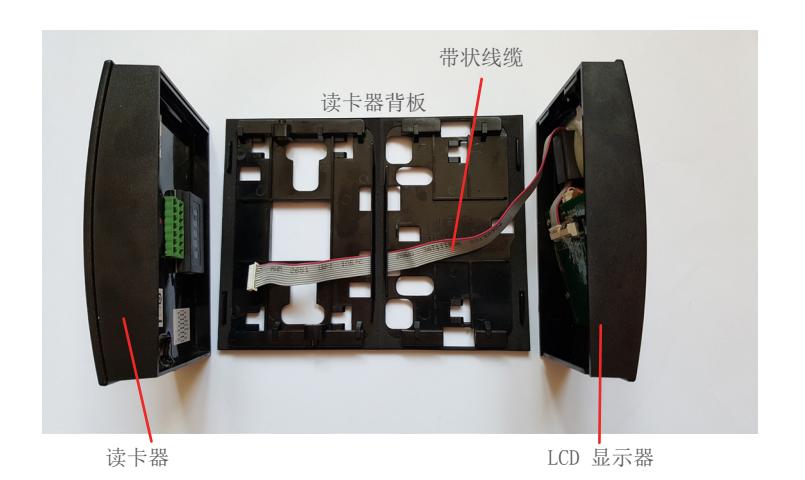
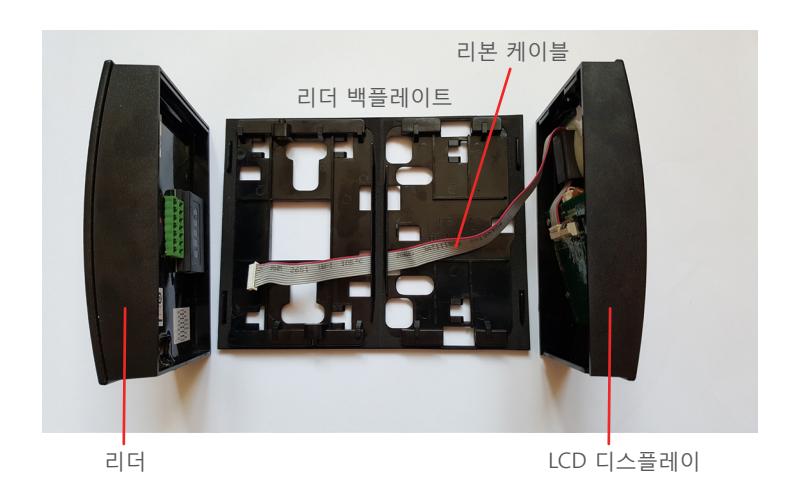
1. Disassemble the Reader.
- Remove the Reader from the backplate.
- Carefully unplug the ribbon cable from the module in the back of the Reader. Caution: Do not pull on the ribbon cable as this may damage the connection to the connector .
- Remove the LCD Display from the backplate.
- Gently pull the ribbon cable through the backplate.
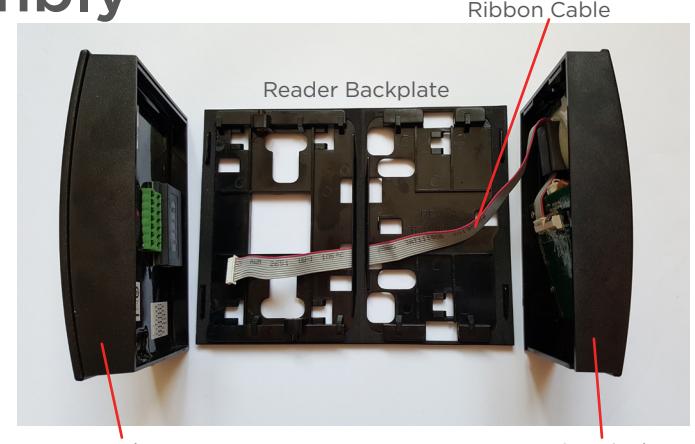
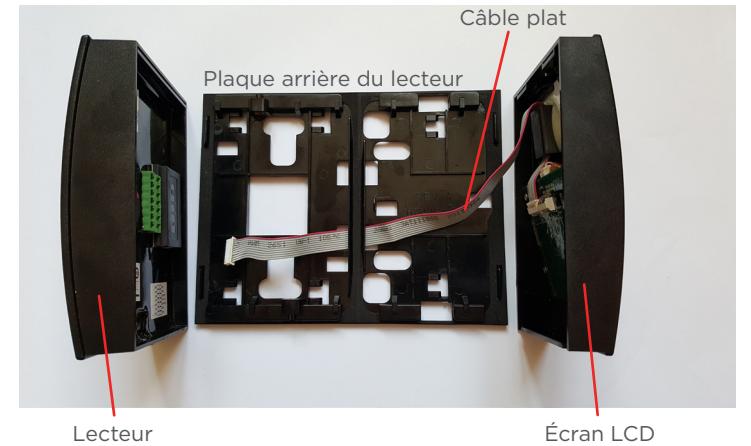
Reader LCD Display
-
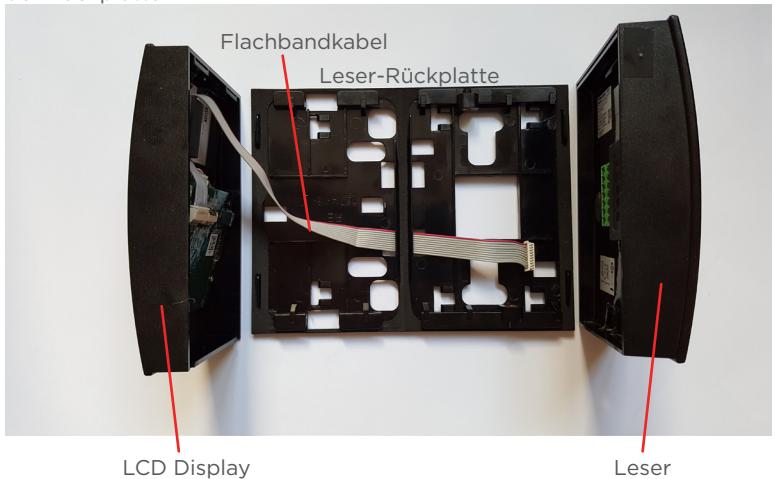
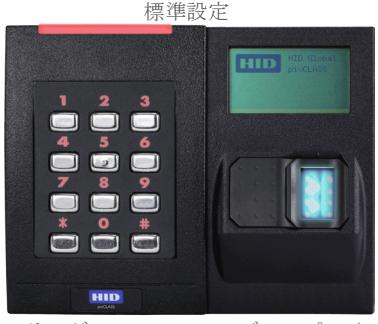
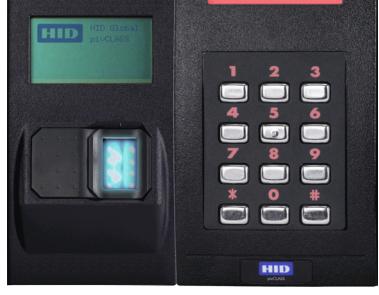
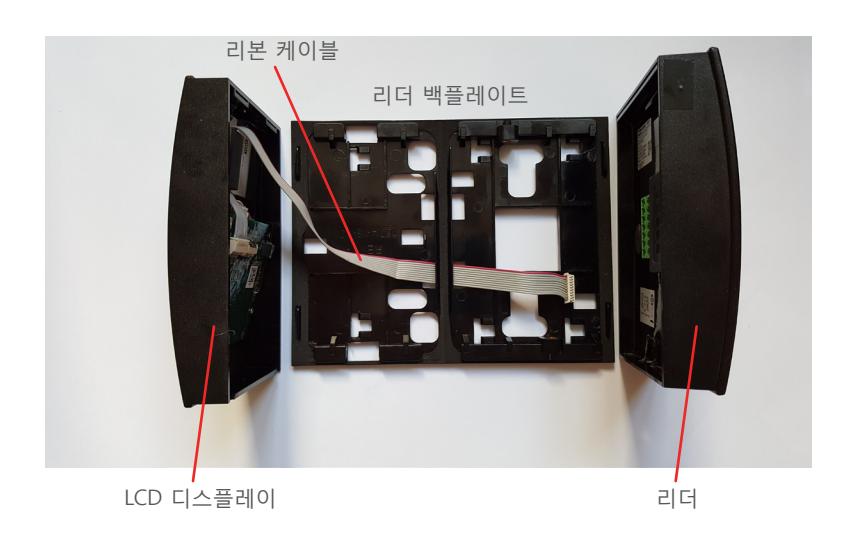
2. Reassemble with the LCD Display on the left side of the assembly.
- Rotate the backplate so that the large cutout for the power cable is on the right
- Gently route the ribbon cable back through the backplate slots, as shown below
- Plug the ribbon cable back into the module (back of Reader) and ensure module is fully seated into the reader
- Attach the LCD Display to the backplate (this must be installed first, as the Reader will fit slightly over the LCD Display)
• Attach the Reader to the backplate (power cable must be threaded through the large square cutout on the backplate)
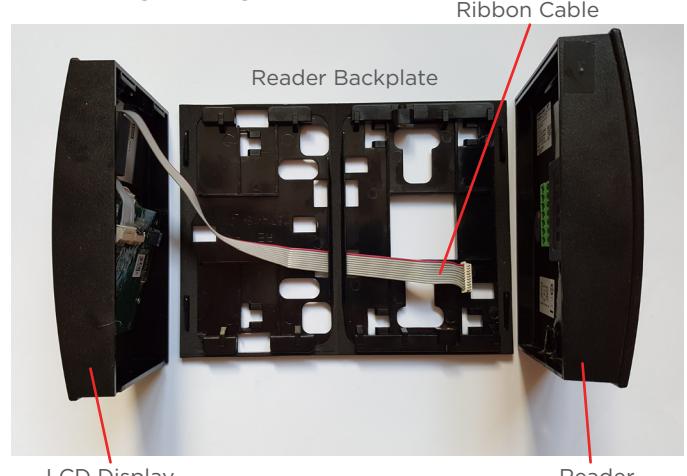
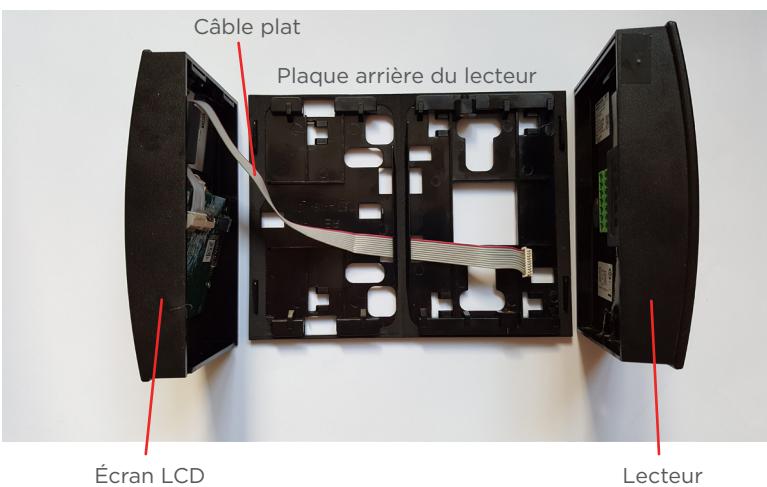
LCD Display Reader
Autre montage du lecteur
La procédure suivante reconfigure l'ensemble lecteur pour positionner l'écran LCD sur le côté gauche de l'ensemble.
-
1. Démonter le lecteur.
- Retirer le lecteur de la plaque arrière.
- Débrancher soigneusement le câble plat du module à l'arrière du lecteur. Mise en garde : ne pas tirer sur le câble plat, car cela risquerait d'endommager la connexion au connecteur .
- Retirer l'écran LCD de la plaque arrière.
- Faire passer délicatement le câble plat à travers la plaque arrière.
Lecteur Écran LCD
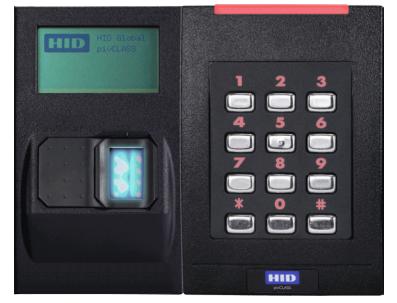
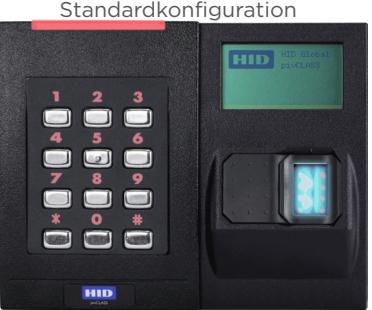
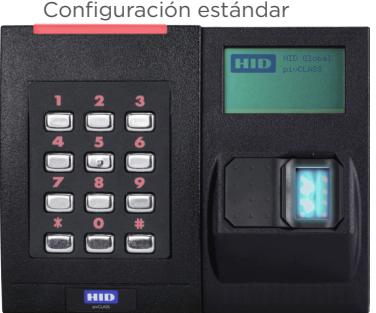
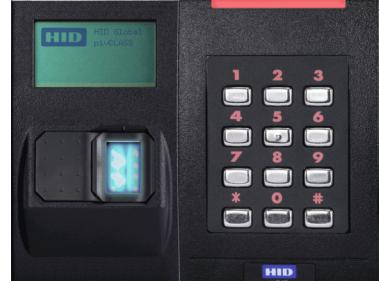
Alternate Configuration
Écran LCD Lecteur
-
2. Procéder au remontage en positionnant l'écran LCD sur le côté gauche de l'ensemble.
- Retourner la plaque arrière de sorte que la grande ouverture pour le câble d'alimentation se trouve à gauche.
- Refaire passer délicatement le câble plat dans les fentes de la plaque arrière, comme indiqué ci-dessous.
- Rebrancher le câble plat sur le module (arrière du lecteur) et s'assurer que le module est complètement inséré dans le lecteur.
- Fixer l'écran LCD à la plaque arrière (celui-ci doit être installé en premier, car le lecteur s'insérera légèrement par-dessus l'écran LCD).
- Fixer le lecteur à la plaque arrière (en faisant passer le câble d'alimentation par la grande ouverture carrée sur la plaque arrière).
This Installation Guide is for informational purposes only. HID makes no warranties, expressed or implied, in this summary. Company, product names and data used in sample output are fictitious. Specifications are subject to change without notice.
Alternative Leseranordnung
Anhand der folgenden Schritte wird der Leser so konfiguriert, dass sich das LCD-Display auf der linken Seite befindet.
-
1. Demontieren Sie den Leser.
- Nehmen Sie den Leser von der Rückplatte ab.
- Ziehen Sie das Flachbandkabel vorsichtig von dem Modul auf der Rückseite des Lesers ab. Vorsicht: Ziehen Sie nicht an dem Flachbandkabel, da dies die Verbindung zum Anschlussstück beschädigen kann .
- Entfernen Sie das LCD-Display von der Rückplatte.
- Führen Sie das Flachbandkabel vorsichtig durch die Öffnung in der Rückplatte.


LCD Display Leser
Leser LCD Display
-
2. Montieren Sie das Gerät mit dem LCD-Display auf der linken Seite.
- Drehen Sie die Rückplatte, sodass sich die große Öffnung für das Stromkabel auf der linken Seite befindet.
- Führen Sie das Flachbandkabel vorsichtig wie dargestellt durch die Rückplatte zurück.
- Stecken Sie das Flachbandkabel wieder in das Modul auf der Rückseite des Lesers und stellen Sie sicher, dass das Modul fest auf dem Leser sitzt.
- Befestigen Sie das LCD-Display an der Rückplatte. (Das Display muss zuerst montiert werden, da der Leser leicht über dem LCD-Display liegt.)
- Befestigen Sie den Leser an der Rückplatte und führen Sie das Netzkabel durch die große quadratische Öffnung in der Rückplatte.
This Installation Guide is for informational purposes only. HID makes no warranties, expressed or implied, in this summary. Company, product names and data used in sample output are fictitious. Specifications are subject to change without notice.
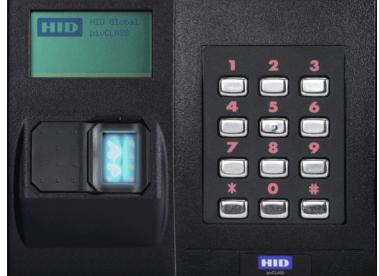
Montaje alternativo del lector
Mediante los siguientes pasos, se reconfigura el conjunto del lector para colocar la pantalla de LCD a la izquierda del conjunto.
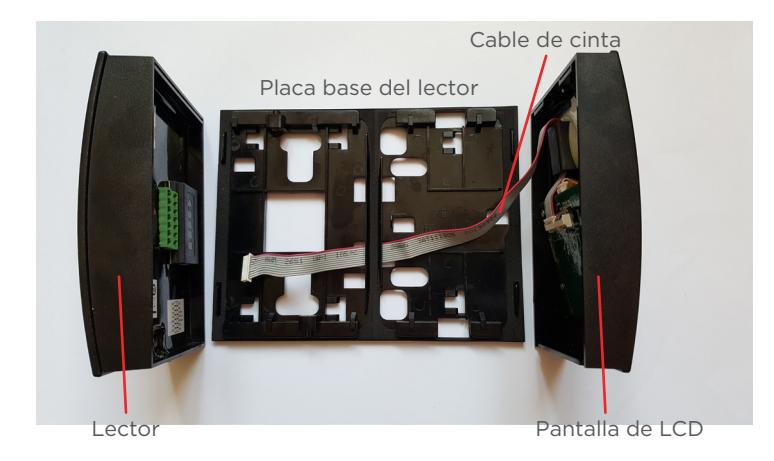
1. Desmonte el lector.
- Retire el lector de la placa base.
- Con cuidado, desenchufe el cable de cinta del módulo en la parte posterior del lector. Precaución: No tire del cable de cinta, porque podría dañar la conexión .
- Retire la pantalla de LCD de la placa base.
- Con cuidado, tire del cable de cinta en la placa base.
Lector Pantalla de LCD
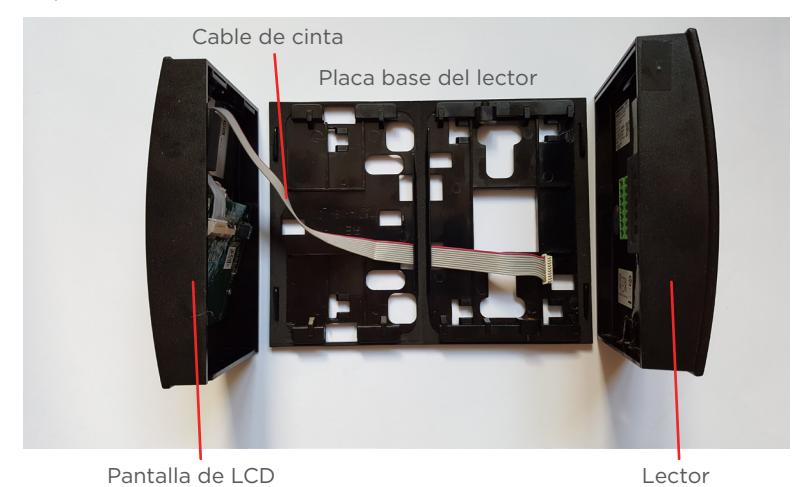
Configuración alternativa
Pantalla de LCD Lector
-
2. Montar de nuevo el conjunto lector pantalla LCD de tal manera que la pantalla LCD quede a la izquierda.
- Girar la placa trasera de tal manera que el paso del cable de alimentación se haga de izquierda a derecha.
- Con cuidado, coloque el cable de cinta nuevamente en las ranuras de la placa trasera, como se muestra continuación.
- Enchufe de nuevo el cable de cinta en el módulo (parte posterior del lector) y asegúrese de que el módulo esté correctamente colocado en el lector.
- Instale la pantalla de LCD en la placa trasera (debe instalarse primero, ya que el lector quedará colocado apenas por encima de la pantalla de LCD.
- Instale el lector en la placa trasera (el cable de cable de alimentación debe pasarse a través del orificio cuadrado grande en la placa trasera).
This Installation Guide is for informational purposes only. HID makes no warranties, expressed or implied, in this summary. Company, product names and data used in sample output are fictitious. Specifications are subject to change without notice.
Альтернативная сборка считывателя
Приведенные далее инструкции предусмотрены для смены конфигурации блока считывателя и размещения компонента ЖК-дисплея на левой стороне блока.
-
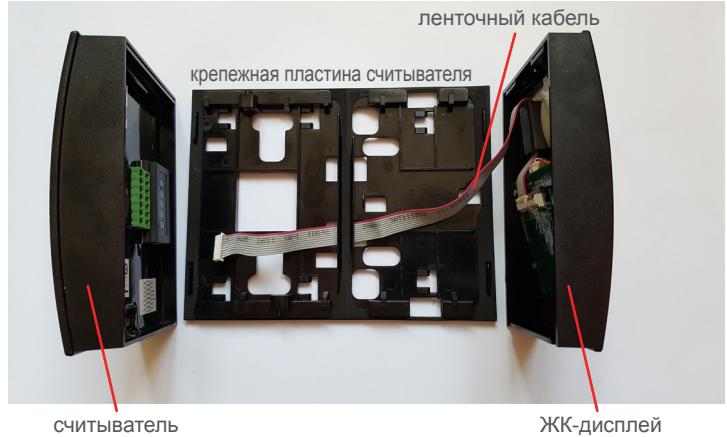
1. Демонтируйте считыватель.
- Снимите считыватель с крепежной пластины.
- Аккуратно отсоедините ленточный кабель от модуля на тыльной стороне считывателя. Осторожно! Не тяните ленточный кабель, т. к. это может привести к повреждению соединителей .
- Снимите ЖК-дисплей с крепежной пластины.
- Осторожно вытяните ленточный кабель из крепежной пластины.
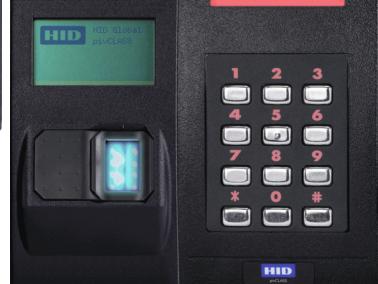
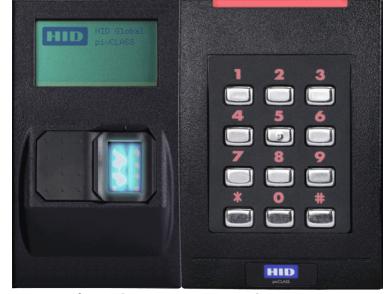
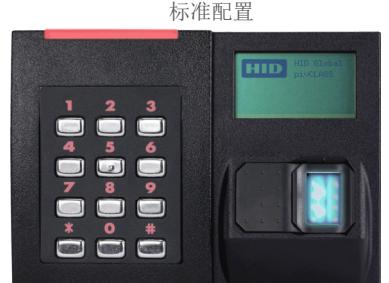
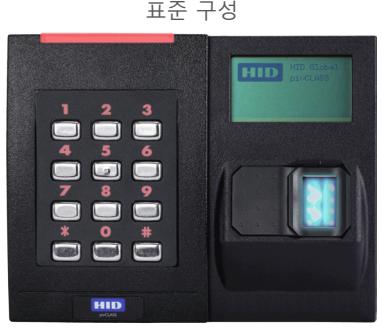
стандартная конфигурация
считыватель ЖК-дисплей
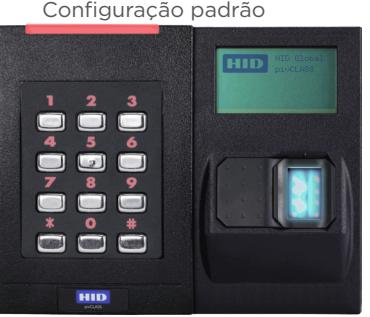
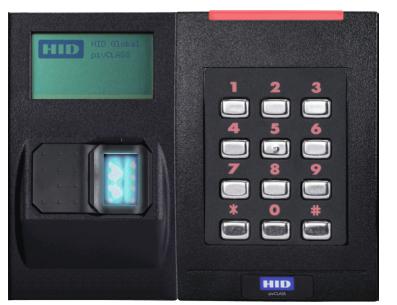
альтернативная конфигурация
ЖК-дисплей считыватель
-
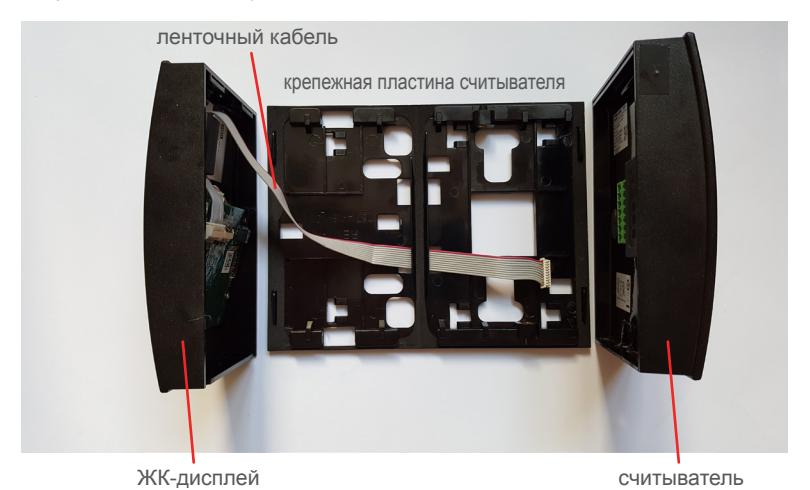
2. Соберите устройство заново, установив ЖК-дисплей на левой стороне блока.
- Поверните крепежную пластину таким образом, чтобы большое отверстие для кабеля питания находилось слева.
- Осторожно протяните ленточный кабель обратно сквозь отверстия в крепежной пластине, как показано на рисунке ниже.
- Снова подсоедините ленточный кабель к модулю (на тыльной стороне считывателя) и убедитесь в том, что модуль вставлен в считыватель до упора.
- Прикрепите ЖК-дисплей к крепежной пластине (это необходимо сделать в первую очередь, поскольку считыватель слегка перекрывает компонент ЖК-дисплея).
- Прикрепите считыватель к крепежной пластине (кабель питания следует провести через большое квадратное отверстие в крепежной пластине).
This Installation Guide is for informational purposes only. HID makes no warranties, expressed or implied, in this summary. Company, product names and data used in sample output are fictitious. Specifications are subject to change without notice.
Montagem alternativa do leitor
As seguintes etapas reconfiguram a montagem do leitor para posicionar a tela LCD à esquerda da montagem.
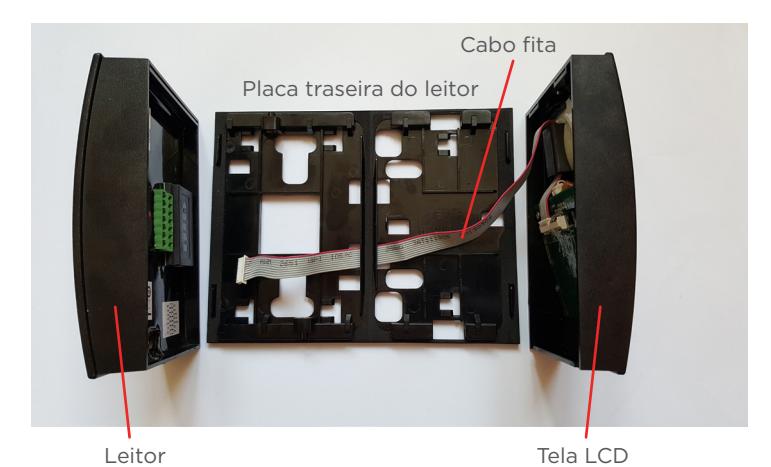
1. Desmonte o leitor
- Remova o leitor da placa traseira.
- Desconecte cuidadosamente o cabo fita do módulo na parte traseira do leitor. Cuidado: Não puxe o cabo fita, pois isso pode danificar os conectores do cabo .
- Remova a tela LCD da placa traseira.
- Puxe gentilmente o cabo fita para fora da placa traseira.
Leitor Tela LCD
Configuração alternativa
Tela LCD Leitor
-
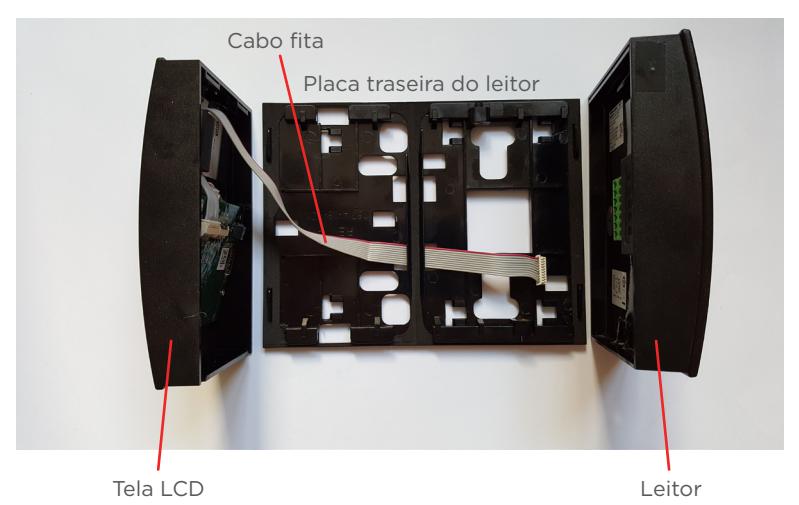
2. Remonte o leitor posicionando a tela LCD à esquerda
- Gire a placa traseira de forma que o orifício grande para passar o cabo de alimentação fique à esquerda.
- Passe o cabo fita gentilmente pelos orifícios da placa traseira, conforme mostrado abaixo.
- Conecte o cabo fita ao módulo (atrás do leitor) e garanta que o módulo esteja completamente encaixado no leitor.
- Conecte a tela LCD à placa traseira (ela deve ser colocada primeiro, porque o leitor será encaixado ligeiramente sobre ela.
- Conecte o leitor à placa traseira (o cabo de alimentação deve passar pelo orifício quadrado grande da placa traseira).
This Installation Guide is for informational purposes only. HID makes no warranties, expressed or implied, in this summary. Company, product names and data used in sample output are fictitious. Specifications are subject to change without notice.
Assemblaggio alternativo del lettore
I seguenti passaggi consentono di riconfigurare l'unità lettore in modo da posizionare il componente schermo LCD sul lato sinistro dell'unità.
1. Disassemblare il lettore.
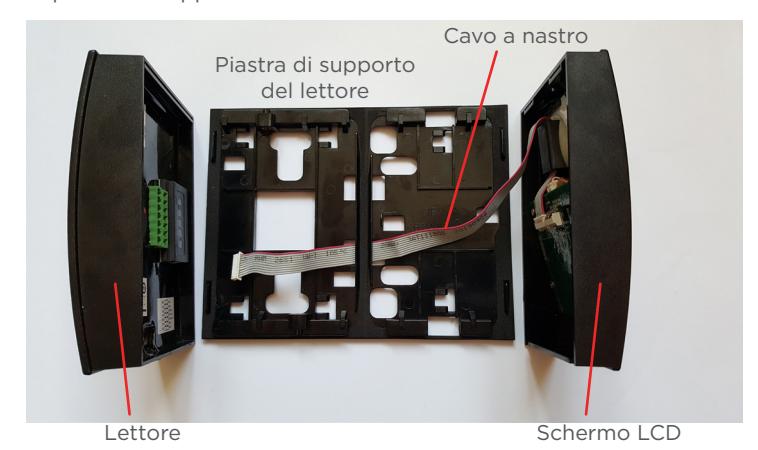
- Rimuovere il lettore dalla piastra di supporto.
- Scollegare con attenzione il cavo a nastro dal modulo sul retro del lettore. Attenzione: non tirare il cavo a nastro poiché potrebbe danneggiare la connessione con il connettore .
- Rimuovere lo schermo LCD dalla piastra di supporto.
- Fare passare lentamente il cavo a nastro attraverso la piastra di supporto.
Lettore Schermo LCD
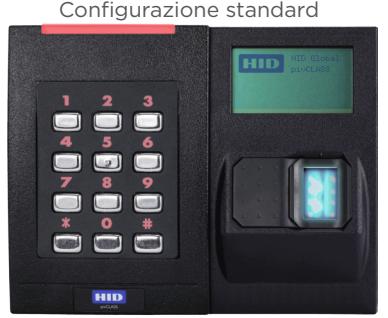
Configurazione alternativa
Schermo LCD Lettore
-
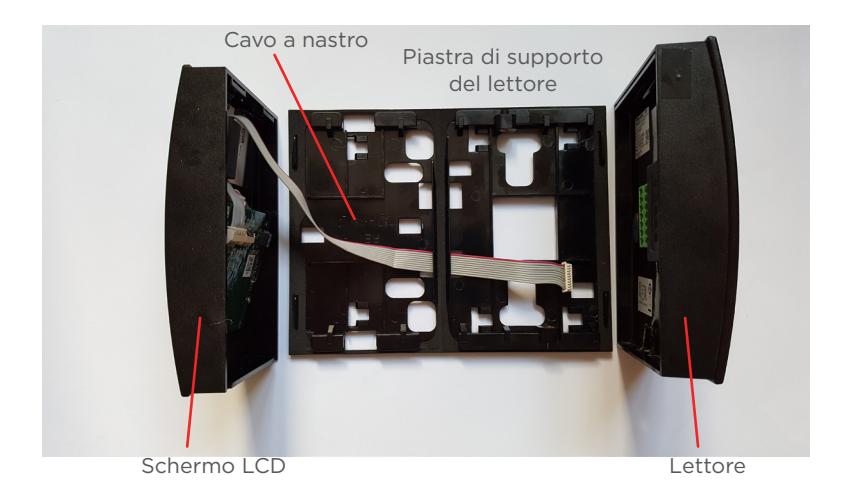
2. Riassemblare lo schermo LCD sul lato sinistro dell'assemblato.
- Ruotare la piastra di supporto in modo che l'ampia sezione per il cavo di alimentazione si trovi a sinistra.
- Fare ripassare lentamente il cavo nelle fessure della piastra di supporto, come illustrato di seguito.
- Reinserire il cavo a nastro nel modulo (retro del lettore) e assicurarsi che il modulo sia completamente saldato nel lettore.
- Collegare lo schermo LCD alla piastra di supporto (questa deve essere installata per prima, in quanto il lettore verrà montato leggermente sopra lo schermo LCD).
- Collegare il lettore alla piastra di supporto (il cavo di alimentazione deve essere fatto passare attraverso l'ampia sezione quadrata della piastra di supporto).
This Installation Guide is for informational purposes only. HID makes no warranties, expressed or implied, in this summary. Company, product names and data used in sample output are fictitious. Specifications are subject to change without notice.
另一读卡器组装方法
下列步骤可重新配置读卡器的组装,将 LCD 显示器部件放置在 装配左侧。
1.拆卸读卡器。
- 从背板上取下读卡器。
- 小心地从读卡器背面的模块中拔出带状线缆。注意: 请勿拉扯带状线缆,因为可能损坏连接器的连接。
- 从背板上取下 LCD 显示器。
- 轻拉带状线缆通过背板。
读卡器 LCD 显示器
其他配置
LCD 显示器 读卡器
-
2. 重新组装,将 LCD 显示器放置在左侧。
- 旋转背板,使电源线的大号断流器位于左侧
- 轻轻地将带状线缆穿回背板插槽,如下图所示
- 将带状线缆插回模块(读卡器背面,确保模块完全插入读卡器
- 将 LCD 显示器装到背板上(必须先进行此步骤,因为读卡器将罩在 LCD 显示器上)
- 将读卡器装到背板上(电源线必须通过背板上的大方形断流器)

This Installation Guide is for informational purposes only. HID makes no warranties, expressed or implied, in this summary. Company, product names and data used in sample output are fictitious. Specifications are subject to change without notice.
別のリーダーの組み立て
次の手順で、リーダーの LCD ディスプレイの位置を 本体の左側に変更できます。
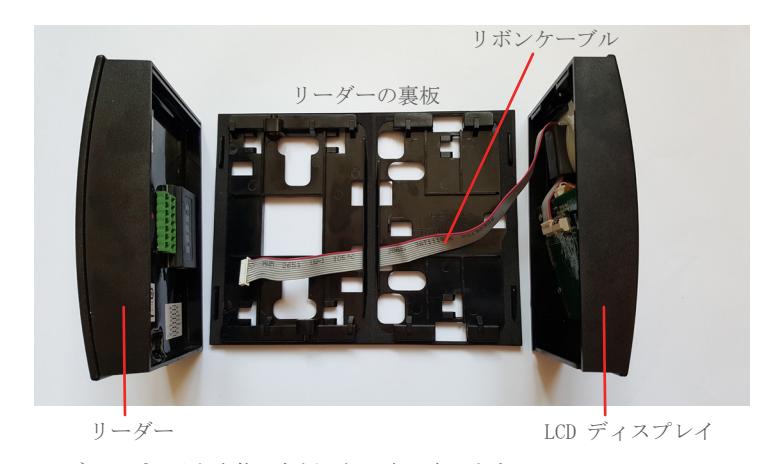
1.リーダーの分解
- 裏板からリーダーを取り除きます。
- リボンケーブルをリーダーの裏側にあるモジュールから 注意して抜きます。 注意:リボンケーブルを 引っ張らないようにしてください。 コネクタとの接続が壊れてしまう可能性があります。
- 裏板から LCD ディスプレイを取り除きます。
- 裏板からリボンケーブルをゆっくり引っ張り出します。
リーダー LCD ディスプレイ
別の設定
LCD ディスプレイ リーダー
-
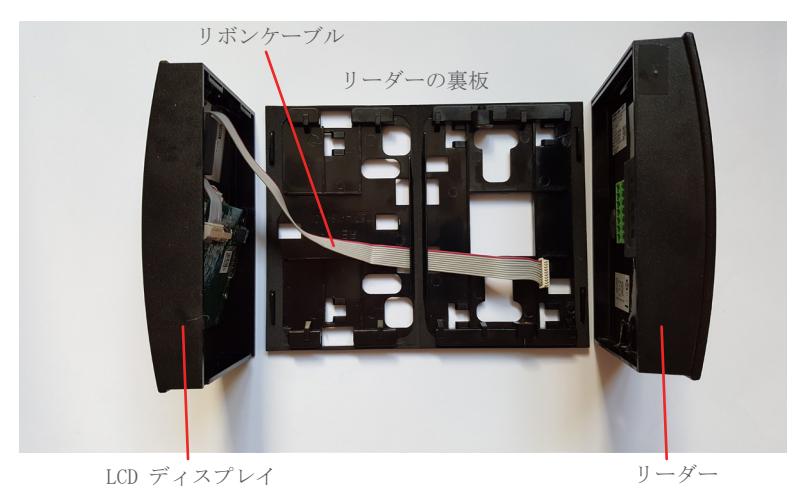
2. LCD ディスプレイを本体の左側に組み立て直します。
- 裏板を回転させて、電源ケーブル用の大きな切り抜きが左にくるようにします。
- リボンケーブルを裏板のスロットから以下のように配線します。
- リボンケーブルをモジュールに挿入して、モジュール(リーダーの裏側)がリーダーに完全に装着されるようにします。
- LCD ディスプレイを裏板に取り付けます(リーダーは LCD ディスプレイよりも少し上に合わさるので、リーダーを最初に装着する必要が あります)。
- リーダー裏板に取り付けます(電源ケーブルは裏板の大きな切り抜くを通して装着する必要があります)。
This Installation Guide is for informational purposes only. HID makes no warranties, expressed or implied, in this summary. Company, product names and data used in sample output are fictitious. Specifications are subject to change without notice.
대체 리더 조립품
다음 단계에 따라 LCD 디스플레이 부품을 조립품의 왼쪽에 배치하도록 리더 조립품을 다시 구성할 수 있습니다.
1. 리더를 분해합니다.
- 백플레이트에서 리더를 제거합니다.
- 리더 뒷면의 모듈에서 리본 케이블을 조심스럽게 뽑습니다. 주의: 리본 케이블을 잡아 당기지 마십시오. 그러면 커넥터 연결부가 손상될 수 있습니다.
- 백플레이트에서 LCD 디스플레이를 제거합니다.
- 백플레이트를 통해 리본 케이블을 부드럽게 당깁니다.
리더 LCD 디스플레이
대체 구성
LCD 디스플레이 리더
-
2. 조립품의 왼쪽에 LCD 디스플레이를 다시 조립합니다.
- 백플레이트를 회전시켜 전원 케이블용 큰 구멍이 왼쪽에 오도록 합니다.
- 아래에 보이는 것처럼 백플레이트 슬롯을 통과하도록 리본 케이블을 다시 넣습니다.
- 리본 케이블을 다시 모듈(리더 후면)에 다시 연결한 후 모듈이 리더 안에 완전히 장착되었는지 확인합니다.
- LCD 디스플레이를 백플레이트에 부착합니다. (이 부품을 먼저 설치해야 합니다. 리더가 LCD 디스플레이 위를 살짝 벗어날 수 있기 때문입니다.)
- 리더를 백플레이트에 부착합니다. (전원 케이블은 백플레이트의 사각 구멍을 통해 연결해야 합니다.)
This Installation Guide is for informational purposes only. HID makes no warranties, expressed or implied, in this summary. Company, product names and data used in sample output are fictitious. Specifications are subject to change without notice.
HID Global
Americas & Corporate
611 Center Ridge Drive Austin, TX 78758 USA
Support: 866 607 7339
Fax: 949 732 2120
Asia Pacific
19/F 625 King's Road North Point, Island East Hong Kong Support: 852 3160 9833
Fax: 852 3160 4809
For additional offices around the world, see www.hidglobal.com corporate offices. HID Global Customer Support: www.hidglobal.com/support
Europe, Middle East & Africa
Phoenix Road Haverhill, Suffolk CB9 7AE England Support: 44 (0) 1440 711 822
Fax: 44 (0) 1440 714 840
This Installation Guide is for informational purposes only. HID makes no warranties, expressed or implied, in this summary. Company, product names and data used in sample output are fictitious. Specifications are subject to change without notice.