HID iCLASS SE Biometric Reader User Guide (PLT-02550 A.4)
Open the original PDF document
View PDFUSER GUIDE

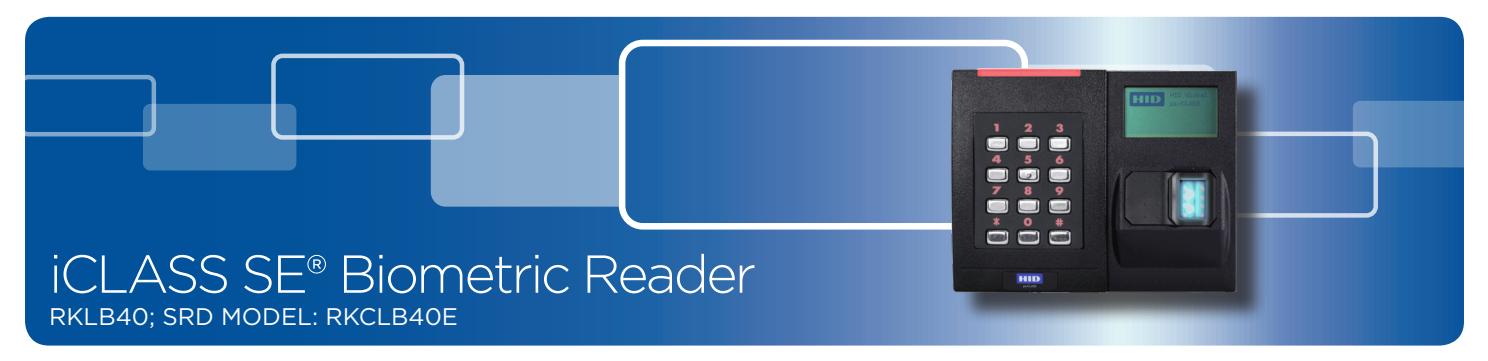
PLT-02550, Rev A.4

www.hidglobal.com/PLT-03342
- Scan the QR code or visit the link to see the multi-language electronic version of this document.
- Lisez le code QR ou suivez le lien pour consulter la version française de ce document.
- Escanee el código QR o visite el vínculo para consultar la versión en Español de este documento.
- Scannen Sie den QR-Code oder öffnen Sie den Link für die deutsche Version dieses Dokuments.
- Faça a leitura do código QR ou acesse o link da versão em português deste documento.
- Scansiona il codice QR o visita il link della versione Italiana di questo documento.
- Отсканируйте QR-код или пройдите по ссылке, чтобы получить версию этого документа на русском языке.
- 扫描 QR 码或访问此 文档的中文版本的链接。
- この文書の日本語版を表示するには、QR コードをスキャンするか、リンク を クリックします。
- QR 코드를 스캔하거나 링크를 방문하면 이 문서의 한국어 버전을 볼 수 있습니다.
1. Introduction
The iCLASS SE® Biometric Reader is a multi-functional reader and enroller that can be used in a variety of locations. It is highly configurable and allows the user to access a wide range of different operational parameters which are outlined in this document.
The Reader has three Operational Modes. The Operational Mode chosen is configured in the Initial Setup and will reflect how the Reader will be used and where it will be located. The Mode can be changed via the Administration menu (see Section 4.2.3: Configuration Menu Functions ).
- Reader/Enroller Mode: Both Reader and Enroller Modes are available.
- Enroller Only Mode: Enrolls user and administration cards. It does not process credentials to allow access control. The Reader will typically be located in an office with secure access.
- Reader Only Mode: Processes credentials. The Reader will typically be located at a building entrance or door.
Notes:
- All enrollment actions are performed locally to the Reader.
- After Initial Setup , additional functionality for the chosen Operational Mode can be accessed via the Administration menu (see Section 2.1.4: Operational Mode ).
- The triangle on the display menu indicates the current default value.
13.56 MHz Credential Compatibility
- iCLASS® Seos® 8kB (iCLASS® Seos® 16kB NOT COMPATIBLE)
- Standard iCLASS® 16-32k bit Access Control Application (iCLASS SE and 2k bit Standard iCLASS - NOT COMPATIBLE)
Biometric Authentication Compatibility
- ANSI-378 template stored on iCLASS Seos credential
- bioCLASS® template stored on standard iCLASS credential (6180A enroller template - NOT COMPATIBLE)
2. Initial Setup
When the Reader is first switched on, the Initial Setup menu is displayed which will take you through the following stages:
- 1. Select Language, Template Type and Operational Mode (all card types).
- 2. Choose Site Key (Seos® cards only).
- 3. Verify Admin (all card types).
Note: If Reader Initial Setup Configuration needs to be modified in the future, two configuration cards are included with the Reader to reset the Reader back to the Initial Setup menu. To complete Initial Setup reset:
- 1. Power cycle the Reader.
- 2. Within the first 15 seconds of power on, present and hold "SE BIO Initial Setup Reset Card 1" to the face of the Reader keypad until the Reader stops beeping and the LED is solid red or flashing blue/red.
- 3. Power cycle the Reader.
- 4. Present and hold "SE BIO Initial Setup Reset Card 2" to the face of the Reader keypad until the Reader stops beeping and the LED is solid red or flashing blue/red.
2.1 Initial Setup – Functional Selections 2.1.1 Select Language
Language
- 1. English
- 2. Francais
- 3. Español
- 4. < more >
- 1. Power on the Reader.
- 2. Select the language by pressing the corresponding number on the keypad. Example : For English, select 1.
Note: To see additional languages select 4. < more > .
Available Languages
- English
- Français (French)
- Español (Spanish)
- Deutsch (German
- Português (Portuguese)
- Italiano (Italian)
- Русский (Russian)
- 中文 (Chinese)
- 日本語 (Japanese)
- 한국어 (Korean)
This User Guide is for informational purposes only. HID makes no warranties, expressed or implied, in this summary. Company, product names and data used in sample output are fictitious. Specifications are subject to change without notice.
© 2017 -2019 HID Global Corporation/ASSA ABLOY AB. All rights reserved. HID, the HID Brick Logo, iCLASS SE, Secure Identity Object, and Seos are trademarks or registered trademarks of HID Global, or its licensors, in the U.S. and/or other countries. All other trademarks, service marks, and product or service names are trademarks or registered trademarks of their respective owners.

-
3. The selected language will appear on the screen.
- Choose 1. Yes to confirm or 2. No to cancel and go back to the language selection dialog.
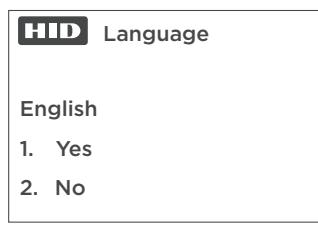
Note: Language selection will restart until a language is chosen.
4. From this point on, all screens will display in the selected language.
Note: To change the language after the Initial Setup, go to the Administration menu and select Configuration (see Section 4.2.3: Configuration Menu Functions ).
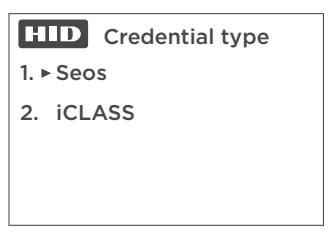
2.1.2 Select Credential Type
Once the language is chosen, Initial Setup advances to the Credential Type menu. This configures the credential types that the Reader will enroll. To read Seos credentials, Seos must be selected during initial set-up to allow the Seos Site Key to be entered, after the Site Key has been entered the Credential type configuration can be changed to allow iCLASS credential to be enrolled. Credential types setting does not configure the card types the reader will read, this is a factory configuration and by default the reader will read both iCLASS and Seos.
-
1. To select the Template Type:
- Select 1. Seos . This Mode enrolls Seos cards but will not enroll iCLASS or iCLASS SR cards.
- Select 2. iCLASS . This Mode enrolls only iCLASS or iCLASS SR cards.
- 2. Once you make your choice a confirmation dialog appears. Choose 1. Yes to confirm or 2. No to cancel and return to the Template Type menu.
2.1.3 PIN Requirement (Local PIN Verify)
Note: PIN Required MUST be set to Not Required UNLESS reader is ordered with Local PIN Verify factory configuration option. Local PIN Verify is used extremely infrequently and therefore PIN Required MUST be configured to Not Required unless for special Local PIN Verify applications.
Note: If set to Required and the reader is ordered without Local PIN Verify configuration option, the reader will need to be reset via the supplied SE BIO Initial Setup Reset Cards to PIN Required set to Not Required .
Note: When the reader is order from factory WITHOUT Local PIN Verify configuration option, PIN data entered on keypad will be sent to the door controller for verification.
PIN Requirement is ONLY applicable to readers with Local PIN Verify factory configuration option. It selects whether a PIN enrolled to the card by the reader must be verified locally by the reader before the card data is sent to the door controller. If Required is chosen, a PIN number will be asked for when Users and Admins are enrolled, and also when cards are presented to a Reader to gain access. (For more information on PINs, see Second page of Configuration options in Section 4.2.3: Configuration Menu Functions ).
- 1. Select 1. Required or 2. Not Required .
- 2. When you make your choice a confirmation dialog appears. Choose 1. Yes to confirm or 2. No to cancel.
2.1.4 Operational Mode
Once the Template Type and PIN Requirement choices are made, Initial Setup advances to the Operational Mode menu.
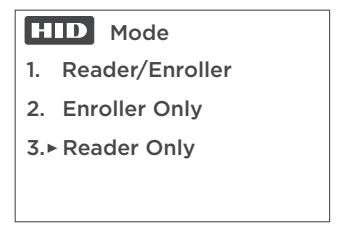
To select the Operational Mode:
- Select 1 for Reader/Enroller: The Present Card menu will be the main interface thereafter. This mode allows the reader to act as either a reader or enroller.
- Select 2 for Enroller Only: The Administration menu will be the main interface thereafter.
- Select 3 for Reader Only: The Present Card menu will be the main interface thereafter.
Confirm the choice:
- Select 1. Yes to confirm.
- Select 2. No to cancel and return to the Operational Mode menu.
- If you select 1. Yes , a confirmation dialog appears. Choose 1. Yes to confirm or 2. No to cancel.
This ends the Initial Setup – Functional Selections stage. The next stage differs, depending on the Template Type chosen.
Note: If the Reader is switched off at this point in the Initial Setup process it will return to this stage when it is switched back on.
2.2 Initial Setup – Site Key
Note: A Site Key must be entered for all readers with Template Type set to Seos (including both HID Elite and Standard Key readers), however, the Site Key is only used by Standard Key readers..
The Site Key setup follows the Operational Mode setup.
The Site Key encrypts the biometric credentials onto the card so they are unique to each site. The Site Key must be between 6 and 11 characters and must be entered identically onto all readers on that particular site.
To choose the Site Key:
- 1. Enter the Site Key and press # .
- 2. The reader will display Verify Key . Enter the Site Key number again and press # .
Note: If the Site Key number is not entered within the timeout period the Reader will display Enrollment Failed and return to the Site Key menu.
3. Once the Site Key value has been successfully entered and verified, the Reader displays Success! and advances to the next stage.

2.3 Initial Setup – Verify Admin
The final stage of Initial Setup registers the Admin card . The Reader presents two choices: Enroll Admin or Present Card in order to verify an existing Admin card.
Verify Admin
- 1. Enroll Admin
- 2. Present card
Note: The following Enrollment dialog is the same for Initial Setup, Add Admin, and Add User. The main title at the top of the display changes to indicate the current function.
2.3.1 Enrollment Dialog
Example: "Enroll Admin" choice in the "Verify Admin" step
The Reader displays:
- 1. Enroll Admin
- 2. Present Card
Note: The user should chose 2. Present Card if they already have an Admin card. When an Admin card is successfully presented to the Reader (it will ask for a finger to be presented and Local PIN Verify, if required) this choice will succeed. If there is a failure to present an Admin card, then an error message is shown and the Verify Admin menu is re-presented.
1. Select 1. Enroll Admin . The Reader displays:
First Finger
Capture 1 of 3
Put finger on sensor
The Reader will request to capture the first finger three times.
Enroll Admin
First Finger
Capture 1 of 3
Put finger on sensor
Note: The second line on the display will give instructions to the user, such as Put finger on sensor , Press harder , Move right , Remove finger , and so on. Also, for each of the three captures it is recommended that the user fully removes their finger and repositions it slightly differently on the sensor (e.g., more pressure, to one side a little) as this allows the sensor to collect more/different information.
The Reader then asks for the second finger to be captured three times.
When the operation is complete the Reader displays Success .
Note: If there is an error, if the fingerprint is not captured, or if the Reader times out, the Reader displays Authentication Failed and the sequence returns to the Enroll Admin screen. After three failed attempts the display reverts to the main menu. In the case of Initial Setup the display returns to the Verify Admin menu, as you must successfully enroll a new Admin (or prove that you have already done so) to exit that step.
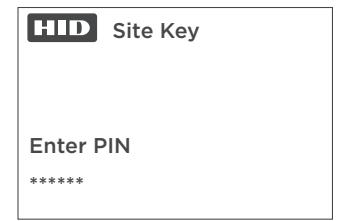
2. If a Local PIN Verify number is required, the Reader then displays:
Keypad PIN
Enter the PIN number and press # . The PIN number can be from 1 to 12 digits. You must the end entry with the # key, unless you use a 12-digit PIN in which case the Reader accepts the PIN when the 12th digit is entered and the # key is not required.
The Reader will display Verify PIN . Enter the PIN again and press # .
Note: If the PIN is not entered within the timeout period the Reader will display Enrollment Failed and will prompt the user to try again. After three attempts the sequence returns to the Enroll Admin screen.
3. The Reader then displays:
Write to card
Present card
Present the card to the reader. If successful, the Reader will reboot into the Operational Mode you have chosen for it and is ready for normal use.
3. Operation – Reader
In Reader Mode, the display shows the Present Card screen.
Present Card iCLASS SE
- 1. Present the card to the Reader.
- 2. Follow the on-screen prompts to present a finger to the Reader, if required.
Note: To ensure a good quality fingerprint acquisition:
- Do not press too hard
- Do not move finger during acquisition
- Leave your finger on the sensor at least 2 seconds
- Do not slide or roll your finger across the sensor
- 3. Enter your Local PIN Verify number, if required.
Note: These requirements can be changed via the Configuration menu.
-
4. When successful, the Reader will:
- Beep and flash green (LED).
- Display Success!
- Transmit the access information that is stored on the card to an attached panel.
Note: If the information provided does not match what is stored on the presented card, the iCLASS SE Biometric Reader will prompt the user to try again. After four unsuccessful attempts at verification the display reverts to Present Card and the user must start over.
Note: If a card with no fingerprint template is presented the reader will display "Security Error".
4. Operation – Administration
4.1 Access the Administration Menu
If the Reader is configured to be a Reader/Enroller and the user wishes to access Administration mode, follow this procedure:
- 1. The Reader that is configured to be a Reader/Enroller displays the Present Card menu as its main screen.
- 2. Before you present a card, select 1 on the keypad.
- 3. Present an Admin card then remove the Admin card from the reading field and follow the on-screen prompts to verify biometric information and Local PIN Verify number as required.
4.2 Administration Menu Functions
From the Administration menu, access the functions below.
Note: Each menu will return to the main menu if it times out (time out occurs after 8 seconds).
Administration
- 1. Manage Users
- 2. Manage Admins
- 3. Configuration
- 4. < exit >
4.2.1 Manage Users
This presents the choice of enrolling or verifying a User: the standard Enrollment dialog is used (see Section 2.3.1: Enrollment Dialog ).

4.2.2 Manage Admins
This presents the choice of enrolling an Admin or verifying an existing Admin card. Each option follows the standard Enrollment dialog (see Section 2.3.1: Enrollment Dialog ). The other choice is to revoke an Admin. If this option is chosen the user must present an existing Admin card to the reader. Users need to ensure they always have at least one Admin card on the site as the only way to get a replacement Admin card is to reset the reader to the factory setup and go through the initial setup process.
4.2.3 Configuration Menu Functions
To access the Configuration menu, select 3 from the Administration menu.
Note: The options in the Configuration menu will differ, depending on how the Reader has been set up. For example, If the Reader has been set up for iCLASS or iCLASS SR cards, then non-relevant menus (e.g., Site Key) will not be displayed.
Configuration
- 1. Language
- 2. Credential type
- 3. Mode
- 4. < more >
- 1. Language: Changes the language.
- 2. Template Type: Changes the Template Type.
Notes:
- If the user changes the Template Type from iCLASS cards to Seos cards, then the user must exit the Administration menu before enrolling Seos User or Admin credentials. After exiting the administration menu the reader will prompt the user to enter a Site Key for reader Seos operation. The Site Key can then be set and an Admin card created which matches the Site Key of the reader. Note: If the Template Type is changed in this way, all readers on a site must be reconfigured with the same Site Key.
- If the user changes the Template Type from Seos cards to iCLASS cards, then the Reader will reboot into Initial Setup – Verify Admin mode. The confirmation Yes/No dialog will display (because the Site Key is not required for iCLASS or iCLASS SR cards).
- 3. Mode: Changes the Operational Mode.
- 4. Select 4 < more > to see the next page of Configuration options.
Second page of Configuration options
Configuration
- 1. PIN Required
- 2. BIO Required
- 3. Capture Quality
- 4. < more >
1. PIN Required
Yes: To require a Local PIN Verify for access.
No: Does not require a PIN for access (Default).
Note: The PIN Required setting can only be changed from Yes to No if the reader is ordered with the Local PIN Verify factory configuration option. Also all cards on site may need to be reenrolled, because they may have been previously enrolled when no Local PIN Verify was required. To facilitate this migration process, It is suggested that the user sets up one or more separate, dedicated enrollers that require a Local PIN Verify and use these enrollers to add PINs to users' cards, including Admin cards. The site Readers are set to ignore Local PIN Verify so they will be able to accept the re-enrolled cards. Once all of the user cards have been re-enrolled then the rest of the Readers on the site can be reset to require Local PIN Verify.
Note: When a PIN is enrolled to iCLASS cards via the RKLB40 reader, this PIN can be used by both RKLB40 and R(P)K40 readers configured for Local PIN Verify.
Note: When a PIN is enrolled to Seos cards via the RKLB40 reader, this PIN can only be used by RKLB40 readers configured for Local PIN Verify. R(P)K40 readers configured for Local PIN Verify can not read these card
2. BIO Required:
Yes: To require a fingerprint presentation for access (Default).
No: Does not require a fingerprint presentation for access.
Note: Seos Credentials require a fingerprint template enrolled on the credential for configuration option BIO Required = No. A fingerprint will not need to be presented for this option.
3. Capture Quality:
Low Quality: Only one scan is required when capturing each fingerprint.
High Quality: Three scans are required when capturing each fingerprint. This is the recommend mode as the likelihood of success when a user presents a finger to gain access is increased.
4. Select 4 < more > to see the next page of Configuration options.
Third page of Configuration options
Firmware: Displays the Firmware information, if needed, when working with Technical Support.
Configuration
- 1. Firmware
- 2. Visitor Card Enabled
- 4. < exit >
Note: Press # to bring up a page with the Site Key number. The Site Key number page is only visible to Admins and is a hidden option to prevent unintended display. The Site Key number should be kept secure. (Option only appropriate when the Template Type is set to Seos ).
Visitor Card Enabled: This option is only available if the Template Type is set to iCLASS .
Yes: To allow visitor cards to be used in this environment.
No: Do not allow visitor cards in this environment (Default).
If you select Yes and go to Manage Users there will now be a third choice in the Enrollment dialog: Enroll Visitor . Visitor cards are prepared ahead of time, are generic, and can be given to visitors without requiring them to enroll their biometric information. No fingerprint information will be processed by the reader. If PIN Required (Local PIN Verify) is set, visitors will need to be told what the Local PIN Verify PIN value is to permit access.
Select 4 < exit > to return to the first screen of Configuration options.
4.3 Sensor Cleaning
For optimum performance, it is recommended that you clean the bioreader periodically. The use of a dry cloth is recommended to clean the acquisition surface. In order not to scratch the surface, remove all dust and residue with gentle movements.
CAUTION: Acidic liquids, alcohol or abrasive materials are prohibited.
4.4 Additional References
Documents kept up-to-date and available on-line:
- iCLASS SE Biomectric Reader Advanced Use Case Application Note - www.hidglobal.com/PLT-03345
- iCLASS SE Biometric / iCLASS SE Display Reader Installation Guide - www.hidglobal.com/PLT-02738