HID HDP6600 CUPS Driver User Guide
Open the original PDF document
View PDFHID® FARGO® HDP®6600 CUPS Driver User Guide
PLT-05253, A.0 May 2023


Copyright
© 2023 HID Global Corporation/ASSA ABLOY AB. All rights reserved.
This document may not be reproduced, disseminated, or republished in any form without the prior written permission of HID Global Corporation.
Trademarks
HID GLOBAL, HID, the HID Brick logo, HDP, and FARGO are trademarks or registered trademarks of HID Global, ASSA ABLOY AB, or its affiliate(s) in the US and other countries and may not be used without permission. All other trademarks, service marks, and product or service names are trademarks or registered trademarks of their respective owners.
Contacts
For technical support, please visit: https://support.hidglobal.com .
What's new
| Date | Description | Revision |
|---|---|---|
| May 2023 | Initial release. | A.0 |
A complete list of revisions is available in Revision history .

| Introduction | 5 |
|---|---|
| 1.1 Supported CUPS driver versions | 6 |
| 1.2 Firmware requirements | 6 |
| 1.2.1 Linux with USB connection | 6 |
|
Installation
and maintenance |
7 |
| 2.1 CUPS driver download | 8 |
| 2.2 CUPS driver manual installation | 8 |
| 2.3 CUPS driver automatic installation | 8 |
| 2.4 Upgrade the CUPS driver from an older version | 9 |
| 2.5 Remove a driver | 9 |
| 2.6 Determine the printer IP address | 9 |
| 2.7 Add a printer connection using a USB cable | 10 |
|
Managing
the printer |
14 |
| 3.1 CUPS web interface | 15 |
| 3.2 Printers tab | 16 |
| 3.3 Option configuration | 17 |
| 3.4 Setting default options | 18 |
| 3.5 View printer specific options from the command line | 19 |
| 3.6 Set printer-specific options from the command line | 19 |
| 3.7 Printing from the command line | 19 |
| 3.8 Printing with magnetic stripe encoding | 20 |
|
Print
job configuration options |
21 |
| 4.1 Device Options | 22 |
| 4.2 Image color | 24 |
| 4.3 K Resin Printing | 26 |
| 4.4 Magnetic track encoding options | 27 |
| 4.4.1 Card printer driver magnetic encoder settings | 29 |
| 4.5 Magnetic stripe encode data | 29 |
| 4.5.1 Magnetic stripe encoding - format details | 29 |
| 4.5.2 URL character encoding mode | 30 |
| 4.5.3 ISO magnetic encoding mode | 30 |
| 4.5.4 JIS II magnetic encoding mode | 31 |
| 4.5.5 Custom magnetic encoding mode | 31 |
| 4.5.6 Raw magnetic encoding mode | 31 |
| 4.6 Banners option | 31 |
| 4.7 Policies options | 32 |
| Licenses | 33 |
| 5.1 Copyright notices | 34 |

| 5.2 The ICC software license, version 0.1 | 34 |
|---|---|
| 5.3 Boost software license - version 1.0 - August 17th, 2003 | 34 |
| 5.4 Apache license- version 2.0, January 2004 | 35 |
Section 01 Introduction


1.1 Supported CUPS driver versions
Common Unix Printing System (CUPS) is a modular printing system for Unix-like computer operating systems. The CUPS driver allows a computer to act as a print server. A computer running the CUPS driver as a host can accept print jobs from client computers, process these jobs, and send them to the appropriate printer.
The minimum required CUPS version for this driver is 1.7.2. If a previous version of the CUPS interface is being used, contact HID Global Technical Support at https://support.hidglobal.com .
The operating systems able to use CUPS include 64-bit Linux versions:
- l NeoKylin 7
- l NeoKylin 10
- l Ubuntu 14.04
- l Ubuntu 16.04
- l Ubuntu 18.04
- l Ubuntu 20.04
- l Unity OS
1.2 Firmware requirements
Printer firmware 1.0.4.10 is required to use the CUPS driver with an HDP6600 card printer connected by USB. You can print a settings card to verify the firmware version. From the printer display, use the buttons to select > Test Prints > Settings .
1.2.1 Linux with USB connection
For each Linux host machine, only one USB connection to a printer is supported.
Section 02 Installation and maintenance


2.1 CUPS driver download
- 1. Open a web browser and go to: https://www.hidglobal.com/drivers .
- 2. From the All Brands list, select FARGO .
- 3. From the All OSs list, select Linux or Linux x64 .
- 4. From the list of driver files, select the HID FARGO HDP6600 Linux driver . Click DOWNLOAD .
- 5. Read the End User License Agreement and click I Accept to download the driver.
2.2 CUPS driver manual installation
Important: The HDP6600 card printer must not be connected to the computer using a USB cable before the driver is installed.
- 1. Copy the downloaded driver archive file into the root directory of the system.
- 2. With root privileges, run the following command:
sudo tar xf /HDP6600-x64.tar.gz -C /
2.3 CUPS driver automatic installation
Important: The HDP6600 card printer must not be connected to the computer using a USB cable before the driver is installed.
- 1. Be sure that the "driver_install.sh" file is stored in the same directory as the downloaded driver file.
- 2. Add execution privileges to the script file using the following command:
chmod +x install_HDP6600_Driver.sh
3. Execute the following script file:
sudo ./install_HDP6600_Driver.sh
The installation begins. As the installation progresses, messages are displayed on the screen. When the installation has completed, you are prompted to reboot your system.

2.4 Upgrade the CUPS driver from an older version
Follow the installation instructions in 2.1 CUPS driver download to download the driver file. Then, see 2.2 CUPS driver manual installation or 2.3 CUPS driver automatic installation to overwrite the existing driver with the new driver.
Note: Depending upon the desired configuration options, you may have to delete and reinstall the printer using the new PPD file. Additional modification of the default print job configuration options may be necessary.
2.5 Remove a driver
There is not an uninstall process to remove a driver. Therefore, the driver files must be deleted manually. The following table shows the locations and names of the files that are installed on the system for the driver.
To remove a driver, locate these files and delete them from your system.
| File | Description |
|---|---|
| /usr/share/cups/model/HDP6600.ppd | PPD file for the HDP6600 card printer. |
| /usr/libexec/cups/filter/rastertofargo-x.y.z | Raster filter driver for the FARGO HDP card printers. |
| /etc/udev/rules.d/92-FARGO.rules | Linux device management rules file. |
2.6 Determine the printer IP address
The printer IP address must be determined prior to adding a network connected printer. You can view the printer IP address from the printer display by using the buttons to select > Network Info > IPv4 .

2.7 Add a printer connection using a USB cable
- 1. Connect the USB cable to the printer.
- 2. Power on the printer.
- 3. Open a web browser and go to http://localhost:631/ .
- 4. Open the CUPS home page and click the Administration tab.
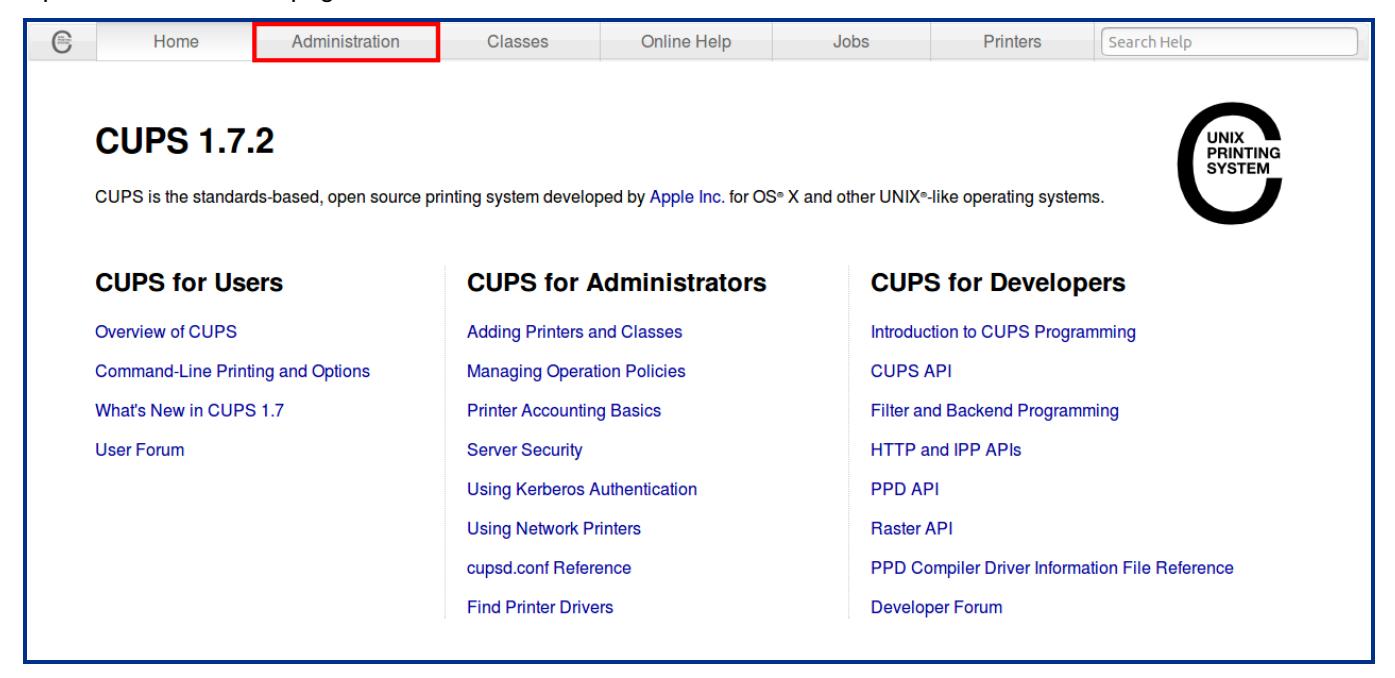
5. Click Add Printer .
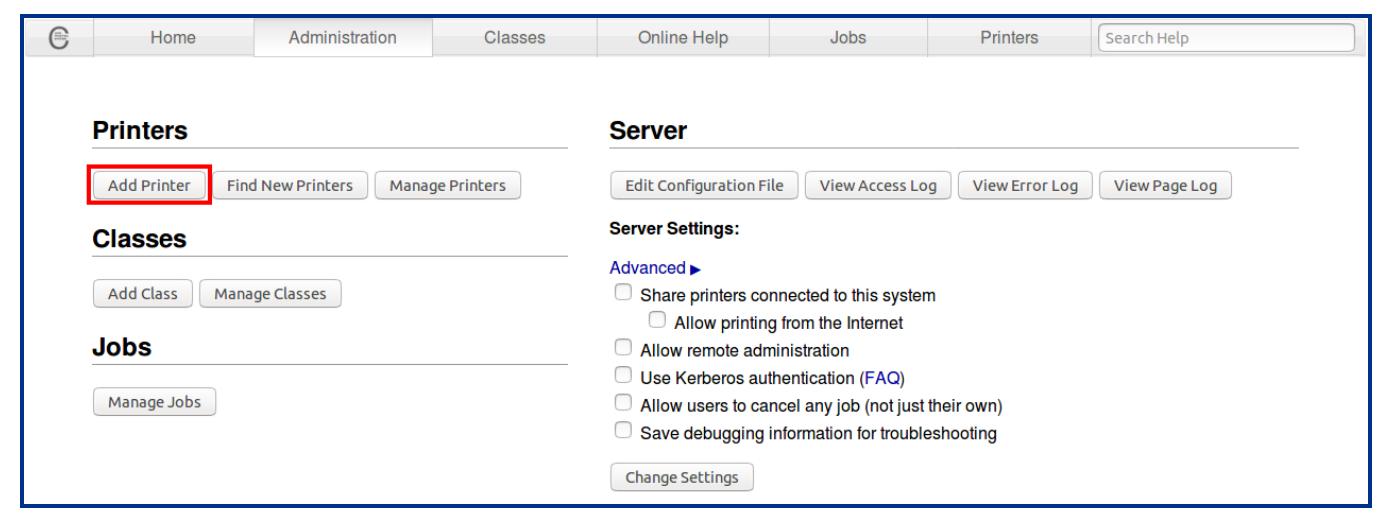
6. If the CUPS Authentication Required message is displayed when adding a printer, enter your login username and password to continue. See your CUPS documentation for more information about permissions and authentication procedures.

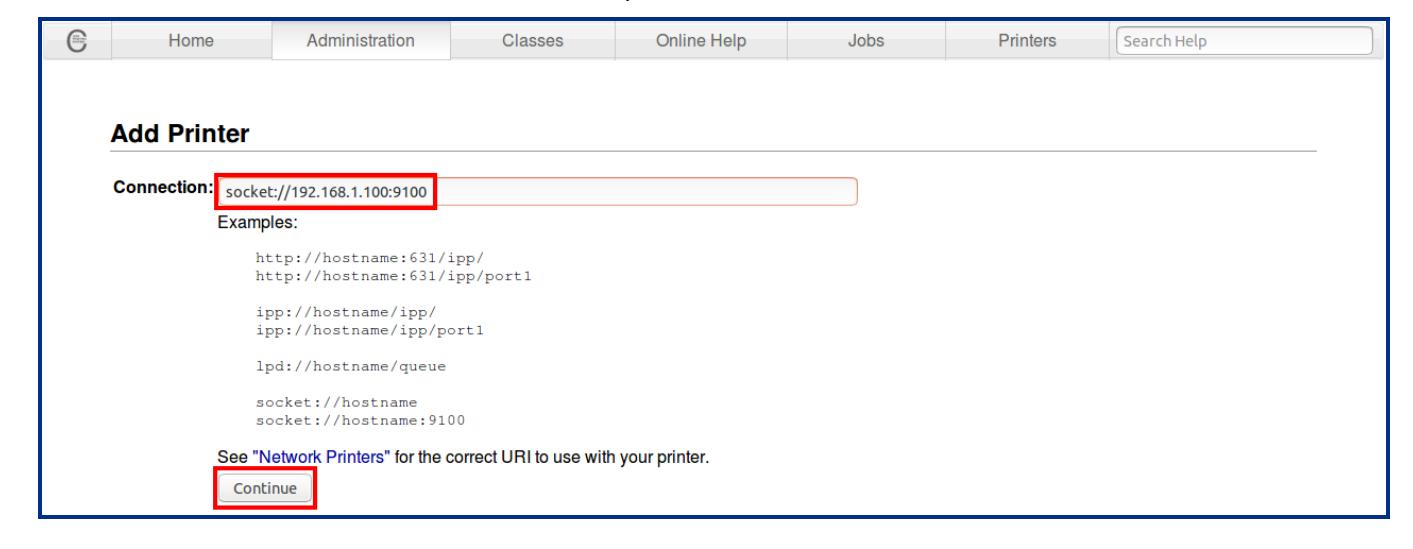
7. Select the USB-connected printer or the http printer.

8. If you selected
- l A USB printer, make sure the USB connections between the printer and the Linux workstation are firm and that the printer is powered on.
- l An http printer, enter the IP address for the printer followed by the port number 9100 using the format socket://aaa.bbb.ccc.ddd:9100 where aaa.bbb.ccc.ddd is the IP address of the printer.

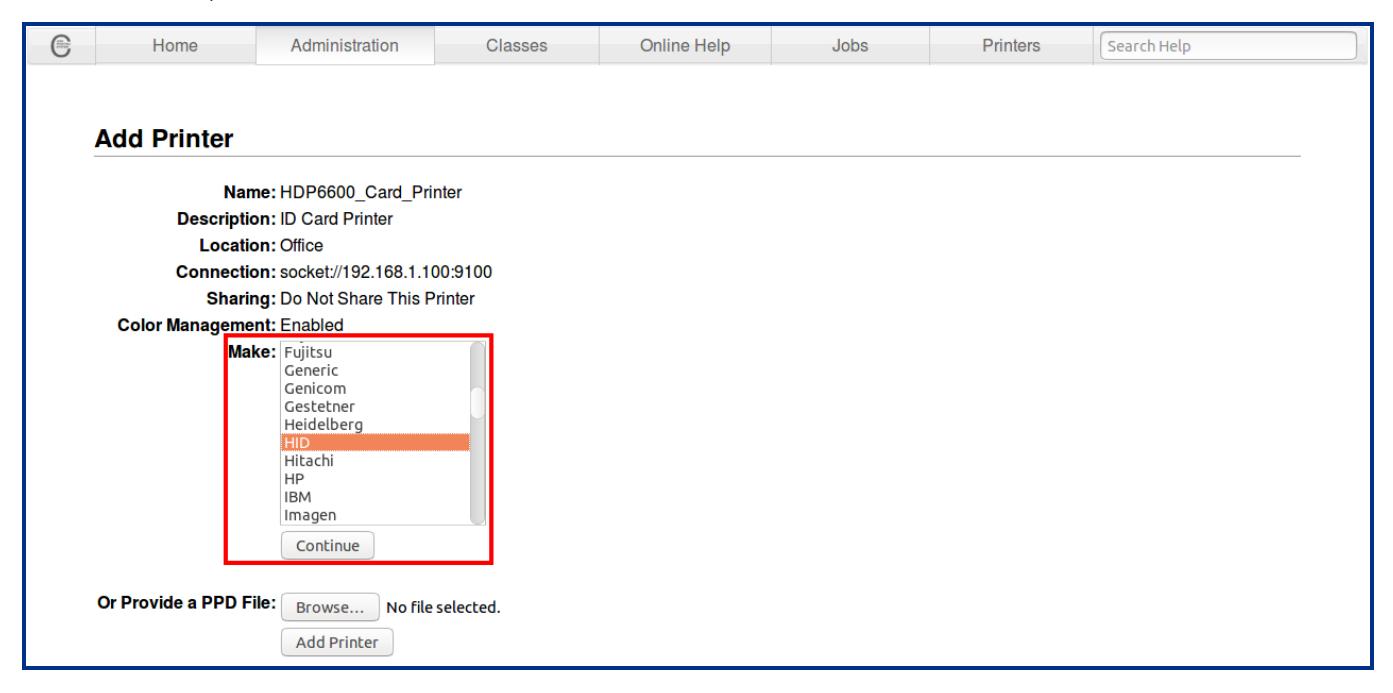
9. Depending upon the requirements, the printer data can be modified in the Add Printer window:
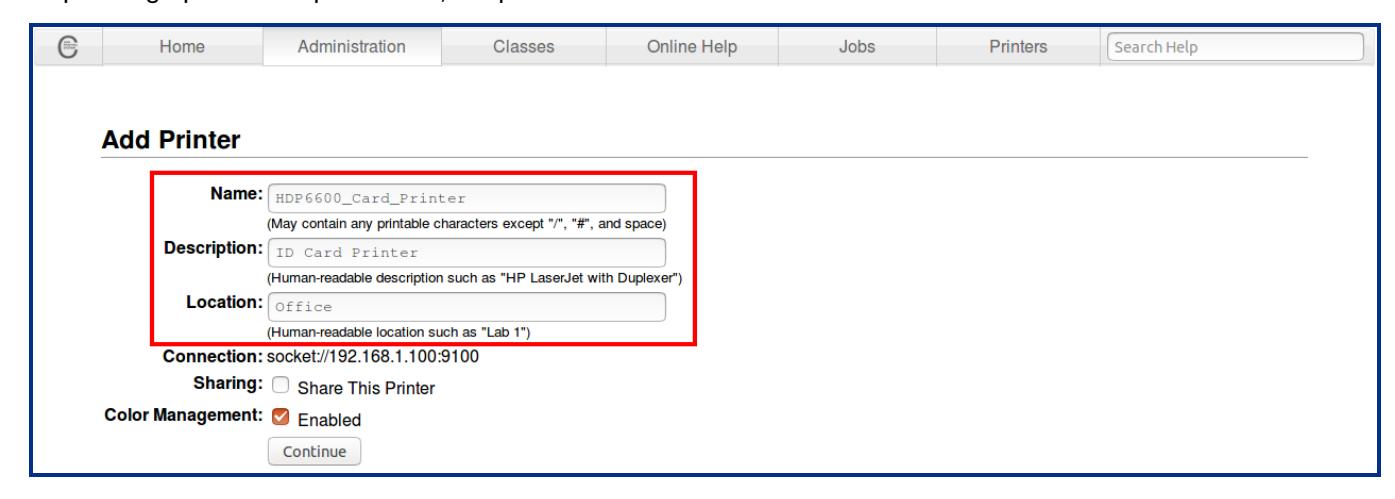
- l Enter a new name for the printer, if needed.
- l Enter a brief description of the printer.
- l Enter a brief description of the location of the printer.
- 10. In the Make list, select HID and click Continue .

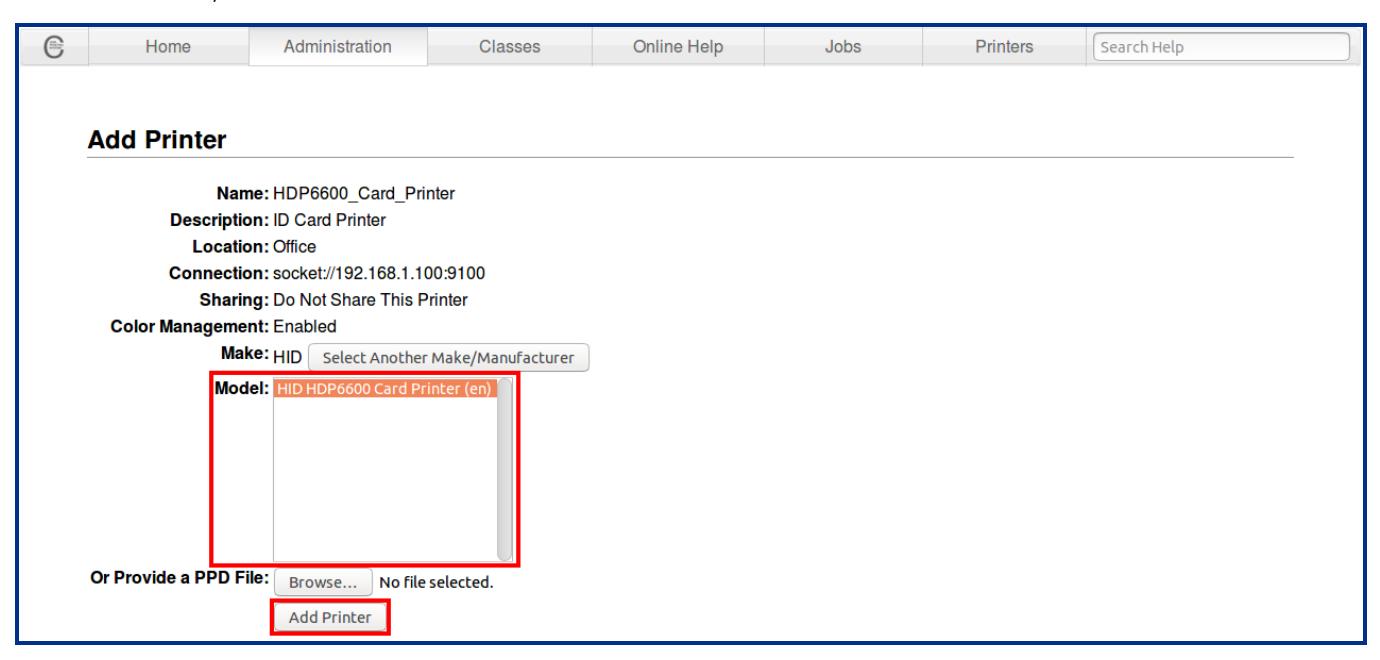
11. In the Model list, select the HDP6600 model and click Add Printer .
Section 03 Managing the printer


3.1 CUPS web interface
The CUPS web-based interface is disabled by default on some operating systems. If you receive a message that it is disabled, enter the following at the command line:
cupsctl WebInterface=yes
To access the CUPS web-based interface for printer management enter the following URL:
http://localhost:631/printers
Note: For a remote server, substitute the appropriate host name string in place of localhost.

3.2 Printers tab
Configuration of the HDP6600 printer is completed through the printer queue. The printer queue is accessed from the CUPS home page.
Note: Information about the CUPS web interface can be found by selecting the Home tab and clicking the associated link.
- 1. Click the Printers tab to access the printer queue.
- 2. Select HDP6600 from the Queue Name list. The printer queue opens to display all printer default information.

| Printer options | Options |
|---|---|
| Maintenance |
Print Test Page
l |
|
Pause Printer
l |
|
|
Reject Jobs
l |
|
|
Move All Jobs
l |
|
|
Cancel All Jobs
l |
|
| Administration |
Modify Printer
l |
|
Delete Printer
l |
|
|
Set Default Options
l |
|
|
Set As Server Default
l |
|
|
Set Allowed Users
l |

3.3 Option configuration
Print job option configuration is completed by using the Set Default Options window of the CUPS web interface. This window is accessed from the Print Queue Administration window.
On the Administration tab, select Set Default Options .
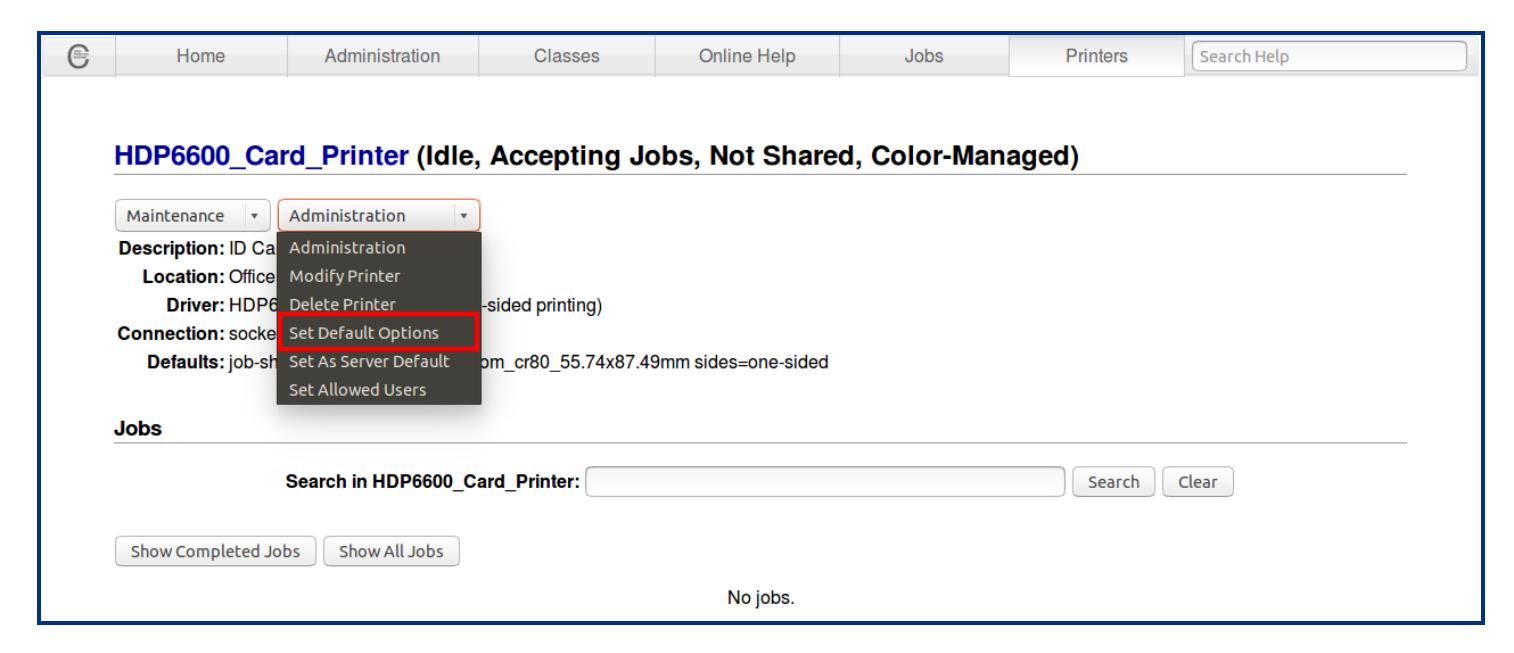
The options on this window vary depending upon the selected printer.
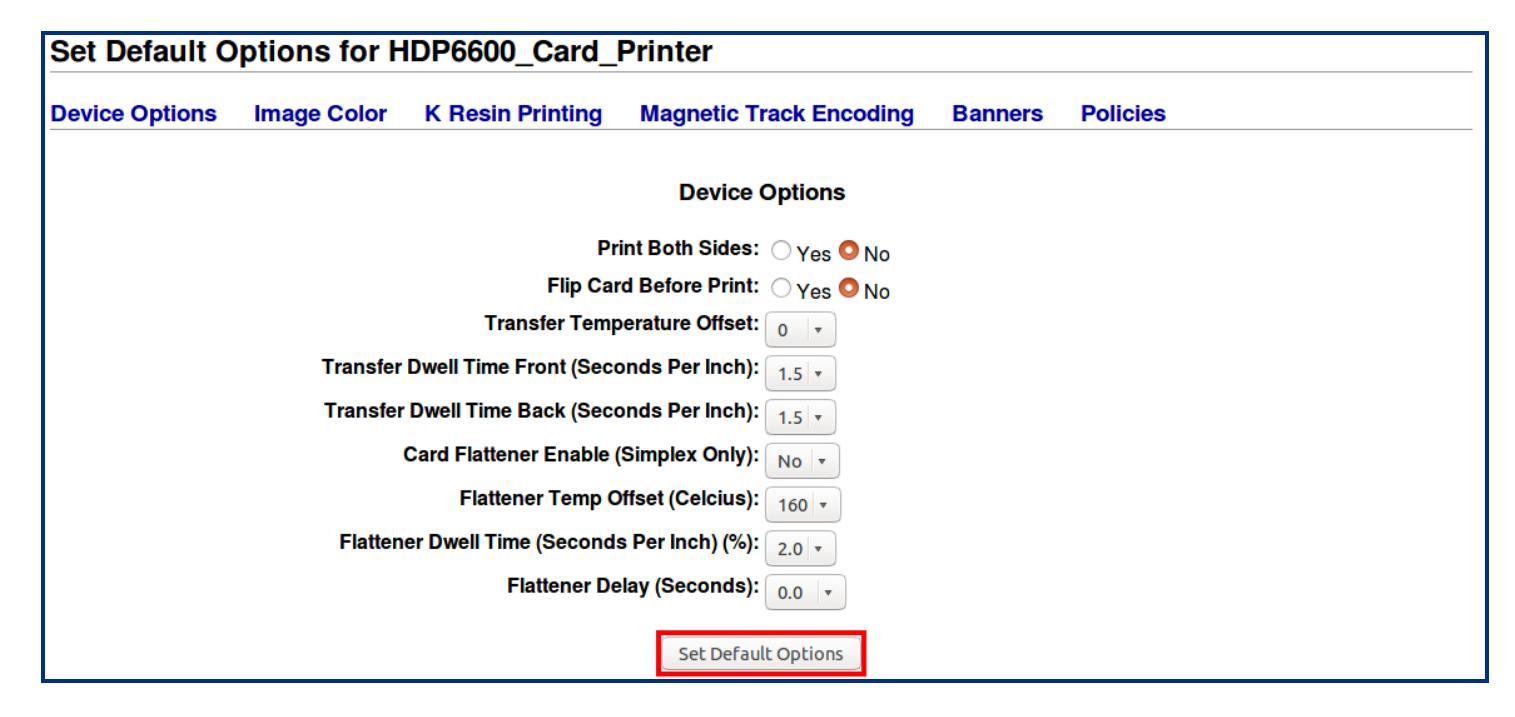

3.4 Setting default options
The following is an example of the Set Default Options window. The selections you make to this list become the default options for your printer. To set the default options:
- 1. Set each option to your desired default.
- 2. Click Set Default Options . A message stating that the default settings have been successfully changed is displayed.
Note: After a brief period, this window automatically transfers back to the Print Queue Administration window and the printer configuration process is complete.


3.5 View printer specific options from the command line
Each printer has its own set of supported options that are detailed in the driver PPD file. However, you cannot access this file directly. The lpoptions command provides a list of the available options supported by the printer. At a command line, enter:
lpoptions -p [printer] -l
where [printer] is the current printer name.
Each of the available options is displayed on a new line. Each option listing
- l Starts with the option name followed by a slash
- l Continues with the text description for that option
- l Finishes with a colon
Following the colon is a list of all selection values that are supported for that option. An asterisk (*) in front of a selection value indicates that this is the default selection for that option.
For a listing of available printer names, enter the following command:
lpstat -p
3.6 Set printer-specific options from the command line
For many print jobs, the default printer options are sufficient. However, at times you may need to change the options for a particular file you are printing.
The lp and lpr commands allow you to pass printer options using the –o option prefix:
lp -d [printer] -o landscape -o scaling=75 -o media=A4 [filename]
or
lpr -P [printer] -o landscape -o scaling=75 -o media=A4 [filename]
3.7 Printing from the command line
CUPS provides both System V (lp) and Berkeley (lpr) printing commands. To print a file to the current default printer, use this basic print command:
lpr -P [printer] [filename]
or
lp -d [printer] [filename]

3.8 Printing with magnetic stripe encoding
To print with magnetic stripe encoding use the following command format:
lp -d [printer] -o "MagTrack1=%25MAGTEST1%3F MagTrack2=%3B1234567890%3F MagTrack3=%3B1234567890%3F" [filename]
Section 04 Print job configuration options


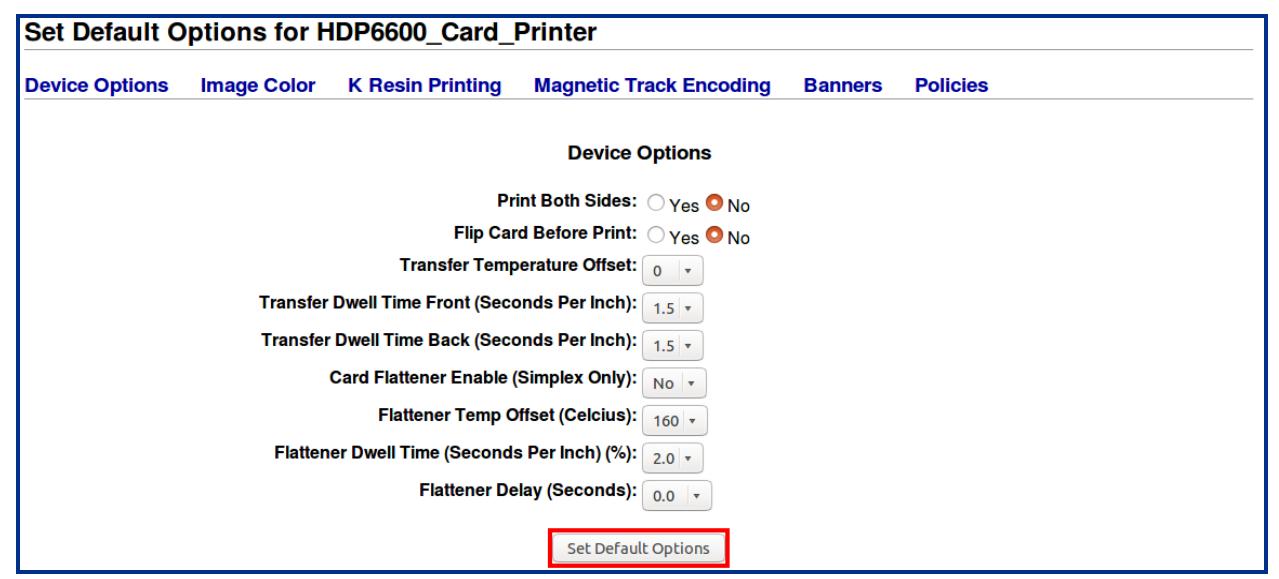
4.1 Device Options
| Device Options | Image Color | K Resin Printing | Magnetic Track Encoding | Banners | Policies |
|---|---|---|---|---|---|
| Device Options | |||||
| Pr | int Both Sides: ○ Yes O No | ||||
| Flip Car | rd Before Print: O Yes O No | ||||
| Transfer Temp | perature Offset: 0 + | ||||
| Transfer | Dwell Time Front (Second | onds Per Inch): 1.5 | + | |||
| Transfer | Dwell Time Back (Seco | onds Per Inch): 1.5 | + | |||
| Card Flattener Enable ( | Simplex Only): No | | ||||
| Flattener Temp C | offset (Celcius): 160 ▼ | ||||
| Flatten | er Dwell Time (Second | s Per Inch) (%): 2.0 + | |||
| Flattener De | elay (Seconds): 0.0 🔻 | ||||
| Set Default Options |
| Field | Description |
|---|---|
| Print Both Sides |
Determines whether duplex printing is enabled or disabled. If the printer is equipped with a flipper module then
odd numbered sides of the print job are printed on the front side of the card and even numbered sides are printed on the back side of the card. Options are: Yes: This option enables duplex printing. If the printer is equipped with a flipper module, then odd l numbered sides of the print job are printed on the front side of the card and even numbered sides are printed on the back side of the card. No: This is the default. This option disables duplex printing. If the print job has multiple sides, then each l side is printed on a separate card. |
| To configure this field from the command line, enter: | |
| PrintBothSides=Selection | |
| where Selection is True or False. | |
| Flip Card Before Printing |
Whether to flip the card before printing to put the front image on the back side of the card and the back image
on the front side of the card. Options are: Yes: This option enables flipping of the card before printing. l No: This is the default. This option disables flipping of the card before printing. l |
| To configure this field from the command line, enter: | |
| FlipCard=Selection | |
| where Selection is True or False. |

| Field | Description |
|---|---|
|
Transfer Temperature
Offset |
Sets temperature offset for InTM Film transfer in Celsius. The default is 0. Options are:
Adjust the value higher (+) to use more heat when transferring image to the card. l Adjust the value lower (-) to use less heat when transferring image to the card. l |
| To configure this field from the command line, enter: | |
| TransferTemp=Selection | |
| where Selection is a numeric value from -50 to 15. | |
|
Transfer Dwell Time Front
(Seconds Per Inch) |
Sets dwell time for InTM Film transfer in seconds per inch for the front side of the card. The default is 1.5.
To configure this field from the command line, enter: |
|
TransferDwell=Selection
where Selection is a numeric value from 1.0 to 3.0. |
|
|
Transfer Dwell Time Back
(Seconds Per Inch) |
Sets dwell time for InTM Film transfer in seconds per inch for the back side of the card. The default is 1.5.
To configure this field from the command line, enter: TransferDwell=Selection where Selection is a numeric value from 1.0 to 3.0. |
|
Card Flattener Enable
(Simplex Only) |
Whether enable flattening of the card after printing. The default is disabled.
To configure this field from the command line, enter: FlattenerEnable=Selection where Selection is True or False. |
|
Flattener Temp Offset
(Celcius) |
Sets the flattener temperature. The default is 160.
To configure this field from the command line, enter: FlattenerTemp=Selection where Selection is a numeric value from 100 to 200. |
|
Flattener Dwell Time
(Seconds Per Inch) |
Sets flattener dwell time for InTM Film in seconds per inch. The default is 2.0.
To configure this field from the command line, enter: FlattenerDwell=Selection where Selection is a numeric value from 1.0 to 3.0. |
| Flattener Delay (Seconds) |
A delay time before flattening the card. The default is 0.
To configure this field from the command line, enter: FlattenerDelay=Selection where Selection is a numeric value from 0 to 15.0. |

4.2 Image color
| Set Default O | Set Default Options for HDP6600_Card_Printer | |||||
|---|---|---|---|---|---|---|
| Device Options | Image Color | K Resin Printing | Magnetic Track | Encoding | Banners | Policies |
| Image Col | or | |||||
| 1 | Ribbon Side 1: YM | CK + | ||||
| Ribbon Side 2: YM | CK + | |||||
| Color Mode: Col | or RGBK 🔻 | |||||
| Co | lor Correction: Def | ault 🕶 | ||||
| Resin Dither: Opt | timize for Grap | hics 🔻 | ||||
| Dye-Sub(YM | C) Heat Offset: 0 | • | ||||
| Resin( | K) Heat Offset: 0 | • | ||||
| Set Default Opt | ions | |||||
| Field | Description |
|---|---|
| Ribbon Side 1 |
Selects colors that will be available for the front side of the card. Options are:
YMCK (default) l YMC l K l |
| To configure this field from the command line, enter: | |
| ColorsFront=Selection | |
| where Selection is YMCK, YMC, or K. | |
| Ribbon Side 2 |
Selects colors that will be available for the back side of the card. Options are:
YMCK (default) l YMC l K l |
| To configure this field from the command line, enter: | |
| ColorsBack=Selection | |
| where Selection is YMCK, YMC, or K. | |
| Color Mode |
The input color mode of the raster image processor. Options are:
Color RGB l Color RGBK (RGB + black) l |
| To configure this field from the command line, enter: | |
| ColorModel=Selection | |
| where Selection is Color RGB or Color RGBK. |

| Field | Description |
|---|---|
| Color Correction |
Optimize image color. Options are:
None: Performed by application. l Default: Default. l Legacy: Matches to legacy printers. l |
| To configure this field from the command line, enter: | |
| ColorMatch=Selection | |
| where Selection is None, Default, or Legacy. | |
| Resin Dither |
Selects which dithering method is used. Options are:
Optimize for Graphics: This is the default. Use this option when printing barcodes and graphics with resin. l Optimize for Photos: Use this option when printing photo quality images with resin. l |
| To configure this field from the command line, enter: | |
| ResinDither=Selection | |
| where Selection is Graphics or Photos. | |
|
Dye-Sub (YMC) Heat
Offset |
Selects the intensity of the dye-sub. The default is 0. Options are:
Adjust the value higher (+) to use more heat when transferring dye-sub colors to the card. This produces a l darker, more saturated image. Adjust the value lower (-) to use less heat when transferring dye-sub colors to the card. This produces a l lighter, less saturated print. |
| To configure this field from the command line, enter: | |
| DyeSubHeat=Selection | |
| where Selection is a numeric value from -50 to 50. | |
| Resin(K) Heat Offset |
Selects the intensity of the Resin(K). The default is 0. Options are:
Adjust the value higher (+) to use more heat to transfer resin to a card when printing resin black on the l front side of the card. Adjust the value lower (-) to use less heat to transfer resin to a card when printing resin black on the front l side of the card. |
| To configure this field from the command line, enter: | |
| ResinHeat=Selection | |
| where Selection is a numeric value from -50 to 50. |

4.3 K Resin Printing
| Set Default C | Set Default Options for HDP6600_Card_Printer | ||||
|---|---|---|---|---|---|
| Device Options | Image Color | K Resin Printing | Magnetic Track Encoding | Banners | Policies |
| K Resin Printing | |||||
| Use K Resin to Print Black in Images: ○ Yes ○ No | |||||
| Remove YMC L | Jnder K Resin: ○ Yes ○ No | ||||
| K Resin Thresh | nold in Images: 2 | ||||
| Set Default Options | |||||
| Field | Description |
|---|---|
|
Use K Resin to Print Black
in Images |
Selects if the K-Panel is used on the card. Options are:
Yes: Instructs the printer to use the resin black ribbon panel to print all black pixels found within the image l data on the card. No: This is the default. l To configure this field from the command line, enter: |
| ColorModel=Selection | |
| where Selection is Yes or No. | |
|
Remove YMC Under K
Resin |
Determines if YMC is printed under the resin black on the card. Options are:
Yes: Enables YMC dye-sub black to be printed underneath the resin black for pixels that are affected by the l K-Panel Area option. This option provides a gradual transition between background colors and the edges of text and bar codes printed with resin black. No: This is the default. YMC dye-sub black is not printed under the resin black for pixels that are affected l by the K-Panel Area option. This option maximizes the sharpness of text and bar codes printed with resin black. To configure this field from the command line, enter: YMCunderK=Selection |
| where Selection is Yes or No. | |
|
K Resin Threshold in
Images |
Changes the level at which the driver moves a pixel to be printed on a resin panel instead of a YMC. The
default value is 2: To configure this field from the command line, enter: |
| ResinThreshold=Selection | |
| where Selection is a numeric value from 1 to 255. |

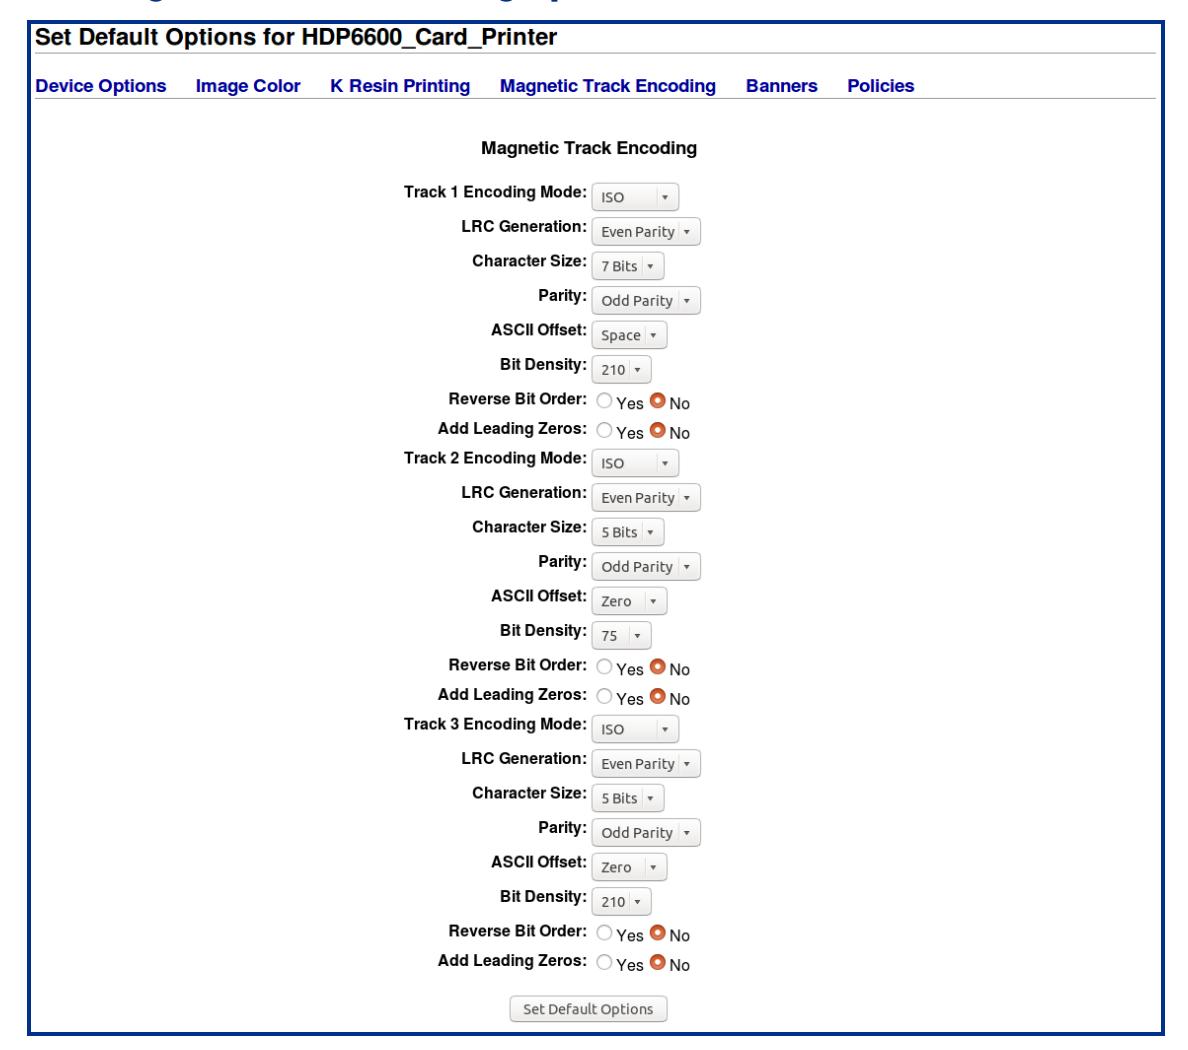
4.4 Magnetic track encoding options
| Field | Description |
|---|---|
|
Track 1 Encoding Mode (Magnetic
Encoding) |
Sets the encoding mode independently for each of the three magnetic tracks. Options are:
ISO - This is the default. l |
|
Custom
l |
|
|
JIS
l |
|
|
Raw
l |
|
| To configure this field from the command line, enter: | |
| MagNTrackMode=Selection | |
| where N is 1, 2, or 3 and Selection is ISO, Custom, JIS, or Raw. |

| Field | Description |
|---|---|
| LRC Generation |
Sets the LRC generation independently for each of the three magnetic tracks. Options are:
None l Even Parity - This is the default. l Odd Parity l |
| To configure this field from the command line, enter: | |
| MagNLRCGeneration=Selection | |
| where N is 1, 2, or 3 and Selection is None, Even, or Odd. | |
| Character Size |
Sets the character size (in bits per character) independently for each of the three magnetic
tracks. Options are: 4 Bits l 5 Bits - This is the default for magnetic tracks 2 and 3. l 7 Bits - This is the default for magnetic track 1. l 8 Bits l |
| To configure this field from the command line, enter: | |
| MagNCharSize=Selection | |
| where N is 1, 2, or 3 and Selection is 4, 5, 7, or 8. | |
| Character Parity |
Sets the character parity independently for each of the three magnetic tracks. Options are:
None l Even Parity l Odd Parity - This is the default. l |
| To configure from the command line: | |
| MagNParity=Selection | |
| where N is 1, 2, or 3 and Selection is None, Even, or Odd. | |
| Character ASCII Offset |
Sets the character ASCII offset independently for each of the three magnetic tracks. Options are:
Null l Space - This is the default for magnetic track 1. l Zero - This is the default for magnetic tracks 2 and 3. l |
| To configure this field from the command line, enter: | |
| MagNASCIIOffset=Selection | |
| where N is 1, 2, or 3 and Selection is Null, Space, or Zero. | |
| Track Bit Density |
Sets the encoding bit density independently for each of the three magnetic tracks. Available
options: 75 - This is the default for magnetic track 2. l 128 l 210 - This is the default for magnetic tracks 1 and 3. l |
|
To configure this field from the command line, enter:
MagNBitDensity=Selection |
|
| where N is 1, 2, or 3 and Selection is 75, 128, or 210. |

4.4.1 Card printer driver magnetic encoder settings
This table shows the settings that should be used to correctly configure HID card printers.
|
Encoding
mode |
Shift
left data |
LRC
generation |
Character
size |
Character
parity |
ASCII
offset |
Bit
density |
Reverse
bit order |
Add
leading zero |
|---|---|---|---|---|---|---|---|---|
| ISO | No | Even |
Track 1 = 7
Track 2 = 5 Track 3 = 5 |
Odd |
Track 1 = Space
Track 2 = Zero Track 3 = Zero |
Track 1 = 210
Track 2 = 75 Track 3 = 210 |
Yes | Yes |
| Custom | Yes, No | No, Even, Odd | 5, 7 | No, Even, Odd |
Null, Space,
Zero |
75,128, 210 | Yes | Yes |
| Raw | No | No | 4, 8 | No | Null | 75, 210 | Yes, No | Yes, No |
| JIS | No | Even | 8 | Even | Null | 210 | No | No |
4.5 Magnetic stripe encode data
Magnetic stripe encode data must be passed to the CUPS driver using the command line. The following command line options have been defined for this purpose:
- l Magtrack1
- l Magtrack2
- l Magtrack3
Each option is set equal to the string of data to be encoded for that track. The string of encode data must be passed to the CUPS driver in URL character encoding mode. See URL character encoding mode .
A command line option flag (-o) must precede the first track of magnetic stripe encode data passed on the command line. The second and third tracks, however, may be specified following the first track without including additional command line option flags.
Command line example:
lp -d <Printer_Queue_Name> -o "Magtrack1=%25MAGTEST1%3F Magtrack2=%3B1234567890%3F Magtrack3=%3B1234567890%3F" <Filename>
4.5.1 Magnetic stripe encoding - format details
The following sections describe the URL character encoding mode and details the currently supported magnetic stripe encoding modes:
- l ISO mode
- l JIS II mode
- l Custom mode
- l Raw mode

4.5.2 URL character encoding mode
The CUPS driver uses URL encoding mode when defining data to be encoded to each of the magnetic stripes. To be recognized, all characters passed to the driver, including any special characters (such as start and end sentinels), must be described with a URL encoding mode.
In URL encoding mode all ASCII characters, except for the reserved character set defined here, are represented by their normal ASCII character codes. Each character in the reserved character set must be represented by a 3-character sequence: a percent character (%) followed by a 2-character representation of the hex equivalent of the ASCII character code.
The following shows the reserved ASCII characters and their associated 3-character URL encoding sequence.
| ASCII character | URL encoding | ASCII character | URL encoding |
|---|---|---|---|
| ! | %21 | # | %23 |
| $ | %24 | % | %25 |
| & | %26 | ' | %27 |
| ( | %28 | ) | %29 |
| * | %2A | + | %2B |
| , | %2C | / | %2F |
| : | %3A | ; | %3B |
| = | %3D | ? | %3F |
| @ | %40 | [ | %5B |
| ] | %5D |
4.5.3 ISO magnetic encoding mode
The ISO magnetic encoding mode comprises three components:
- l Start Sentinel
- l Track Character Data
- l End Sentinel
The first character of each track data string must be the track specific start sentinel (SS), and the last character must be the track specific end sentinel (ES).
The data characters in between the SS and ES must be limited to the track specific range of valid character codes.
The total number of characters for each track must be limited to the track specific maximum character count.
When segmenting track data, the track specific field separator (FS) must be used.
This table details the required start sentinel, end sentinel, field separator, valid character code range, and the maximum character count for each of the three magnetic tracks.
| Track | Start sentinel (SS) | End sentinel (ES) | Field separator (FS) | Valid character code range | Maximum character count |
|---|---|---|---|---|---|
| 1 | % | ? | ^ | ASCII 32-95 | 78 |
| 2 | ; | ? | = | ASCII 48-63 | 39 |
| 3 | ; | ? | = | ASCII 48-63 | 109 |

4.5.4 JIS II magnetic encoding mode
The JIS II magnetic encoding mode allows you to specify string data to be encoded on the magnetic stripe using the JIS II encoding format. JIS normally is only for Track 2. Track 1 and 3 are not standard JIS, but is supported. JIS II does not expect a beginning and ending sentinel for the encoding character string.
4.5.5 Custom magnetic encoding mode
The custom magnetic encoding mode allows you to independently specify each of the various encoding parameters for each magnetic track. Individual characters are encoded on each magnetic track using the set of parameters. For custom encoding more flexibility than for JIS II or ISO is provided.
4.5.6 Raw magnetic encoding mode
The raw magnetic encoding mode allows you to specify raw binary string data to be encoded on the magnetic stripe. A specific format of the input data is not assumed and all encoding parameters for each magnetic track are ignored, except for the track bit density. Using RAW format requires the binary data to be specified more completely than for other formats. Such options as parity, LRC, shift left data are not supported. The bit density can be any value between 75 and 210; however, a value not selectable from the UI can only be specified by a command line option.
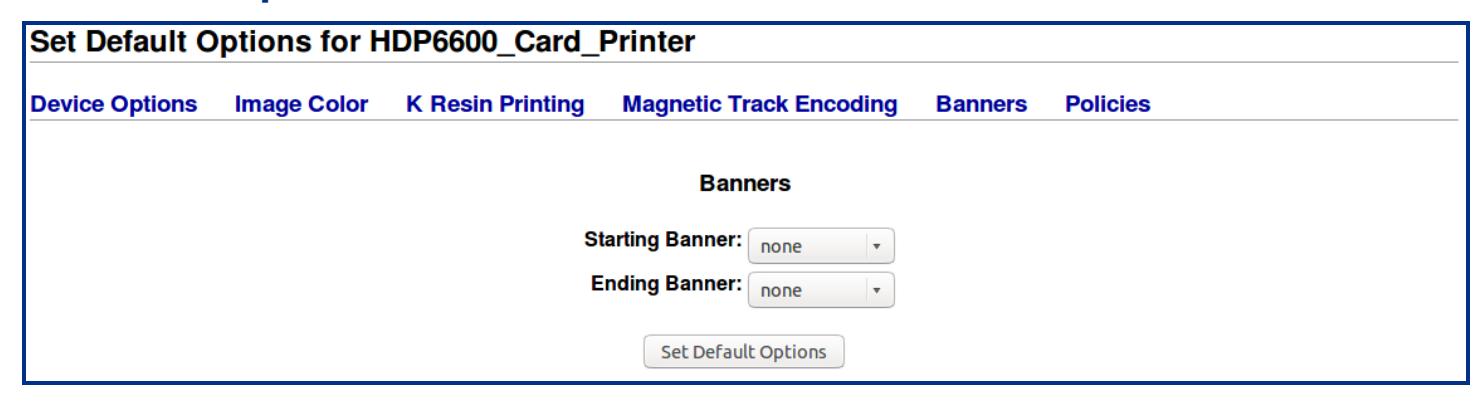
4.6 Banners option
| Field | Description |
|---|---|
| Starting Banner |
Specifies the message that is displayed on the banner (other than the default). Options are:
None - This is the default. l Standard l Confidential l Unclassified l Classified l Secret l |
|
Top Secret
l To configure this field from the command line, enter: job-sheets = StartBanner, EndBanner where: StartBanner and EndBanner are each one of the following: None, Standard, Confidential, Unclassified, Classified, Secret, or Topsecret. |

| Field | Description |
|---|---|
| Ending Banner |
Specifies the message that is displayed on the banner (other than the default). Options are:
None - This is the default. l Standard l Confidential l Unclassified l Classified l Secret l Top Secret l |
|
To configure this field from the command line, enter:
job-sheets = StartBanner, EndBanner where StartBanner and EndBanner are each one of the following: None, Standard, Confidential, Unclassified, Classified, Secret, and Topsecret. |
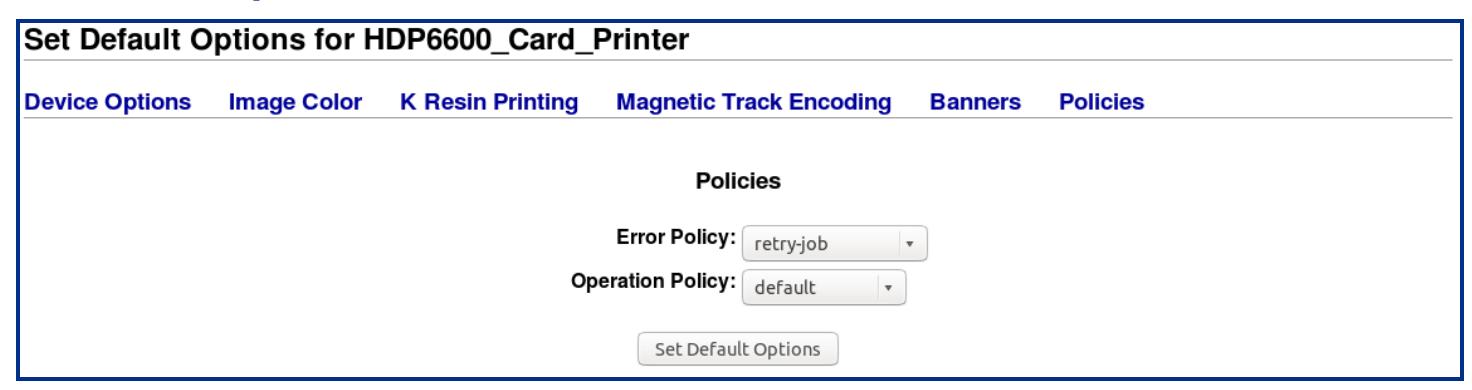
4.7 Policies options
| Field | Description |
|---|---|
| Error Policy |
Defines the policy that is used when a backend is unable to send a print job to the printer.
Options are: Abort-job: Aborts the job and proceeds with the next job in the queue. l Retry-current-job: Retries the current job immediately. l Retry-job: Retries the job after waiting N seconds, where the cupsd.conf JobRetryInterval l directive controls the value of N. Stop-printer - This is the default. Stops the printer and keeps the job for future printing. l The Error Policy is supported using the lpadmin command on the command line interface. |
| Operation Policy |
Defines the required authentication type. Options are:
Default - This is the default. l Kerberos l The Operation Policy is supported using the lpadmin command on the command line interface. |
Section 05 Licenses


5.1 Copyright notices
The driver (hereinafter referred to as Product) includes software packages that are subject to the licenses named in this table.
| Software package | License | |
|---|---|---|
| Sample ICC* | The ICC software license, Version 0.1. | |
| Boost | Boost software license | |
| Xerces | Apache License, Version 2.0 | |
| * This product includes software developed by The International Color Consortium (www.color.org). | ||
5.2 The ICC software license, version 0.1
Copyright © 2003-2007 - The International Color Consortium. All rights reserved.
Redistribution and use in source and binary forms, with or without modification, are permitted provided that the following conditions are met:
- 1. Redistributions of source code must retain the above copyright notice, this list of conditions and the following disclaimer.
- 2. Redistributions in binary form must reproduce the above copyright notice, this list of conditions and the following disclaimer in the documentation and/or other materials provided with the distribution.
- 3. The end-user documentation included with the redistribution, if any, must include the following acknowledgment: This product includes software developed by The International Color Consortium (www.color.org) Alternatively, this acknowledgment may appear in the software itself, if and wherever such third-party acknowledgments normally appear.
- 4. In the absence of prior written permission, the names ICC and The International Color Consortium must not be used to imply that the ICC organization endorses or promotes products derived from this software.
5.3 Boost software license - version 1.0 - August 17th, 2003
Permission is hereby granted, free of charge, to any person or organization obtaining a copy of the software and accompanying documentation covered by this license (the Software) to use, reproduce, display, distribute, execute, and transmit the Software, and to prepare derivative works of the Software, and to permit third-parties to whom the Software is furnished to do so, all subject to the following:
The copyright notices in the Software and this entire statement, including the above license grant, this restriction and the following disclaimer, must be included in all copies of the Software, in whole or in part, and all derivative works of the Software, unless such copies or derivative works are solely in the form of machine-executable object code generated by a source language processor.

5.4 Apache license- version 2.0, January 2004
TERMS AND CONDITIONS FOR USE, REPRODUCTION, AND DISTRIBUTION
1. Definitions.
License shall mean the terms and conditions for use, reproduction, and distribution as defined by Sections 1 through 9 of this document.
Licensor shall mean the copyright owner or entity authorized by the copyright owner that is granting the License. Legal Entity shall mean the union of the acting entity and all other entities that control, are controlled by, or are under common control with that entity. For the purposes of this definition, control means (i) the power, direct or indirect, to cause the direction or management of such entity, whether by contract or otherwise, or (ii) ownership of fifty percent (50%) or more of the outstanding shares, or (iii) beneficial ownership of such entity.
You (or Your) shall mean an individual or Legal Entity exercising permissions granted by this License.
Source form shall mean the preferred form for making modifications, including but not limited to software source code, documentation source, and configuration files.
Object form shall mean any form resulting from mechanical transformation or translation of a Source form, including but not limited to compiled object code, generated documentation, and conversions to other media types.
Work shall mean the work of authorship, whether in Source or Object form, made available under the License, as indicated by a copyright notice that is included in or attached to the work (an example is provided in the Appendix below).
Derivative Works shall mean any work, whether in Source or Object form, that is based on (or derived from) the Work and for which the editorial revisions, annotations, elaborations, or other modifications represent, as a whole, an original work of authorship. For the purposes of this License, Derivative Works shall not include works that remain separable from, or merely link (or bind by name) to the interfaces of, the Work and Derivative Works thereof. Contribution shall mean any work of authorship, including the original version of the Work and any modifications or additions to that Work or Derivative Works thereof, that is intentionally submitted to Licensor for inclusion in the Work by the copyright owner or by an individual or Legal Entity authorized to submit on behalf of the copyright owner. For the purposes of this definition, submitted means any form of electronic, verbal, or written communication sent to the Licensor or its representatives, including but not limited to communication on electronic mailing lists, source code control systems, and issue tracking systems that are managed by, or on behalf of, the Licensor for the purpose of discussing and improving the Work, but excluding communication that is conspicuously marked or otherwise designated in writing by the copyright owner as Not a Contribution.
Contributor shall mean Licensor and any individual or Legal Entity on behalf of whom a Contribution has been received by Licensor and subsequently incorporated within the Work.
- 2. Grant of Copyright License. Subject to the terms and conditions of this License, each Contributor hereby grants to You a perpetual, worldwide, non-exclusive, no-charge, royalty- free, irrevocable copyright license to reproduce, prepare Derivative Works of, publicly display, publicly perform, sublicense, and distribute the Work and such Derivative Works in Source or Object form.
- 3. Grant of Patent License. Subject to the terms and conditions of this License, each Contributor hereby grants to You a perpetual, worldwide, non-exclusive, no-charge, royalty-free, irrevocable (except as stated in this section) patent license to make, have made, use, offer to sell, sell, import, and otherwise transfer the Work, where such license applies only to those patent claims licensable by such Contributor that are necessarily infringed by their Contribution(s) alone or by combination of their Contribution(s) with the Work to which such Contribution(s) was submitted. If You institute patent litigation against any entity (including a cross-claim or counterclaim in a lawsuit) alleging that the Work or a Contribution incorporated within the Work constitutes direct or contributory patent infringement, then any patent licenses granted to You under this License for that Work shall terminate as of the date such litigation is filed.

-
4. Redistribution. You may reproduce and distribute copies of the Work or Derivative Works thereof in any medium, with or without modifications, and in Source or Object form, provided that You meet the following conditions:
- 1. You must give any other recipients of the Work or Derivative Works a copy of this License; and
- 2. You must cause any modified files to carry prominent notices stating that You changed the files; and
- 3. You must retain, in the Source form of any Derivative Works that You distribute, all copyright, patent, trademark, and attribution notices from the Source form of the Work, excluding those notices that do not pertain to any part of the Derivative Works; and
- 4. If the Work includes a NOTICE text file as part of its distribution, then any Derivative Works that You distribute must include a readable copy of the attribution notices contained within such NOTICE file, excluding those notices that do not pertain to any part of the Derivative Works, in at least one of the following places: within a NOTICE text file distributed as part of the Derivative Works; within the Source form or documentation, if provided along with the Derivative Works; or, within a display generated by the Derivative Works, if and wherever such third-party notices normally appear. The contents of the NOTICE file are for informa- tional purposes only and do not modify the License. You may add Your own attribution notices within Derivative Works that You distribute, alongside or as an addendum to the NOTICE text from the Work, provided that such additional attribution notices cannot be con- strued as modifying the License.
- 5. You may add Your own copyright statement to Your modifications and may provide addi- tional or different license terms and conditions for use, reproduction, or distribution of Your modifications, or for any such Derivative Works as a whole, provided Your use, reproduction, and distribution of the Work otherwise complies with the conditions stated in this License.
- 5. Submission of Contributions. Unless You explicitly state otherwise, any Contribution intentionally submitted for inclusion in the Work by You to the Licensor shall be under the terms and conditions of this License, without any additional terms or conditions. Notwithstanding the above, nothing herein shall supersede or modify the terms of any separate license agreement you may have executed with Licensor regarding such Contributions.
- 6. Trademarks. This License does not grant permission to use the trade names, trademarks, service marks, or product names of the Licensor, except as required for reasonable and customary use in describing the origin of the Work and reproducing the content of the NOTICE file.
- 7. Disclaimer of Warranty. Unless required by applicable law or agreed to in writing, Licensor provides the Work (and each Contributor provides its Contributions) on an AS IS BASIS, WITHOUT WARRANTIES OR CONDITIONS OF ANY KIND, either express or implied, including, without limitation, any warranties or conditions of TITLE, NON-INFRINGEMENT, MERCHANTABILITY, or FITNESS FOR A PARTICULAR PURPOSE. You are solely responsible for determining the appropriateness of using or redistributing the Work and assume any risks associated with Your exercise of permissions under this License.
- 8. Limitation of Liability. In no event and under no legal theory, whether in tort (including negligence), contract, or otherwise, unless required by applicable law (such as deliberate and grossly negligent acts) or agreed to in writing, shall any Contributor be liable to You for damages, including any direct, indirect, special, incidental, or consequential damages of any character arising as a result of this License or out of the use or inability to use the Work (including but not limited to damages for loss of goodwill, work stoppage, computer failure or malfunction, or any and all other commercial damages or losses), even if such Contributor has been advised of the possibility of such damages.
- 9. Accepting Warranty or Additional Liability. While redistributing the Work or Derivative Works thereof, You may choose to offer, and charge a fee for, acceptance of support, warranty, indemnity, or other liability obligations and/or rights consistent with this License. However, in accepting such obligations, You may act only on Your own behalf and on Your sole responsibility, not on behalf of any other Contributor, and only if You agree to indemnify, defend, and hold each Contributor harmless for any liability incurred by, or claims asserted against, such Contributor by reason of your accepting any such warranty or additional liability.
END OF TERMS AND CONDITIONS
PLT-05253, A.0 36 May 2023

Revision history
| Date | Description | Revision |
|---|---|---|
| May 2023 | Initial release. | A.0 |

For technical support, please visit: https://support.hidglobal.com
© 2023 HID Global Corporation/ASSA ABLOY AB. All rights reserved. PLT-05253, Rev. A.0
Part of ASSA ABLOY