HID FARGO Connect Console User Guide
Open the original PDF document
View PDFHID® FARGO® Connect™ Console User Guide
PLT-03680, A.5 October 2024


Copyright
© 2024 HID Global Corporation/ASSA ABLOY AB. All rights reserved.
This document may not be reproduced, disseminated, or republished in any form without the prior written permission of HID Global Corporation.
Trademarks
HID GLOBAL, HID, the HID Brick logo, FARGO, and FARGO Connect are trademarks or registered trademarks of HID Global, ASSA ABLOY AB, or its affiliate(s) in the US and other countries and may not be used without permission. All other trademarks, service marks, and product or service names are trademarks or registered trademarks of their respective owners.
Contacts
For technical support, please visit: https://support.hidglobal.com .
What's new
| Date | Description | Revision |
|---|---|---|
| October 2024 | Updated document to support HID FARGO Connect 1.11. | A.5 |
A complete list of revisions is available in Revision history .

| Overview | 4 |
|---|---|
| 1.1 Introduction | 5 |
| 1.2 Console layout | 6 |
| 1.3 Quick reference | 7 |
| Connection | 8 |
| 2.1 Connecting the console | 9 |
| 2.1.1 Connecting to a printer via USB | 9 |
| 2.1.2 Connecting a printer via Ethernet | 10 |
| 2.1.3 Connecting to a local network via Ethernet | 10 |
| 2.1.4 Connecting the power | 10 |
| Operation | 11 |
| 3.1 Log in | 12 |
| 3.1.1 Home screen | 13 |
| 3.2 Print Management | 14 |
| 3.2.1 Print Queue tab | 14 |
| 3.2.2 Printer status tab | 15 |
| 3.3 Printer Setup | 17 |
| 3.3.1 Printer Settings: Ethernet | 18 |
| 3.3.2 Printer Settings: USB | 19 |
| 3.4 Help | 20 |
| 3.4.1 Help: Maintenance tab | 20 |
| 3.4.2 Help: Inventory tab | 21 |
| 3.4.3 Help: Setup tab | 22 |
| 3.5 System Support | 23 |
| 3.5.1 Device Information tab | 23 |
| 3.5.2 Support Contact tab | 24 |
| 3.5.3 Software Update tab | 25 |
| 3.6 Side menu | 26 |
| 3.6.1 Settings: Server Settings tab | 26 |
| 3.6.2 Settings: Network Settings tab | 29 |
| 3.6.3 Settings: Display Settings tab | 30 |
| 3.6.4 Settings: Language Settings tab | 32 |
| 3.6.5 Home and Logout | 33 |
| Specifications | 35 |
| 4.1 Regulatory | 36 |
| 4.2 Warranty | 38 |
Section 01 Overview


1.1 Introduction
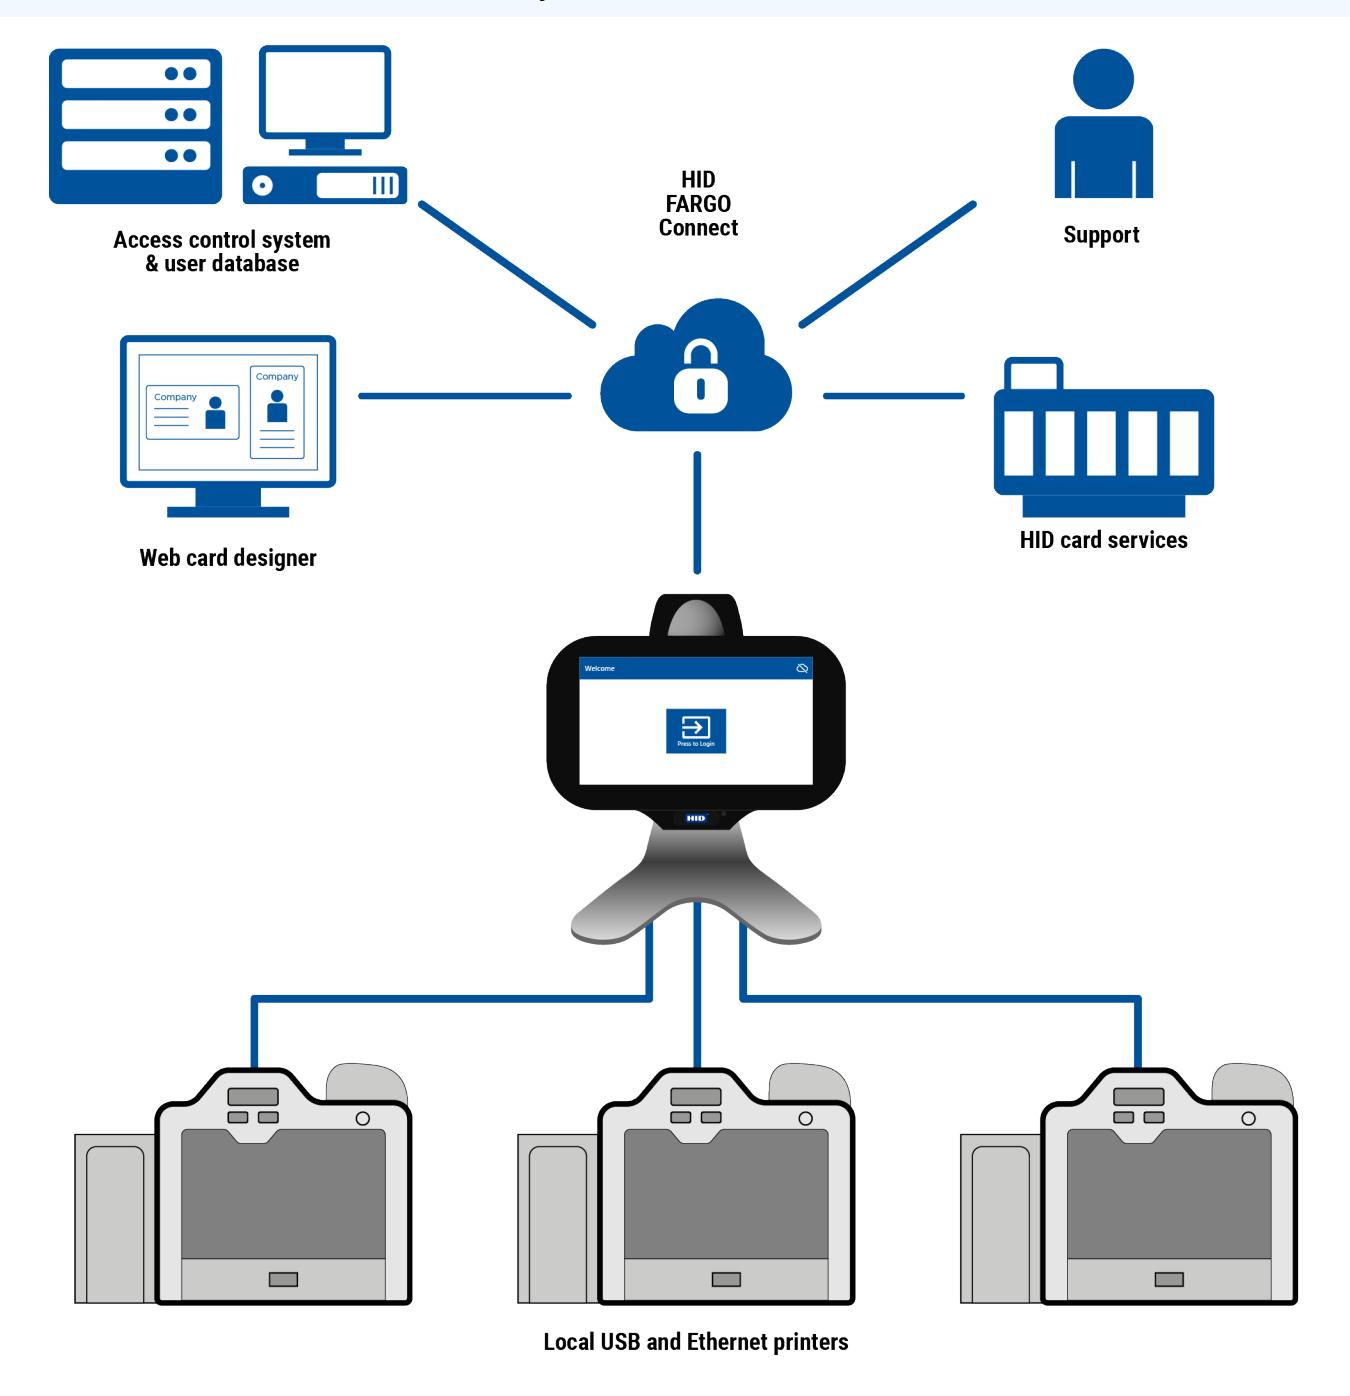
The HID FARGO® Connect™ Console provides a secure gateway between your local FARGO card printers and the HID FARGO Connect platform, whether installed on-premises or in the cloud. The console provides a clear, easy to use touchscreen interface for local control and monitoring of the connected FARGO card printers.
Note: If you are using the new, version 2 HID FARGO Connect Console, you must use version 1.11 of HID FARGO Connect for the console to work correctly.

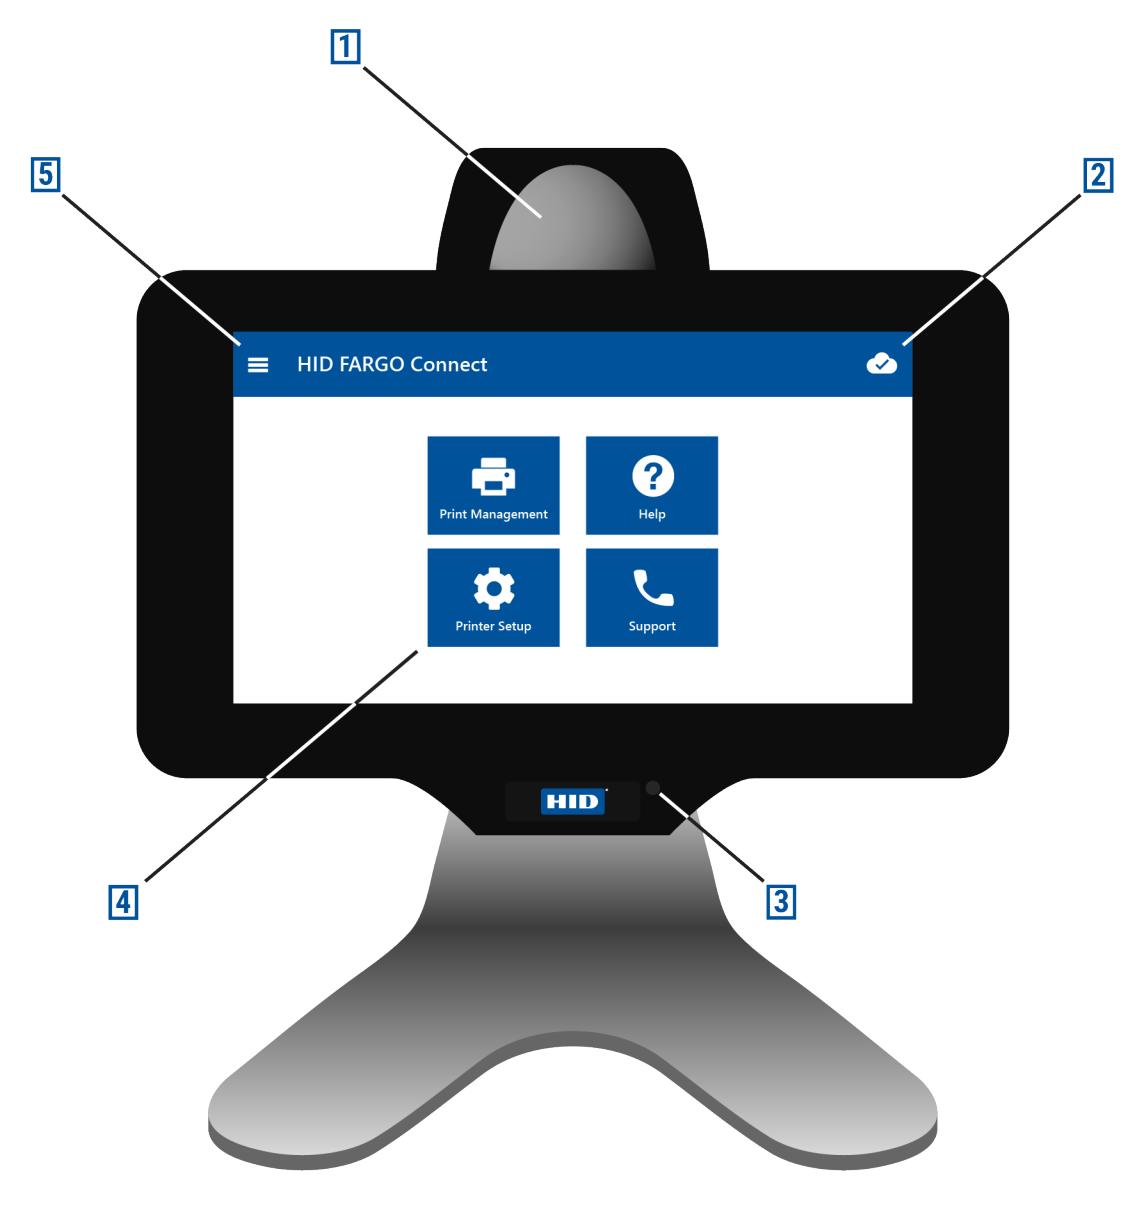
1.2 Console layout
| Number | Description |
|---|---|
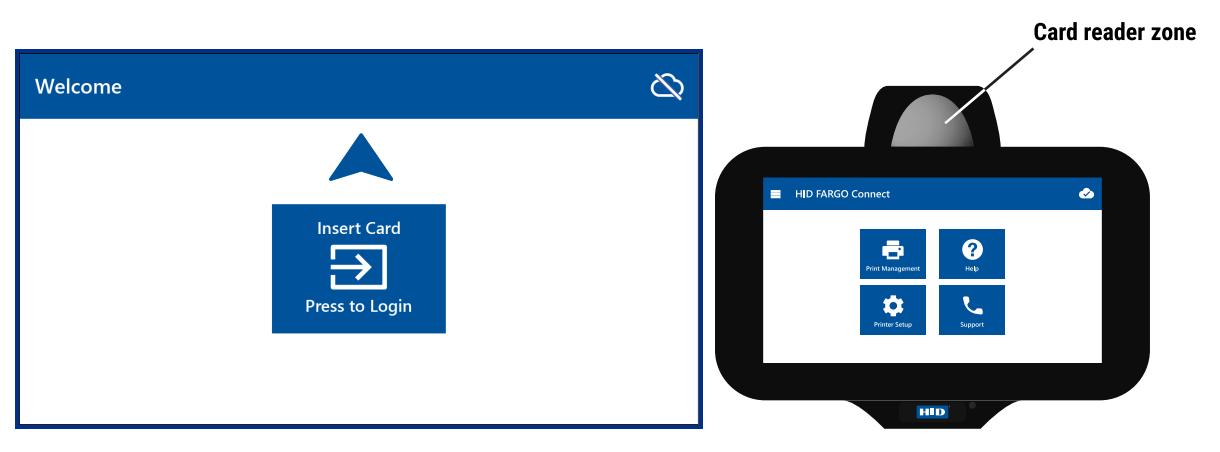
| 1 | Card reader zone. See 3.1 Log in for more information. |
| 2 | HID FARGO Connect cloud connection status |
| 3 | Power status LED |
| 4 |
Function buttons. See 3.2 Print Management,3.3 Printer Setup, 3.4 Help, and 3.5 System Support for more
information. |
| 5 | Side menu control. See 3.6 Side menu for more information. |

1.3 Quick reference
HID FARGO Connect cloud See 3.6 Side menu Connected Disconnected If the console is connected to the internet and is not registered with the portal the Connected icon flashes. Check printing status/queue See3.2 Print Management Manually start a print job See 3.2 Print Management Check printer consumables See 3.2 Print Management Use the displayed part number to re-order stock Edit printer settings See 3.3 Printer Setup or to select printer type Enable auto printing See 3.3 Printer Setup Change display brightness See 3.6 Side menu Change server settings See 3.6 Side menu Check with your administrator before changing server settings Logout See 3.6 Side menu
Section 02 Connection


2.1 Connecting the console
The console can be connected to a total of three printers, using USB, Ethernet, or a combination of both.
Note: To read or write to a contactless smart card during the print process, the printer must to be connected to the console using a USB connection.
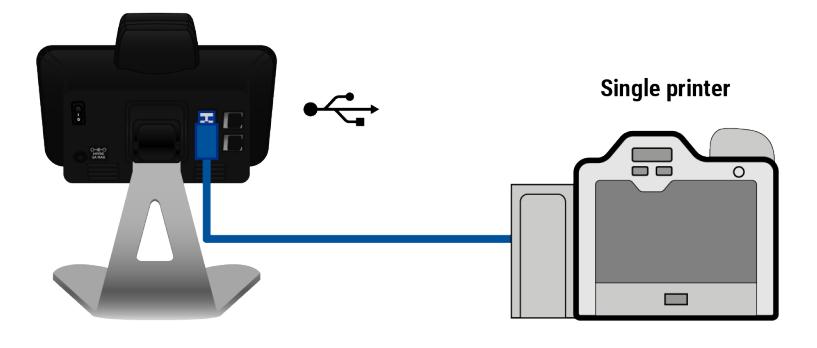
2.1.1 Connecting to a printer via USB
- l If you have only one printer, you can connect it directly to the USB port on the console.
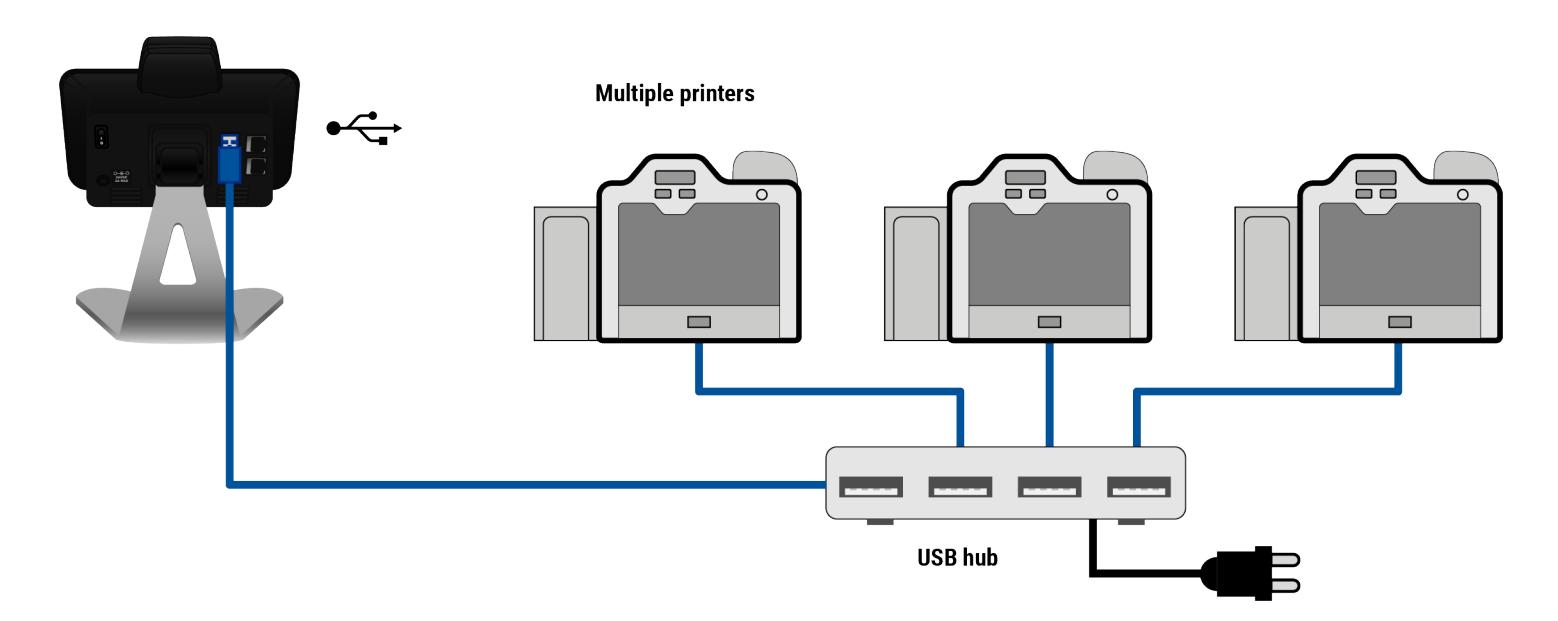
- l If you have more than one printer, you can connect the printers to a self-powered USB 2.0 hub and then connect the console using the USB port.

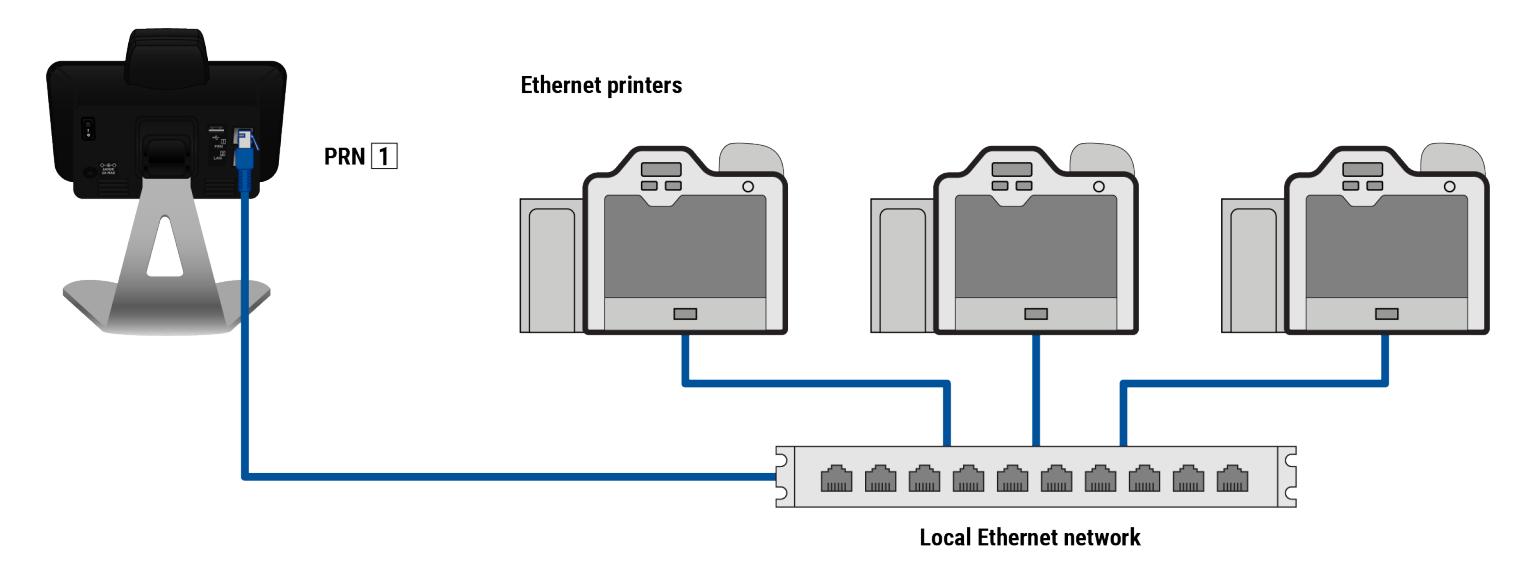
2.1.2 Connecting a printer via Ethernet
Connect an Ethernet cable between the PRN Ethernet port on the console and the local Ethernet network.
Note: The console and printer must be on the same network, so that the printer is "visible" to the console.
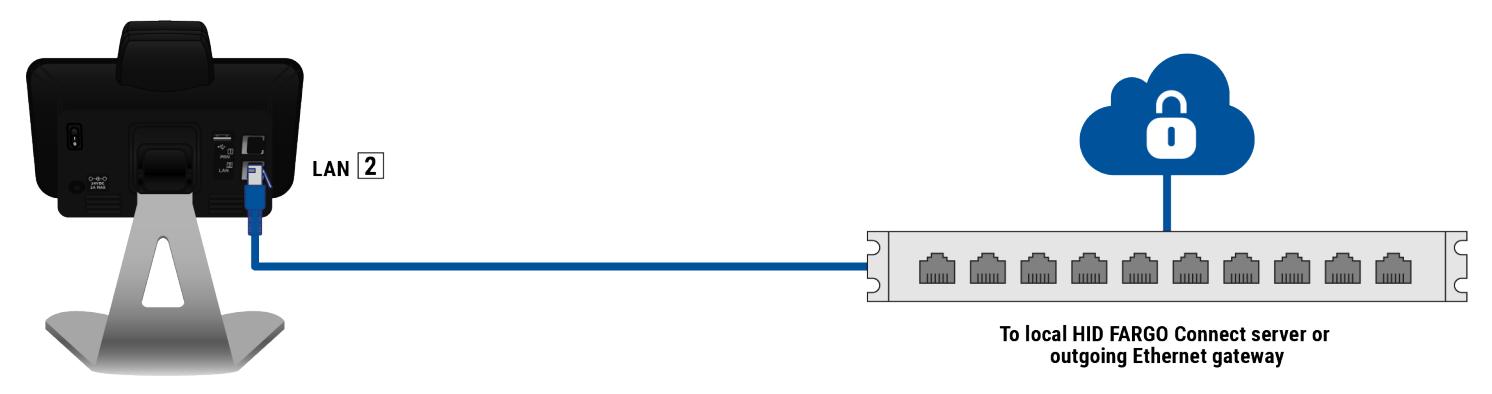
2.1.3 Connecting to a local network via Ethernet
The LAN port connects the console to HID FARGO Connect, which may be hosted on a local "on-premises" server, or using the HID cloud solution.
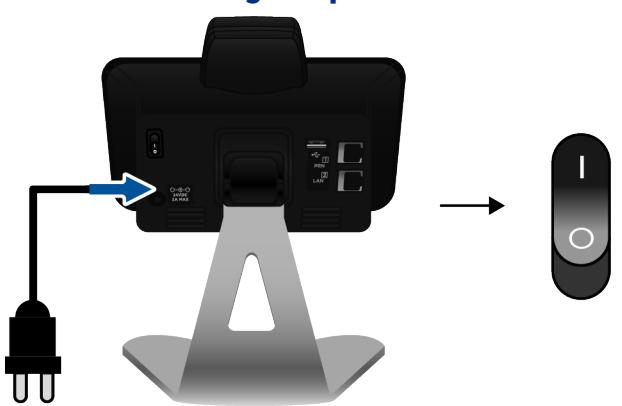
2.1.4 Connecting the power
Section 03 Operation


3.1 Log in
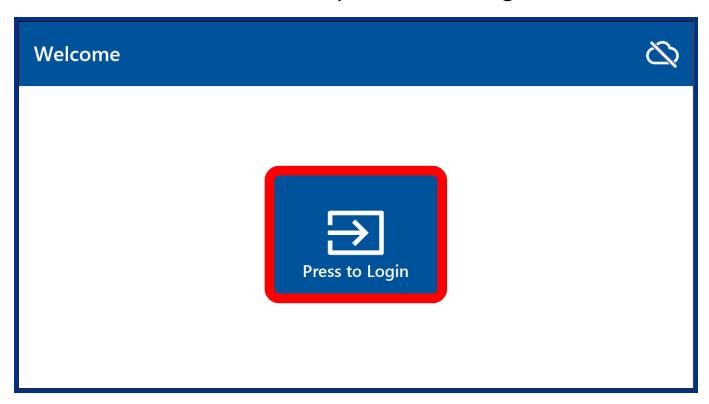
1. On the Welcome screen, tap Press to Login .
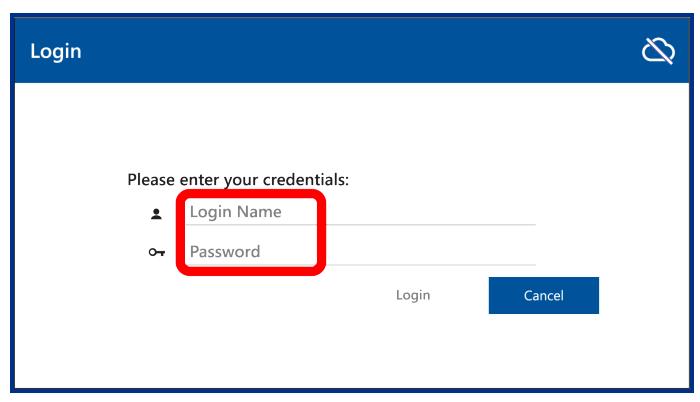
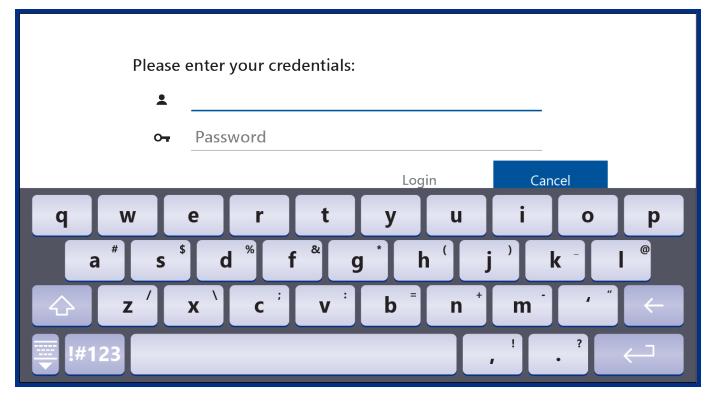
2. Tap the Login Name and Password fields and enter your credentials using the on-screen keyboard. The default Login Name is "fargo" and the default Password is "connect". Tap Login .

Alternatively, if you have enabled smart card authentication in the portal (see HID FARGO Connect Portal User Guide , PLT-03980), a prompt is displayed to tap (or hold) your contactless ID card beside the card reader zone at the top of the console.
Place your smart card on the card reader zone at the top of the console.
3. If log in is successful, the home screen is displayed.
Note: You can log in to the console even if you are not connected to the HID FARGO Connect network.
Note: If you remove your smart card from the card reader zone, you are automatically logged off.
Note: After the initial log in using your smart card, you can place your card on the card reader zone to log in without entering any credentials.
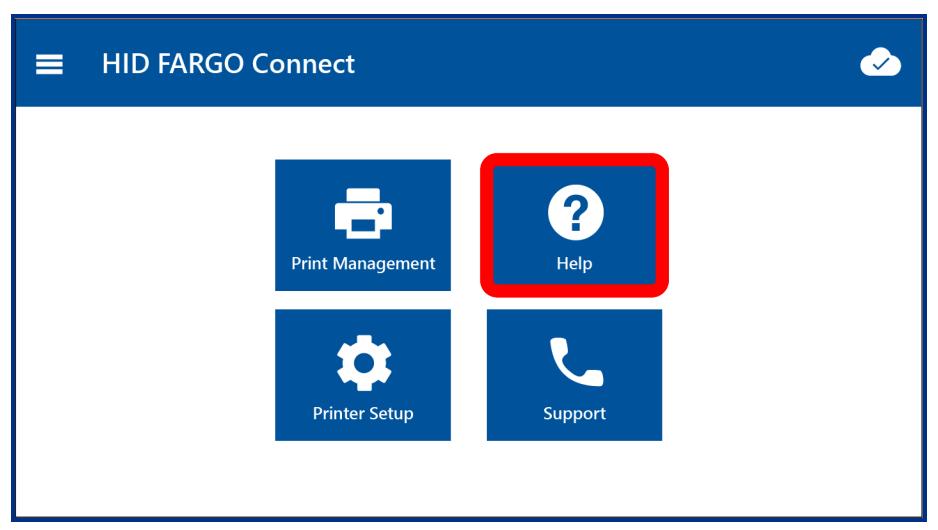
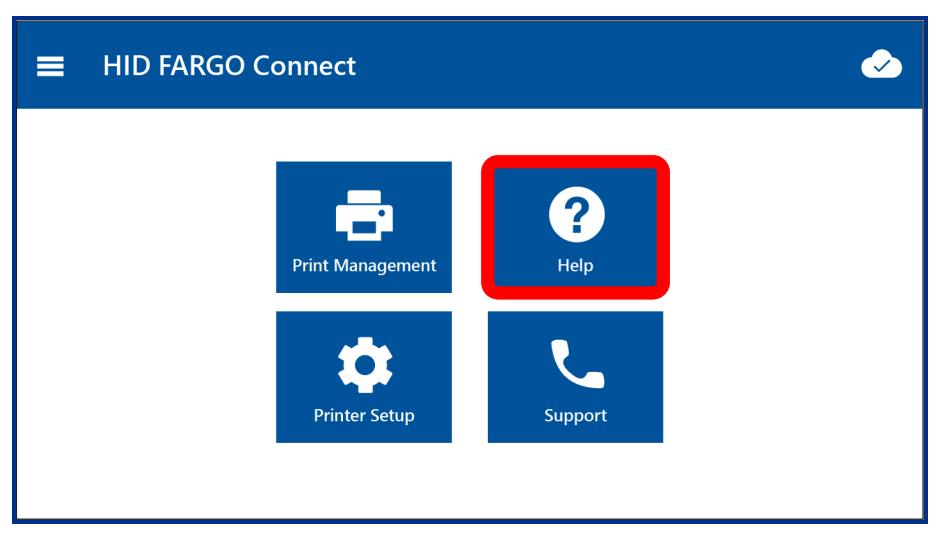
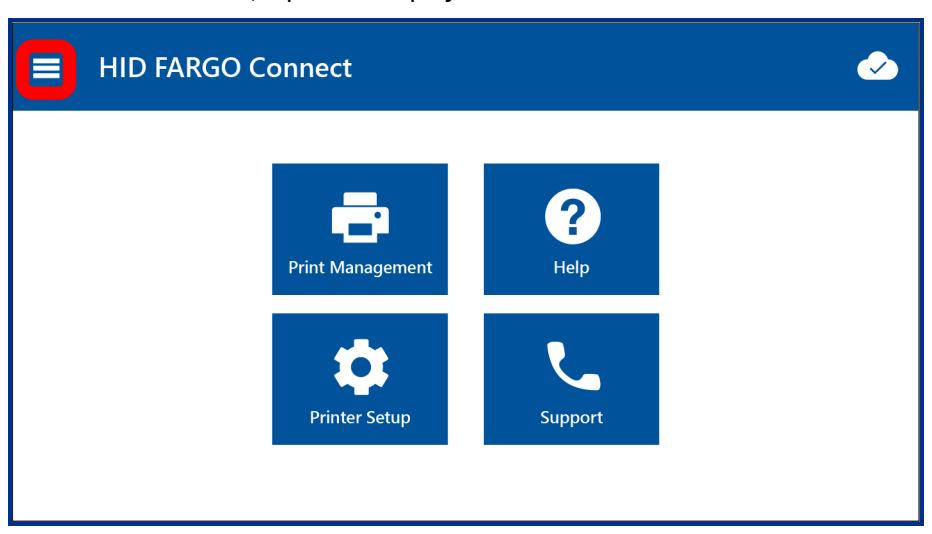
3.1.1 Home screen
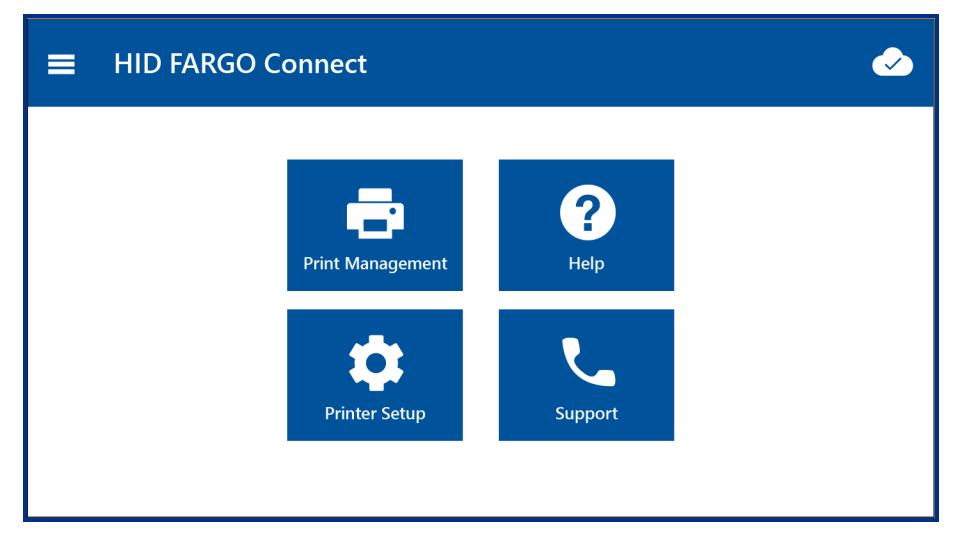
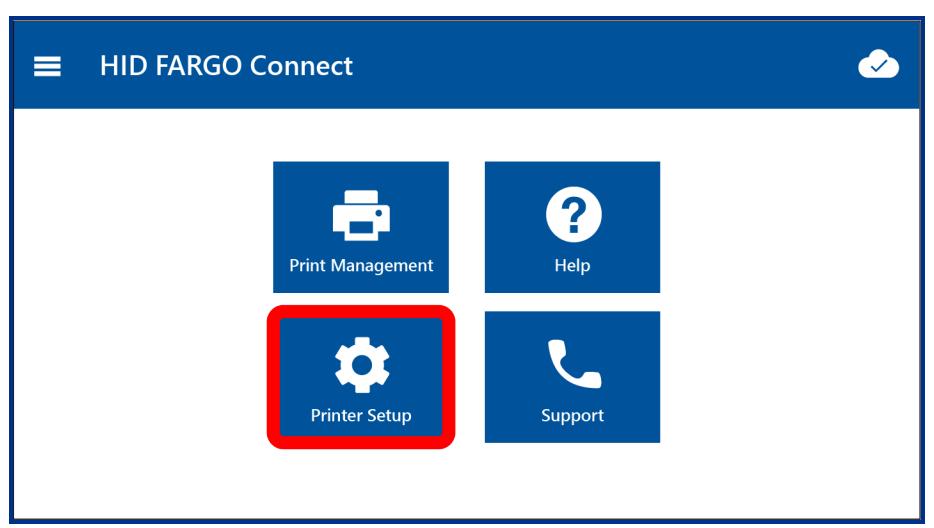
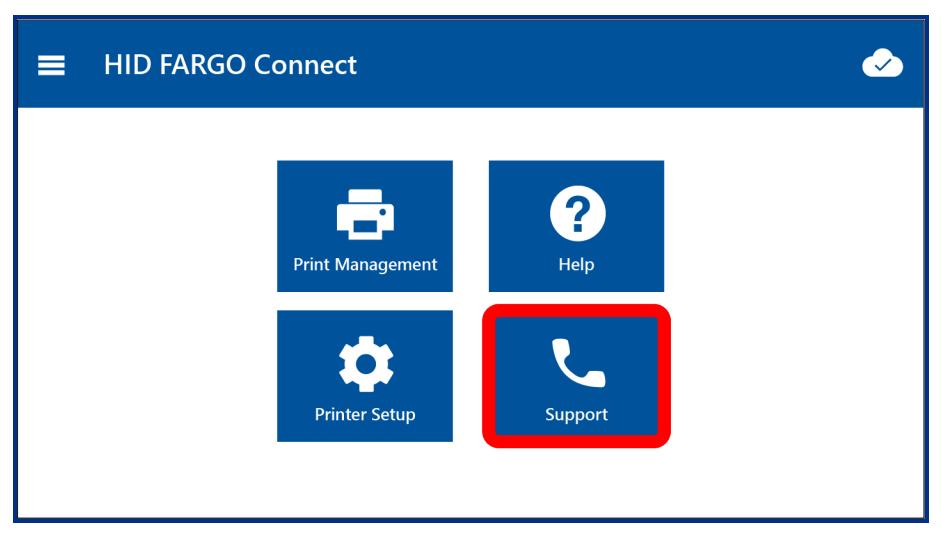
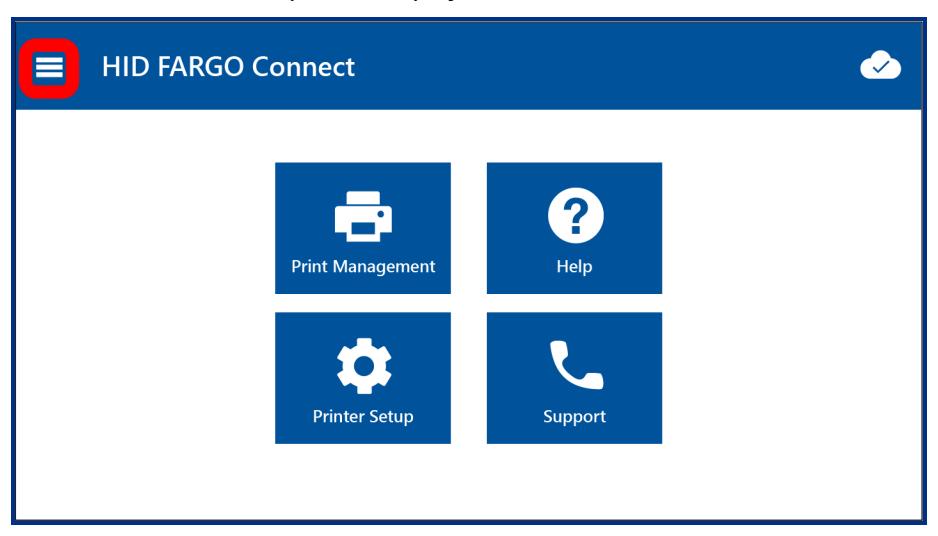
The four large icons on the home screen provide access to the console's major functions.
- l Tap an icon to select Print Management, Printer Setup, Help, or Support.
- l Tap to display the side menu. See 3.6 Side menu .
- l Tap to display the HID FARGO Connect network connection status.
- l Tap then Home (or the HID logo) to return to the home screen at any time.

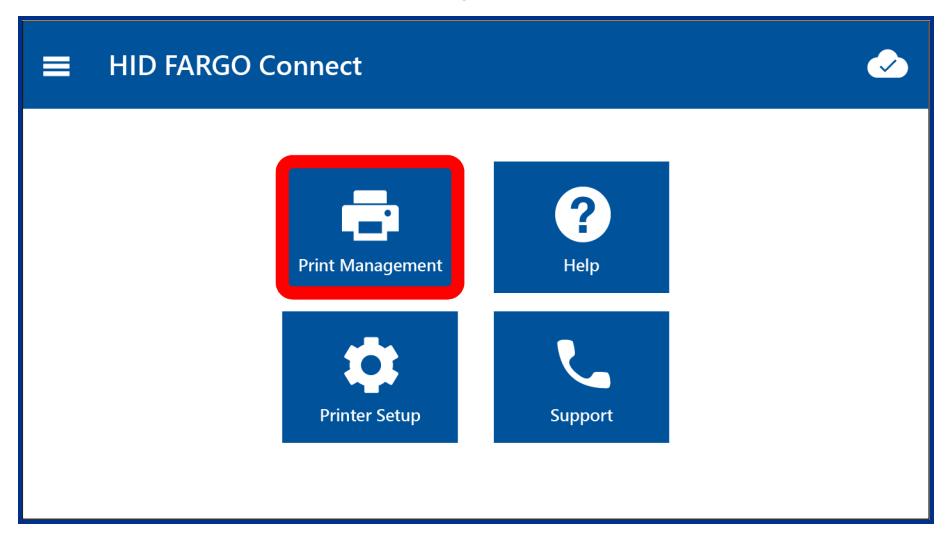
3.2 Print Management
The Print Management screen allows you to view the print queue, start or cancel print jobs, and view printer status.
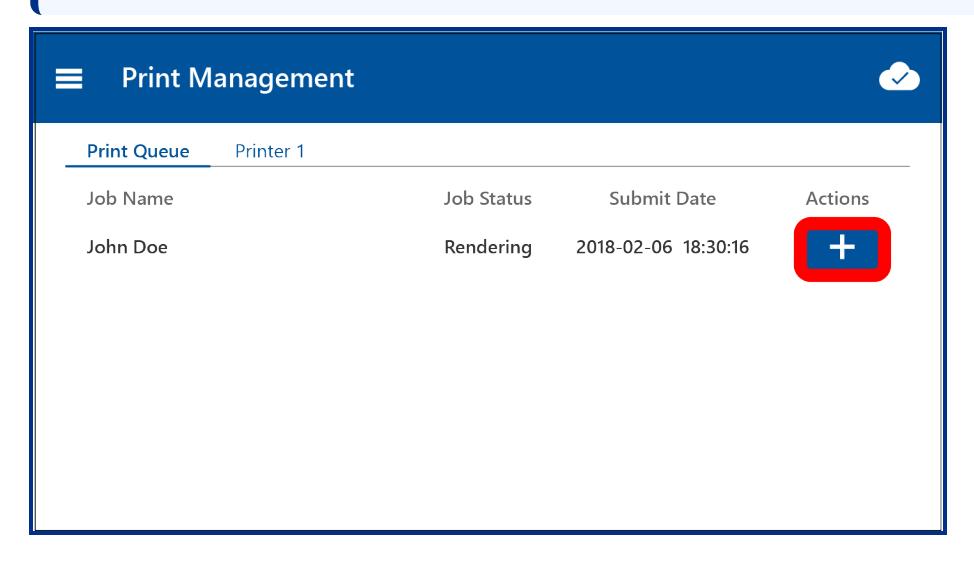
3.2.1 Print Queue tab
1. On the home screen, tap Print Management .
2. On the Print Management screen, tap to display the available actions for a print job.
Note: If print jobs have been set to start automatically, you don't have to start them here. See 3.3.1 Printer Settings: Ethernet or 3.3.2 Printer Settings: USB .

3. The Actions dialog provides three options.
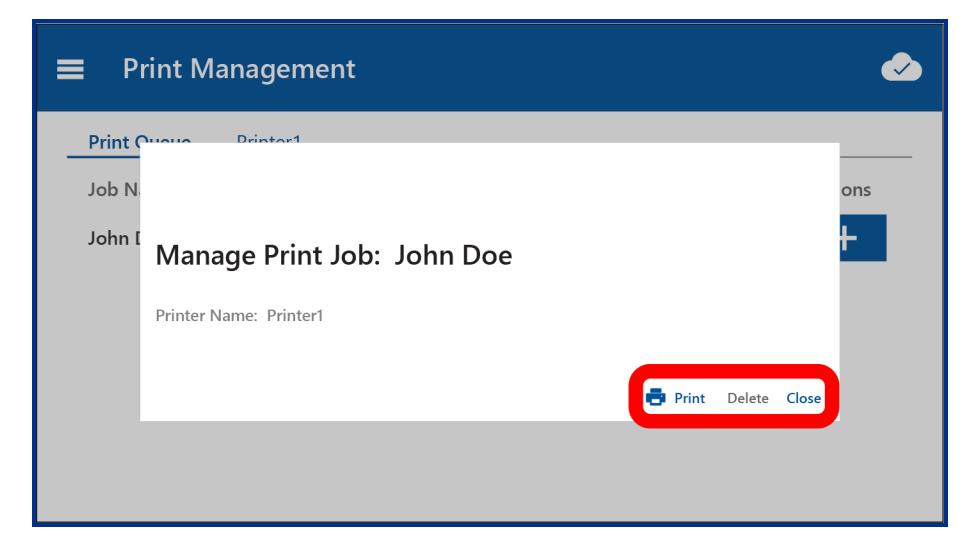
- l Tap Print to start the print job (if Auto Print is not selected).
- l Tap Delete to remove the job from the print queue.
- l Tap Close to return to the print queue.
Note: The Actions dialog also provides information about failed print jobs, if applicable.
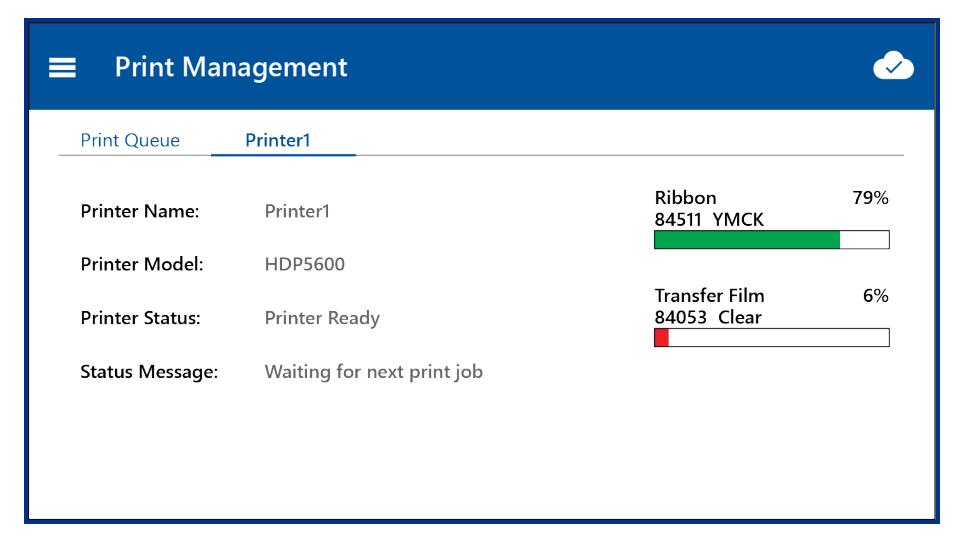
3.2.2 Printer status tab
Each connected printer has its own status tab at the top of the Print Management screen.
1. On the home screen, tap Print Management .


2. On the Print Management screen, tap the printer's name tab, e.g. Printer1 .
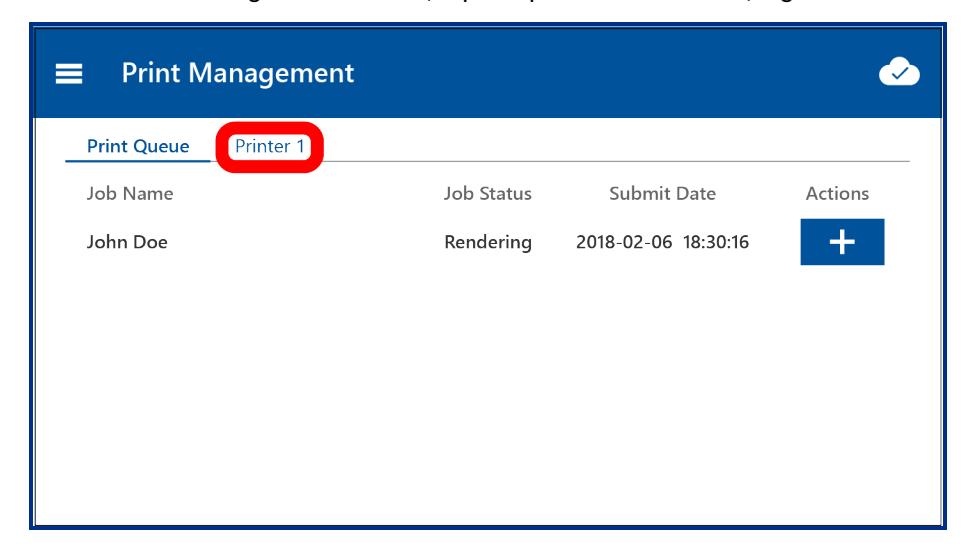
The printer status is displayed. The status bars indicate the level of each consumable in the printer, together with the replacement order code, e.g. Ribbon 84511 YMCK or Transfer Film 84053 Clear.

3.3 Printer Setup
The Printer Setup screen allows you to configure attached or virtual printers.
1. On the home screen, tap Printer Setup .
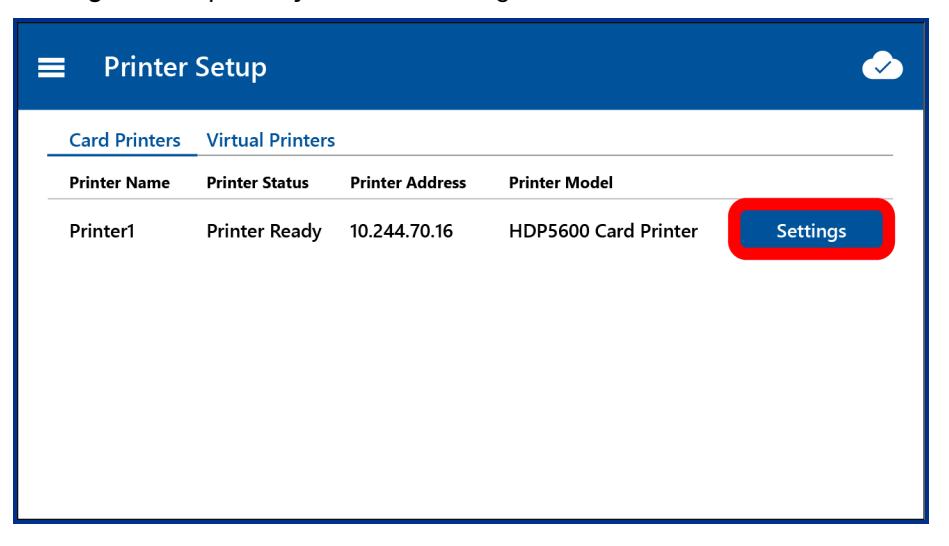
2. On the Printer Setup screen, the Card Printer tab is selected. Select the Card Printer or Virtual Printers tab. Tap Settings for the printer you wish to configure.

3.3.1 Printer Settings: Ethernet
Ethernet printers are indicated by the icon.
Note: To read or write to a contactless smart card during the print process, the printer must be connected to the console using a USB connection.
1. Tap the Network Address field to enter the printer's IP address, which can be found in the printer's status screen Info menu. The console and printer must be on the same network, so that the printer is "visible" to the console.
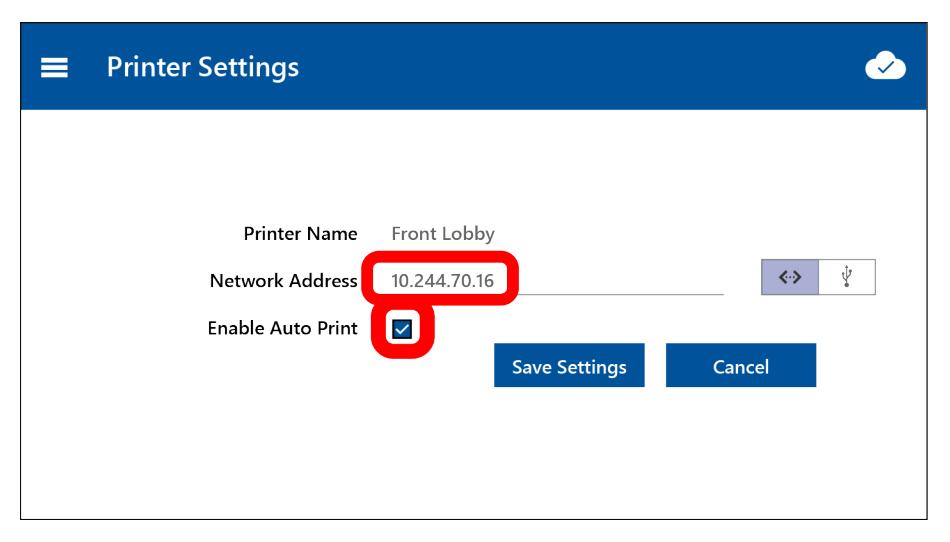
2. Tap the Enable Auto Print check box to make all incoming print jobs go straight to the printer. This allows you to leave the console unattended, without having to start each job using the Print Management > Actions screen.

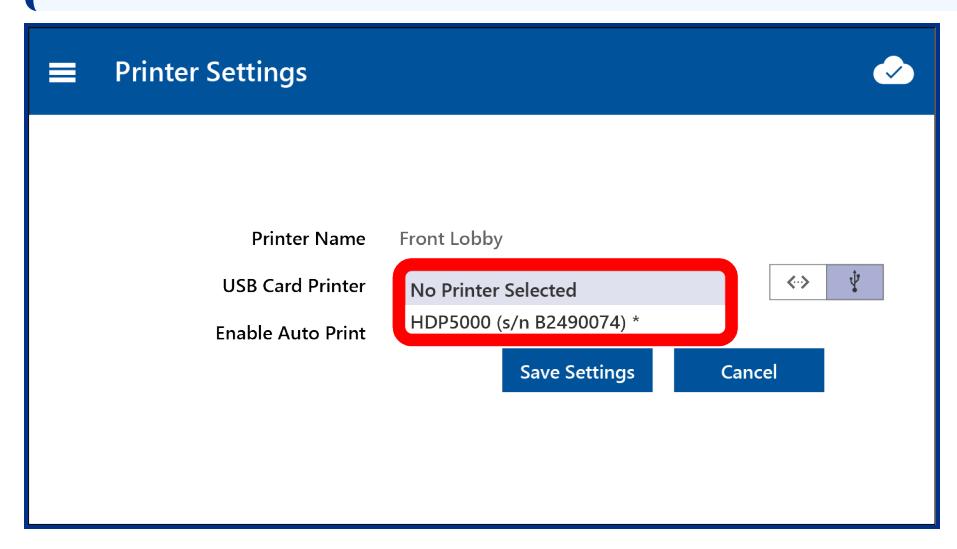
3.3.2 Printer Settings: USB
USB printers are indicated by the icon.
1. Tap the USB Card Printer field to select the printer. The printer model and serial number are listed.
Note: If there are multiple printers of the same model type, the serial number can be used to identify an individual printer.
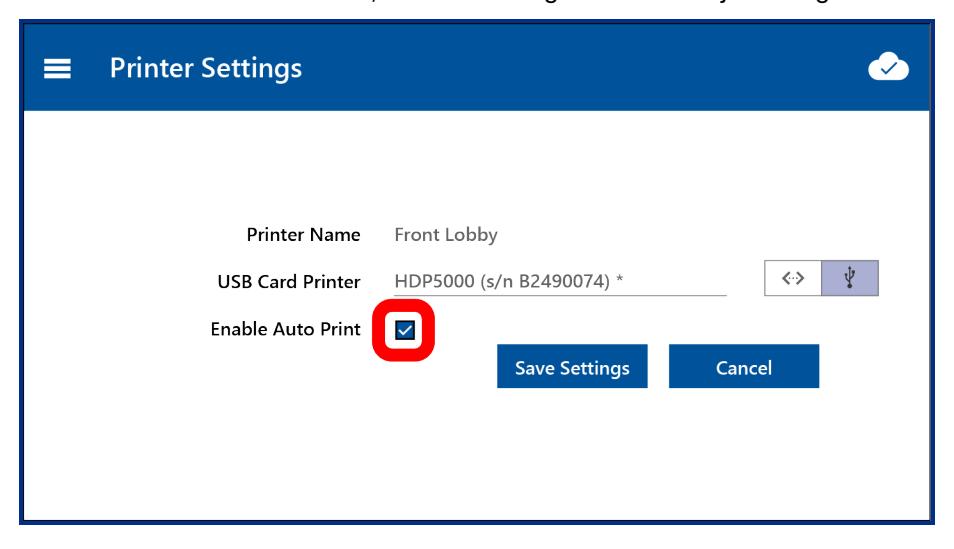
2. Tap the Enable Auto Print check box to make all incoming print jobs go straight to the printer. This allows you to leave the console unattended, without having to start each job using the Print Management > Actions screen.

3.4 Help
The Help screen provides many help videos and topics to assist you.
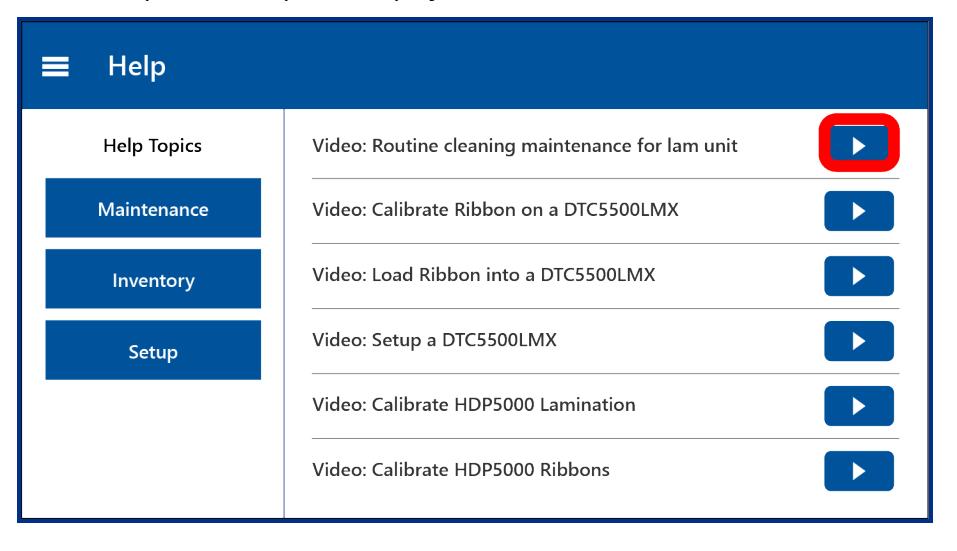
3.4.1 Help: Maintenance tab
1. On the home screen, tap Help .

2. On the Help screen, tap to play a video.

3.4.2 Help: Inventory tab
1. On the home screen, tap Help .
2. On the Help screen, tap Inventory .
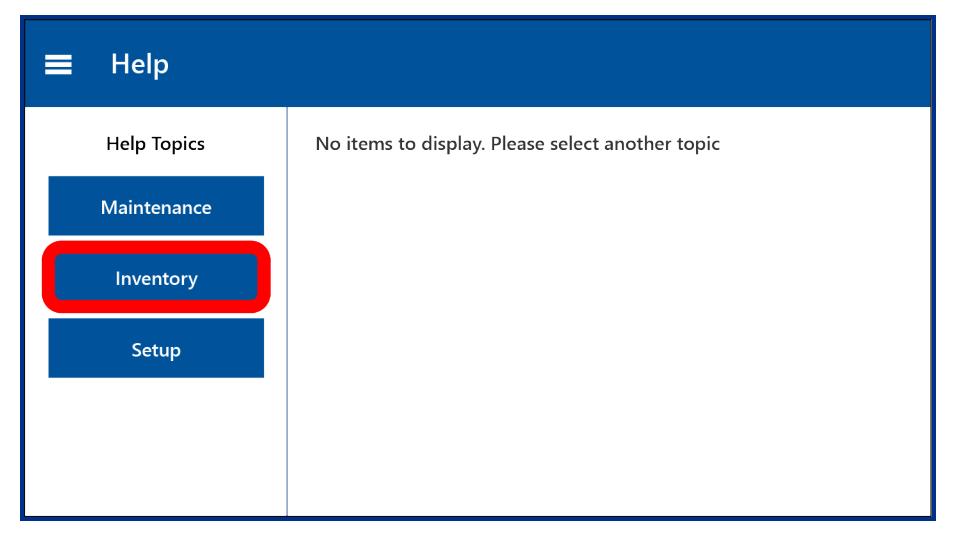
Note: The Inventory screen is currently in development, and new features will be added in future updates.

3.4.3 Help: Setup tab
1. On the home screen, tap Help .
2. On the help screen, tap Setup .
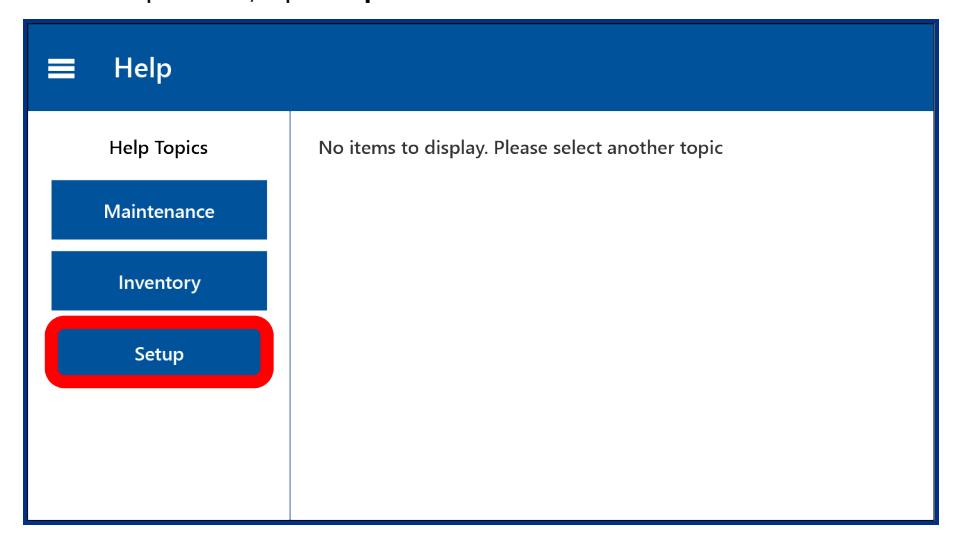
Note: The Setup screen is currently in development, and new features will be added in future updates.

3.5 System Support
The System Support screen displays device information, contact information, and the software update screen.
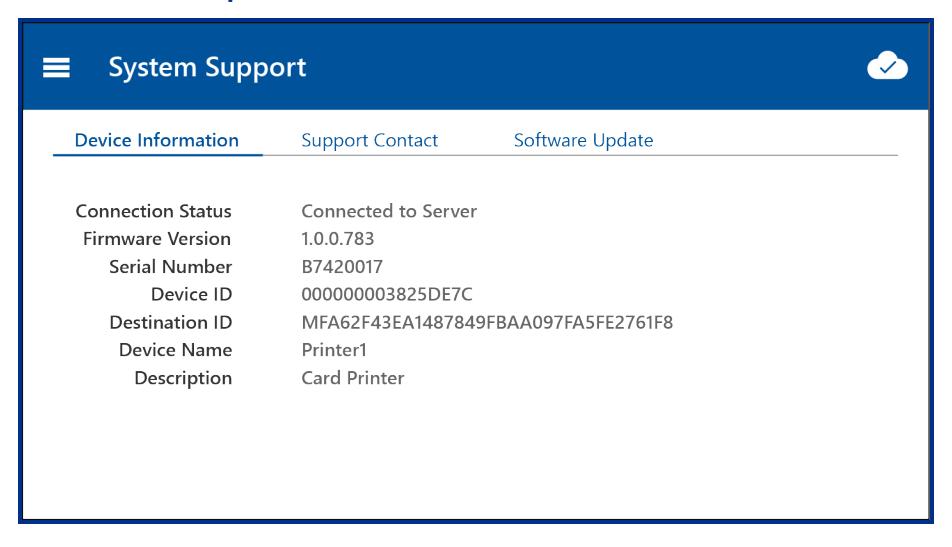
3.5.1 Device Information tab
1. On the home screen, tap Support .

The Device Information tab is displayed. This shows all hardware information, including the firmware version; see 3.5.3 Software Update tab .

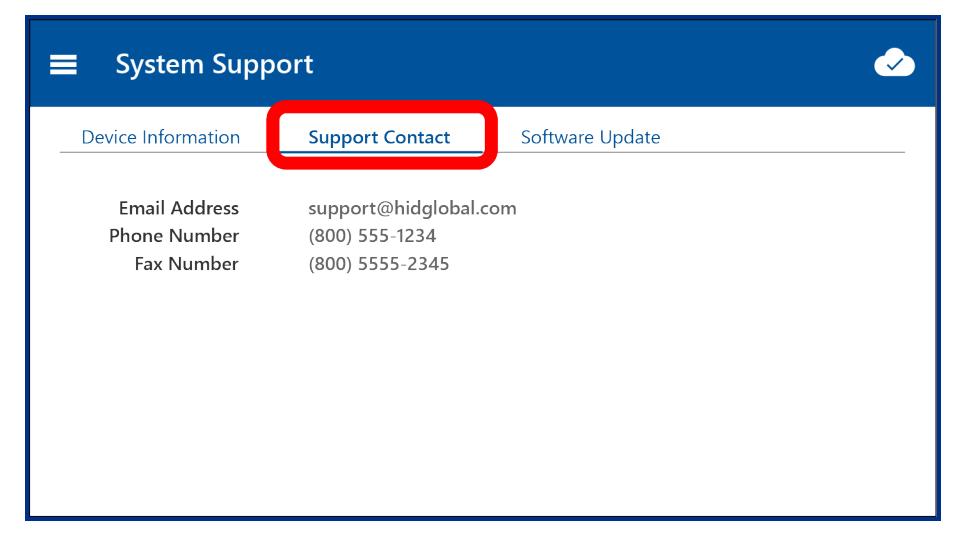
3.5.2 Support Contact tab
1. On the home screen, tap Support .
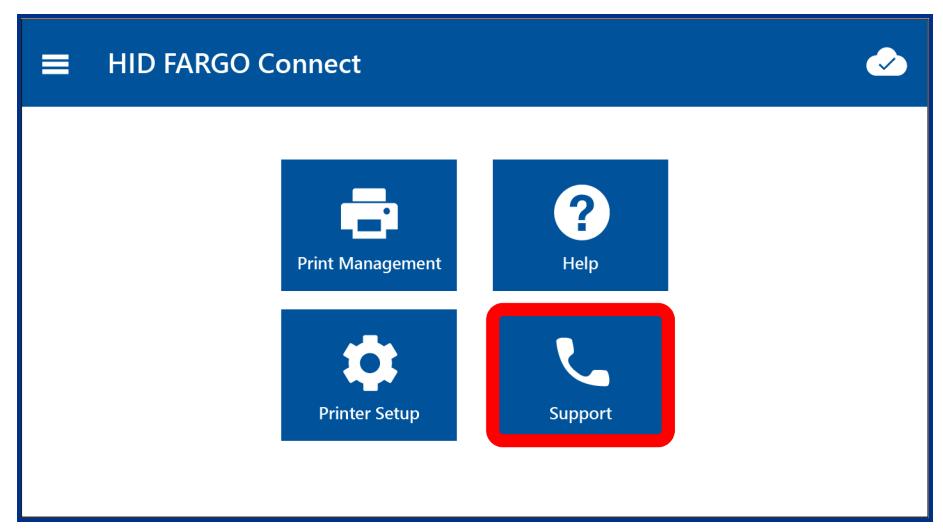
2. On the System Support screen, tap Support Contact to display HID contact information.

3.5.3 Software Update tab
The console can check online for firmware updates.
1. On the home screen, tap Support .
2. On the System Support screen, tap Software Update .
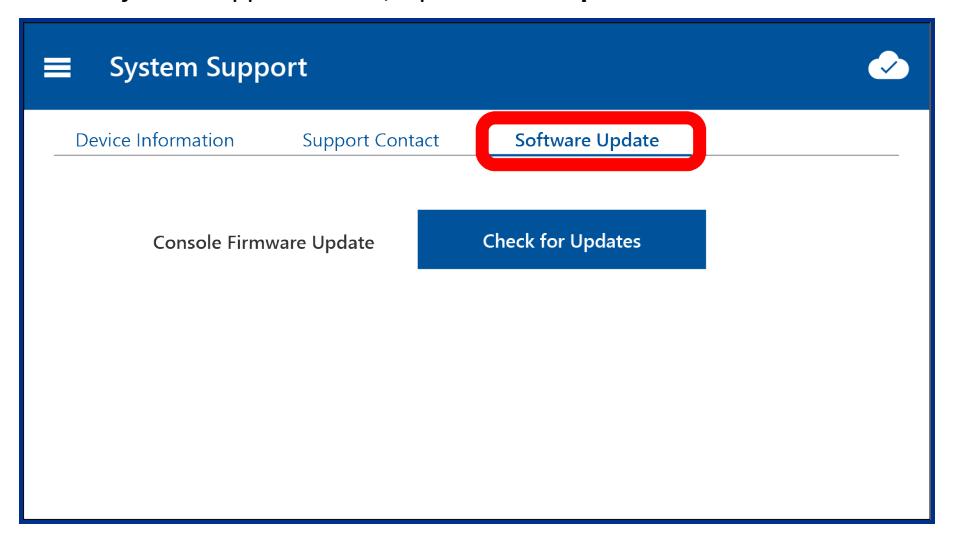
3. Tap Check for Updates to search for console firmware updates.

3.6 Side menu
The side menu provides access to all of the main console tools and an additional system settings menu.
Note: Tap the HID logo (or Home ) on the side menu to go back to the home screen at any time.
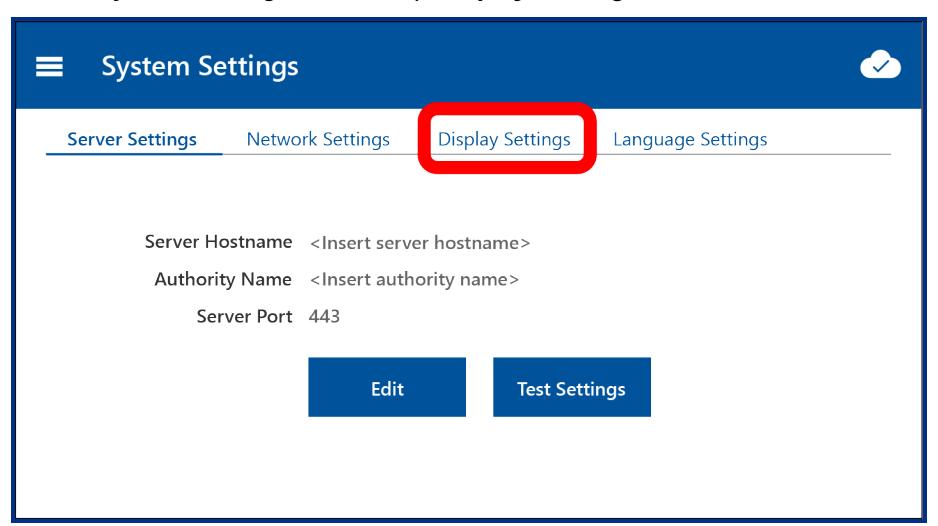
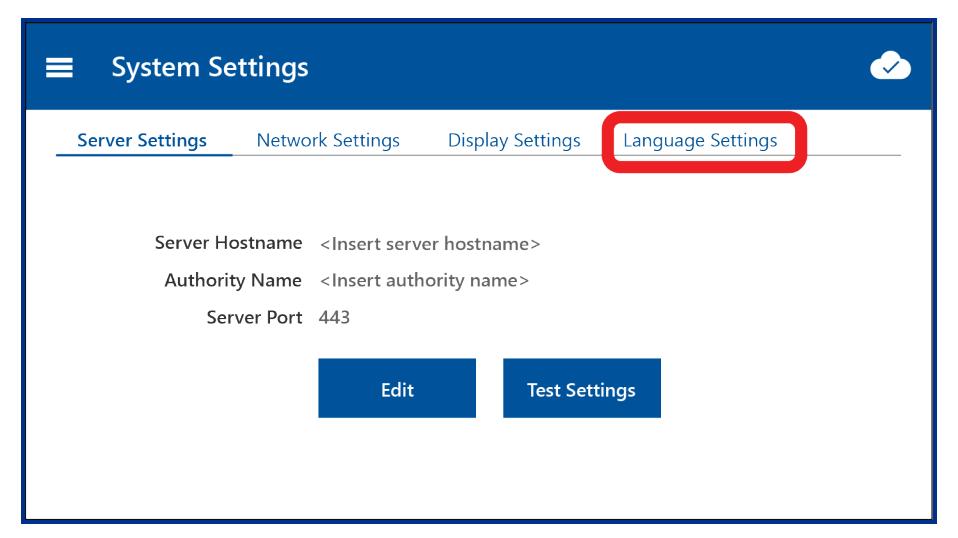
3.6.1 Settings: Server Settings tab
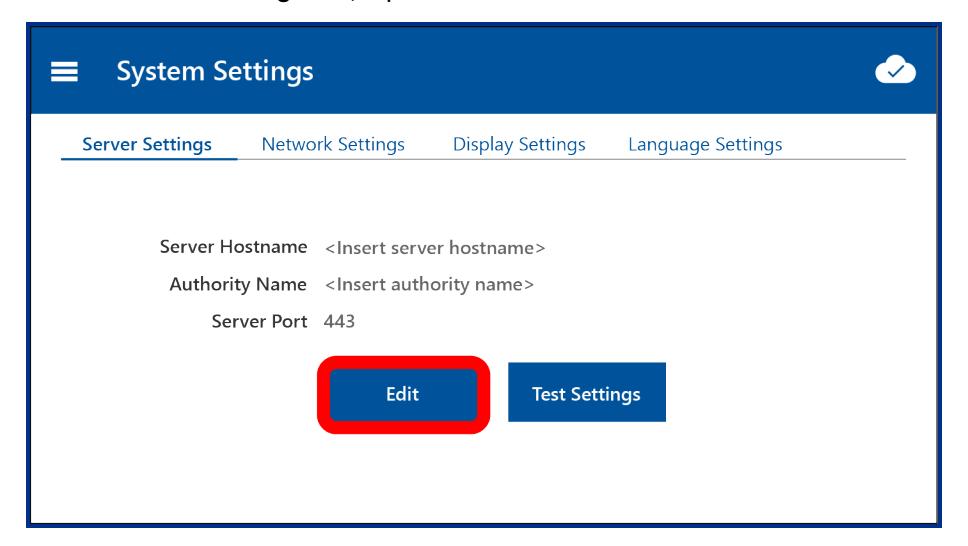
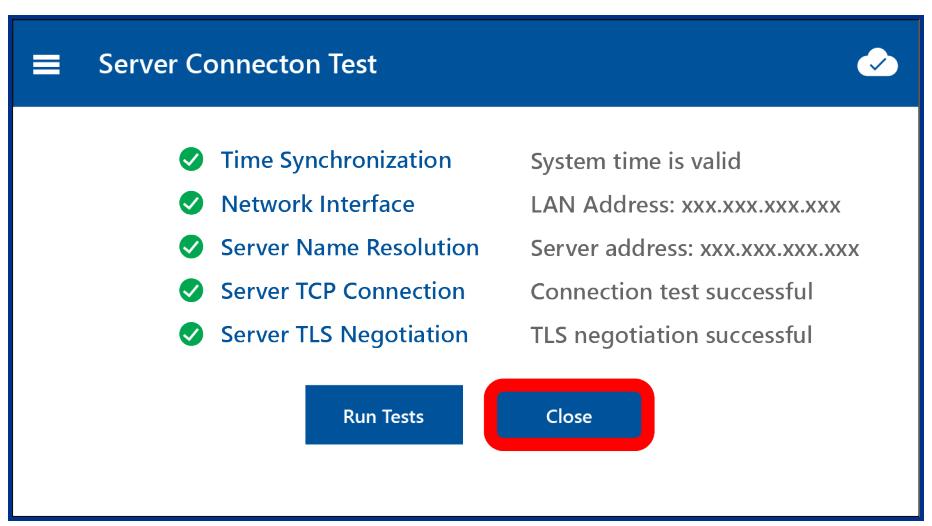
The Server Settings tab allows you to configure and test the connection settings for the HID FARGO Connect server.
Note: Please check with your system administrator before changing server settings. Incorrect settings can cause the console to become disconnected from the HID FARGO Connect server.
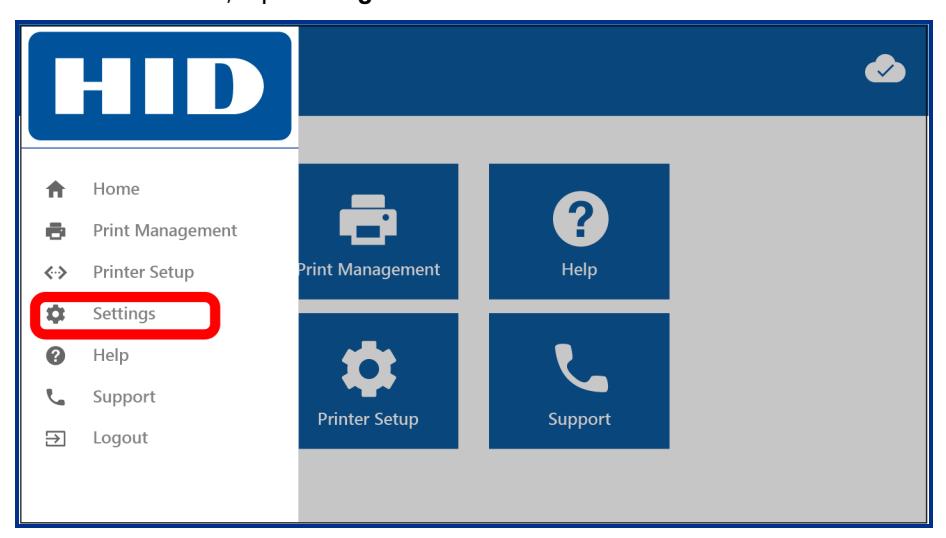
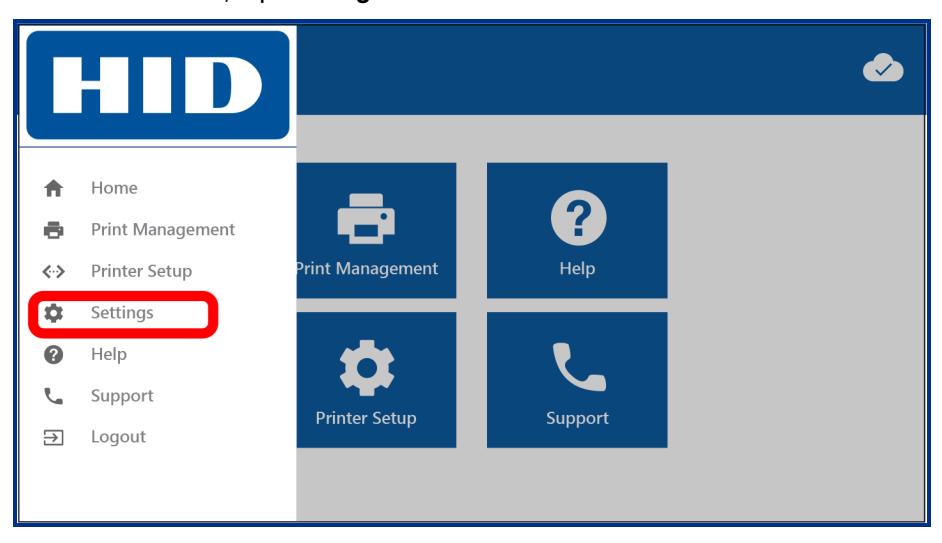
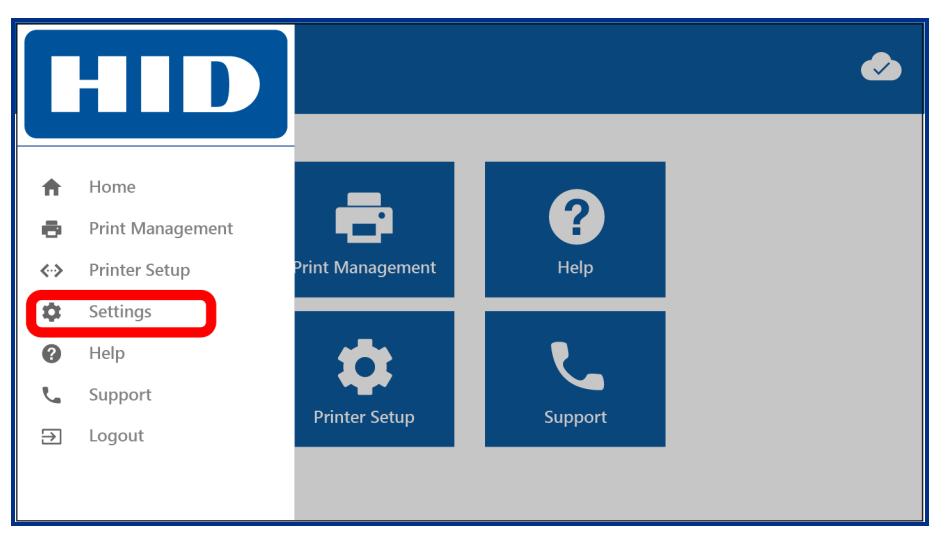
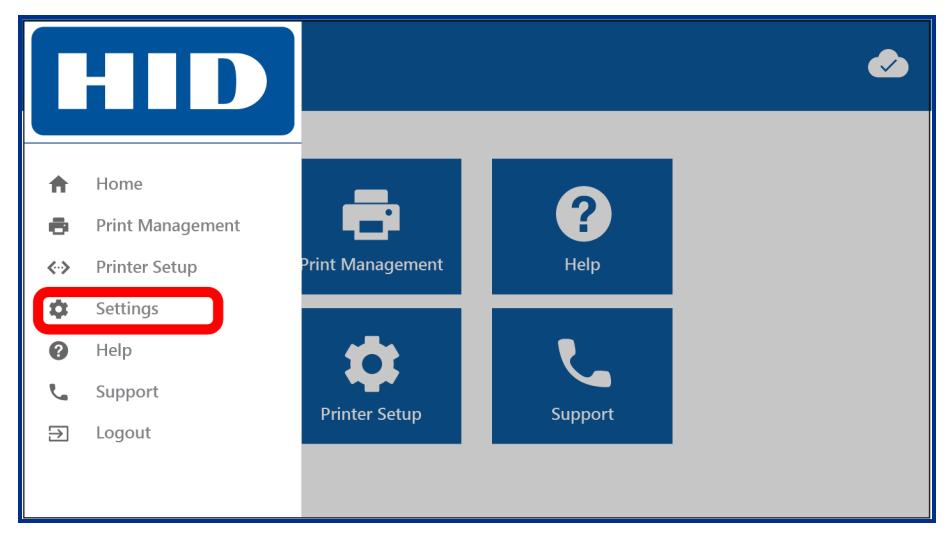
1. On the home screen, tap to display the side menu.

2. On the side menu, tap Settings .

3. On the Server Settings tab, tap Edit .
4. Enter the Server Hostname, Server Port and, optionally, the Authority Name.
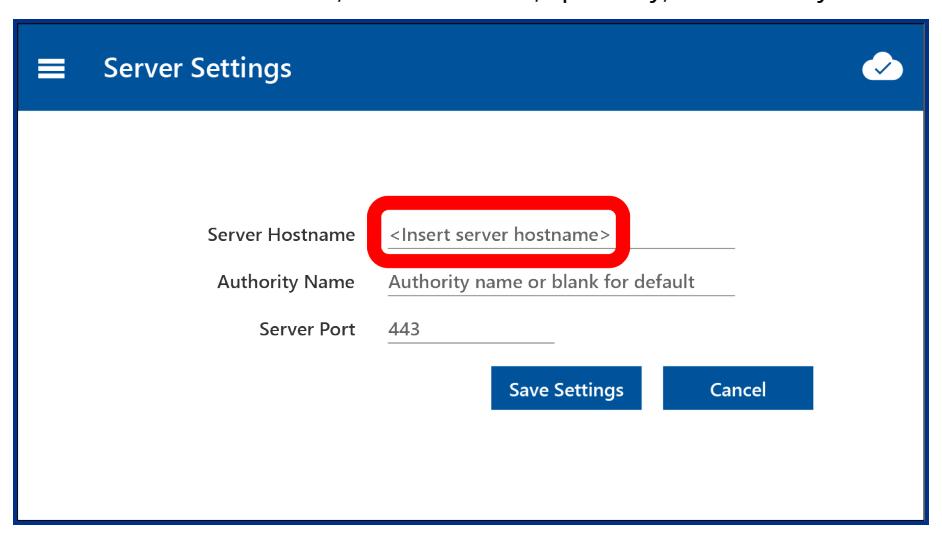
- 5. Tap Save Settings to return to the Server Settings tab. When the Server Settings are established, you can test the connections to verify connectivity.
- 6. On the Server Settings tab, tap Test Settings .

7. Tap Run Tests .
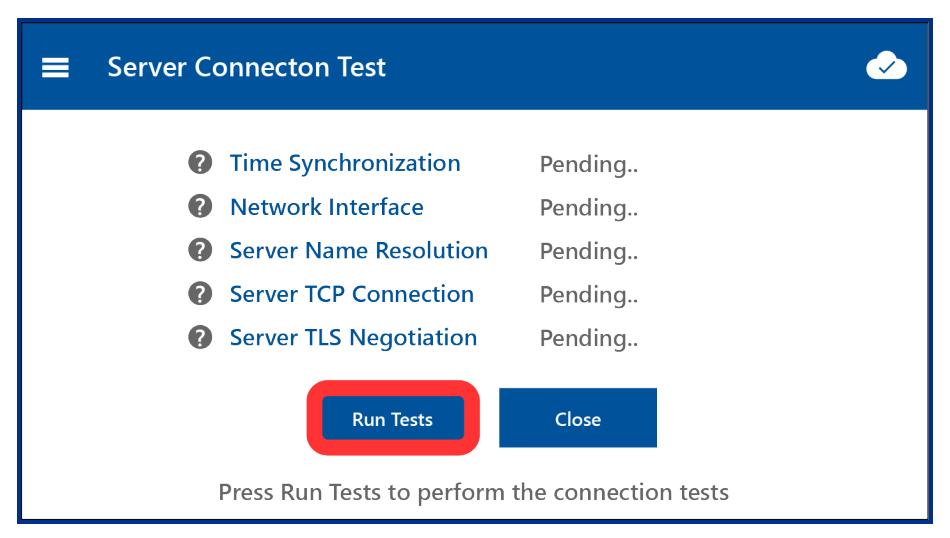
8. When complete, tap Close .

3.6.2 Settings: Network Settings tab
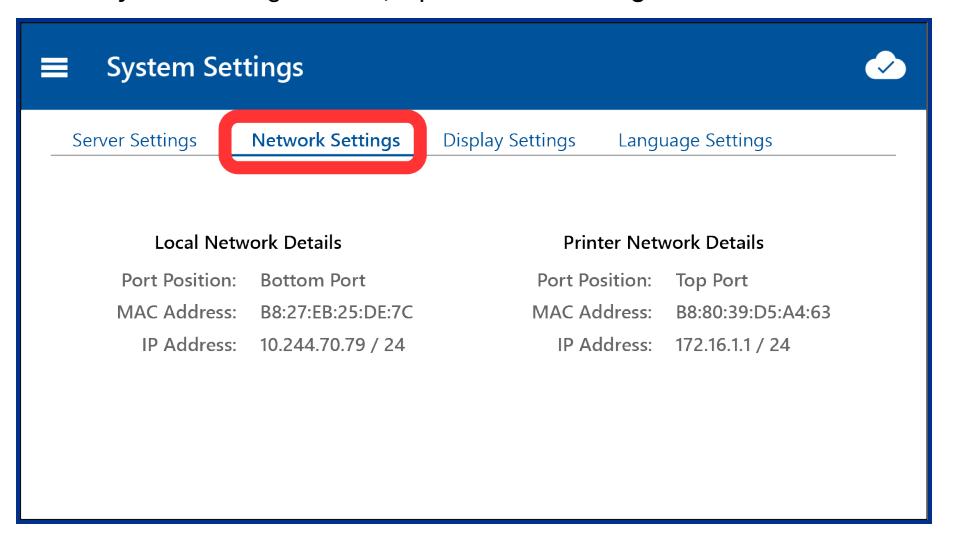
The Network Settings tab displays the MAC address and IP address of the console's rear panel Ethernet ports:
- l PRN is the printer network port.
-
l
LAN
is the HID FARGO Connect network port.
- 1. On the home screen, tap to display the side menu.
2. On the side menu, tap Settings .

3. On the System Settings screen, tap Network Settings .
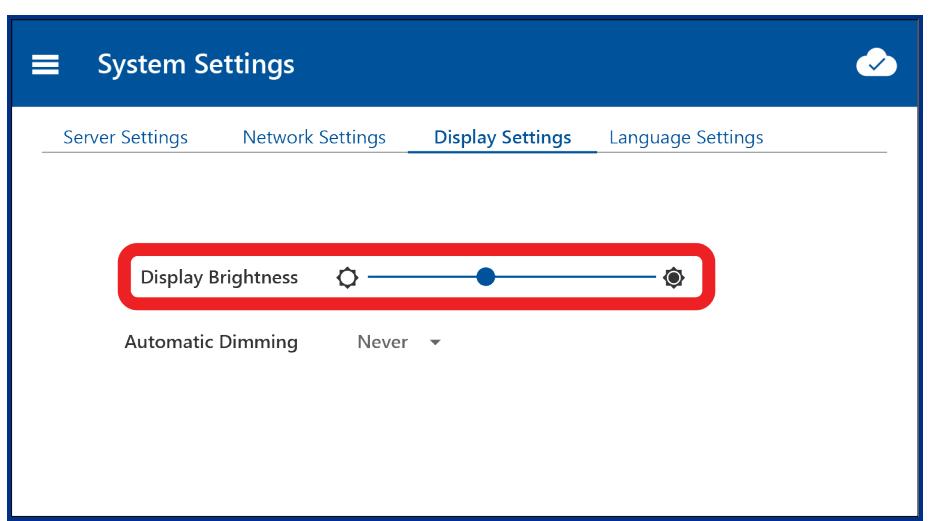
3.6.3 Settings: Display Settings tab
The Display Settings tab allows you to configure the display brightness and auto-dimming period.
1. On the home screen, tap to display the side menu.


2. On the side menu, tap Settings .
3. On the System Settings screen, tap Display Settings .
4. On the Display Settings tab, tap or drag the Display Brightness slider.

-
5. Tap the
Automatic Dimming
field. If the console is not being used, it will dim the display after a preset period to reduce distraction and prolong screen life.
- l Never means the console does not dim the display.
- l x Minutes sets the period after which the display is dimmed.
Touching the screen restores normal brightness.
3.6.4 Settings: Language Settings tab
The Language Settings tab allows you to select the menu screen language.
1. On the home screen, tap to display the side menu.
2. On the side menu, tap Settings .

3. On the System Settings screen, tap Language Settings .
4. On the Language Settings tab, tap the Select Language drop-down to choose a language.

3.6.5 Home and Logout
Note: If you logged in by placing your smart card on the card reader zone at the top of the console, you can log out by removing your card from the card reader zone.

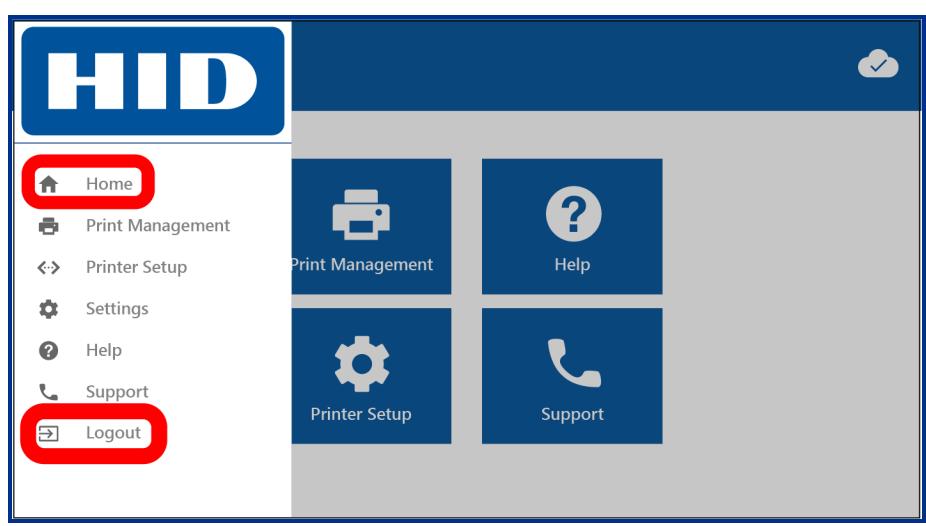
- 1. From any screen, tap to display the side menu.
-
2. On the side menu:
- l Tap Home to return to the home screen.
- l Tap Logout to log out and return to the Welcome screen (see 3.1 Log in ).
Section 04 Specifications


4.1 Regulatory
FCC
This device complies with part 15 of the FCC Rules. Operation is subject to the following two conditions: (1) This device may not cause harmful interference, and (2) this device must accept any interference received, including interference that may cause undesired operation.
CAUTION: Any changes or modifications to this device not explicitly approved by the manufacturer could void your authority to operate this equipment.
Canada Radio Certification
This device complies with Industry Canada license-exempt RSS standard(s). Operation is subject to the following two conditions: (1) this device may not cause interference, and (2) this device must accept any interference, including interference that may cause undesired operation of the device.
Le present appareil est conforme aux CNR d'Industrie Canada applicables aux appareils radio exempts de licence. L'exploitation est autorisee aux deux conditions suivantes : (1) l'appareil ne doit pas produire de brouillage, et (2) l'utilisateur de l'appareil doit accepter tout brouillage radioelectrique subi, meme si le brouillage est susceptible d'en compromettre le fonctionnement.
CE Marking
HID Global hereby declares that these proximity readers are in compliance with the essential requirements and other relevant provisions of Directive 2014/53/EU. Por el presente, HID Global declara que estos lectores de proximidad cumplen con los requisites esenciales y otras disposiciones relevantes de la Directiva 2014/53/EU. HID Global declare par la presente que ces lecteurs a proximite sont conformes aux exigences essentielles et aux autres stipulations pertinentes de la Directive 2014/53/EU. A HID Global, por meio deste, declara que estes leitores de proximidade estao em conformidade com as exigencias essenciais e outras condicoes da diretiva 2014/53/EU. HID Global bestatigt hiermit, dass die Leser die wesentlichen Anforderungen und anderen relevanten Bestimmungen der Richtlinie 2014/53/EU erfullen. HID Global dichiara che i lettori di prossimita sono conformi ai requisiti essenziali e ad alter misure rilevanti come previsto dalla Direttiva europea 2014/53/EU. Download copies of the Radio Equipment Directive (RED) Declaration of Conformity (DoC) at http://www.hidglobal.com/certifications .

Korean KCC
| HID FARGO Connect Console (X002400) | |
|---|---|
| 항목 | 규격 |
| 송신주파수 | RFID:13.56 MHz, BLE 2.4 -2.48GHz |
| 수신주파수 | RFID:13.56 MHz, BLE 2.4 -2.48GHz |
| 출력 |
RFID: 10m에서,
47.544mv이하 |
| 전원 | DC 12.0V |
| 전파형식 | A1D |
| 발진방식 | X-tal |
| 변조방식 | RFID: ASK |
인증번호 : R-C-JQ6-X002400
제 품 명 칭 : Console 모 델 명 : X002400
인증 받은 자의 상호 : HID Global Corporation
제조 업체 명 : Integral Components, 1220 Tech Ct, Westminster, MD 21157
제 조 국 명 : USA
제 조 년, 월 : September 1, 2018
Japan MIC
" この装置は総務省の型式指定を受けています。"
(総務省指定番号は第AC-xxxxx号です)
本製品は電波を使用したRFID 機器の読み取り・書き込み装置です。
そのため使用する用途・場所によっては、医療機器に影響を与える恐れがあります
Israel
.השימ וש במ כשיר ה ינ ו ע ל בס יס ״משנ י״ ופט ור מרשי ו ן הפ ע לה א לח וט י
.רק ״בפ ע ו לת בזק״ לשימ וש ע צמ י של ה לק וח ב לבד, ה לק וח פט ור מרשי ו ן הפ ע לה א לח וט י
.אס ור להח ל יף את האנטנה המק ור ית של המ כשיר, ו לא ל עשות ב ו כ ל שינ ו י ט כנ י אחר
UAE

Singapore
Indonesia
South Africa

Australia and New Zealand
Philippines
4.2 Warranty
https://www.hidglobal.com/warranty-policy

Revision history
| Date | Description | Revision |
|---|---|---|
| October 2024 | Updated document to support HID FARGO Connect 1.11. | A.5 |
| November 2022 | Updated document to support HID FARGO Connect 1.10. | A.4 |
| April 2022 | Added Philippines certification to Section 4, reformatted and refreshed document with HID branding. | A.3 |
| July 2020 | Added additional Regulatory information in Section 3. | A.2 |
| December 2018 | Updated document to support HID FARGO Connect 1.2.5. | A.1 |
| March 2018 | Initial release. | A.0 |

For technical support, please visit: https://support.hidglobal.com
© 2024 HID Global Corporation/ASSA ABLOY AB. All rights reserved. PLT-03680, Rev. A.5
Part of ASSA ABLOY