HID DTC1000 4000 4500 Toolbox User Guide
Open the original PDF document
View PDF

15370 Barranca Parkway Irvine, CA 92618-2215 USA
DTC1000/4000/4500
Toolbox User Guide - Linux & Mac OS X
Rev.1.1, © 2011 HID Global Corporation. All rights reserved.
Exclusive permission is granted to authorized resellers of HID Global products to reproduce and distribute this copyrighted document to authorized HID Global customers, who have signed a "no disclosure agreement" regarding the restricted, proprietary use of said document.
The revision number for this document will be updated to reflect changes, corrections, updates and enhancements to this document.
| Revision Control Number | Date | Document Title |
|---|---|---|
| Revision 1.0 | Sep 6, 2011 | DTC1000/4000/4500 Toolbox User Guide |
| Revision 1.1 | Nov 15, 2011 | DTC1000/4000/4500 Toolbox User Guide |
These reference documents were thoroughly reviewed to provide HID Global with professional and international standards, requirements, guidelines and models for our technical, training and user documentation. At all times, the Copyright Protection Notice for each document was adhered to within our HID Global documentation process. This reference to other documents does not imply that HID Global is an ISO-certified company at this time.
- ANSI/ISO/ASQ Q9001-2000 American National Standard, (sub-title) Quality Management Systems - Requirements (published by the American Society of Quality, Quality Press, P.O. Box 3005, Milwaukee, Wisconsin 53201-3005)
- The ASQ ISO 9000:2000 Handbook (editors, Charles A. Cianfrani, Joseph J. Tsiakals and John E. West; Second Edition; published by the American Society of Quality, Quality Press, 600 N. Plankinton Avenue, Milwaukee, Wisconsin 53203)
- Juran's Quality Handbook (editors, Joseph M. Juran and A. Blanton Godfrey; Fifth Edition, McGraw-Hill)
Any questions regarding changes, corrections, updates or enhancements to this document should be forwarded to:
HID Global Support Services 6533 Flying Cloud Drive Eden Prairie, MN 55344 (USA) (866)607-7339 Ext #6 FAX: (952) 946-8492
Table of Contents
| Section 1: Linux | |
|---|---|
| Requirements: | 4 |
| Installation Mono: | 5 |
| Installation Toolbox: | 6 |
| Running the Toolbox: | 7 |
| Section 2: Mac OS X | 8 |
| Required packages: | |
| Installation Mono Framework: | |
| Installation X11: | 8 |
| Installation Toolbox: | 9 |
| Running the Toolbox: | 9 |
| Section 3: Toolbox Features | |
| Select Printer screen: | 10 |
| Printer Configuration tab: | |
| Clean Printer tab: | |
| Calibrate Ribbon tab: | |
| Calibrate Lamination tab: | |
| Advanced Settings tab: | 15 |
| Advanced Settings List: |
Section 1: Linux
Requirements:
You have to be super user on your Linux system.
Fargo DTC Printer with the newest driver installed.
Mono 2.6 or higher with the library WinForms installed.
Installation Mono:
Basic install:
Most Linux distributions come with Mono available in the package manager.
Installation steps for the package manager:
Search for a "winforms" package.
If you get more results select all packages that contain "mono".
If you still have more results pick the one with the highest version number.
Install this package. The package manager will resolve all dependencies for you.
Install for Red Hat:
Mono is not included in the basic Red Hat Linux distributions.
Download the toolbox installer from www.hidglobal.com
Extract the installer and execute the script " prepareRedHatForMono.sh" as super user.
Now Mono is available in the package manager. Follow the instructions in the "Basic install" section.
In addition, you have to install "gdiplus0" from the package manager.
Bug fix Mono 2.8 (E.g.: Suse 11.4):
Due to a bug in Mono_2.8 the advanced settings list is incomplete. You have to upgrade to Mono_2.10.
For upgrading visit "mono-project.com", go to the download section, select your Linux distribution and follow the instructions.
Installation Toolbox:
Download the toolbox installer for your architecture from www.hidglobal.com.
Extract the installer to a temporary folder.
Execute installToolbox.sh as super user.
Toolbox.exe is installed to "/usr/bin".
For more comfort you may create a launcher.
Running the Toolbox:
Depending on the mono support of your Linux distribution you have to use one of the following 3 calls.
Ubuntu:
Run the application by executing "Toolbox.exe".
Suse / Fedora:
Run the application by executing "mono /usr/bin/Toolbox.exe".
Red Hat:
Run the application by executing "/opt/novell/mono/bin/mono /usr/bin/Toolbox.exe".
Section 2: Mac OS X
Required packages:
Mono Framework Apple's X11 Toolbox-1.0
Installation Mono Framework:
Go to Mono download page:
http://www.go-mono.com/mono-downloads/download.html
Download long term supported version for Mac OS X Mono 2.10.6 for Intel platform
Install downloaded .dmg package
Installation X11:
Toolbox uses System.Windows.Forms and requires X11 to be installed.
For Mac OS X 10.5 (Leopard) go to X11 download page:
http://xquartz.macosforge.org/trac/wiki/Releases
And download the X11-2.6.3.dmg package (final Leopard release) and install it.
For Mac OS X 10.6 (Snow Leopard) and 10.7 (Lion) :
See that the optional X11 application already installed on your Mac. In Finder under /Applications/Utilities/X11 .app
If it is not there go to site:
http://xquartz.macosforge.org/trac/wiki/Releases
download the X11-2.7.0.dmg package and install it.
Installation Toolbox:
Install Toolbox dmg package.
A "Toolbox" shortcut will be created on your desktop.
Running the Toolbox:
Click the "Toolbox" shortcut on your desktop to run the Toolbox.
Warning: At first startup it may take 60 seconds or longer until the load process is complete.
Section 3: Toolbox Features
Select Printer screen:
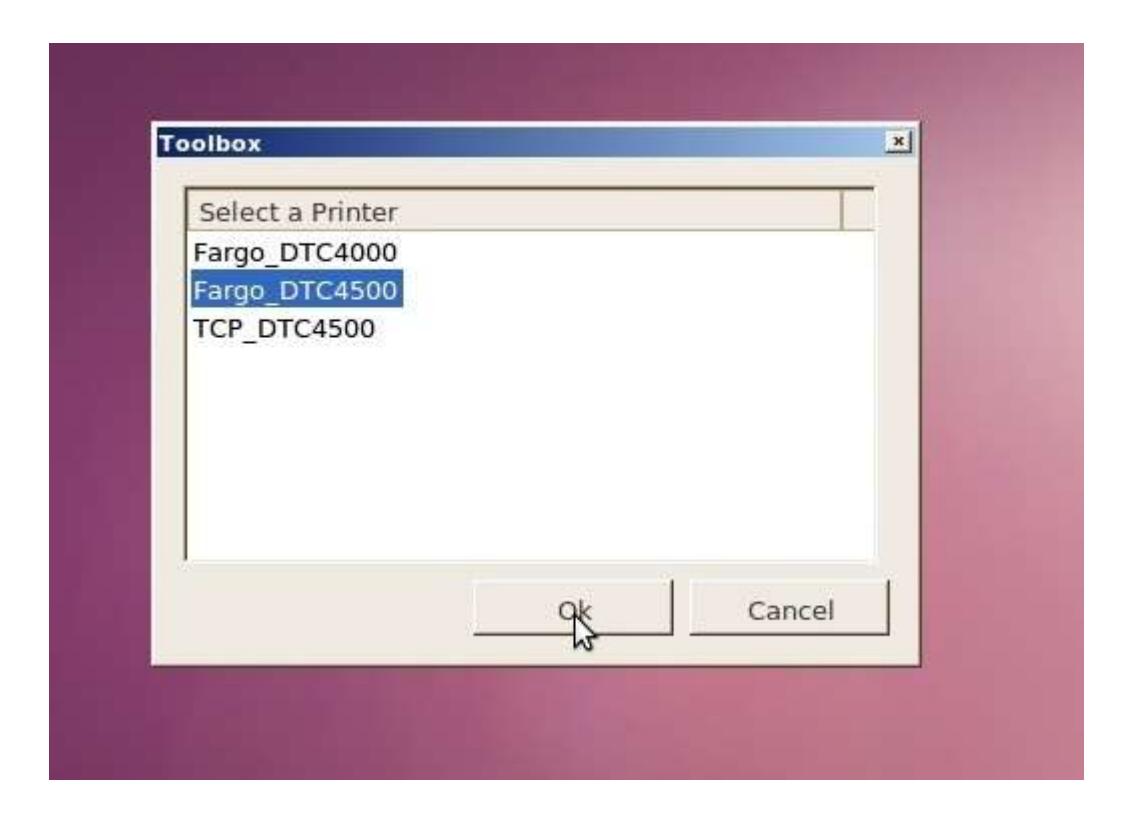
As first step select your printer and click "Ok".
Now the main window is launched for your printer. The Toolbox consists of 4-5 tabs, depending on your printer features. The following section describes these tabs.
Printer Configuration tab:
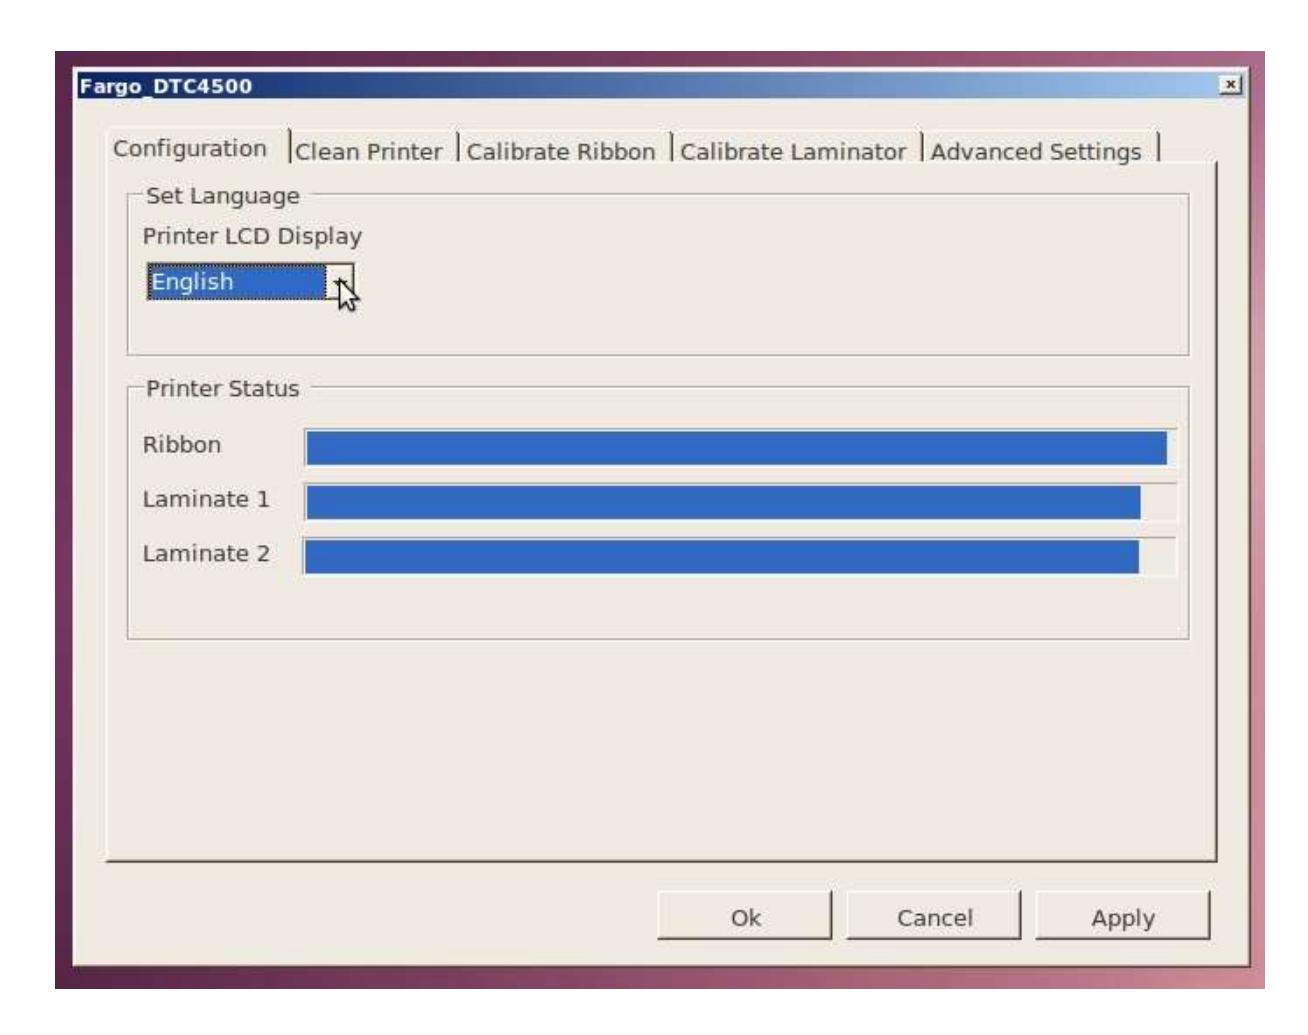
Language:
"Printer LCD Display" shows the currently selected language.
To change the language selects the desired language and click "Apply" or "Ok".
Status:
The Printer Status box shows the usage of the ribbon and lamination material.
Clean Printer tab:
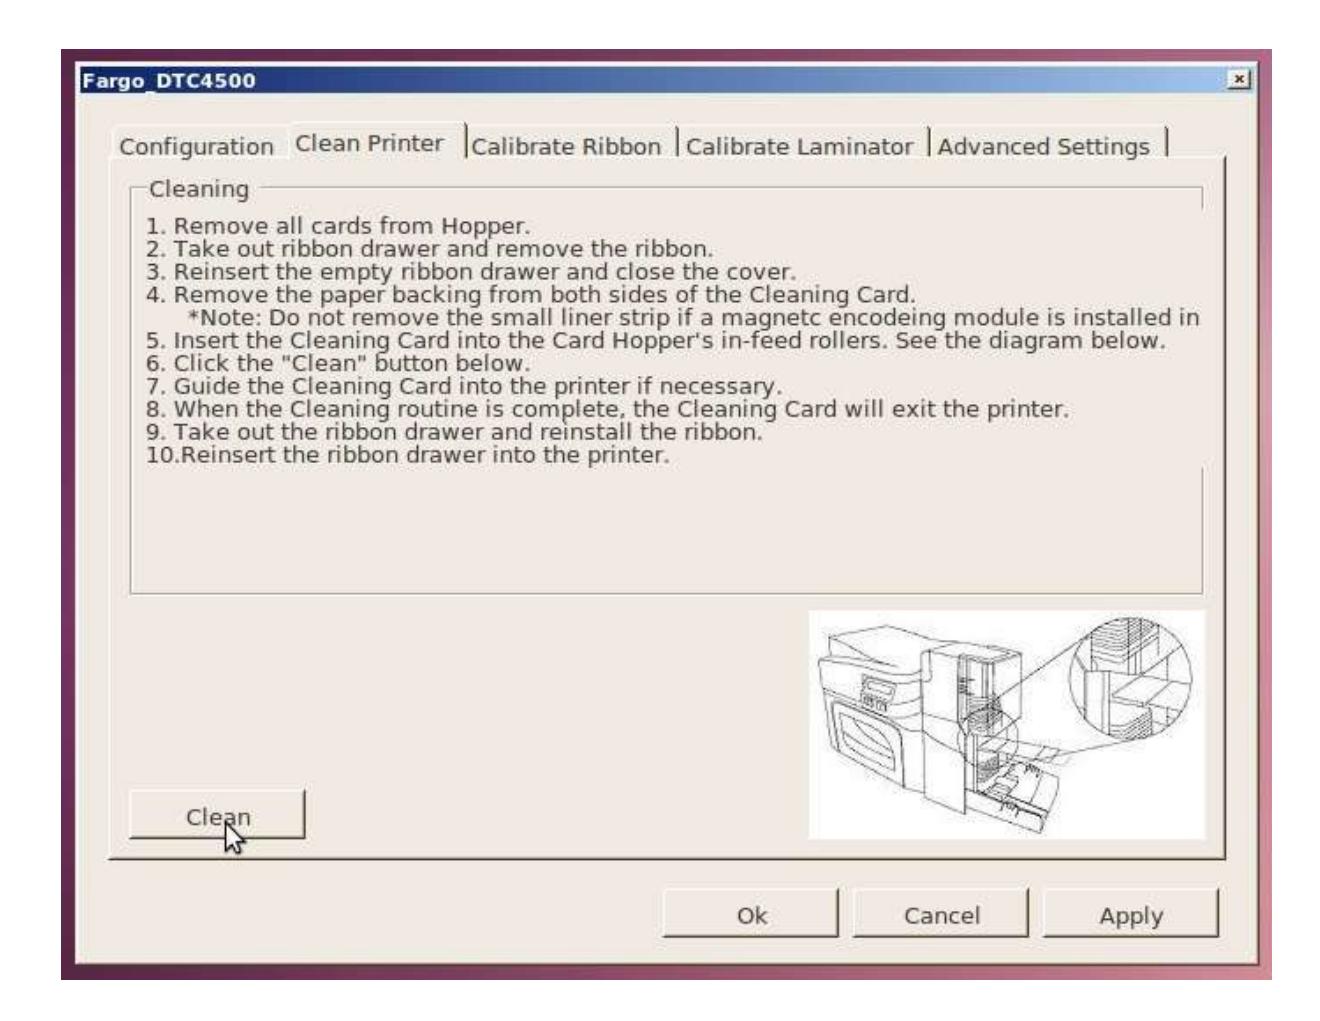
The "Clean" Button sends the Clean Command to Printer. Follow the instructions on the page to set up the Printer.
Calibrate Ribbon tab:
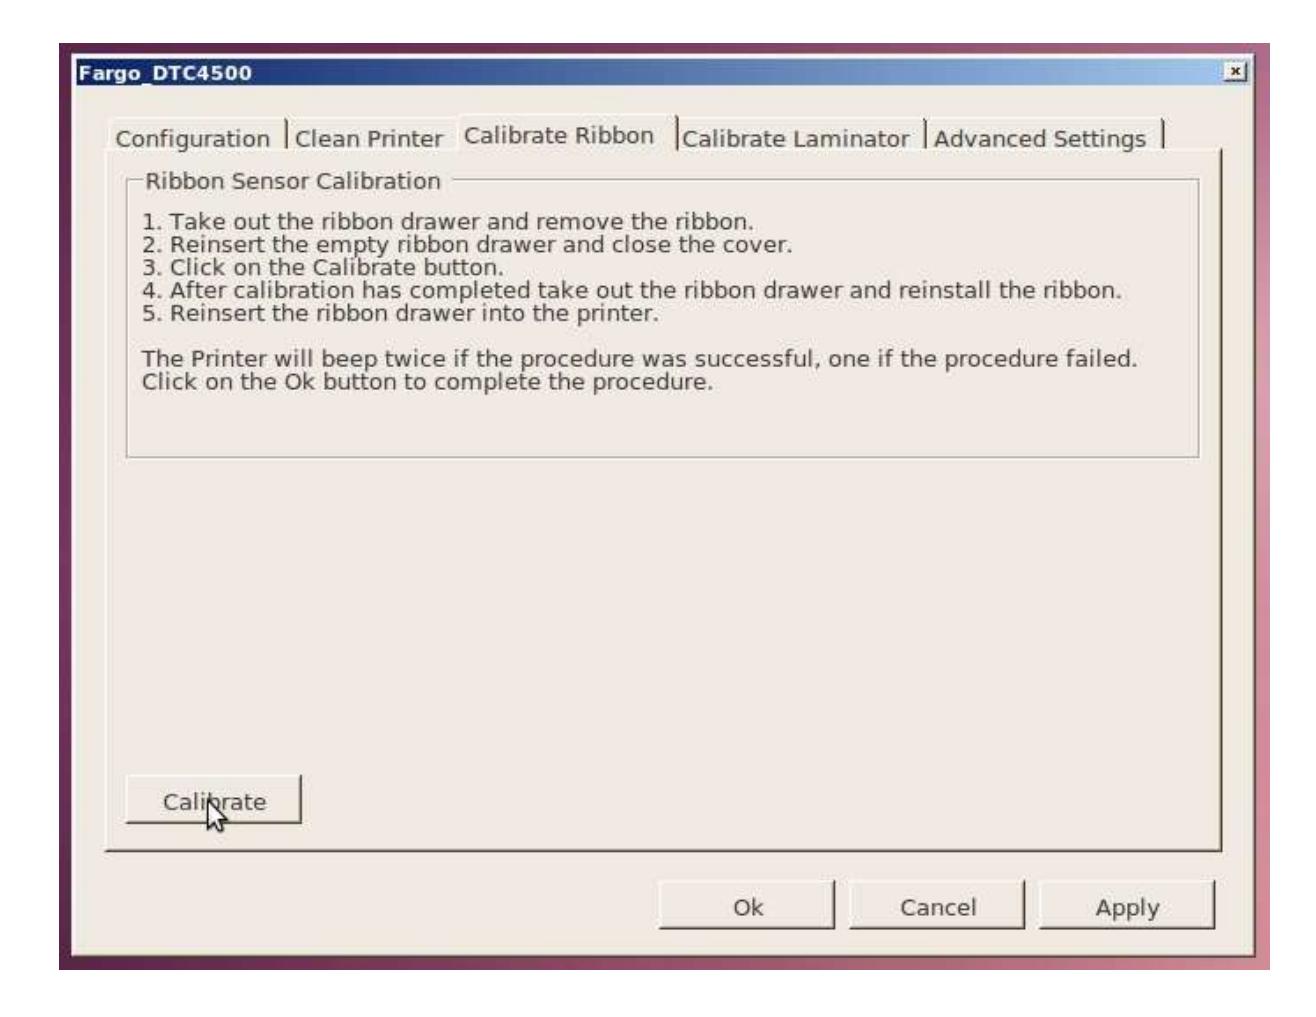
The "Calibrate" Button sends the Calibrate Ribbon Command to Printer. Follow the instructions on the page to set up the Printer.
Calibrate Lamination tab:
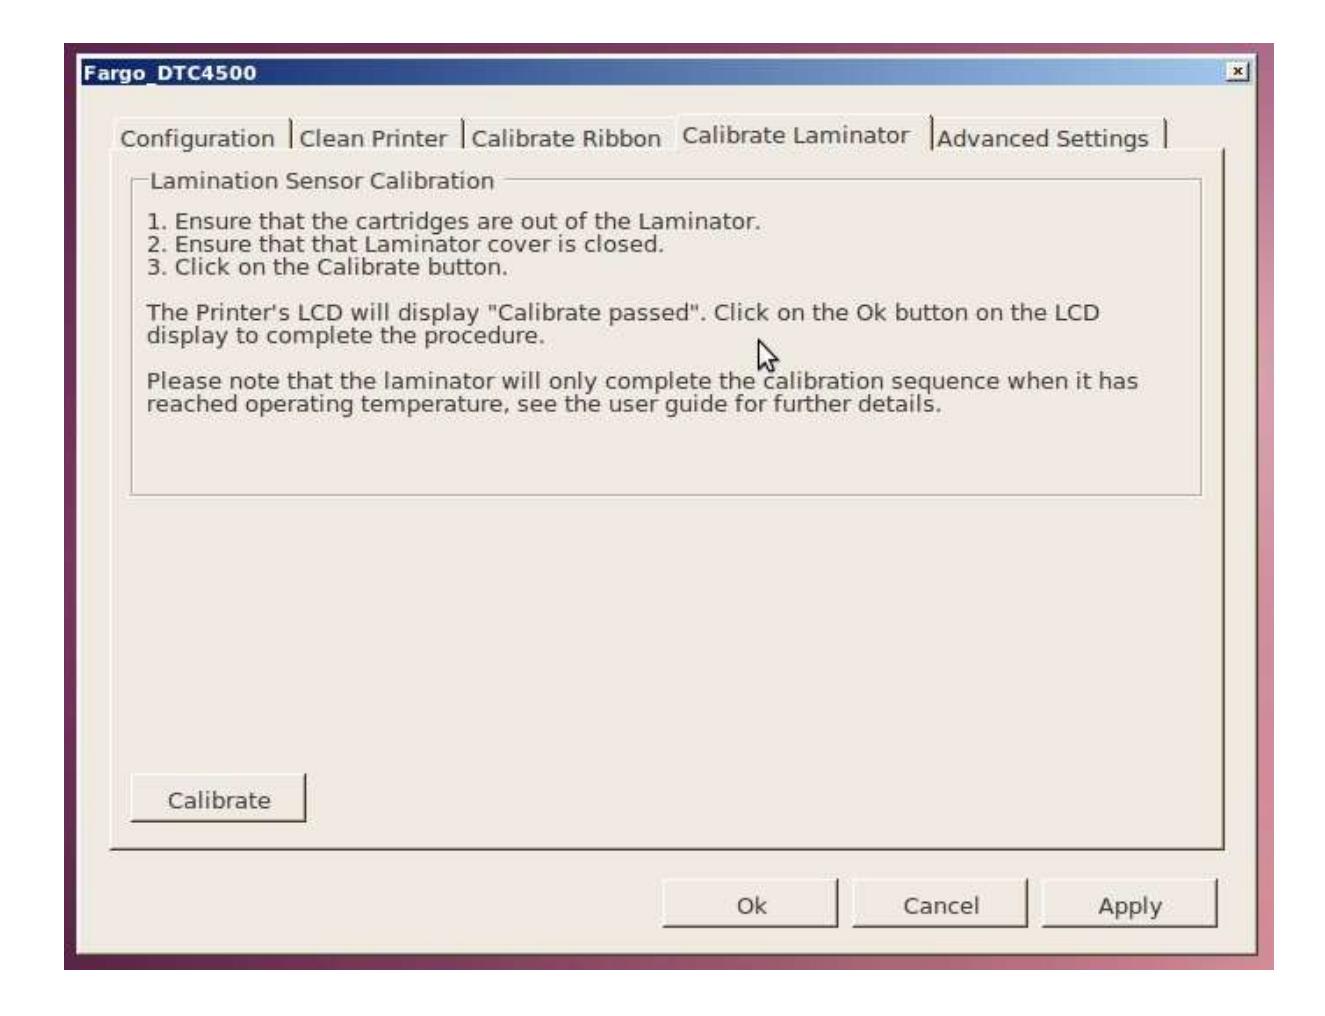
The "Calibrate" Button sends the Calibrate Laminator Command to Printer. Follow the instructions on the page to set up the Printer.
Advanced Settings tab:
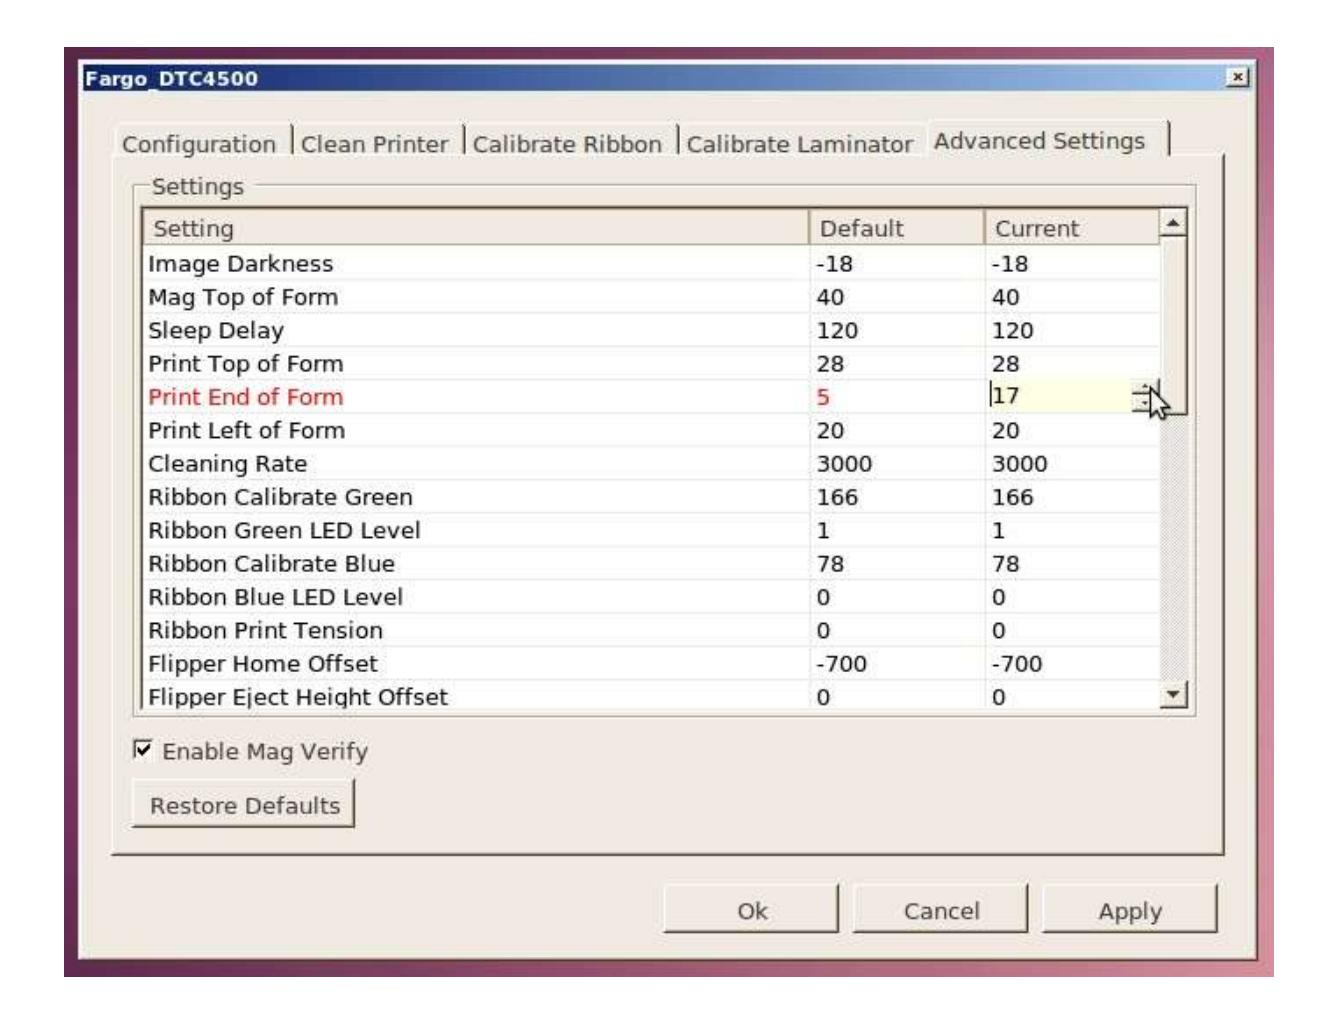
Settings show the status of the internal Printer settings. The table is also used for adjusting the settings.
The settings table consists of the following three columns:
Setting:
Displays label for setting.
See Advanced Settings List for more details about the settings.
Default:
Displays default value for setting.
The default settings are customized for every Printer at the factory.
Current:
Displays current value for setting.
Change the value by clicking on the line to activate spin control. After activation you can spin to the new value or type the new.
If the new value is over the maximum or under the minimum the value is corrected to the maximum or minimum.
Restore Defaults:
Set all current values to the factory defaults.
Enable Mag Verify:
Use this to enable or disable magnetic verify after write.
To send the new values to the printer click "Apply" or "Ok".
Advanced Settings List:
This list contains details about selected advanced settings:
| Image Darkness |
Use this option to set the overall darkness of the printed
image by increasing or decreasing the amount of heat (used by the Print head when printing). |
|
|---|---|---|
|
Caution:
If the value is set too high, the Ribbon may jam or even break. |
||
| Mag Top of Form |
Use this option to shift the starting point where the Printer
begins to encode the magnetic track data on the card's Magnetic Stripe. |
|
|
Caution:
If the negative value is set too high, the Printer may start encoding before the Magnetic Stripe reaches the encoding head. |
||
| Each increment equals .01". | ||
| Sleep Delay |
The Sleep Time setting adjusts the number of minutes of
inactivity before the Printer enters a low power sleep state. |
|
| Print Top of Form |
Use this option to adjust the length-wise or horizontal
position of the printed image on the card (so it appears to be centered). |
|
|
Caution:
If the negative value is set too high, the Print Ribbon may break. |
||
| Print End of Form |
Use this option to reduce or increase the overall printable
area; this is done in order to optimize edge to edge printing |
|
| toward the trailing edge of the card. | |
|---|---|
| Each increment equals .01". | |
| Print Left of Form |
Use this option to adjust the vertical position of the printed
image on the card; so it appears centered. |
| Each increment equals .01". | |
| Cleaning Rate |
Use this option to adjust the number of cards printed before
the Printer displays a message indicating cleaning is needed. |
| Ribbon Calibrate Green |
This is a calibration driven value and should not be
adjusted. |
|
(Note:
This is factory set and should not be changed unless directed by a technician.) |
|
| Ribbon Green LED Level |
This is a calibration driven value and should not be
adjusted. |
|
(Note:
This is factory set and should not be changed unless directed by a technician.) |
|
| Ribbon Calibrate Blue |
This is a calibration driven value and should not be
adjusted. |
|
(Note:
This is factory set and should not be changed unless directed by a technician.) |
|
| Ribbon Blue LED Level |
This is a calibration driven
value and should not be adjusted. |
|
(Note:
This is factory set and should not be changed unless directed by a technician.) |
|
| Ribbon Print Tension |
Use the Ribbon Tension option to increase or decrease the
amount of tension (drag) on the Ribbon during printing. |
| Flipper Home Offset |
This is a calibration driven value and should not be
adjusted. If the Flipper unit is replaced and has not been calibrated, this value may need to be adjusted. |
|
(Note:
This is factory set and should not be changed unless directed by a technician.) |
|
|
Flipper Eject
Height Offset |
This is a calibration driven value and should not be
adjusted. If the Flipper unit is replaced and has not been calibrated, this value may need to be adjusted. |
|
(Note:
This is factory set and should not be changed unless directed by a technician.) |
|
| Mag Hi-Co Voltage Offset |
This option changes the voltage going the magnetic head.
(Note: This is factory set and should not be changed unless directed by a technician.) |
| Mag Lo-Co Voltage Offset |
This option changes the voltage going the magnetic head.
(Note: This is factory set and should not be changed unless directed by a technician.) |
|
|---|---|---|
| OLED Contrast | (Display contrast) | |
|
Use this option to increase or decrease the contrast of the
printer OLED (if applicable). |
||
| Resin Heat Adjust |
Use this adjustment for Black resin text and barcodes if
they appear faded or too light/dark. |
|
|
(Note:
This control can be helpful for fine-tuning the transfer of resin text and bar codes.) |
||
| Head Resistance |
This is factory set. If the main board or
the Print head is replaced then adjust this number. |
|
|
Locate the Print head
Setting Number on the bottom of the Print head. |
||
| The number reads R=XXXX | ||
| Head Home Offset |
This is a calibration driven value and should not be
adjusted. If the Print head assembly is replaced then this value may need to be adjusted. |
|
|
(Note:
This is factory set and should not be changed unless directed by a technician.) |
||
| Head Contact Offset |
This is a calibration driven value and should not be
adjusted. If the Print head assembly is replaced then this value may need to be adjusted. |
|
|
(Note:
This is factory set and should not be changed unless directed by a technician.) |
||
| Erase Heat Offset |
Adjust the Erase temperature for the rewriteable cards as
needed. |
|
|
Increase the Current Setting
to cause more heat to be used in the erasing process. |
||
| OR | ||
|
Decrease the Current Setting
to cause less heat to be used in the erasing process. |
||
|
(Note: Erase Heat Offset
provides user ability to control the Print head heat level when the Erase Operation is performed. Appropriate heat levels should be applied for the proper erase process. This setting should be adjusted for proper erasure.) |
||
| Write Heat Offset | Adjust the Write temperature for the rewriteable cards as | |
needed.
Increase the Current Setting to cause more heat to be used in the printing process of a rewritable card.
OR
Decrease the Current Setting to cause less heat to be used in the printing process of a rewritable card.
(Note: Write Heat Offset provides user ability to control the Print head heat level when the Write Operation is performed. Appropriate heat levels should be applied for the proper writing process.)