First Choice Building Products Frame for Keyed Removable Mullion InstallationTemplate
Open the original PDF document
View PDFFrame Prep for Keyed Removable Mullion:
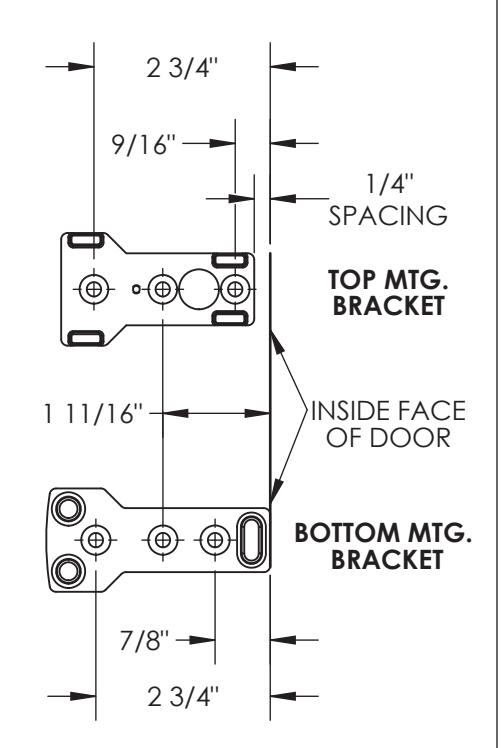
1. Locate the Top and Bottom Mounting Brackets according to the dimensions shown, and centered in the door opening (so that both doors will equally overlap the mullion.) Use the Mounting Brackets as templates to locate and drill mounting holes.
Note: Depending on the frame, a shim may be required to properly secure the Top Mounting Bracket (when overhang occurs). It is highly recommended to choose a shim that covers the entire profile of the Mounting Bracket to ensure security.
- 2. Cut the threshold for the Bottom Bracket for mounting directly to the finished floor.
- 3. With Mounting Brackets installed to the header and floor, secure the Lock Assembly to the Top Mounting Bracket using 4x #10-32 x 1/2" screws. Plastic snap-arms inside the Lock Assembly should fit over the head of #6 screw in the Top Mounting Bracket to keep the Lock Assembly from falling during installation.

Mullion Preperation for Keyed Removable Mullion:
- 1. Rough Cut: Measure length from finished floor to finished frame and subtract 3 1/4". (If shim is used, subtract shim-thickness.) Cut Mullion to calculated length.
- 2. Finishing Cut: Place bottom of Mullion onto the Bottom Bracket and tilt into place. Using the specified edge of the Lock Housing as a guide (shown to the right), scribe/etch a line on the Mullion and cut to this exact height . Make multiple small cuts if needed.
- 3. Set the Mullion Lock Strike on top of the Mullion, slide the Clamping Plate over the top, and secure it to the Lock Strike with " Flat-Head screws.
- 4. Attach the two Mullion Security Clips to the pre-drilled holes, using 2x #10-32 Flat-Head screws each.
