Falcon_RM70_&_RM170_Mullion_Installation_Instructions_-_English_107317
Open the original PDF document
View PDFInstallation Instructions
1. Prepare frame header for filler or adapter plate. Install filler or adapter plate and top bracket.
For RM70 and RM170, see Figures 1 and 2. (Filler, filler mounting screws, and bracket mounting screws by others.)
For RM70A and RM170A, see Figures 3 and 4.
- 2. Prepare floor and threshold for bottom bracket. Install bottom bracket (Figures 5 and 6, other side).
- 3. Cut mullion to length from top (Figures 7 and 8, other side).
- 4. Slide mullion over top fitting and swing into position on bottom fitting (Figure 9, other side).
- 5. Slide mullion clamp over top fitting and secure with three screws (Figure 10, other side).
- 6. Install security clips on door (Figure 11, other side).

Figure 1. Header and filler preparation for top bracket (RM70 and RM170).

Figure 2. Filler and top bracket installation (RM70 andRM170).

Figure3. Header preparation for adapter plate (RM70A and RM 170A).

Figure 4. Adapter plate and top bracket installation (RM70A andRM170A).

RM70, RM70A, RM170, and RM170A Removable Mullions
© Allegion 2016 Printed in U.S.A. 4270108237 Rev. 12/16-f
PAGE NO. REVISION 1 of 2 F 4270108237


Figure 5. Floor and threshold preparation for bottom bracket.

Figure 6. Bottom bracket installation.

Figure 7. Required mullion length.

Figure 8. Cut mullion to length.
Figure 9. Install mullion.

Figure 10. Slide mullion clamp up over top bracket and secure with screws.
© Allegion 2016 Printed in U.S.A. 4270108237 Rev. 12/16-f
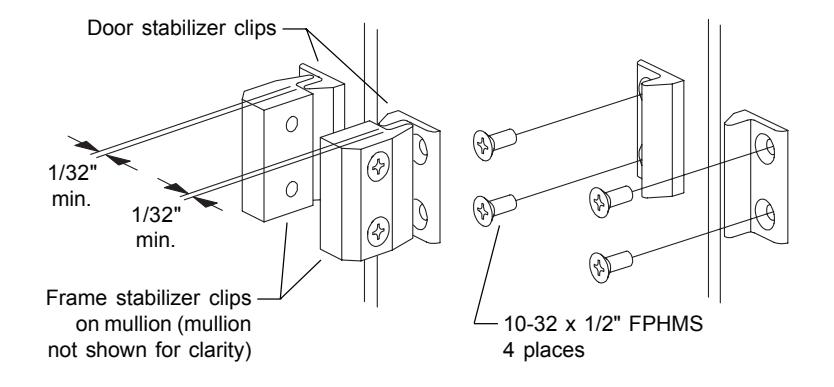
Figure 11. Position door stabilizer clips as shown, drill and tap door 10-32, 4 places, and install door stabilizer clips.

RM70, RM70A, RM170, and RM170A Removable Mullions
PAGE NO. REVISION
2 of 2 F
4270108237