FE576, FE596 – Keypad Entry with Built-In Alarm User’s Guide
Open the original PDF document
View PDF

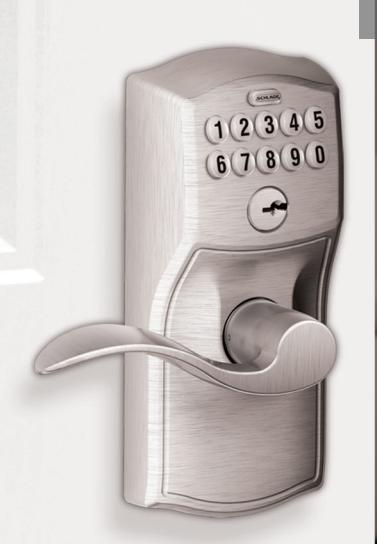
Keypad Entry with Built-in Alarm

CONTENTS
| Lock Parts2 | |
|---|---|
|
Security You Hear Instantly
3 |
|
|
Using the Keypad4
User Codes and Keypad Programming4 Locking and Unlocking 4 Emergency Key Override 5 Terms You Should Know5 Restore Keypad Factory Settings5 |
|
|
Alarm Operation6
Choosing the Alert Setting6 Powering On the Alarm7 Powering Off the Alarm 7 Programming the Alert Setting7 Sensitivity Level 7 |
| Replacing the Keypad Batteries8 | |
|---|---|
|
Troubleshooting
8 |
|
|
Replacing the Alarm Batteries
9 |
|
| My Codes10 |
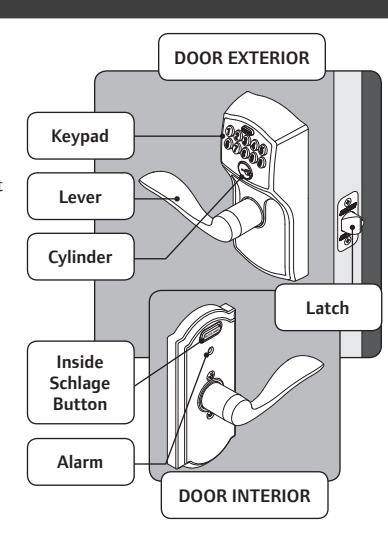
LOCK PARTS
Keypad
- Located on the outside of the door.
- Used to enter codes for programming and unlocking.
Lever
- The inside lever can be rotated at any time to retract the latch.
- The outside lever can be rotated at any time, but will only retract the latch when the lock is unlocked.
Cylinder
- Located on the outside of the lock.
- Used only in emergency situations to unlock the lock. See Emergency Key Override on page 5.
Inside Schlage Button
- Located on the inside of the door.
- Has three distinct lights and used to set and program the alarm. See Alarm Operation on page 6.
Alarm
• Sounds alerts based on the chosen settings. See Alarm Operation on page 6.
SECURITY YOU HEAR INSTANTLY
When you choose Schlage, you choose a product backed by nearly a century of total dedication to security, quality and innovation. And, today, products like the Keypad Entry with Built-in Alarm offer you another key advantage: convenience and control. The Keypad Entry with Built-in Alarm combines proven Schlage security with the added safeguard of a sensor alarm. Specifically engineered to detect vibration and motion, it sounds an alarm—based on the alert setting you choose—to alert you to activity at the door on first contact with the door or handle. Best of all, the alarm is easily adjusted as your needs change either day to day or over the years.
Security
- Tested and rated to meet ANSI lock security and durability standards
- Only audible residential alarm lock to alert you to activity upon first contact at lock handle—not just when door is opened
Quality
- Rugged, all-metal construction
- Lifetime limited warranty on mechanical components and finish
- One-year electronics warranty
Convenience
- Easy to use—press the Inside Schlage Button to program the alarm
- Various mode and sensitivity level options to meet different needs
- Installed with just a screwdriver in minutes
- Uses two AAA and one 9-volt batteries—3-year battery life with low battery indicator
» DID YOU KNOW? Schlage is the most preferred residential door lock brand by consumers* and most used by builders.**
- * Nooro Research Report, independent research funded by Ingersoll Rand Co., 2011.
- ** Builder Magazine, April 2011
The Keypad Entry with Built-in Alarm was designed with you in mind. It provides a more sophisticated security option to the standard lockset—but without the complexity that often accompanies electronic alarm systems.
IMPORTANT!
If you have questions about installation or programming, don't return the Keypad Entry with Built-in Alarm to the store, contact Schlage Customer Service.
This owner's guide provides easy step-by-step instructions. If you have other questions, we're simply a call—or a live chat—away.
Toll-Free Calling From:
U.S.A.: (888) 805-9837 Canada: (800) 997-4734 Mexico: 018005067866
Live Chat: schlage.com
Visit our web site for videos, FAQs and more.
keypad.schlage.com alarm.schlage.com
Register Your Product
Document your purchase and register your warranty at RegisterMySchlage.com.
USING THE KEYPAD
User Codes and Keypad Programming
The Keypad Locks Programming Guide (see separate document included in this package) contains the following information:
- · Factory Preset Programming Code -
- · Factory Preset User Codes -
- Instructions for adding and deleting User Codes and changing the Programming Code
Find the yellow Programming Sticker on the Keypad Locks Programming Guide
Programming Code XXXXXX User Code A xxxx S/N x-xxxxxxxx
User Code B xxxx Model xxxxx

Locking and Unlocking
- The lock is always locked from the outside. It is not necessary to lock the lock from the inside; if the door is shut then the lock is locked and secure.
- To temporarily unlock the door from the outside, enter a User Code. There is no way to leave the lock permanently unlocked.
- The lock is always unlocked from the inside. To open the door from the inside, simply turn the lever and exit.
- >> It is recommended that you change your User Codes on a periodic basis so buttons wear evenly.
- >> If lighting is low, press the Schlage button to illuminate the keypad before beginning.
- >> To program User Codes and the Programming Code, see the Keypad Locks Programming Guide .
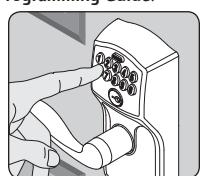
Temporary Unlocking Using the Keypad
Enter a User Code into the keypad. The lock comes with two factory preset User Codes. See the Keypad Locks Programming Guide.
Watch the Schlage button. If it lights green, a valid code was entered and the lock is temporarily unlocked. If it lights red, then an invalid code was entered.
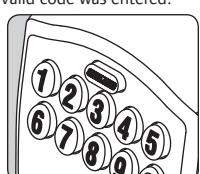
Rotate the lever to open the door. Door will automatically relock after a few seconds..
Emergency Key Override
Emergency Key Override can be used when the battery is completely dead, or when no valid User Code is known.
-
1. Insert key. 2. Rotate key 270° to unlock.
- 3. Rotate knob/lever to open door.*
* Rotate the key back to starting position to relock. The key cannot be removed from the cylinder while the lock is unlocked. See Replacing the Keypad Batteries on page 8.
Terms You Should Know
User Code
Any combination of four (4) digits entered into the keypad to unlock the lock. These four digits must be different from the first four digits of the Programming Code. Two User Codes are programmed into the lock by default. These two codes can be found on the yellow stickers, one on the back of the keypad assembly and one on the Keypad Locks Programming Guide.
Programming Code
Any combination of six (6) digits entered into the keypad to put the lock in programming mode. The first four digits must be different from all of the User Codes currently in the lock. One Programming Code is programmed into the lock by default. This code can be found on the yellow stickers, one on the back of the keypad assembly and one on the Keypad Locks Programming Guide.
Vacation Mode
When enabled, no User Codes will unlock the lock. This feature prevents unauthorized access attempts when the property is unattended for a long period of time. See the Keypad Locks Programming Guide for more information.
Restore Keypad Factory Settings
WARNING
Locate the default programming and User Codes on the front of the Keypad Locks Programming Guide or the back of the keypad before beginning! Default programming and User Codes will be restored. All existing User Codes and current Programming Code will be erased. CUSTOMER SERVICE CANNOT RETRIEVE LOST DEFAULT CODES! DO NOT RESTORE FACTORY SETTINGS UNLESS YOU CAN LOCATE THE DEFAULT CODES.
- 1. Disconnect the battery. See Replacing the Keypad Batteries on page 8.
- 2. Press and release .
- 3. Reconnect the battery and wait until is no longer lit (about one second).
- 4. Within 10 seconds, press and hold until lights green and the lock beeps.
ALARM OPERATION
Choosing the Alert Setting
Activity Alert

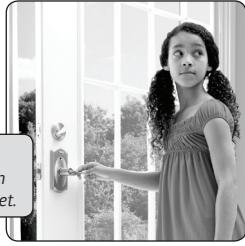
Your little one is now able to reach door handles and loves to explore…you're caring for an elderly parent or a child with special needs…or maybe you simply feel more secure knowing every time there's activity at your door. Whatever your reason or season of life, the Activity Alert setting is perfect for monitoring doors while you're at home.
- Alarm beeps twice every time a door opens or closes
- Middle LED light flashes
- Sound: Two short beeps
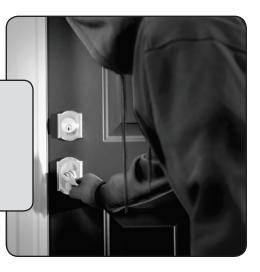
Tamper Alert
» When the alarm is triggered, there is a built-in 3 second delay for it to reset.
If you're home alone during the day or evening, or want to monitor a secondary entry door, the Tamper Alert is the ideal setting. As the most sensitive alert setting, the Tamper Alert senses even subtle activity at the handle lock – not just when the door opens – notifying you immediately of any tampering.
- Alarm sounds for about 15 seconds when the door knob/lever is disturbed
- Left and right LED lights flash alternately
- Built-in 60-second delay before device alarms to allow you to exit and lock the door
- Sound: Longer alarm sound (90 dB = the sound of your smoke alarm)
» If the alarm sounds, you can silence it early by pressing down on the Schlage button until the alarm sound stops.
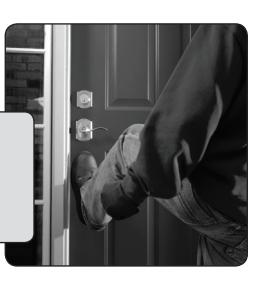
Forced Entry Alert

Daily opening and closing of doors may no longer be a worry for you… but you may be concerned about protecting against break-ins. The Forced Entry Alert is perfect for nighttime or when you're away from home.
- Three-minute alarm sounds when significant force pushes against the door—like when someone tries to kick it in
- Acts as an effective deterrent by instantly alerting you – and others nearby – at first impact against your door
- Least sensitive mode many choose to program this alert setting all the time
- All lights on the LED track flash
- Sound: Shrill, steady siren (90 dB=the sound of your smoke alarm)
» If the alarm sounds, you can silence it early by pressing down on the Schlage button until the alarm sound stops.
Powering On the Alarm
- 1. Press the inside Schlage button for 5 seconds, until any light flashes around the Schlage button.
- 2. Release the inside Schlage button. The alarm is now turned on.
» Not sure your alarm is activated? Simply press the Schlage button and it will beep and light up to confirm it is activated. If it does not, confirm new batteries are installed properly. See Replacing the Alarm Batteries on page 9.
Powering Off the Alarm
- 1. Press and hold the inside Schlage button until second LED flash.
- 2. Release the inside Schlage button. The alarm is now turned off.
Programming the Alert Setting
The alarm comes pre-set to the Forced Entry setting and is ready to use. If you want to change it from Forced Entry to another alert setting, follow these simple steps:
- 1. Press the inside Schlage button for 2 seconds, until it flashes.
- 2. Release the button. The alarm will beep. Immediately continue to press and release the inside Schlage button to cycle through the three alert settings. Stop pressing the button when the setting light that matches your desired alert setting is lit.
» If you want to check which alert setting the alarm is currently activated to, press and release the Schlage button once. The alarm will light up on the left, middle or right of the LED track to indicate the alert setting.


Activity Alert Tamper Alert Forced Entry
Alert
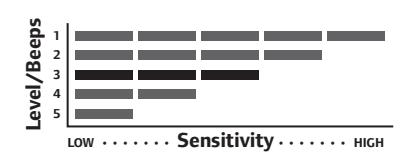
Sensitivity Level
The sensitivity level indicates the level of touch or activity needed to set off the alarm. There are five levels of sensitivity, with one (1) being the most sensitive and five (5) being the least sensitive. The lock comes pre-set to level 3.
- 1. Press and hold the Inside Schlage Button until the third LED flash. This will take about 10 seconds.
- 2. Tab the Inside Schlage Button to cycle through the five sensitivity levels. Stop tabbing to select the sensitivity level you prefer.
» As you cycle through the five levels, the alarm will beep the same number of times as each setting level.
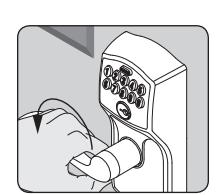
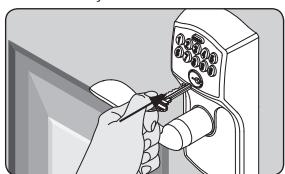
REPLACING THE KEYPAD BATTERIES

1. Remove the lock from the door. 2. Open the battery compartment and replace the 9V battery.
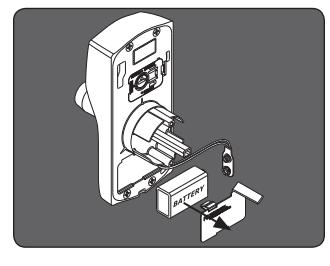
3. Replace the lock on the door.
TROUBLESHOOTING
| PROBLEM | SOUNDS* | LIGHTS | SOLUTION | |||
|---|---|---|---|---|---|---|
| INSIDE | ||||||
|
Alarm sounds too frequently
or false alarm |
Alarm | — |
Sensitivity level is too high (at 1 or 2) and should
be adjusted to a less sensitive level (3, 4 or 5). See Sensitivity Level on page 7. |
|||
|
Outside lights on inside
Schlage button are blinking |
— |
Left and
Right |
Batteries are low and should be replaced. See Replacing
the Alarm Batteries on page 9. |
|||
|
The tamper alert is not
sounding. |
— | — |
There is a 60-second delay before device alarms to allow
you to exit and lock the door. |
|||
| OUTSIDE (KEYPAD) | ||||||
| I forgot my Programming Code. |
Check front of Keypad Locks Programming Guide or back
of keypad assembly for default Programming Code. |
|||||
|
If needed, restore lock to factory settings. Terms You
Should Know on page 5 |
||||||
| I need to delete a User Code that I don't remember. |
Delete all User Codes. Then add all needed User Codes
back into the lock. See the Keypad Locks Programming Guide. |
|||||
| User code does not unlock |
2
Red |
User Code entered is not a valid User Code. | ||||
| lock. |
1 High,
1 Low |
Green
then Red |
Vacation Mode is enabled. See the Keypad Locks
Programming Guide to disable Vacation Mode. |
|||
| does not light when numbers are pressed. |
Too many incorrect User Codes have been entered. Wait
30 seconds and try again. |
|||||
|
If keypad does not respond after 30 seconds, then replace
battery. Replacing the Keypad Batteries on page 8. |
||||||
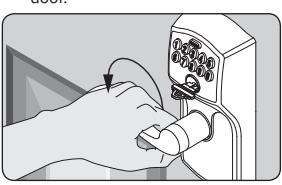
REPLACING THE ALARM BATTERIES
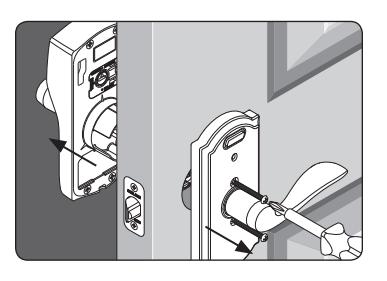
-
1. Remove the lock from the door. 2. Replace the AAA batteries in the lever. 3. Replace the lock
- on the door.
| PROBLEM | SOUNDS* | LIGHTS | SOLUTION | |||
|---|---|---|---|---|---|---|
|
There is a delay before unlock
after a valid User Code is entered. |
High/Low,
then 1 |
Red then
Green |
Battery is low and should be replaced. See Replacing the
Keypad Batteries on page 8. |
|||
|
blinking red but no
codes have been entered. |
— |
Quick Red
Blinking |
Battery is dead and MUST be replaced. See Replacing the
Keypad Batteries on page 8. |
|||
| Cannot add a new User Code. | High/Low | Red |
19 User Codes already exist. Delete a User Code before
adding a new one. See the Keypad Locks Programming Guide. |
|||
| 2 | Red |
Second User Code entered did not match first User Code
entered. |
||||
|
The User Code matches the first four digits of the existing
Programming Code. |
||||||
| Cannot delete a User Code. | 2 | Red |
Second User Code entered did not match first User Code
entered. |
|||
|
Cannot change Programming
Code. |
2 | Red |
Second Programming Code entered did not match first
Programming Code entered. |
|||
|
First four digits of new Programming Code match an
existing User Code. |
||||||
| Cannot delete all User Codes. | 2 | Red | Programming code entered second time is incorrect. | |||
|
Lock will not stay in
programming mode. |
2
Red |
Any key other than
was pressed immediately after programming mode was entered. |
||||
|
An incorrect entry was made during the programming
process. See the Keypad Locks Programming Guide. |
||||||
* Beeps sound on keypad only when beeper is enabled.
MY CODES
Use these tables to record programming and User Codes that you program into the lock. For programming instructions and default codes, see the Keypad Locks Programming Guide.
Programming Code
Any combination of six (6) digits entered into the keypad to put the lock in programming mode. The first four digits must be different from all of the User Codes currently in the lock. One Programming Code is programmed into the lock by default. This code can be found on the yellow stickers, one on the back of the keypad assembly and one on the Keypad Locks Programming Guide.
» Use a pencil to enter the codes in the boxes so you can easily change them later.
| Date | Programming Code | |||||
|---|---|---|---|---|---|---|
User Codes
Any combination of four (4) digits entered into the keypad to unlock the lock. These four digits must be different from the first four digits of the Programming Code. Two User Codes are programmed into the lock by default. These two codes can be found on the yellow stickers, one on the back of the keypad assembly and one on the Keypad Locks Programming Guide.
» Up to 19 User Codes can be stored in the lock at one time. Consider changing your User Codes on a periodic basis so buttons wear evenly.
To learn more about this product, scan the code with your smartphone.
Download the app at scanlife.com.

| User Name | User Code | ||||
|---|---|---|---|---|---|
| Example: John Smith | 1 | 2 | 3 | 4 | |
| 1. | |||||
| 2. | |||||
| 3. | |||||
| 4. | |||||
| 5. | |||||
| 6. | |||||
| 7. | |||||
| 8. | |||||
| 9. | |||||
| 10. | |||||
| 11. | |||||
| 12. | |||||
| 13. | |||||
| 14. | |||||
| 15. | |||||
| 16. | |||||
| 17. | |||||
| 18. | |||||
| 19. | |||||
If you have questions about any part of installation or programming, don't return the Keypad Entry with Built-in Alarm to the store. Our Schlage Customer Service representatives are ready to help.
Toll-Free: 1.888.805.9837 Live Chat: schlage.com

www.allegion.com/us www.schlage.com