Edwards Signaling 3101961-EN R003 57PLEDM Series Rotating Polaris LED Beacon Installation Sheet
Open the original PDF document
View PDF

57PLEDM Series Rotating Polaris LED Beacon Installation Sheet
Description
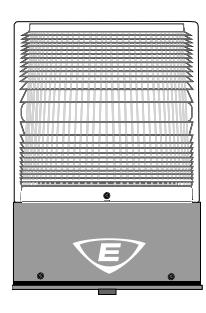
The 57PLEDM Series Rotating Polaris LED Beacon is UL and cUL listed for general signaling use. The beacon is available in 120 VAC or multivoltage 12 VDC, 24 VAC, or 24 VDC models. There are six lens colors to choose from, and a choice of black or gray bases. The beacon utilizes high-power LED lights and is suitable for indoor or outdoor use. The beacon is provided with an enclosure rated for NEMA Type 4X and IP66.
The beacon is well suited for high ambient noise level areas, especially where ear protection must be worn. It is also ideal for high vibration applications and areas where LED technology provides longer lamp life. The beacon features a 360-degree beam of light with 16 userselectable flash or rotation patterns, including Steady. The patterns are selected by pressing the Edwards logo push button. The factory setting is Light Burst pattern.
The beacon is designed to be mounted on 3/4 in. NPT conduit (indoor or outdoor). To maintain the NEMA Type 4X and IP66 ratings for outdoor installation, the beacon must be mounted with the dome facing directly up. When installing the beacon indoors in dry environments, it can be mounted in any position.
Installation
Install the beacon in accordance with the applicable requirements in the latest edition of the National Electrical Code, Canadian Electrical Code, and local codes.
WARNINGS
- To prevent electrical shock, ensure that the power is disconnected before installing the beacon.
- To prevent leakage and potential electrical shock, use care when disassembling the beacon to prevent tearing of the permanently affixed gaskets provided for the environmental integrity and ratings.
- When mounting outdoors, the beacon must be installed with the lens or dome facing directly up.
Note: The beacon is designed to be conduit mounted.
To install the beacon:
- 1. Remove the three screws from the bottom of the beacon base (Figure 1).
- 2. Separate the beacon baseplate to gain access to the wiring chamber.
Note: The beacon mounts on a 3/4 in. NPT conduit pipe. The female threaded entry is located on the bottom of the base.
- 3. Install the baseplate on the conduit. Wrench-tighten for a leak free seal.
- 4. Route the field wiring from the appropriate power source through the conduit, and then through the conduit entrance in the baseplate.
- 5. Wire in accordance with "Wiring" below.
- 6. Place the connected wires inside the base and secure the beacon base plate to the base using the screws provided (Figure 1).
- 7. Apply power and verify proper operation.
Wiring
Wire the beacon in accordance with the applicable requirements in the latest edition of the National Electrical Code, Canadian Electrical Code, and local codes.
To wire the beacon for 120 VAC:
- 1. Using wire nuts (not supplied), connect the field wiring to the beacon wiring.
- 2. Connect the beacon's black lead to hot, the white lead to neutral, and the green lead to ground.
To wire the beacon for 12 VDC:
- 1. Using wire nuts (not supplied), connect the field wiring to the beacon wiring.
- 2. Connect the beacon's red lead to positive (+) and the black lead to negative (−).
To wire the beacon for 24 VAC/VDC:
- 1. Using wire nuts (not supplied), connect the field wiring to the beacon wiring.
- 2. Connections depend on the voltage supply. Choose the connections that match your power supply:
24 VAC: Connect the beacon's black lead to hot, the red lead to neutral, and the green lead to ground.
24 VDC: Connect the beacon's red lead to positive (+) and the black lead to negative (−).
Selecting the flash or rotation pattern
The beacon can be configured with one of 16 user-selectable flash or rotation patterns using a push button (membrane switch). The push button is located in the center of the Edwards shield logo on the base of the beacon (Figure 1).
To select a flash or rotation pattern:
- 1. Press and hold the push button for one second to switch to the next pattern in the sequence (Table 1).
- 2. Press and hold the push button for three seconds to set the beacon back to the first pattern (Steady).
Table 1: Flash and rotation patterns
| Pattern | Description |
|---|---|
| 1. Steady | On steady |
| 2. S65 | 65 Single FPM |
| 3. Light Burst |
1,100 FPM (seven pulses),
440 ms off, Repeat |
| 4. Singular Burst | 310 Single FPM |
| 5. Binary Burst | 200 Double FPM |
| 6. Quad Burst | 100 Quad FPM |
| 7. iBurst |
4 pulses at 750 FPM, Off,
4 pulses at 750 FPM, Off, 6 pulses at 870 FPM, Off, Repeat |
| 8. Rotating 80 RPM | 80 RPM |
| 9. Rotating 95 RPM | 95 RPM |
| 10. Rotating 130 RPM | 130 RPM |
| 11. Rotating 200 RPM | 200 RPM |
| 12. Slow Rotating with Burst |
2 rotations at 84 RPM,
2 pulses at 940 FPM, Repeat |
| 13. Flash Rotating with Burst |
3 rotations at 174 RPM,
4 pulses at 900 FPM, Repeat |
| 14. Quad Flash with Pop |
4 pulses at 650 FPM, 160ms Off,
1 pulse at 410 FPM, 410 ms Off, Repeat |
| 15. Variable Rotating | 83 to 420 RPM repeated every 6.6s |
| 16. Variable Flashing |
137 - 535 Single FPM repeated
every 4.1s |
FPM – Flashes Per Minute RPM – Rotations Per Minute
Maintenance
Lens and dome replacement
WARNING: Electrocution hazard. To prevent electrical shock, disconnect the beacon from the supply circuit and allow five minutes for stored energy to dissipate before disassembling.
Caution: Do not overtighten the screws or damage to the dome may occur.
To replace the lens or the dome:
- 1. Remove the four screws from the dome and lens assembly, and then remove the dome and lens as shown in Figure 1.
- 2. Make sure the O-ring is in place around the base of the unit, and then replace the lens and dome.
- 3. Reinstall the four screws and tighten each firmly until the gasket slightly compresses between the dome and the screw head.
Cleaning
Caution: To prevent damage to the lens or dome, do not use abrasive materials or cleaners.
Periodically clean the lens surface with a soft cloth and water or a mild detergent solution to maintain optimum light visibility. Ensure that the lens is completely dry before assembling the beacon.
Figure 1: Installation
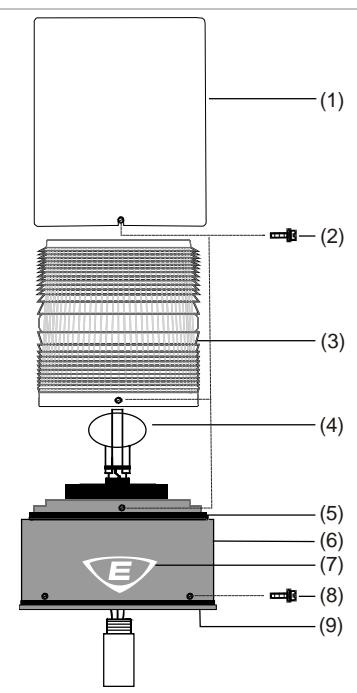
- (1) Dome
- (2) Dome screw (4X)
- (3) Lens
- (4) LED tower
- (5) O-ring
- (6) Beacon base
- (7) Push button
- (8) Base screw (3X) (9) Baseplate
Specifications
Table 2: Specifications
| Model number | Electrical specs | Dimensions | Color | |
|---|---|---|---|---|
| Gray base | Black base | |||
| 57PLEDMA24AD | 57PLEDMA24ADB |
12 VDC, 0.700 A
24 VAC/VDC 0.550 A |
8 × 6.5 in. (203 × 165 mm) | Amber |
| 57PLEDMB24AD | 57PLEDMB24ADB |
12 VDC, 0.700 A
24 VAC/VDC 0.550 A |
8 × 6.5 in. (203 × 165 mm) | Blue |
| 57PLEDMG24AD | 57PLEDMG24ADB |
12 VDC, 0.700 A
24 VAC/VDC 0.550 A |
8 × 6.5 in. (203 × 165 mm) | Green |
| 57PLEDMM24AD | 57PLEDMM24ADB |
12 VDC, 0.700 A
24 VAC/VDC 0.550 A |
8 × 6.5 in. (203 × 165 mm) | Magenta |
| 57PLEDMR24AD | 57PLEDMR24ADB |
12 VDC, 0.700 A
24 VAC/VDC 0.550 A |
8 × 6.5 in. (203 × 165 mm) | Red |
| 57PLEDMW24AD | 57PLEDMW24ADB |
12 VDC, 0.700 A
24 VAC/VDC 0.550 A |
8 × 6.5 in. (203 × 165 mm) | White |
| 57PLEDMA120A | 57PLEDMA120AB | 120 VAC, 0.250 A | 8 × 6.5 in. (203 × 165 mm) | Amber |
| 57PLEDMB120A | 57PLEDMB120AB | 120 VAC, 0.250 A | 8 × 6.5 in. (203 × 165 mm) | Blue |
| 57PLEDMG120A | 57PLEDMG120AB | 120 VAC, 0.250 A | 8 × 6.5 in. (203 × 165 mm) | Green |
| 57PLEDMM120A | 57PLEDMM120AB | 120 VAC, 0.250 A | 8 × 6.5 in. (203 × 165 mm) | Magenta |
| 57PLEDMR120A | 57PLEDMR120AB | 120 VAC, 0.250 A | 8 × 6.5 in. (203 × 165 mm) | Red |
| 57PLEDMW120A | 57PLEDMW120AB | 120 VAC, 0.250 A | 8 × 6.5 in. (203 × 165 mm) | White |
Figure 2: Dimensions

Table 3: Electrical specifications
| Specification | 57PLEDM(*)24AD | 57PLEDM(*)120A |
|---|---|---|
| Operating voltage |
12 VDC
24 VAC/VDC |
120 VAC |
| Off state leakage current | 5 mA | 5 mA |
| Continuous On current |
700 mA (12 VDC)
550 mA (24 VAC/VDC) |
250 mA |
| Surge (inrush/duration) | 8.5 A / 2 ms | 4.5 A / 1 ms |
* The letter in this position indicates the color of the lens. A = amber, B = blue, C = clear, G = green, M = magenta, or R = red.
Table 4: Replacement parts
| Component | Catalog number | |
|---|---|---|
| Clear outer dome | 57E-DC | |
| Lens | 57E-L(*) | |
* The letter in this position indicates the color of the lens. A = amber, B = blue, C = Clear, G = green, M = magenta, or R = red. For example, a part number for a red lens would be 57E-LR.
Note: 57PLEDMW uses a clear lens.
Regulatory information
|
North American standards
UL 1638A, cUL C22.2 No. 205 |
|---|
Contact information
For contact information, see www.edwardsfiresafety.com.