Edwards Signaling 200 Class 18mm Stackable Beacon Installation Instructions
Open the original PDF document
View PDF

200 CLASS 18mm LED STACKLIGHT™ COLONNE LUMINEUSE DE SIGNALISATION À DIODES DE 18mm CLASSE 200 LUZ DE TORRE LED CLASE 200 DE 18mm

INSTALLATION AND INSTRUCTION SHEET NOTICE D'INSTALLATION HOJA DE INSTALACIÓN
- The Edwards 200 Class 18mm LED Stacklight is a modular stacklight that can be combined for visual signalling in commercial and industrial environments, suitable for indoor use.
- The LIGHT modules are available in 6 different colors (red amber blue green yellow clear).
- The LED integrated internal circuit allows a long life span and reduced energy consumption.
- La colonne lumineuse de signalisation à diodes de 18mm, Edwards classe 200, est une colonne composée de modules superposables, pour la signalisation visuelle dans les établissements industriels et commerciaux, indiquée pour emploi interne.
- Les modules LUMINEUX sont offerts dans un choix de 6 couleurs (rouge ambre bleu vert jaune et transparent).
- Le circuit interne à diodes lumineuses intégrées garantit une longue durée de service et une consommation électrique réduite.
- La luz de torre LED Edwards clase 200 de 18mm es una torre de señalización visual modular y combinable para ambientes industriales y comerciales, adecuada para utilización interna.
- Los módulos LUMINOSOS están disponibles en 6 colores (rojo ámbar azul verde amarillo transparente).
- El circuito LED interno integrado garantiza una larga vida útil y reduce el consumo de energia.
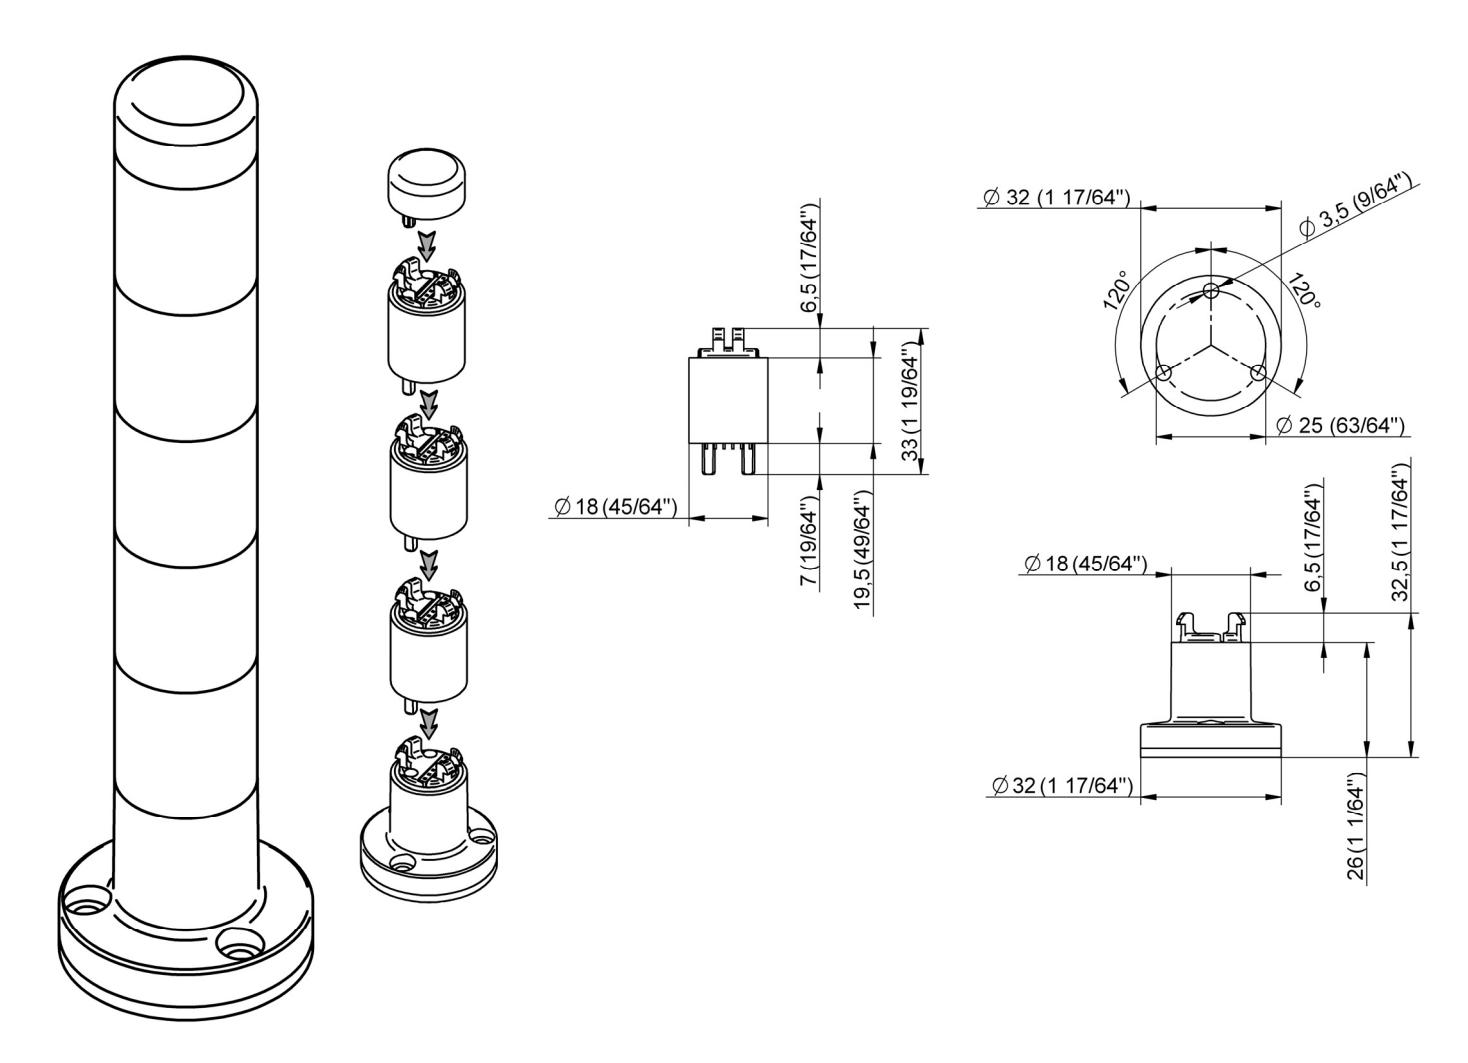
Determine the color sequence before assembling the tower and proceed as indicated here below:
- Remove the clear plastic protection lid from the bottom of the module as shown in Picture 1 and 2
- Before assembling the first module, position the base of the stacklight on a flat and firm surface
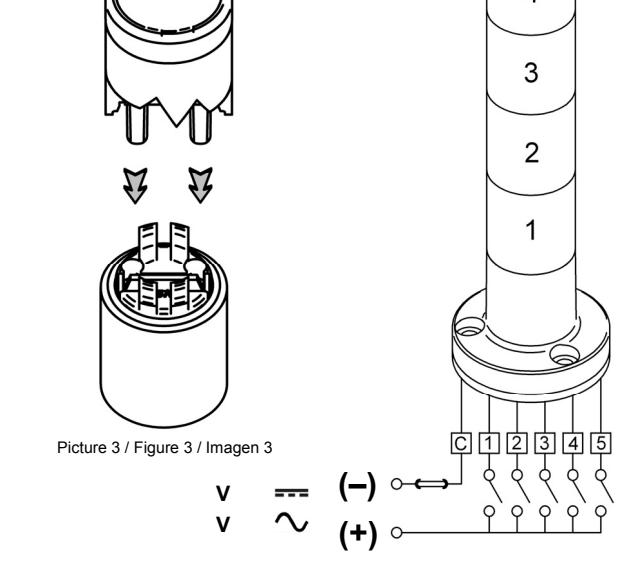
- Insert the two fixing pins of the module into the matching holes and push down until the modules lock together as shown in Picture 3. Make sure pressure is applied vertically only to avoid tilting of the module when inserting
- Remove the clear plastic lid from the top of the module and repeat the sequence for all the needed modules
It is possible to stack 5 light modules on each base.
Do not disassemble the modules once it has been assembled as it will void the warranty.
Déterminer la séquence des couleurs avant d'assembler la colonne et procéder selon les indications suivantes:
- Enlever la protection transparente de la base du module comme montré dans le dessin (figure 1,2)
- Avant d'assembler le premier module, poser la base de la colonne sur une surface plane
- Insérer les deux pieds de fixation du module dans les deux fentes correspondantes et pousser jusqu'au blocage du module, comme montré en figure 3. Faire bien attention à pousser verticalement afin d'éviter de tordre les pieds lors de l'insertion
- Enlever la protection transparente du haut du module et répéter l'opération pour le module suivant
Il est possible d'emboiter 5 modules lumineux sur chaque base.
Ne pas démonter les modules une fois assemblés sous peine d'annulation de la garantie.
Determine la secuencia de los colores antes de montar la columna y continúe como indicado abajo:
- Quite la tapa de protección de plástico claro proporcionada del inferior del módulo como indicado en el dibujo (Imagen 1,2)
- Antes de montar el primer modulo, coloque la base de la columna sobre una superficie plana y firme
- Introduzca las dos clavijas del módulo en los agujeros correspondientes y empuje hacia abajo hasta que los módulos encajan como enseñado en la Imagen 3. Asegúrese que la presión es aplicada sólo verticalmente evitando inclinar el módulo luminoso durante la inserción
- Quite la tapa clara de plástico de la cima del módulo y repita la secuencia para todos los módulos necesarios
Es posible apilar 5 módulos luminosos sobre cada base.
No desmonte los módulos después de que la columna se haya montado. En este caso la garantía ya no será válida.
Remove the clear plastic lid from the bottom of the module Enlever la protection transparente de la base du module Quite la tapa de protección de plástico claro proporcionada del inferior del módulo
Picture 2 / Figure 2 / Imagen 2
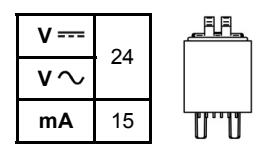
WARNING: Use a 100mA time-lag fuse on the power supply line. MISE EN GARDE: Utiliser un fusible retardé de 100mA sur la ligne d'alimentation ADVERTENCIA: Utilice un fusible lento de 100mA en la línea de alimentación
UL LISTED TO U.S. AND CANADIAN SAFETY STANDARDS
| MODEL |
ELECTRICAL
RATING |
MAXIMUM AMBIENT
TEMPERATURE ALLOWED |
|---|---|---|
|
200 CLASS 18mm
LED STACKLIGHT |
24V AC/DC | 50°C / 122°F |
TEMPERATURE RATINGS
Picture 1 / Figure 1 / Imagen 1
The stacklight must be installed by qualified personnel L'installation doit être effectuée par du personnel qualifié Personal calificado debe realizar la instalación
REGULATORY INFORMATION - REINSEGNEMENTS RÉGLEMENTAIRES - INFORMACIÓN ADMINISTRATIVA :
Edwards Signaling: Edwards, A division of UTC Fire & Security Americas Corporation, Inc. 8985 Town Center Parkway, Bradenton, FL 34202, USA
CONTACT INFORMACION - COORDONNÉES - INFORMACIÓN DE CONTACTO : www.edwardssignaling.com