Edwards Signaling 156G Series Installation Instructions
Open the original PDF document
View PDF

Installation Instructions for the Catalog Number 156 Monitor Bell
DESCRIPTION
The Edwards Catalog 156 Monitor Bells are insulated, grounded, vibrating bells featuring a concealed plunger and a corrosion resistant gray finish. The grounding strap may be removed if not required. For outdoor applications the weatherproof gasket (provided) should be installed.
SPECIFICATIONS
| US MODELS | ||||
|---|---|---|---|---|
| Cat. No.* | Amps. | Volts | dB Rating | |
| 156G-3AM | .8A | 6-8VDC 8-10VAC | 72dBA | |
| 156G-3AX | .2A | 12-18VDC | 72dBA | |
| 156G-3E1 | .3A | 12VDC | 72dBA | |
| 156G-3G1 | .15A | 24VDC | 72dBA | |
| 156G-3G5 | .3A | 24VAC | 72dBA | |
| 156G-3J1 | .11A | 32VDC | 72dBA | |
| 156G-4AM | .8A | 6-8VDC 8-10VAC | 76dBA | |
| 156G-4E1 | .3A | 12VDC | 76dBA | |
| 156G-4G1 | .15A | 24VDC | 76dBA | |
| 156G-4G5 | .3A | 24VAC | 76dBA | |
| 156G-6AM | .8A | 6-8VDC 8-10VAC | 80dBA | |
| 156G-6AW | .15A | 20-24VDC | 80dBA | |
| 156G-6E1 | .3A | 12VDC | 80dBA | |
| 156G-6G1 | .15A | 24VDC | 80dBA | |
| 156G-6G5 | .3A | 24VAC | 80dBA | |
| CANADIAN MODELS | ||||
|---|---|---|---|---|
| Cat. No.** | Amps. | Volts | dB Rating | |
| 156-AM | .8A | 6-8VDC 8-10VAC | 72dBA | |
| 156-G1 | .15A | 24VDC | 72dBA | |
| 156-G5 | .3A | 24VAC | 72dBA | |
- Bell gong size is denoted by suffix number. For example, the 156G-6G1 has a six inch gong.
- ** Canadian models provided with three inch gongs.
INSTALLATION
CAUTION
Do not apply power to the bell until installation has been completed.
-
1. If grounding is not required, remove the grounding strap from the back of the bell as follows (See Figure 1):
- a. Remove the #6-32 x 1/4" pan head screw securing the ground strap.
- b. Remove the adjacent terminal screw and remove the grounding strap.
- c. Replace the terminal screw removed in step 1b.
- d. Replace the pan head screw removed in Step 1a with (1) #6-32 x 3/8" nylon hex head screw (supplied).
- 2. For use in outdoor applications, install the weatherproof gasket on the back of the bell.
- 3. Connect the bell to an appropriate AC or DC power source using the terminal screws on the back of the bell.
- 4. Mount the bell to a flat surface using hardware appropriate for the application.
- 5. Apply power and test the bell to ensure that it operates properly.
MAINTENANCE
CAUTION
Always disconnect all power before servicing or cleaning bell.
1. Examine the bell periodically for accumulation of dirt and clean as necessary.
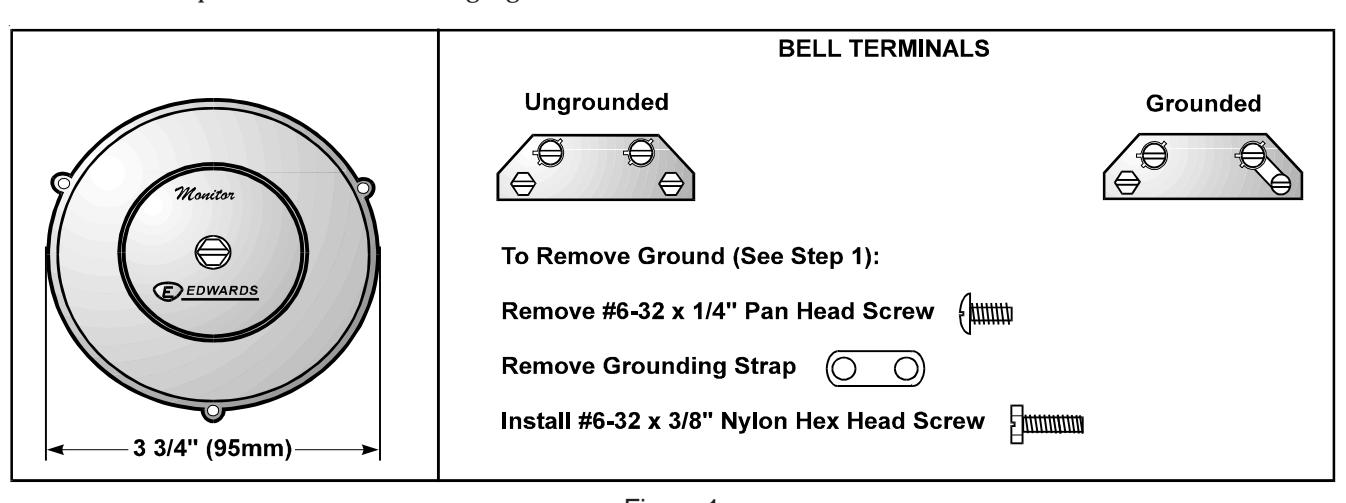
Figure 1.