E77-Installation Instructions
Open the original PDF document
View PDF

801 Avenida Acaso, Camarillo, Ca. 93041 • (805) 494-0622 • Fax: (805) 494-8861 www.sdcsecurity.com • E-mail: service@sdcsecurity.com
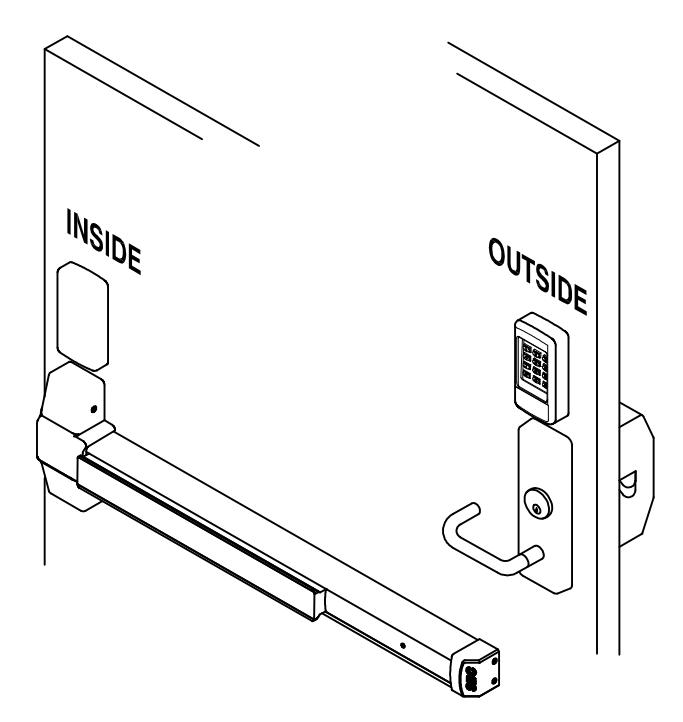
INSTALLATION INSTRUCTIONS E77 SERIES STANDALONE ELECTRONIC LOCKSET
- Keypad Programmable
- 3,000 Users, 32 Temporary Users
- 4 to 6 digit PIN Codes
- 3 Passage Mode Option
- 32 Access Groups, Schedules
- 32 Holidays
- 4 Authority Levels
- Keypad Tamper Lockout
- Mechanical Key Override
- Battery Powered (4AA)
- Blue Backlit Cast Metal Keys
- Weather & Vandal Resistant
- Retrofit existing Lock Door Prep
- Electrified SDC Mortise Lockcase
- Heavy Duty ANSI Grade 1
- Vandal resistant Lever Handles
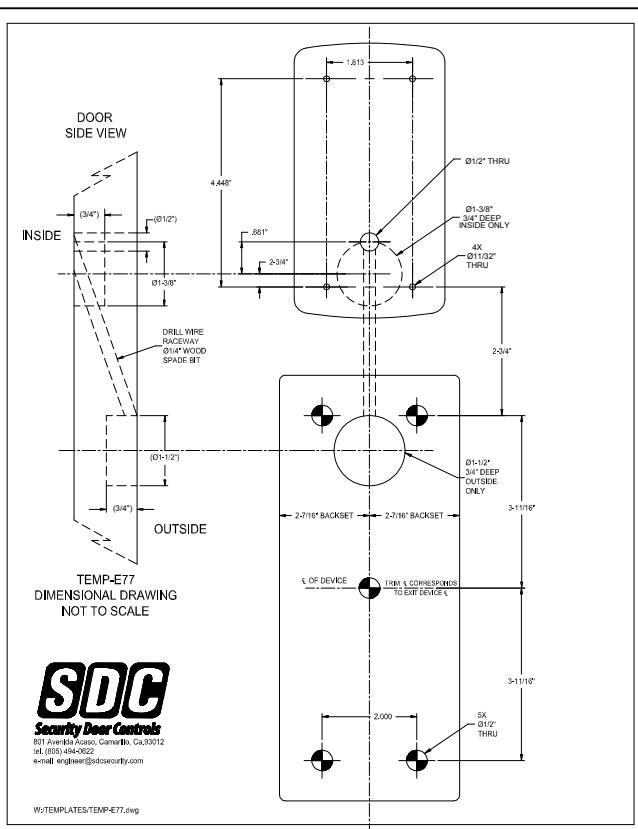
Mark and drill hole locations per TEMP-E77 1
NOTE; Wood doors, use a 1/4" spade bit, to drill the wire raceway where shown.
Specifications
Power 4AA Batteries (Alkaline only) or
External 12VDC Power @ 30mA
Inputs 1 Request-To-Exit
1 Door Position Switch
Output SPDT Contacts 1A @ 30VDC Relay Temperature -20 F to +130 F (-30 C to +54 C)
Humidity 5% to 95% non-condensing
Latch Bolt 3/4" Backset 2-3/4"
Strike 4-7/8" ANSI A115.2 Door 1-3/4" to 2-1/8"
Thickness
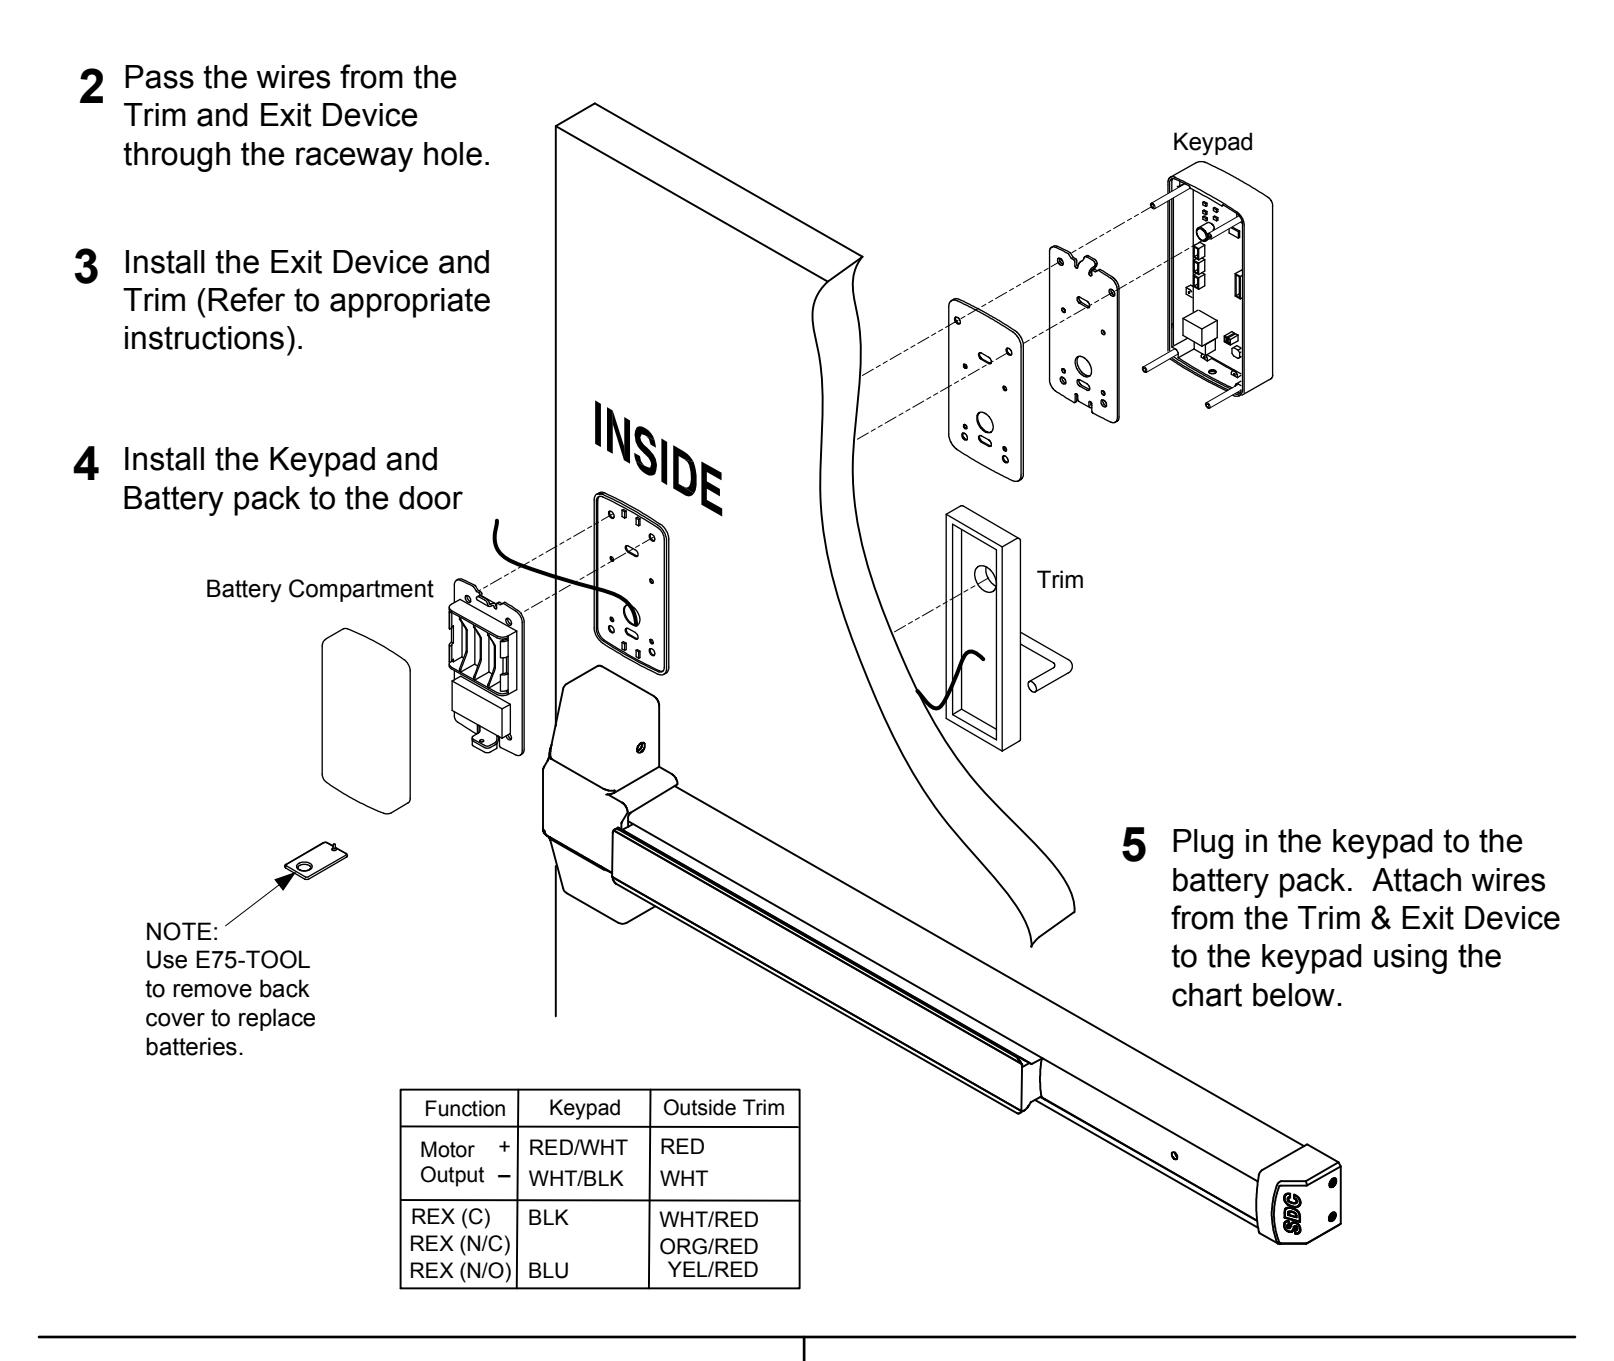
Additional Wire Connections
12VDC Ext Power In = RED(+) / BLK(-)
Request-To-Exit = BLU(N/O) / BLK(COM)
Door Position Switch = GRY(N/O) / BLK(COM)
Auxiliary Relay = ORG (N/C)
WHT(COM) YEL(N/O)
System Reset = BRN / BRN
Quick Start Programming Instructions E77 EntryCheck TM
Lock Initiation
When the lock is first installed or when after a hard reset has been performed, the E77K must be initialized and a lock ID must be entered before you will be allowed to enter the program mode.
To test lock operation before initialization, enter *741 . This temporary code will unlock the E77K for testing purposes. Once a lock initialization has been performed, this code is no longer active until a hardware reset is performed which will erase all the users and return the E77K back into the uninitialized factory default condition.
To Initialize Lock:
- 1) Apply Power (Plug in the battery pack)
- 2) Press #9* 123456# 0001#
- 3) Press **#
The above example enters a Lock ID of 0001. If Multiple locks are used with the Management Software, Each lock must have it's own Unique Lock ID (0002, 0003 etc)
User Programming
Enter Programming Mode: #9# User No# User PIN #
1) Press #9# 01# 123456#
User 01 is the administrator and has full programming rights. 20 seconds of inactivity will automatically return you from programming mode you to operational mode.
Add a User: 01# User No.# PIN Code # Pin Code # Group No.#
Example: Press 01# 04# 5555# 5555# 06#
You have just added User #04 with a PIN of 5555# to unlock the door.
User 4 has also be assigned to group 06 (24/7 access).
User must be assigned a 4 to 6 digit PIN code.
Add a Card: 06# User No.# Present Card #
Example: Press 06# 04# Present Card #
You have just added a card as User #4.
User 4 has also be assigned to group 06 (24/7 access).
Prox Units Only
3 Card and Pin
Set Entry Mode : 05# Mode #
Example 1: Press 05# 1# Mode = 1 PIN or Card (default)
Unlock the door either by entering a (PIN + #) or presenting card. 2 Card Only
Example 2: Press 05# 2#
Unlock the door by presenting a valid card.
Example 3: Press 05# 3#
Unlock the door by presenting card plus the associated user (PIN +#).
Change a User PIN Code: 03# User No.# New PIN Code # New Pin Code #
Example: Press 03# 05# 1220# 1220#
You have just Changed User #05's Pin code to 1220
The Administrator's PIN code must be 6 digits in length. All other PIN codes may be 4-6 digits in length
Delete a User: 02# User No.#
Example: Press 02# 04#
You have just Deleted User #04
Exit Programming Mode: **#
Press **#
Additional E77 Programming
Change a User Group: 04# User No.# New user Group
Example: Press 04# 05# 02# You have just Changed User #05's group to Group 02.
Enable a User: 26# User No.# Example: Press 26# 04# You have just re-enabled User #04 .
Disable a User: 27# User No.# Example: Press 27# 04#
You have just disabled User #04 . It re-enable this user, use Function 26
Set Unlock Timer: 21# Seconds#
Example: Press 21# 03 # Unlock timer is set for 03 seconds. (default) Seconds = 03-20
Beep on Key Press : 62# Status #
Example 1: Press 62# 1# The E76K will beep each time you press a key. Status = 0 Disabled 1 Enabled (default)
Set the Date: 30# MMDDYY#
Example: Press 30# 011513 # The date is set for January 15 th 2013 MM = 2 digit Month DD = 2 digit Day YY = 2 digit Year
Set the Time: 31# HH MM# Example: Press 31# 1320 # HH = Hours (24hr format) MM = Minutes (24hr format)
The time is now set to 1:20 PM.
Example 1: Press 99# 000000 #
Clear all Programming : 99# 000000 #
All user codes and programming is erased and settings are set to factory defaults. Lock initialization and Lock ID are not cleared.
Resetting the E77 to Factory Settings
Warning!! This procedure will preform a hardware reset and will erase all the users and custom settings returning the E77K back into the uninitialized factory default condition.
- 1) Remove power (Unplug the battery pack)
- 2) Short and hold the 2 Brn reset wires together
- 3) Apply power. (Plug in the battery pack)
The LED will Flash Red/Grn light during the initialization process. When initialization is complete, you will hear 3 beeps.
- 4) Remove power (Unplug the battery pack)
- 5) Disconnect and insulate the Brn Reset wires.
To test lock operation after a Hardware Reset and before initialization, enter *741 . This temporary code will unlock the E77K for testing purposes. Once a lock initialization has been performed (see page 1), this code is no longer active until a hardware reset is performed again.
User Chart
| Master Code: | |
|---|---|
| PIN Length | Digits |
| Name | User No. | PIN Code | Group |
|---|---|---|---|
Group Codes:
Group 01 Administrator: Full Programming Rights ( User 01 )
Group 02 Managers: May perform programming functions 1-39 (except Function29)
Groups 03-05 Supervisors: May perform programming functions 01,02 & 04.
Groups 06-32 User:
No programming rights. Access granted upon proper PIN and group access.
Notes:
Groups must have an assigned schedule before they will become active (except groups 01 & 06).
Group 06 always has 24/7 access.