DynaLock 7000 Series Installation Instructions
Open the original PDF document
View PDF

705 Emmett Street Bristol, CT 06011-2728 Phone:(860)582-4761 Fax:(860)585-0338
SERIES 7000 KEYSWITCHES INSTALLATION INSTRUCTIONS
ASSEMBLY PROCEDURE
To begin the installation select any standard 1-1/8" or 1-1/4" mortise cylinder. The keyswitch is designed to work with any cam. The "bat" type cam (see reverse side) is recommended.
FIGURE A
- Insert the Mortise Cylinder through the front of the Faceplate. Be sure to orient the cylinder keyway correctly. 1.
- Slide the Cylinder Spacer onto the end of the Mortise Cylinder, up to the back of the Faceplate. 2.
- Slide the Switch Mounting Bracket onto the end of the cylinder. The triangular tabs on the bracket must align with the corresponding notches in the barrel of the cylinder. With the bracket installed its upper tab will rest against the back of the Faceplate and center itself over the upper Faceplate mounting screw hole. 3.
- With all parts in proper alignment apply the supplied thread lock and install the Cylinder Locknut onto the end of the Mortise Cylinder. Firmly tighten with pliers. 4.
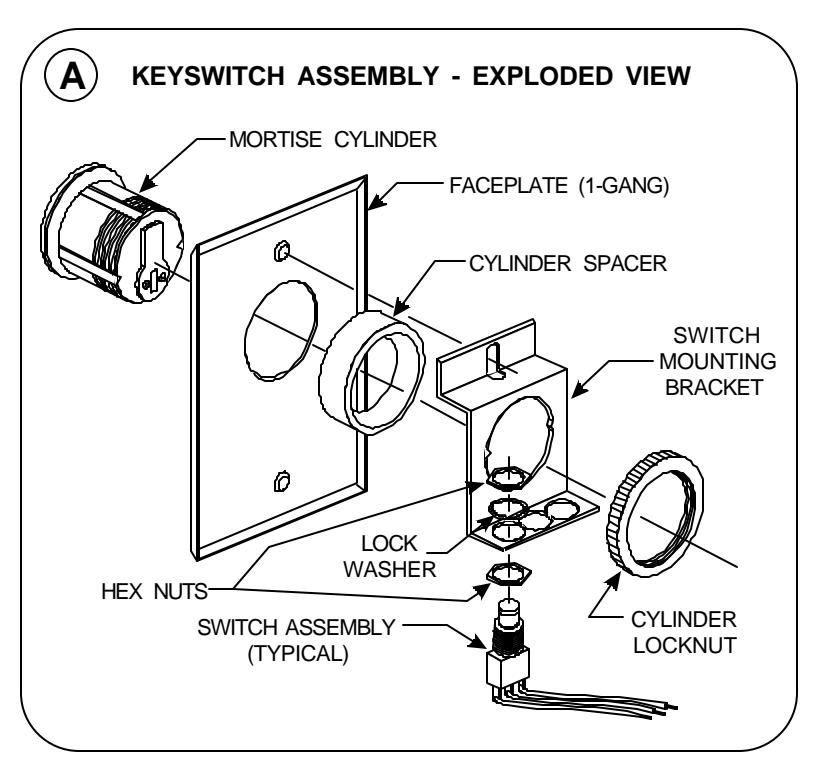
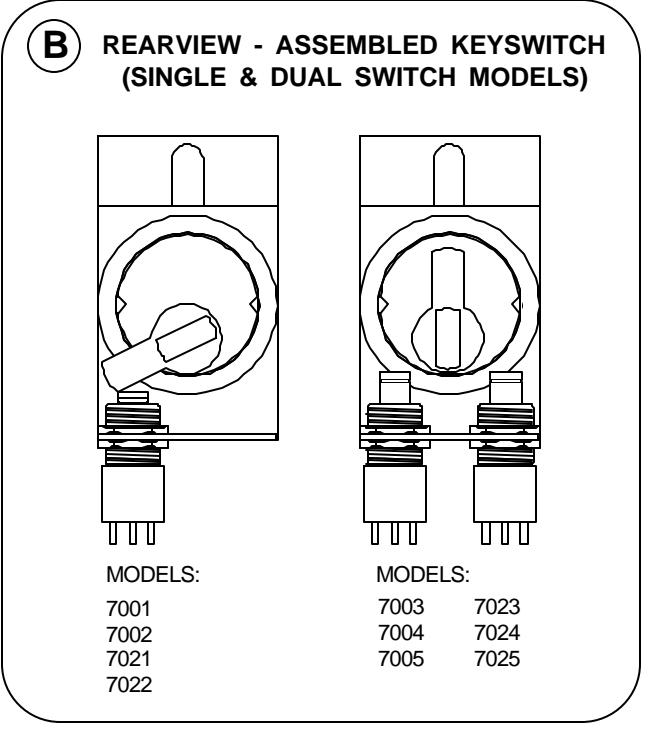
FIGURE B
- Mount the switch(es) supplied for your specific model to the Switch Mounting Bracket using the hardware furnished. For models utilizing only one switch mount the switch in left side position (as viewed from the rear of the Keyswitch). Do not use the center mounting hole. 5.
- Final switch adjustment will vary depending upon cylinder and cam type selected. Experiment with switch location until cam makes reliable contact with the switch and fully depresses the plunger when activated. Note: Mount the switch as high as reasonable within the bracket for maximum clearance between switch and box botttom. 6.
7000 SERIES KEYSWITCH INSTALLATION INSTRUCTIONS
MORTISE CYLINDER CAMS
For proper keyswitch operation DynaLock recommends using one of the three commonly available "bat" style mortise cylinder cams shown.
Note: Images are approximately actual size.

SWITCH INFORMATION
Note: All switch contacts are rated 6 Amps @ 125VAC
|
SWITCH
DESCRIPTION |
WIRING DETAILS | |
|---|---|---|
| SPDT | DPDT | |
|
MOMENTARY CONTACT:
Rotating the key to its stop changes the state of the contact while the key is held in that position. Rotating the key back to vertical returns the switch contact to its original state. Key is removeable in the vertical position. |
||
|
MAINTAINED CONTACT:
Rotating the key from vertical to its stop and back to vertical changes the state of the switch contact. To return the contact to its original state this procedure must be repeated. Key is removeable in the vertical position. |
||
BI-COLOR LED OPTION WIRING
The Bi-Color LED can display status in two colors - red or green and is pre-configured to operate on 24VDC. For 12VDC operation remove the outer resistor from the black wire. The LED may be wired to operate as follows:
Applying (+) VDC to RED wire and (-) to BLACK wire illuminates LED - RED Applying (+) VDC to GREEN wire and (-) to BLACK wire illuminates LED - GREEN
