DynaLock 3101BTJ Installation Manual
Open the original PDF document
View PDF

MODEL3101B-TJ101 ELECTROMAGNETIC LOCK MOUNTING INSTRUCTIONS
705 Emmett Street Bristol, CT 06010 1-877-DynaLock www.dynalock.com
MODEL 3101B-TJ101 ELECTROMAGNETIC LOCK MOUNTING INSTRUCTIONS
PLEASE DELIVER THIS MANUAL TO THE END-USER UPON COMPLETION OF THE INSTALLATION
FOR PRODUCT SUPPORT AND PARTS ORDERING INFORMATION CONTACT:
DynaLock Corp. 705 Emmett Street Bristol, CT 06010 Bus: (877) 396-2562 Toll-Free
(860) 582-4761 Fax: (860) 585-0338
DYNALOCK ON THE INTERNET:
E-mail: info@dynalock.com Website: www.dynalock.com

GWXT Auxiliary Lock
FWAX Special Locking Arrangements CSFM California State Fire Marshal
INSTALLATION DESCRIPTION
The Series 3101B-TJ101 is a 1500 pound holding force delay egress top jamb-mounted electromagnetic lock designed to secure a single-inswinging door. The lock requires both installation procedures as described herein and in the separate wiring instructions included.
Note: This device is not intended for use on emergency exit doors.
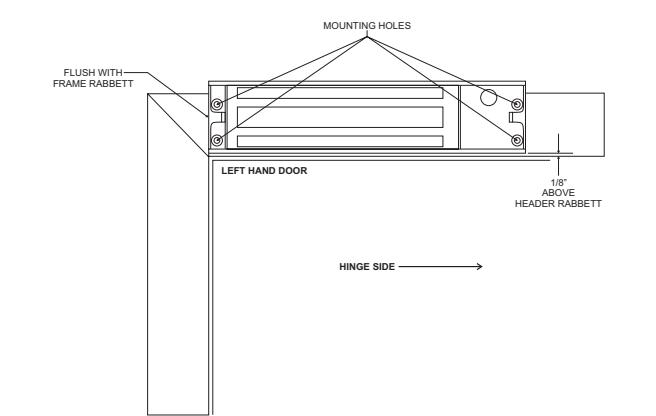
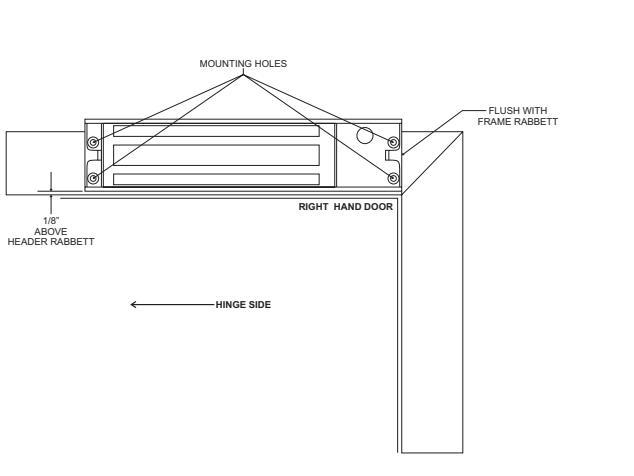
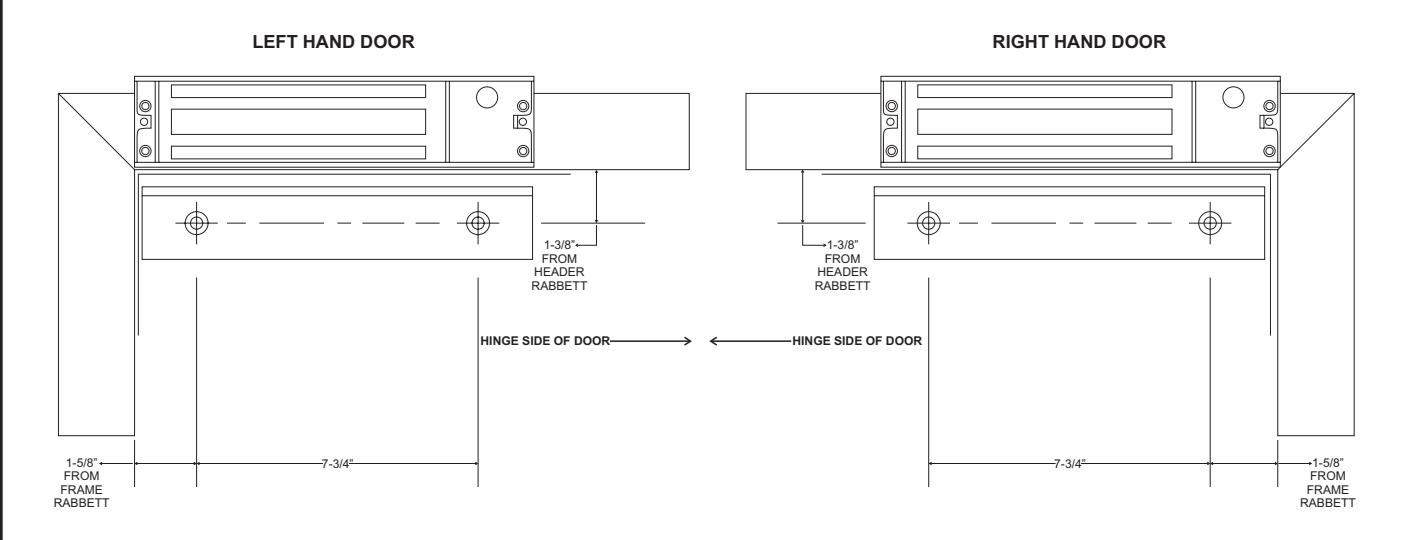
Typical installations of the lock on single-inswing doors:
LEFT HAND DOOR RIGHT HAND DOOR

HANDLING
Care must be taken that the lock face and armature face are kept free of dirt, rust, paint, or any other obstruction which may interfere with the lock and armature making good contact. These faces may be cleaned with a nonabrasive pad and wiped with an oil dampened cloth.
MECHANICAL INSTALLATION
Familiarize yourself with the door and frame conditions. The lock must mount rigidly to the face of the door frame header. The door mounted armature is supplied with an adjustable mounting bracket and hardware that allows it to pivot slightly to compensate for reasonable misalignment.
NOTE: If this lock is supplied with the DSM option be certain that disc magnets are present inside the armature housing.
ELECTRICAL INSTALLATION
After mechanical installation is complete the lock needs to be wired to a 12 or 24 VDC/VAC power source. Once low voltage power is supplied the unit is fully operational. All other wiring is for selected options. Refer to the separate wiring instructions included for further information.
3101B-TJ101 INSTALLATION MANUAL Page 8 02/11 3101B-TJ101 INSTALLATION MANUAL Page 1 02/11

MODEL 3101B-TJ101 ELECTROMAGNETIC LOCK MOUNTING INSTRUCTIONS
com WOONTING INSTRU
- Individual door and frame conditions may vary. Dimensions shown at right are for a typical hollow metal door and frame.
- The lock assembly should be mounted closest to the strike jamb of the frame for maximum performance. Verify that there is proper clearance for the lock assembly at the planned mounting location.
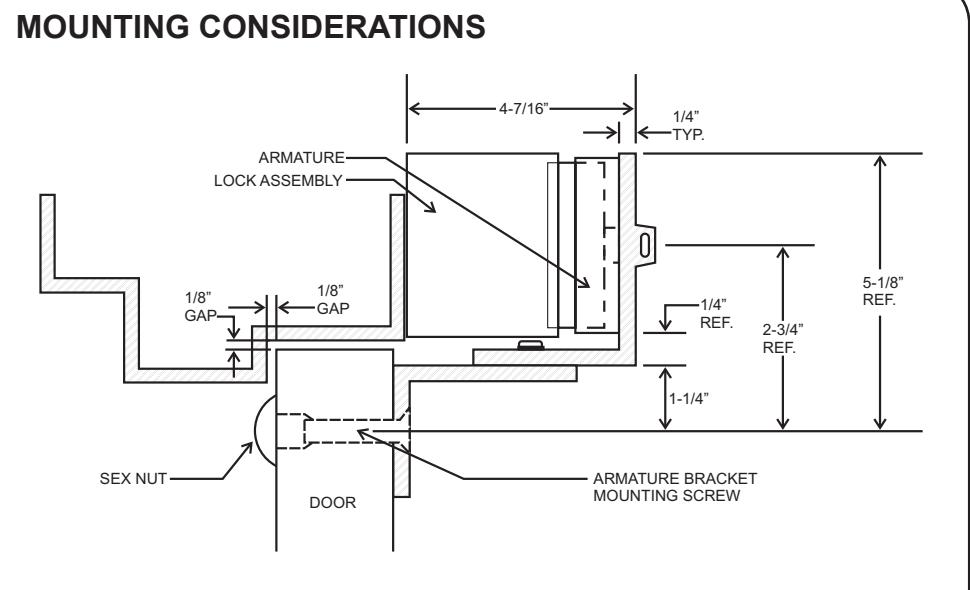
INSTALL THE LOCK ASSEMBLY
- Drill out the four dimpled mounting hole locations inside the back of the lock housing using a 5/32" drill. Position the lock assembly on the face of the frame header, on the pull side of the door, as shown. Locate and mark the centers of the four mounting holes.
- 2. Drill the marked holes in the face of the frame header: Four (4) 5/32" dia. mounting holes.
- 3. Attach the lock assembly to the frame header using four (4) #14-1½ pan head wood screws or 10/32 x 1¾ philips pan head machine screws. Firmly tighten the screws using a #2 phillips screwdriver.
3101B-TJ101 INSTALLATION MANUAL

MODEL 3101B-TJ101 ELECTROMAGNETIC LOCK MOUNTING INSTRUCTIONS

MODEL 3101B-TJ101 ELECTROMAGNETIC LOCK MOUNTING INSTRUCTIONS
705 Emmett Street Bristol, CT 06010 1-877-DynaLock www.dynalock.com
MODEL 3101B-TJ101 ELECTROMAGNETIC LOCK MOUNTING INSTRUCTIONS
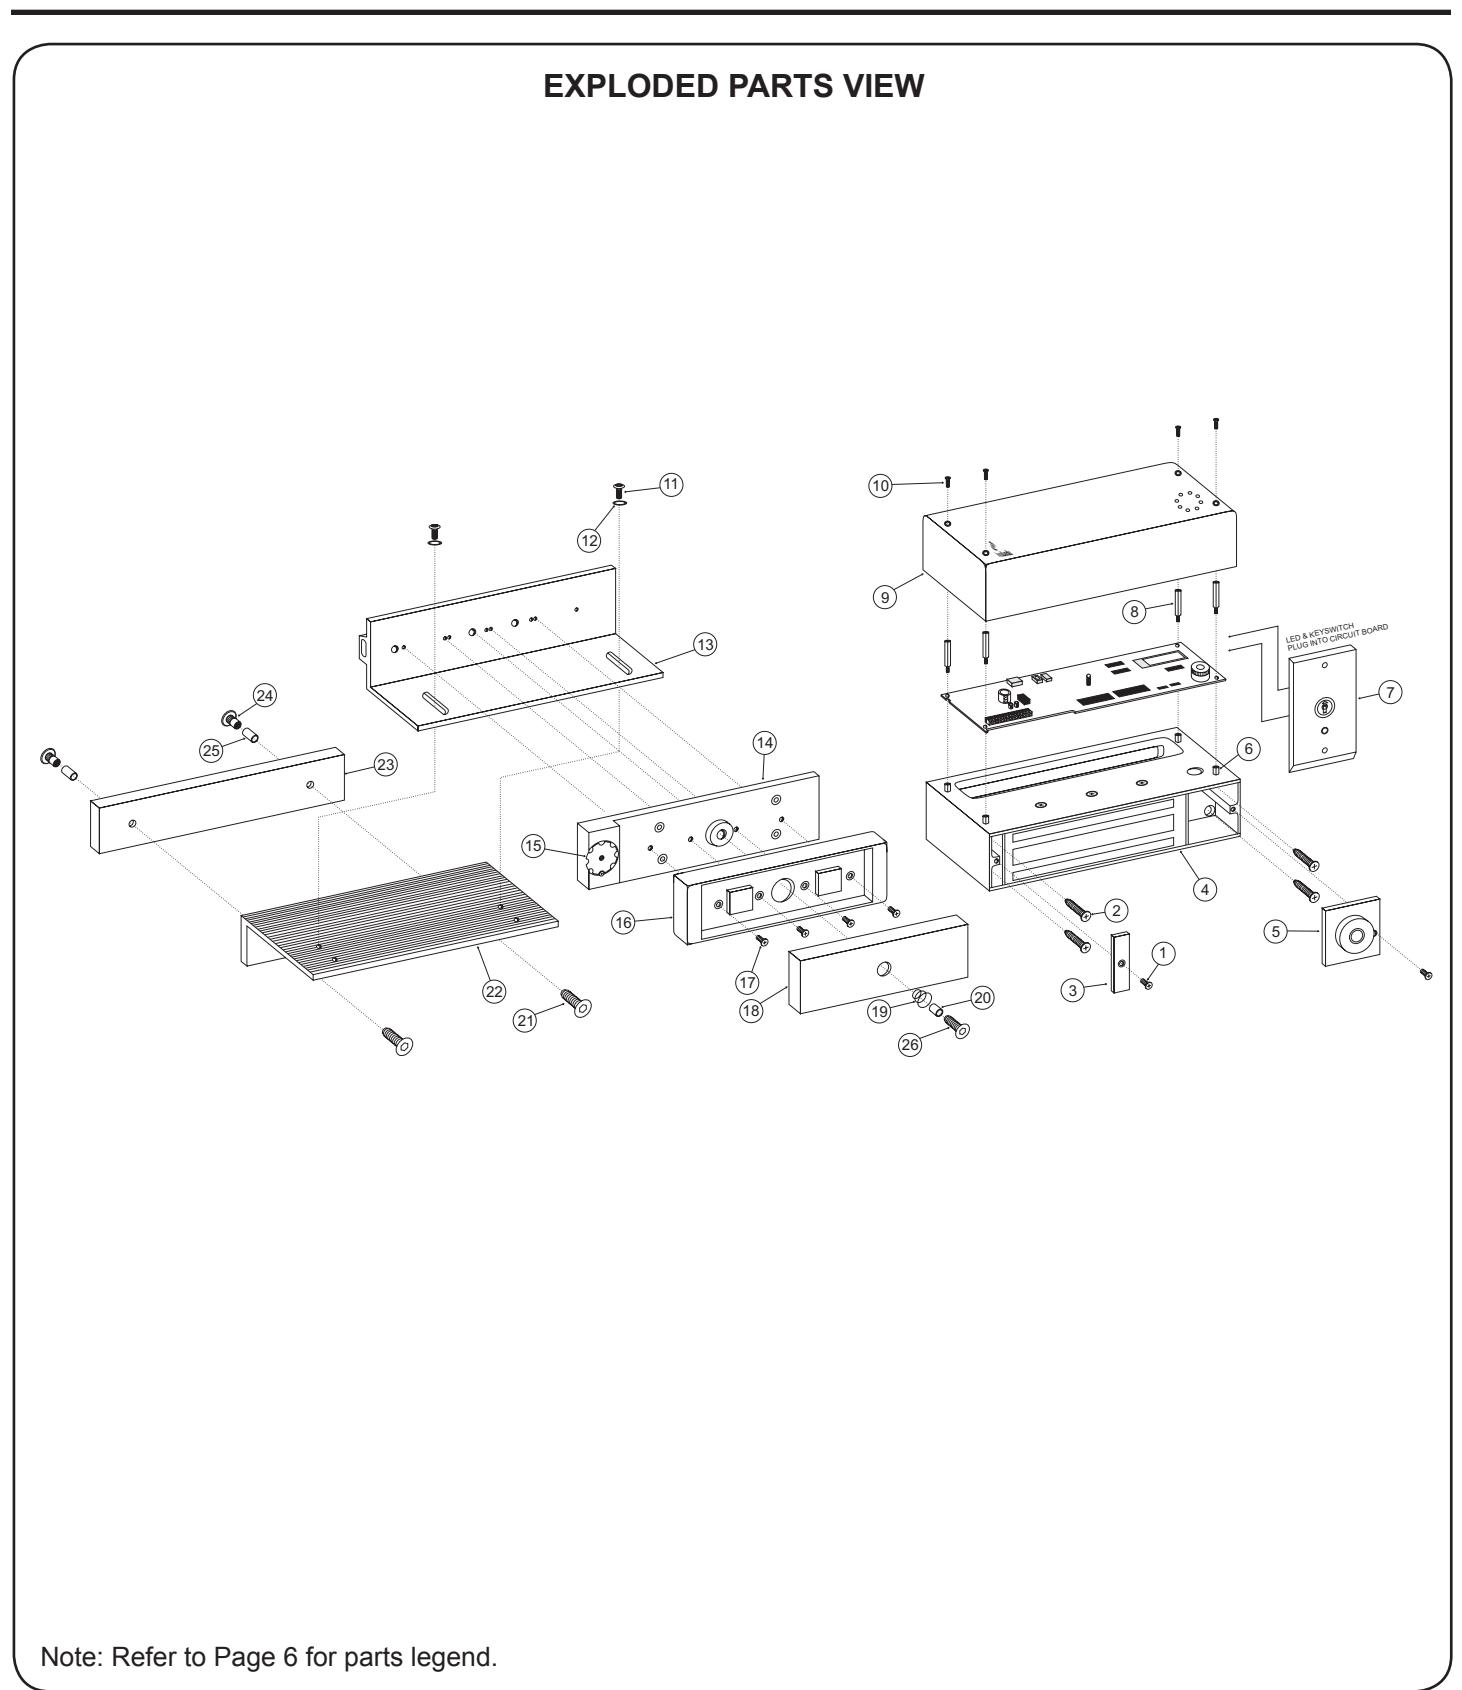
EXPLODED PARTS VIEW LEGEND
|
**1
8-32 x ¼" PHILIPS FLAT HEAD 300541 **2 *14 1½" PAN HEAD SCREWS 301218 3 END COVER 300010 4 LOCK HOUSING N/A 5 301037 ACCESS COVER / EGRESS SENSOR 6 6-32 x 5/16" STANDOFFS 301231 7 7050xLEDxUS32D N/A 8 6-32 x 7/8" STANDOFFS 301232 9 ELECTRONICS COVER 300353 6-32 x ½" SECURITY SCREW 10 700058 **11 ¼-20 x ½" HEX BOLT 300738 ¼" TOOTH LOCK WASHER 300742 **12 13 UPPER ARMATURE BRACKET 301254 14 301038 ARMATURE MOUNTING PLATE ASSEMBLY 15 WHEEL KIT ASSEMBLY 301393 16 ARMATURE HOUSING 301334 **17 8-32 x ½" PHILIPS FLAT HEAD 301005 18 ARMATURE 300373 **19 ARMATURE SPRING 300753 ARMATURE SPACER 300002 **20 **21 5/16-18x2" FHS 300018 22 BOTTOM ARMATURE BRACKET 301260 23 3101B-TJ SPACER SHIM 301411 **24 SEX NUT 300004 **25 SPACER TUBE 300001 300374 **26 5/16"-18x1" FHS TURNED |
|||
|---|---|---|---|
| ITEM | DESCRIPTION |
PART
# |
|
*#10/32x1" TYPE F PHILIPS PAN HEAD (FOR METAL APPLICATION) ** PART OF HARDWARE PACK 301417
Refer to Page 7 for parts locations.
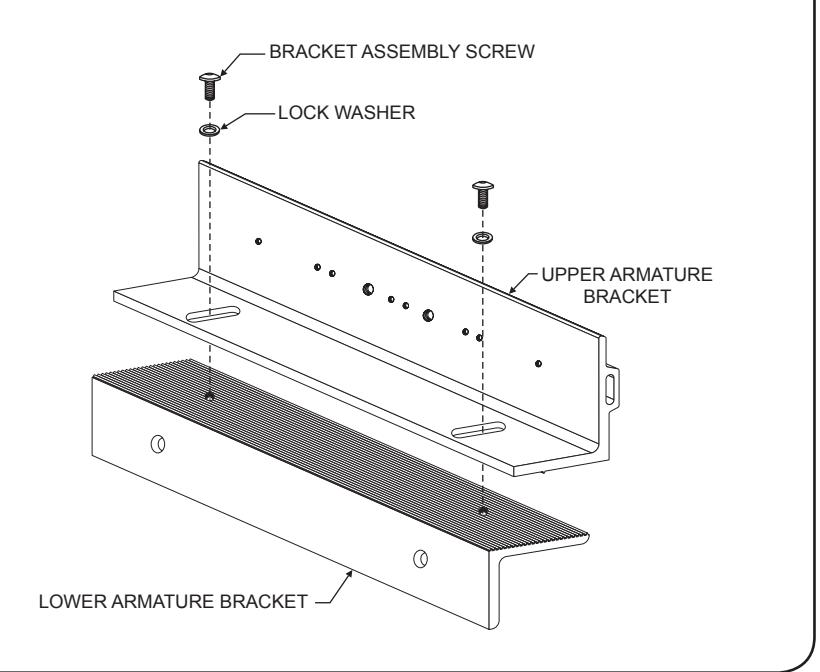
ASSEMBLE THE ARMATURE MOUNTING BRACKET
Locate the two armature mounting bracket assembly screws and lock washers from the hardware kit and assemble the bracket as shown.
Firmly tighten the mounting screws with a 5/32" hex wrench. They may be loosened later for adjustment, as necessary.
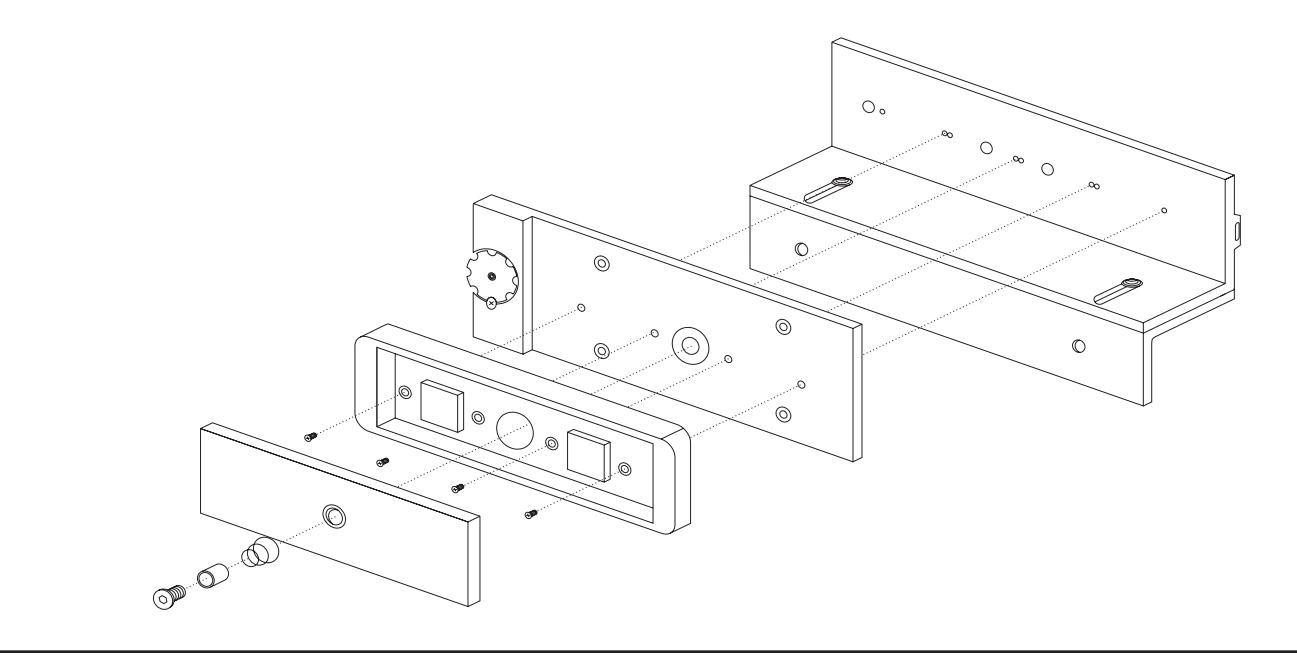
ATTACH THE ARMATURE TO THE ARMATURE MOUNTING BRACKET
Attach the Armature Housing to the top Armature Mounting Bracket as shown below. (See Exploded Parts View on page 7).
Failure to properly secure the armature to the bracket could result in serious injury or possible security breach.

MODEL 3101B-TJ101 ELECTROMAGNETIC LOCK MOUNTING INSTRUCTIONS
INSTALL THE ARMATURE MOUNTING BRACKET
Use the figures below to identify and mark the locations of the armature mounting bracket screw holes on the door. 1.
Refer to door and frame prep drawing #301416 for further information.
From the illustrations below select the one that resembles your door type and follow the instructions for drilling the two (2) armature mounting bracket screw holes. 2.
Drill an 11/32" diameter hole through door. From sex nut side only enlarge the 11/32" hole to 21/32" diameter. Drill an 11/32" diameter hole through door. From sex nut side only drill 1/2" diameter hole to 1" depth. Drill an 11/64" diameter hole and tap for 5/16"-18 thread. GLASS & ALUMINUM OR HOLLOW METAL DOOR SOLID CORE DOOR REINFORCED DOOR ^^^^^^^^^^^^^^^^^^^^^^^^^^^^ DOOR SPACER LOWER ARMATURE MOUNTING BRACKET ARMATURE BRACKET MOUNTING SCREW SEX NUT 21/32" SHIM PLATE ^^^^^^^^^^^^^^^^^^^^^^^^^^^^ LOWER ARMATURE MOUNTING BRACKET ARMATURE BRACKET MOUNTING SCREW ½" 1" SHIM PLATE ^^^^^^^^^^^^^^^^^^^^^^^^^^^^ 1/4" MIN LOWER ARMATURE MOUNTING BRACKET ARMATURE BRACKET MOUNTING SCREW SHIM PLATE 5/16"-18 THREAD
Mount the armature and mounting bracket assembly to the door using the appropriate hardware for you door type. Firmly tighten the mounting screws with a 3/16" hex wrench. 3.

MODEL 3101B-TJ101 ELECTROMAGNETIC LOCK MOUNTING INSTRUCTIONS
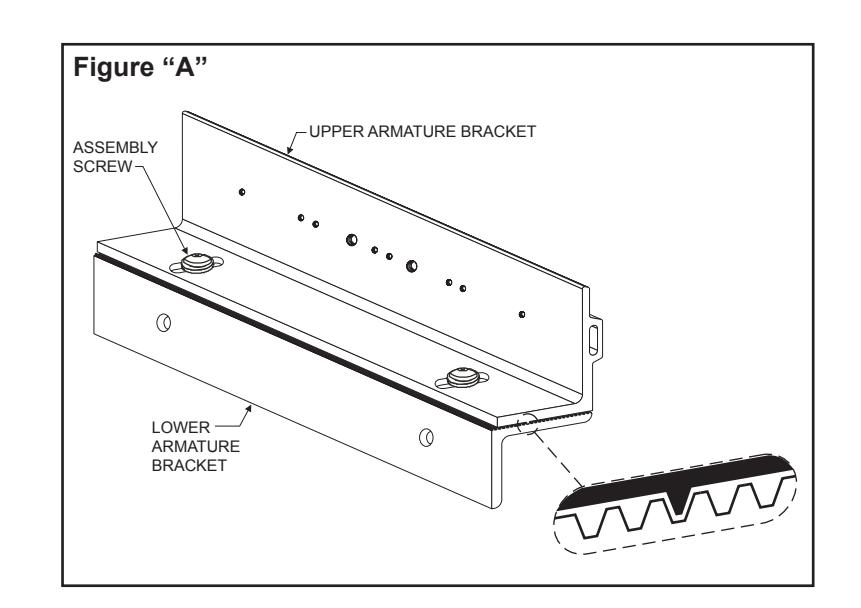
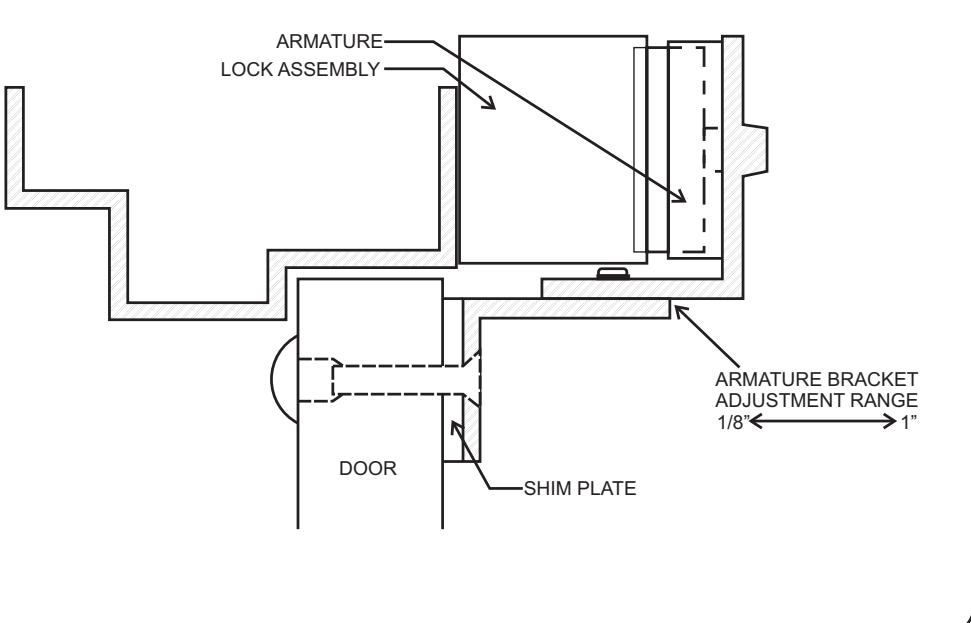
ARMATURE ADJUSTMENT
- Using a 5/32" hex wrench, temporarily loosen the armature bracket assembly screws roughly 1-1/2 turns to allow the upper armature bracket to move in and out freely (Ref. Figure "A"). 1.
- Close and latch the door. The mating surfaces of the lock and armature should fully contact each other. If necessary, slide the armature in or out to ensure full contact is made with the lock while still allowing the door to properly close and latch. 2.
- When the desired adjustment is achieved, slowly open the door taking care to maintain the position of the armature. Firmly tighten the armature bracket assembly screws, making sure that the locking ribs on the upper and lower bracket halves properly mesh (Ref. Figure "A") 3.
NOTE:
Make sure the door hits the frame just before the armature hits the maglock, to prevent loosening over time (armature not slamming against the lock).
3101B-TJ101 INSTALLATION MANUAL Page 4 02/11 3101B-TJ101 INSTALLATION MANUAL Page 5 02/11