Detex ValueSeries 03WS Installation Instructions
Open the original PDF document
View PDF

Detex Corporation, 302 Detex Drive, New Braunfels, Texas 78130-3045 (830)629-2900 / 1-800-729-3839 / Fax (830)620-6711 IAIL: detex@detex.com E-MAIL: detex@detex.com
INSTALLATION INSTRUCTIONS FOR 03WS ADVANTEX & VALUE SERIES TRIM
TOOLS AND SUPPLIES
Safety Glasses
(Always put on safety glasses prior to beginning installation of unit)
Pencil
Center Punch
Hammer
Drill Motor
1-1/2" Hole Saw
Drill Bits & Taps
Screw Driver (Phillips Drive)
Tape Measure
PREPARING THE TRIM:
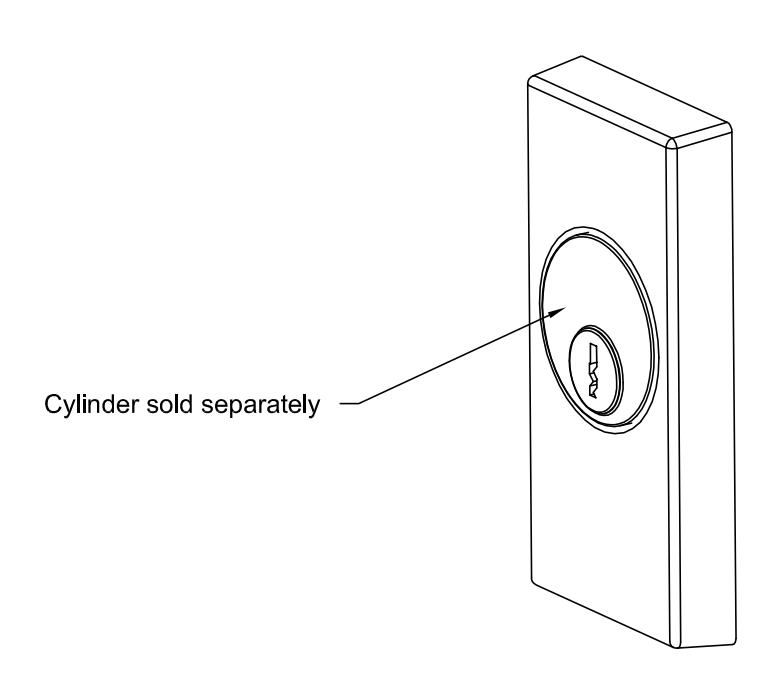
- 1. Insert a rim cylinder (not included) and cut rim cylinder tailpiece as described in Fig. 1.
- Assemble the rim tailpiece assembly and cylinder as shown in Fig. 2 below. Cut cylinder screws as required.
Use lockwashers to tighten cylinder to escutcheons.
NOTE: If key does not turn freely, recut or file the cylinder tailpiece.
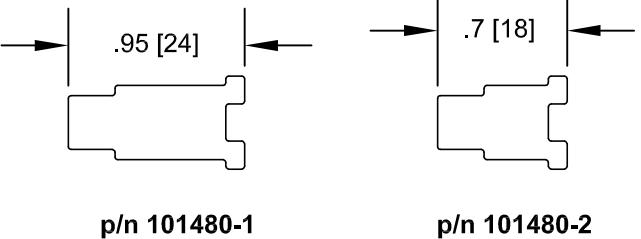
3. Select tailpiece for proper thickness of door. See Fig 2.

PREPARING THE DOOR:
- 1. Mark device location on inside face of door (see device side instructions). Establish device height and backset. Detex recommends the device to be mounted 40" above the finished floor.
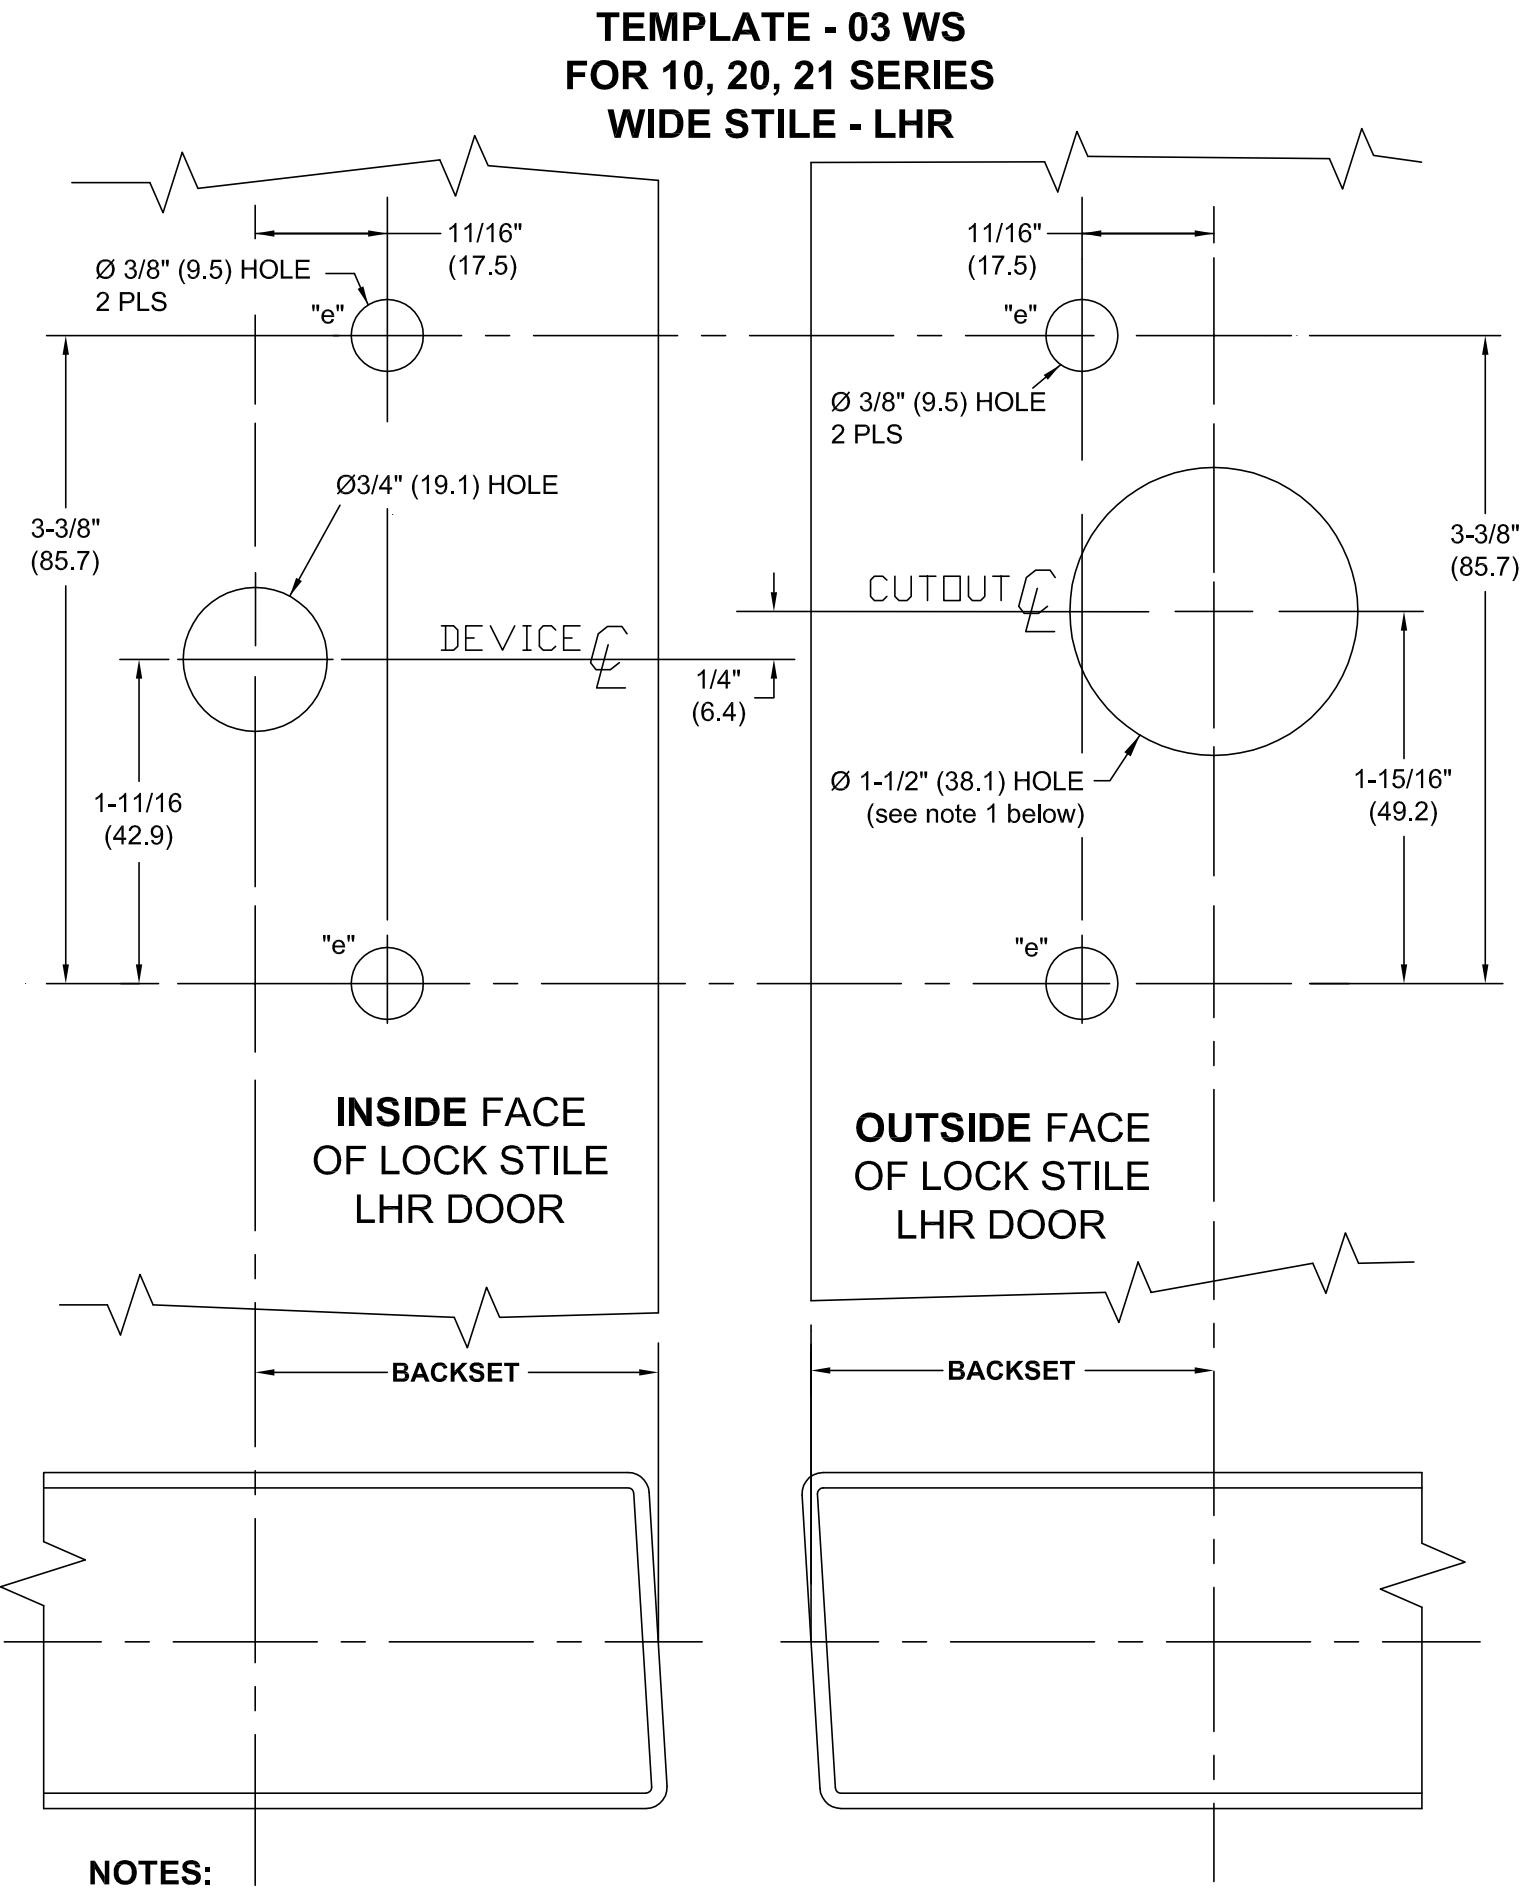
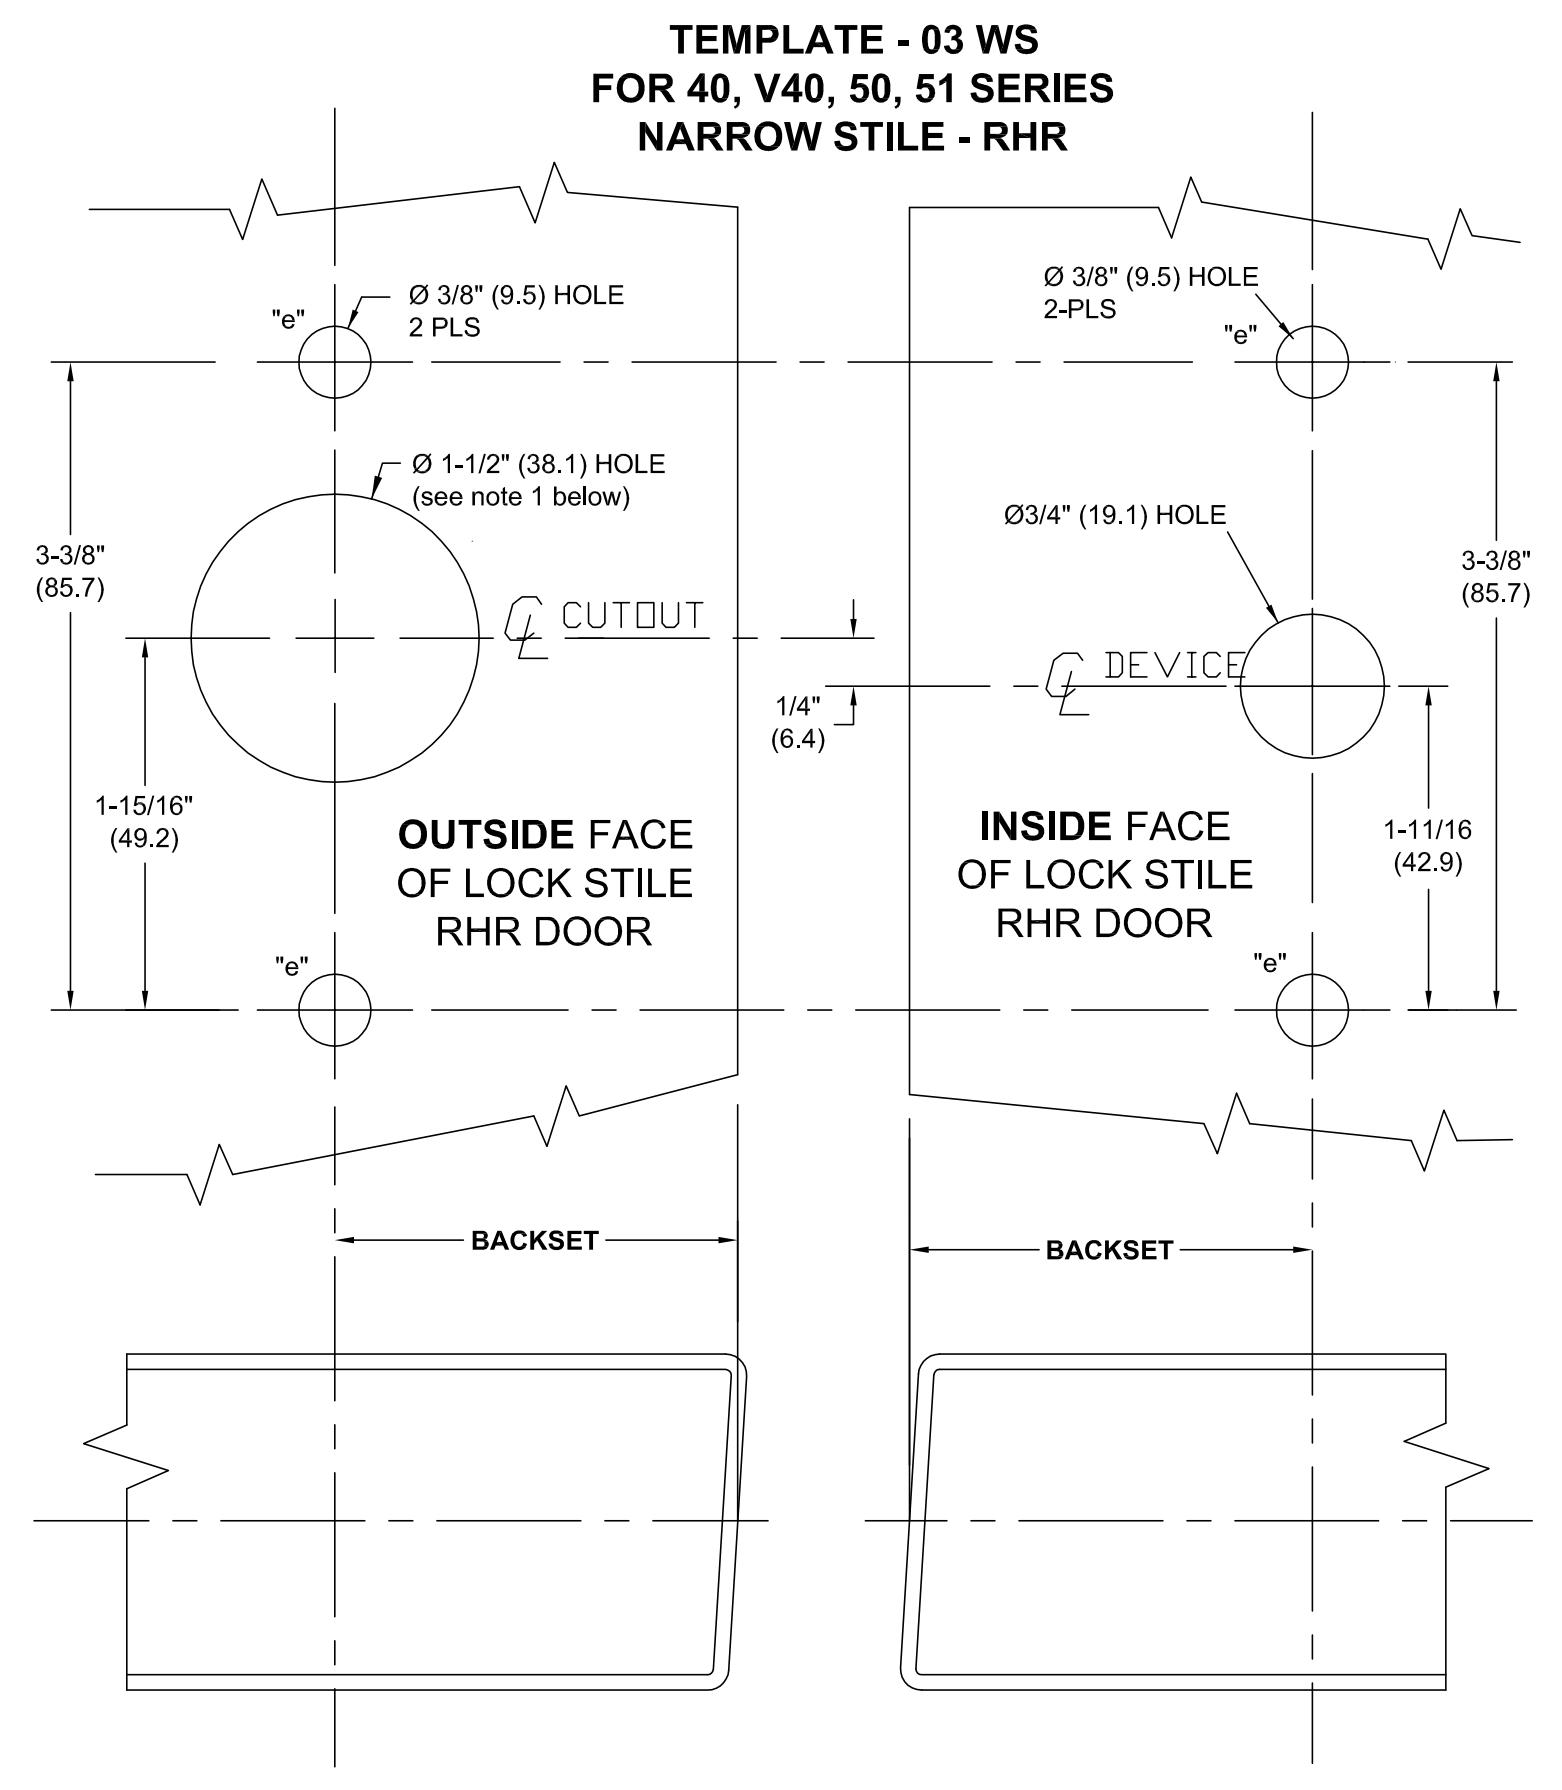
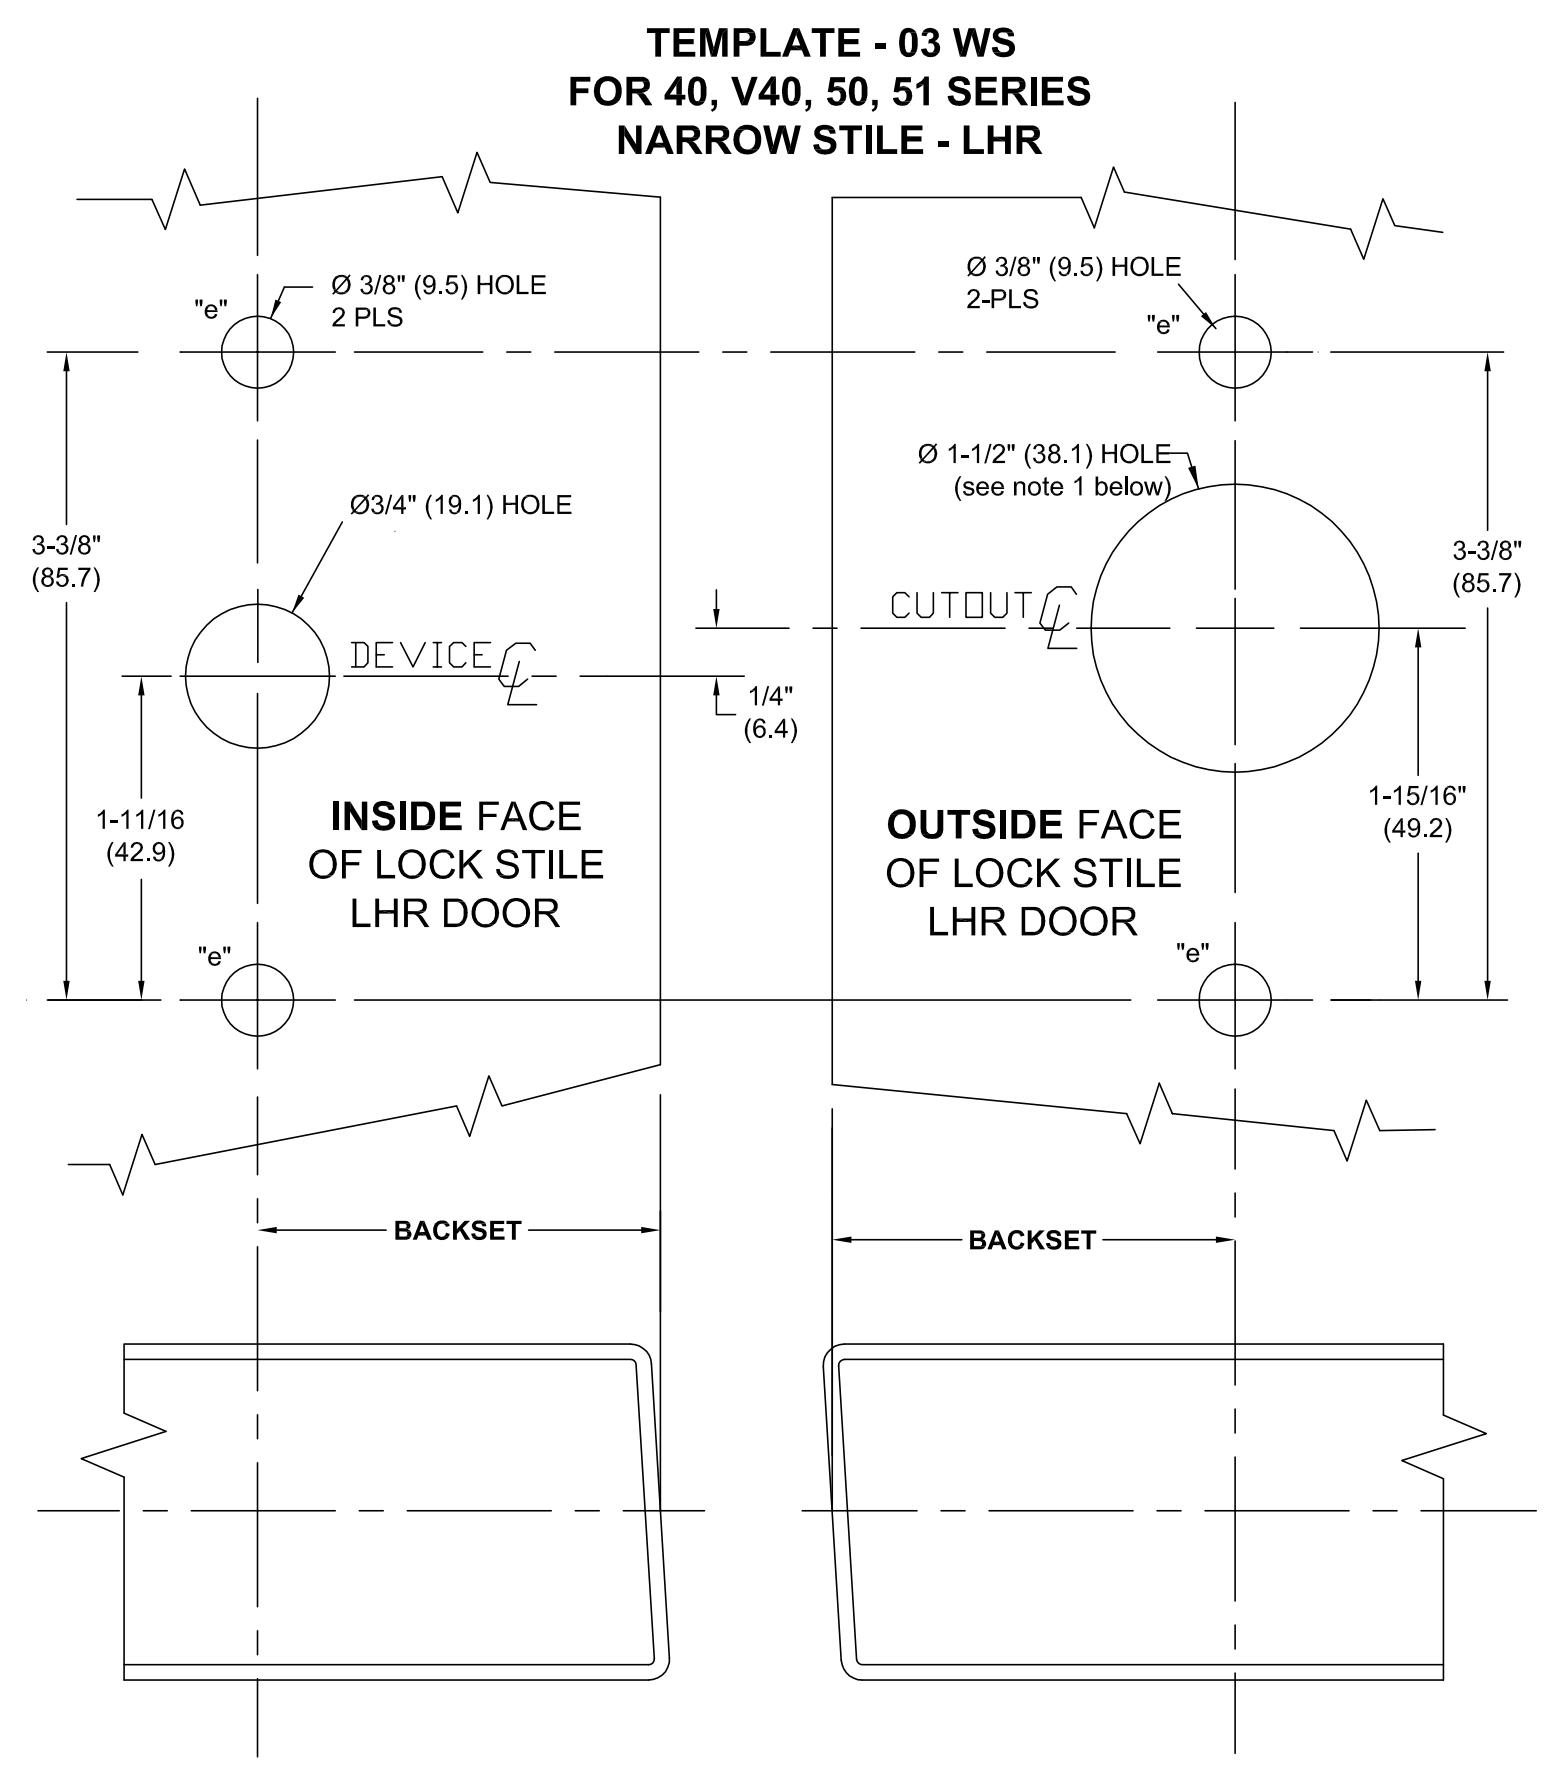
- 2. Use inside & outside face templates to mark and drill holes as noted.
For NARROW STILE (40, 50, V40 & V50) RHR, use page 9
For NARROW STILE (40, 50, V40 & V50) LHR, use page 10
For WIDE STILE (10 & 20) RHR, use page 11
For WIDE STILE (10 & 20) LHR, use page 12
NOTE: Be sure to allow for doors with beveled edges.
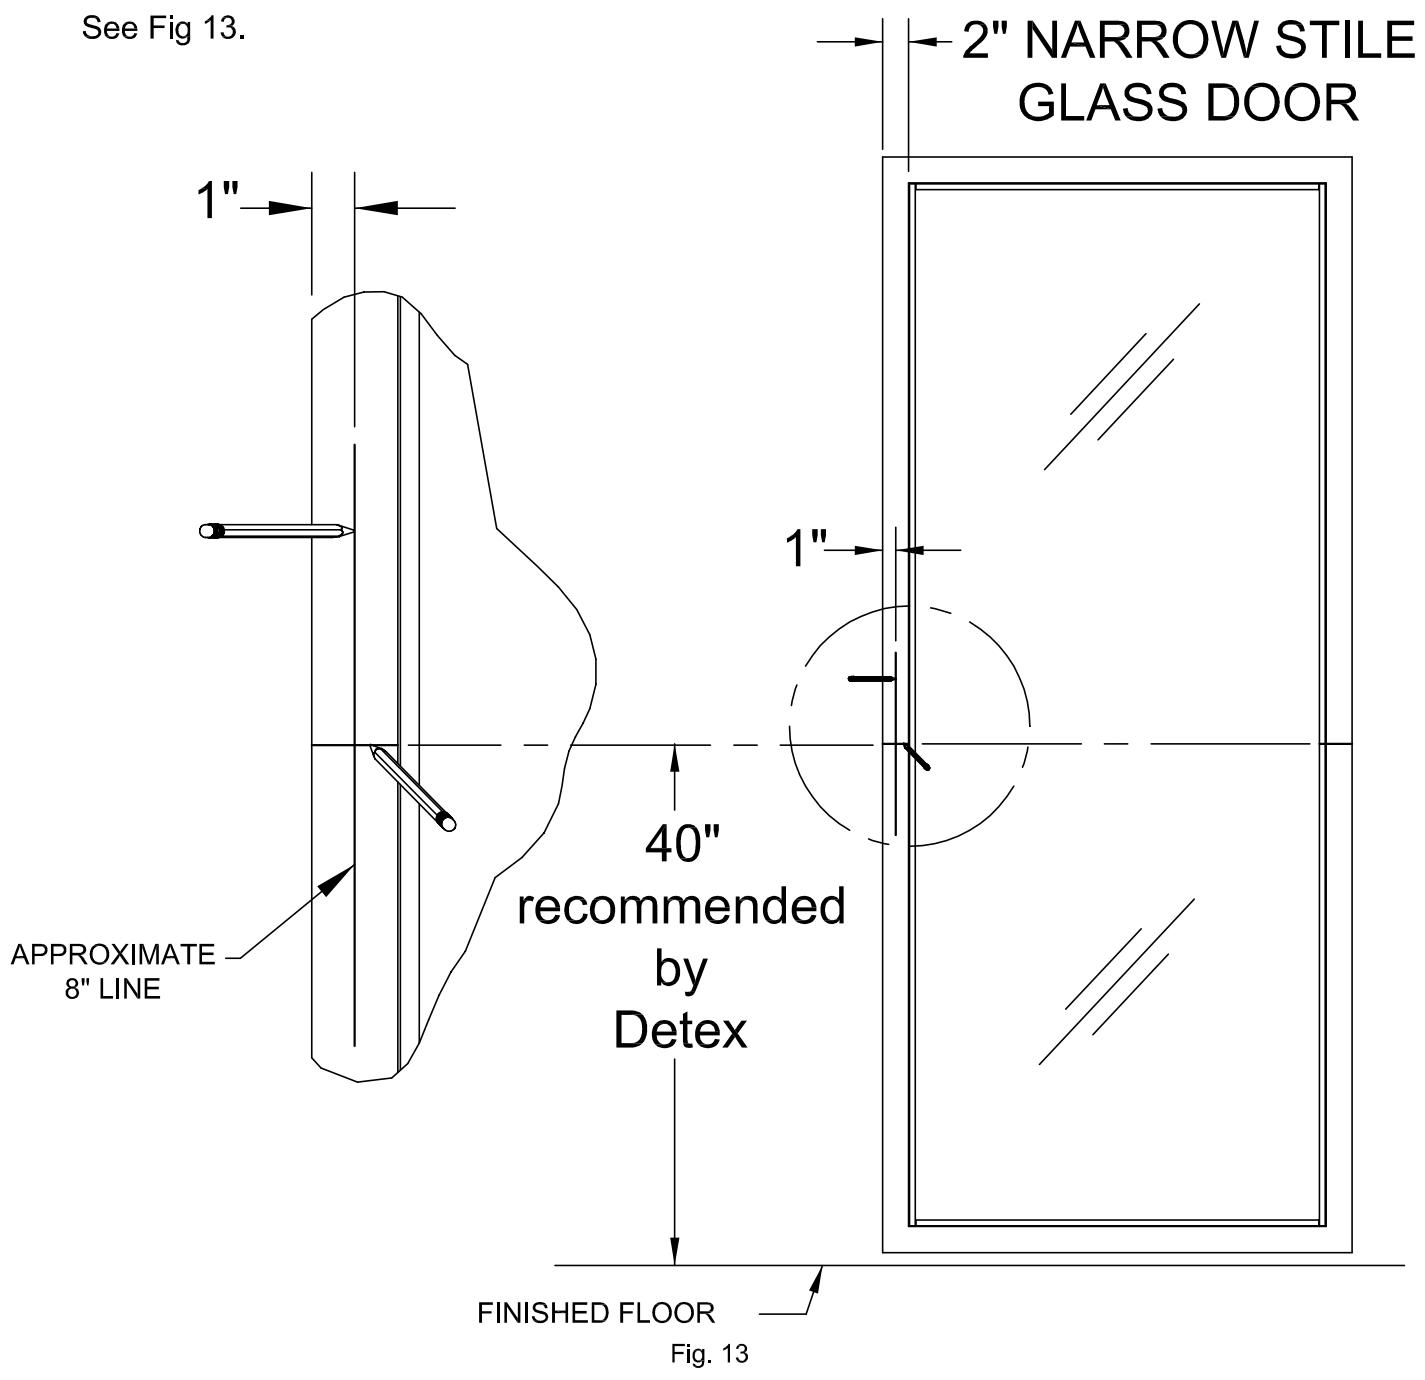
CAUTION: If you are using 03WS trim on a 2" narrow stile glass door, DO NOT USE THE PROVIDED STRIKE LOCATOR! See pages 5-8 for 2" narrow stile glass door prep. All other trims can use the narrow strike locator provided in the strike kit.
3. Select the screw length from the chart (Fig 3).
| Trim Mounting Holes | |||
| Ì | Door | 1/4-20 | |
| ı | Thickness | Screw Length | |
| I | 1 3/8" | 2" | |
| l | 1 3/4" | 2 1/4" | |
| 2" or 2 1/4" | * 3" | ||
Fig. 3
Fig. 1
Cut to Length
Page 2
ADVANTEX RIM DEVICE: ASSEMBLING THE OUTSIDE TRIM AND BACKPLATE ONTO THE DOOR:
(If surface vertical rod device - go to page 4)
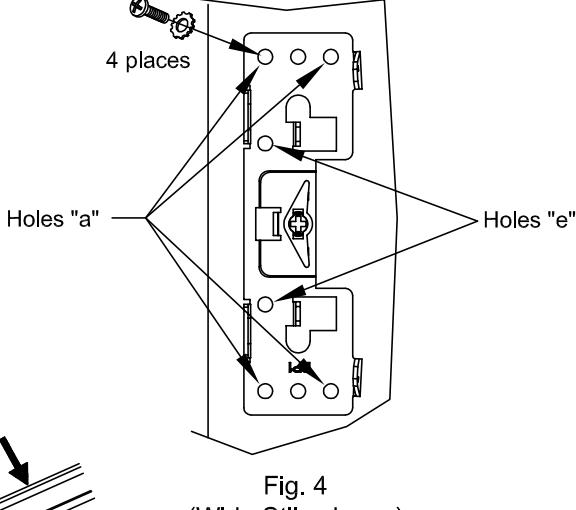
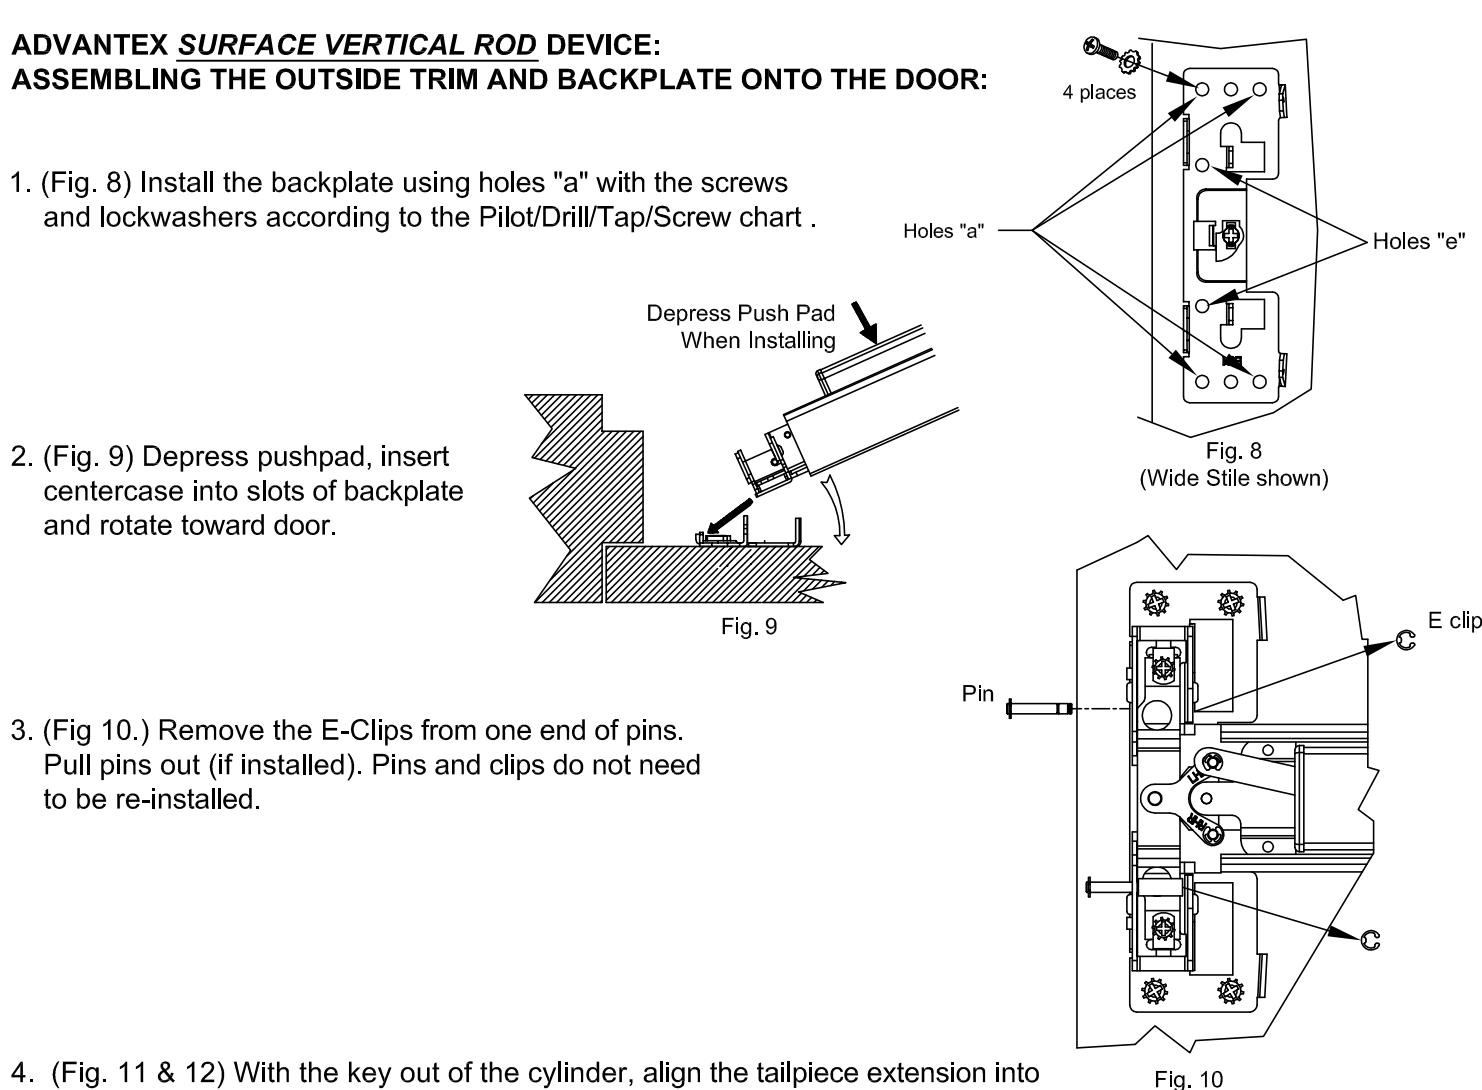
1. (Fig. 4) Install the backplate using holes "a" with the screws and lockwashers according to the Pilot/Drill/Tap/Screw chart.
2. (Fig. 5) Depress pushpad, insert centercase into slots of backplate and rotate toward door.

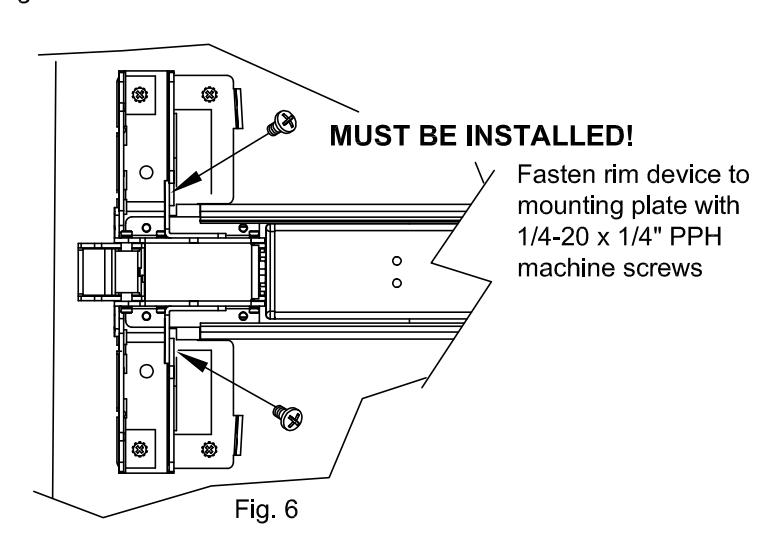
3. (Fig. 6) Fasten rim device to mounting plate with 1/4-20 x 1/4" PPH machine screws.
- 4. (Fig. 7) With the key out of the cylinder, align the tailpiece extension into the backplate's trim cam on the inside door face. Using "e" holes, fasten the trim to the backplate with 1/4-20 machine screws. Three screw lengths are provided for varying door thicknesses.
- 5. Resume with panic hardware instruction.
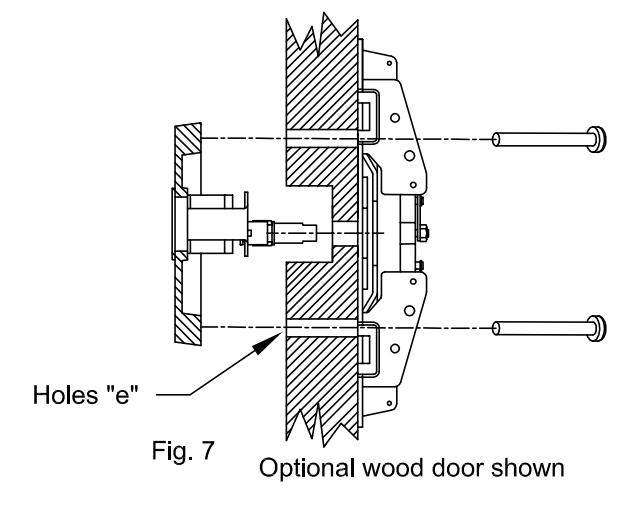
4. (Fig. 11 & 12) With the key out of the cylinder, align the tailpiece extension into the backplate's trim cam on the inside door face. Using "e" holes, fasten the trim to the backplate with 1/4-20 machine screws. Three screw lengths are provided for varying door thicknesses.
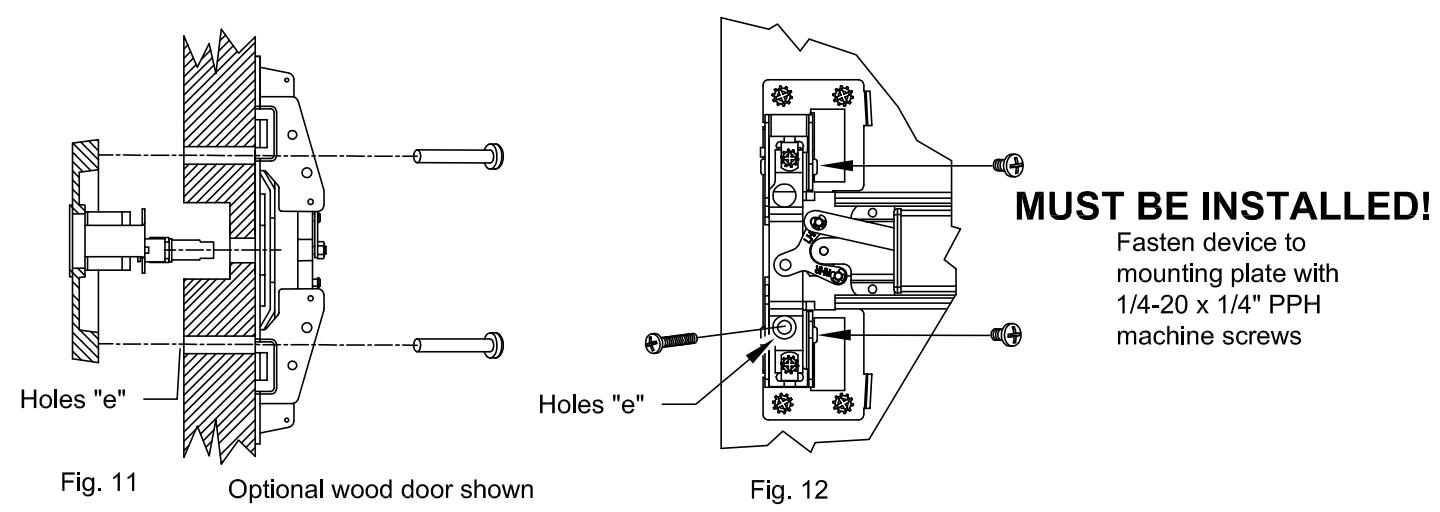
Depress the pushpad to align the through hole in the carriage with the mounting hole drilled in the door. Install the 1/4-20 machine screw without lockwasher. Repeat for the remaining hole.
5. Continue with Surface Vertical Rod Installation Instructions.
Trouble Shooting Note: Screw heads should not interfere with the movement of the carriage.
Door Prep for 2" narrow stile glass doors using 03WS trim devices:
CAUTION: If you are using 03WS trim on a 2" narrow stile glass door, DO NOT USE THE PROVIDED STRIKE LOCATOR!
To install 03WS device without a strike locator:
INSIDE DOOR FACE:
Mark a vertical line 1" from the edge of the door. Mark horizontal device centerline on door stile & frame.
Door Prep for 2" narrow stile glass doors using 03WS trim devices: (continued)
2. Block door shut.
Perform steps 3 through 5 on inside of door.
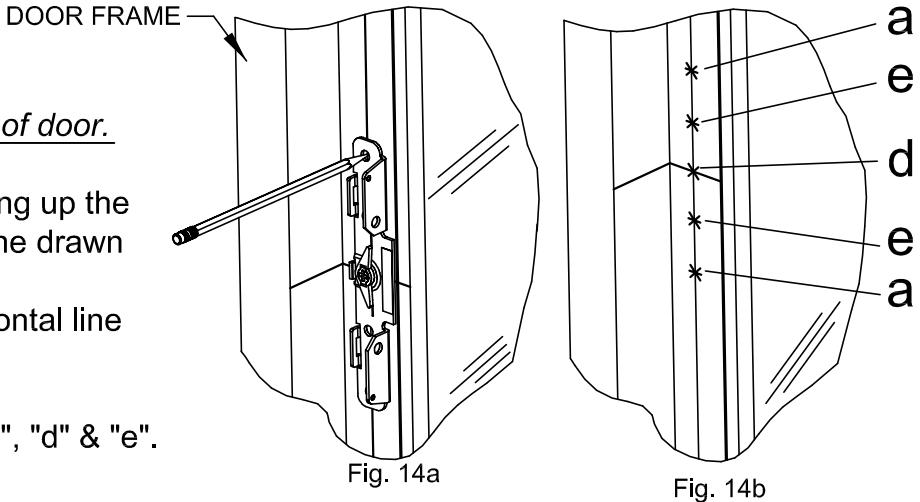
3. Place back plate on door stile, lining up the mounting holes with the vertical line drawn in step 1.
Align center of cam with the horizontal line drawn in step 1.
Mark and center punch 5 holes "a", "d" & "e". See Fig. 14a & 14b.
4. Slide the 98 strike against the blocked door & center on the line drawn on door frame.
Mark and center punch 2 strike holes. See Fig. 15a 15b.
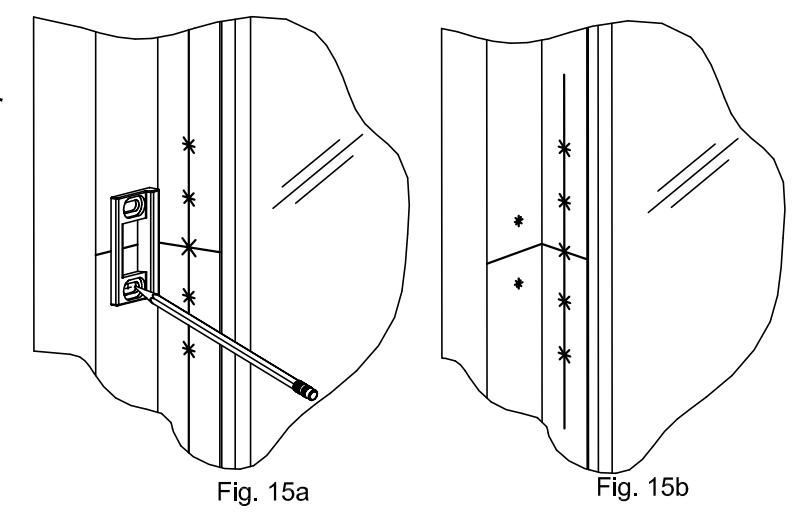
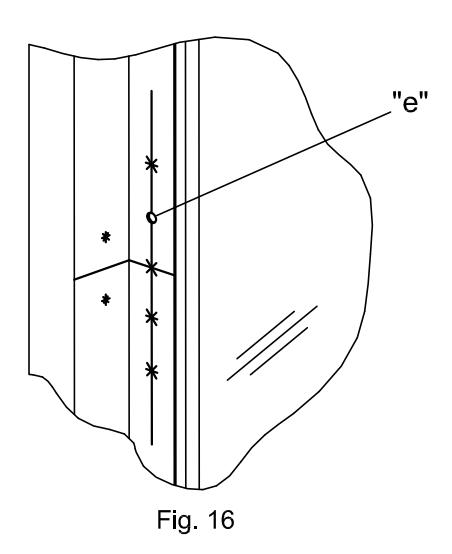
Drill one pilot hole "e" straight and level thru door at location shown. See Fig. 16.
Door Prep for 2" narrow stile glass doors using 03WS trim devices:
(continued)
OUTSIDE DOOR FACE:
6. Place the back plate on outside of door and center it as shown on the pilot hole previously drilled. Align back plate vertically parallel to door stile.
See Fig. 17.
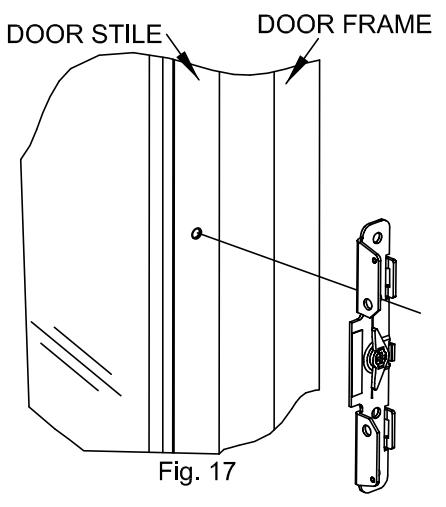
7. Mark the cam center "d". Mark and center punch the other hole "e". See Fig. 18.
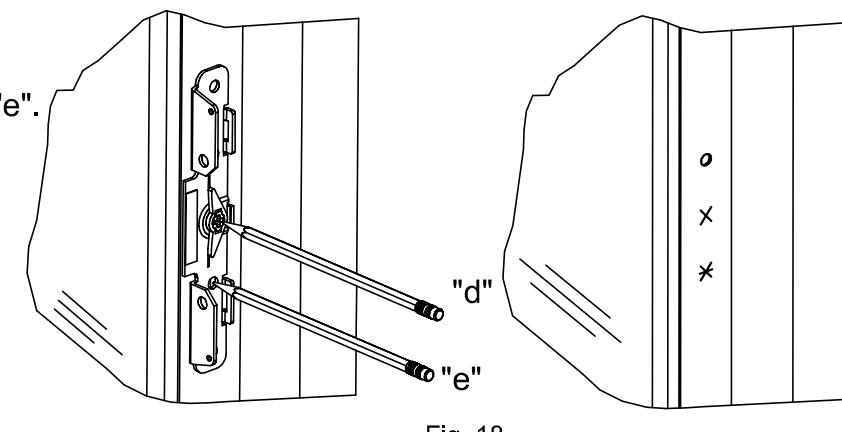
Fig. 18
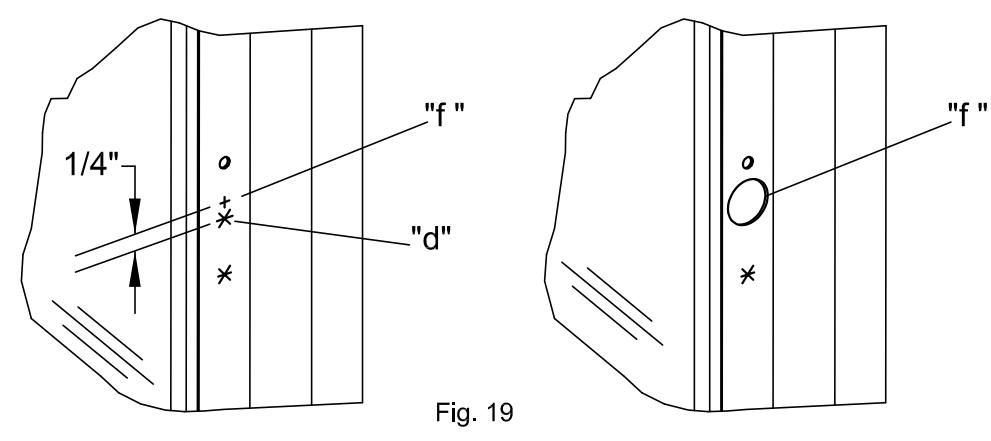
8. Make a new mark and center punch 1/4" higher than the cam center "d" (Fig 19). This will be the mark for the 1-3/4" outside cylinder hole "f". Using a 1-3/4" hole saw, drill only through outside door face at "f".
NOTE: DRILL STRAIGHT AND LEVEL. USE EXTREME CAUTION - TIGHT TOLERANCE WITH NO MARGIN FOR ERROR!
Door Prep for 2" narrow stile glass doors using 03WS trim devices:
(continued)
INSIDE DOOR FACE:
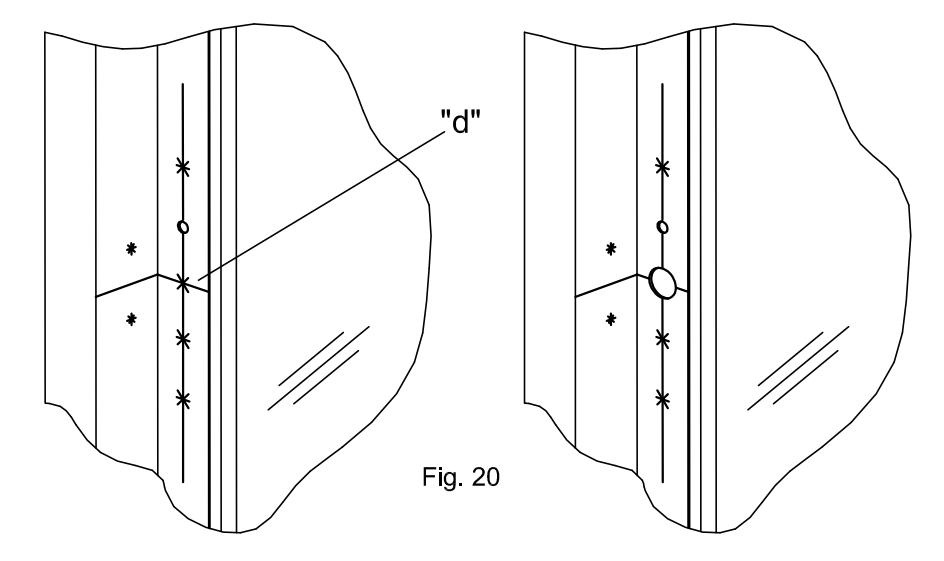
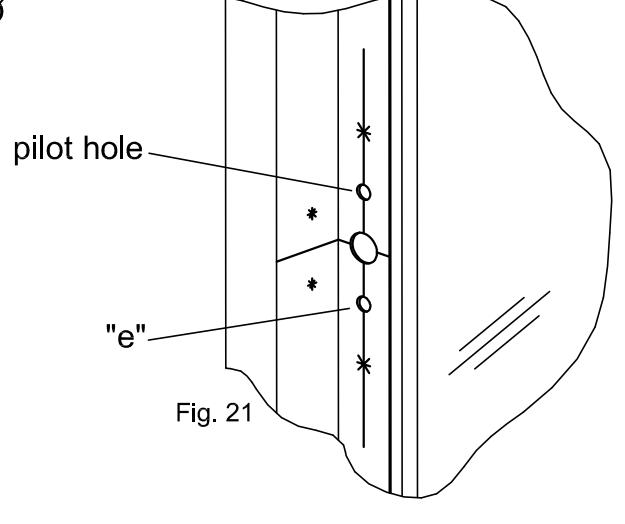
9. Drill a 3/4" hole through INSIDE door face at "d". See Fig. 20.
10. Enlarge the pilot hole drilled earlier to 3/8"Ø through the door & drill the second "e" hole to 3/8"Ø through the door.
See Fig. 21.
| Trim holes "e" | |||
|---|---|---|---|
| 1/4-20 | Door | Screw Length | |
| Machine Screw | Thickness | Ociew Length | |
| 1-3/8" | 2" | ||
| _ , | 1-3/4" | 2-1/4" | |
| 3/8" | 2" or 2-1/4" | * 3" | |
*Cut to length
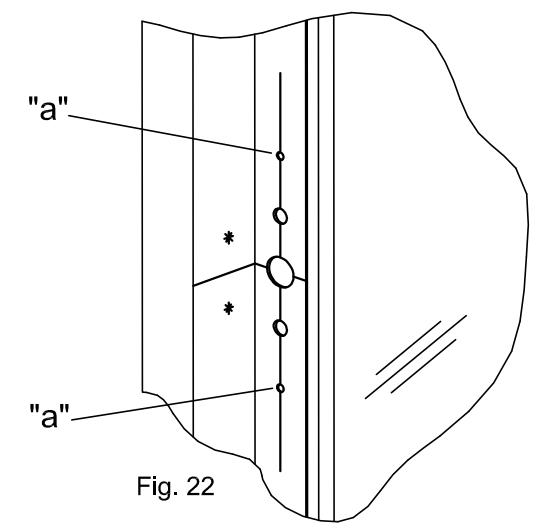
11. Drill the back plate mounting holes "a" on the INSIDE door face only per chart. See Fig. 22.
| Back plate mounting holes "a" | |||||
|---|---|---|---|---|---|
| | 1/4-20 | #14 | #14 | |||
| Machine Screw | Wood Screw | Sheetmetal Screw | |||
| #7 | #7 | ||||
| □R | 3/16" | ||||
|
□R
|
3/16" | or | |||
Go back to sheet 2 of this instruction and complete the "Preparing the Trim" section. Complete sheet 3.
Complete the "Assembling the Outside Trim" section on sheet 4.
Resume with Panic Hardware Instruction.

NOTES:
NOTES:
TEMPLATE - 03 WS FOR 10, 20, 21 SERIES WIDE STILE - RHR 11/16" 11/16" (17.5)(17.5)Ø 3/8" (9.5) HOLE 2 PLS "e" "e" Ø 3/8" (9.5) HOLÉ 2 PLS Ø 1-1/2" (38.1) HOLE Ø3/4" (19.1) HOLE (see note 1 below) 3-3/8" 3-3/8" (85.7)(85.7)CUTOUT DEVICE 1/4" 1-15/16" 1-11/16 (49.2)(42.9)"e" "e" INSIDE FACE OUTSIDE FACE OF LOCK STILE OF LOCK STILE RHR DOOR RHR DOOR BACKSET BACKSET NOTES: