Corbin Russwin Thru-Bolted Trim for ML2000 Series Mortise Locks Wood or Metal Doors Installation Instructions_FM1030
Open the original PDF document
View PDFInstructions for Installing "Half Dummy Trim" on Wood or Metal Doors (Metal Door Shown)
KNOB TRIM . . . SNAP-ON TYPE
KNOB TRIM ... SCREW-ON TYPE
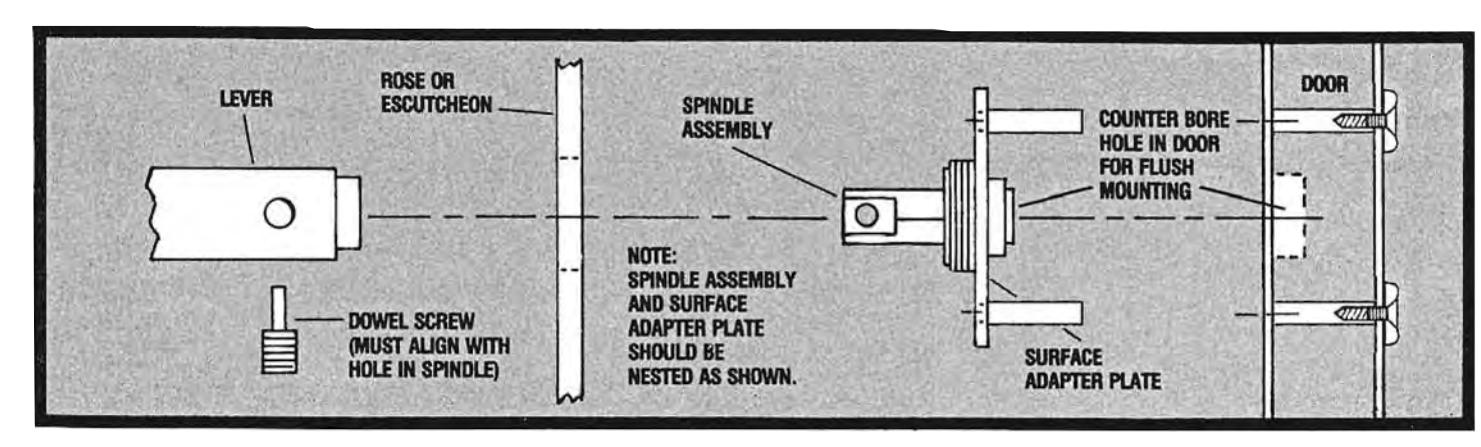
- A. Door MUST be counter bored to assure flush mounting of surface adapter plate.
- B. Spindle assembly MUST be mounted so that hole aligns with lever dowel screw before securing to door with set screws.
- C. Install remainder of trim and lever to complete installation.
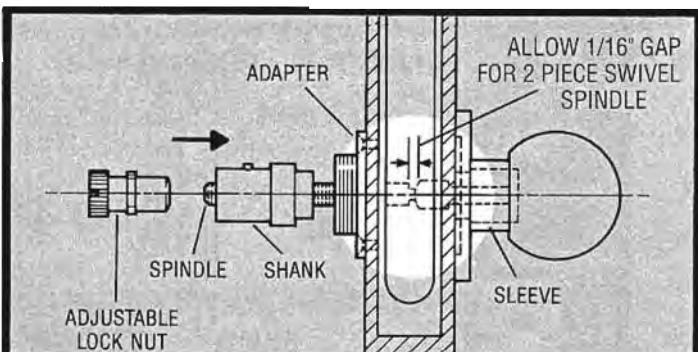
TO CHECK OPERATION OF LEVER HANDLE TRIM
If you have drawn up the lever too tight and it binds.
- A. Loosen the set screw holding the lever to the spindle and remove the lever.
- B. Remove the trim and surface adapter plate.
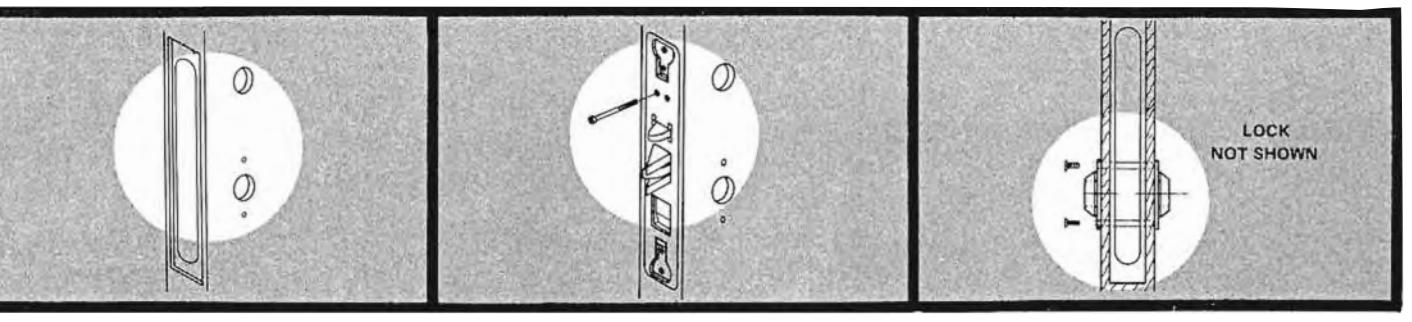
- C. Pull the spindle and jamb nut assembly out of the lock hub just far enough to turn it clockwise a quarter turn (See Illustration)
- D. Slide the spindle and jamb nut assembly back into the lock hub and reinstall the surface adapter plate. trim and lever.
Instructions for reversing the hand of the ML2000
Apply the adapter plate (having two long lugs) with the word "TOP" in
Use supplied washer and screw to
adapter plate followed by the rose
or escutcheon and then secure with threaded sleeve. Tighten with
Slip the reinforcing ring into the
C. Attach knob by depressing retainer and pushing until it snaps into
position (make sure "Engaging
Hole" in knob aligns with knob
the highest position.
wrench furnished.
attach trim to the door.
Instructions for Installing Thru-Bolted Trim with Mortise Locks
Steps 1 and 2 Common to all Trim.
Mortise door for required lock and bore holes. Use template packed
2 Thread cylinder set screws partially into lock before inserting and into lock before inserting and fastening lock into mortise.
Install adapter plates squarely on door with lugs passing throught lock case. Adapters must be accurately centered to insure smooth operation. Tighten screws securely.
For LEVER X LEVER TRIM, proceed to Step 4. For KNOB x KNOB TRIM, proceed to Step 5.
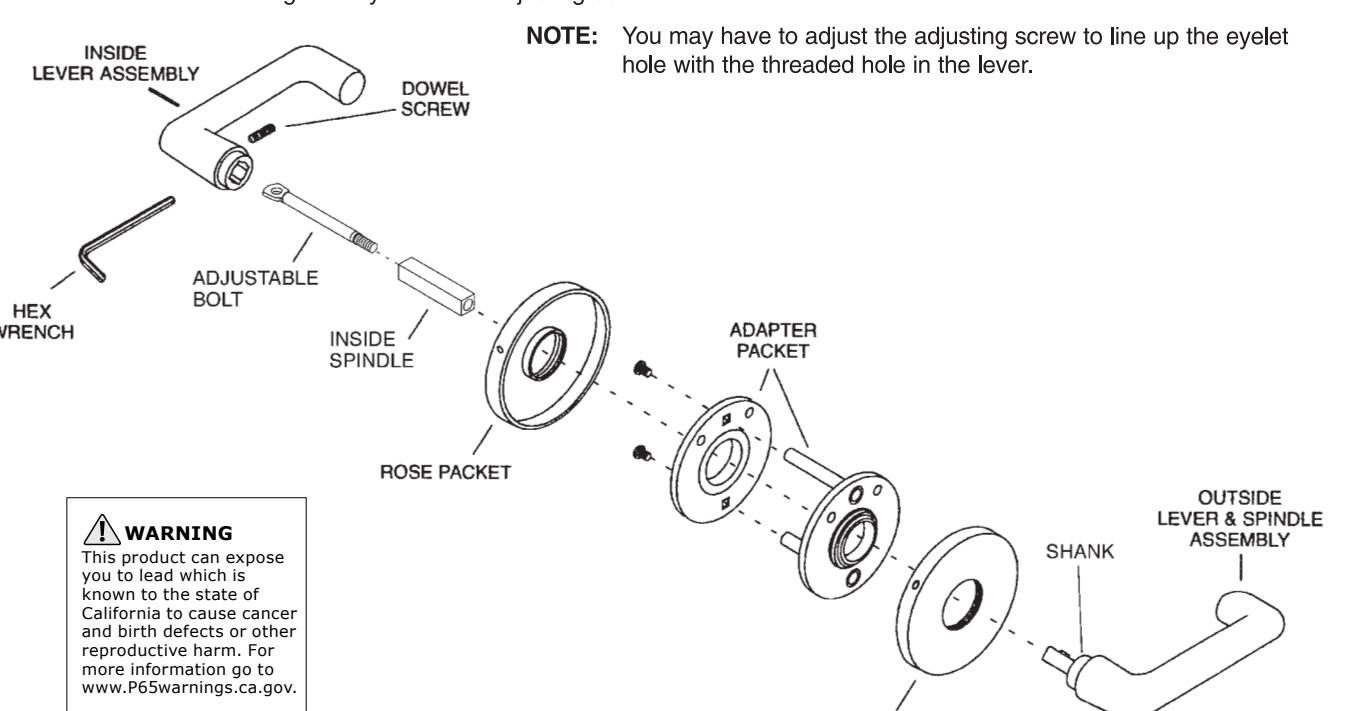
A. Install escutcheons or roses. Remove adjusting bolt and inside spindle from outside lever.
- B. Install outside lever and spindle assembly into the adaptor plate and outside hub of the lock body. Make sure lever shank seats into the plastic bushing of the adaptor plate.
- C. Insert the inside spindle and adjusting bolt into the inside hub of the lock body. Screw adusting bolt into the outside spindle. Tighten completely and then unscrew the bolt until the outside lever operates smoothly.
- D. Remove the set screw from the inside lever. Install the lever onto the inside spindle with the eyelet of the adjusting screw in line with the threaded hole in the lever. Make sure the lever shank seats in the adaptor bushing completely. Screw the set screw into the lever and through the eyelet of the adjusting bolt.
ROSE PACKET
160 Four Valley Drive
Vaughan, Ontario, Canada L4K 4T9
ASSA ABLOY, the global leader in door opening solutions:
Corbin Russwin
Instructions for Installing Thru-Bolted Trim with Mortise Locks
Steps 1 and 2 Common to all Trim.
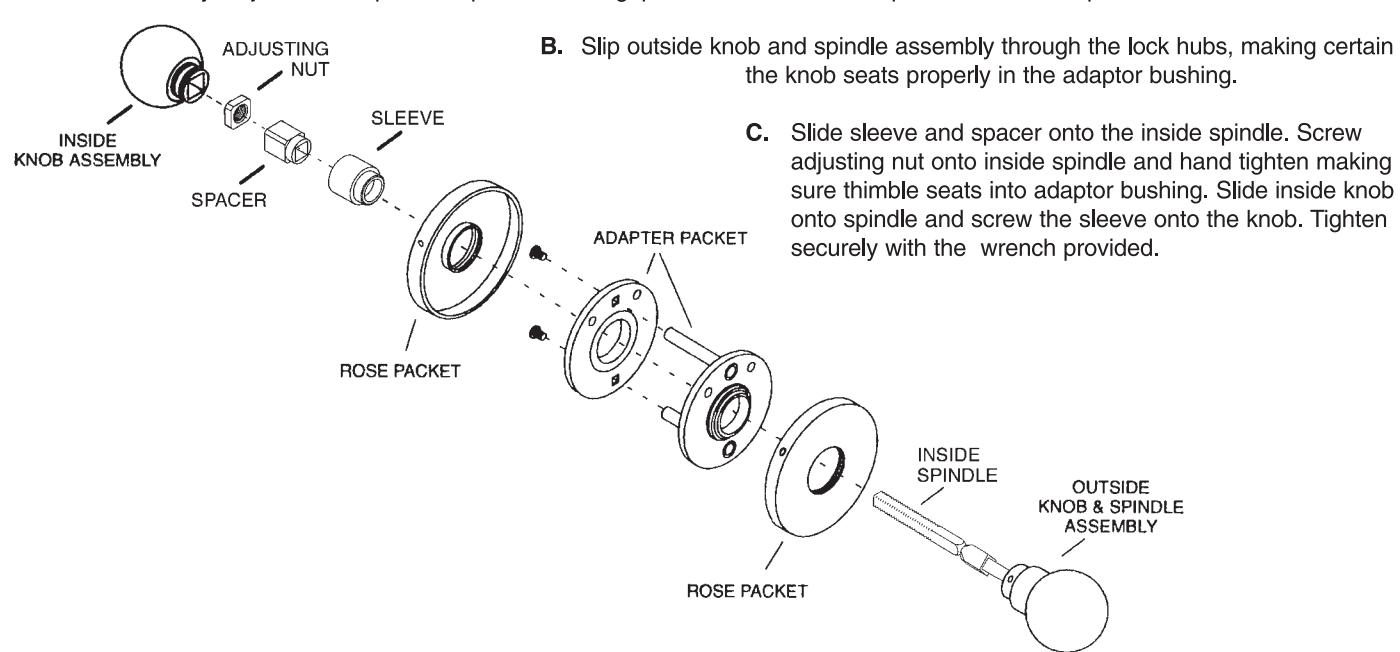
If you have a CAST KNOB x KNOB follow Step 3 and then proceed as follows:
Install escutcheon or roses and secure tightly. Remove inside spacer, sleeve, adjusting nut and threaded thimble from spindle assembly. Adjust inside spindle to provide 1/16" gap between the outside spindle and inside spindle.
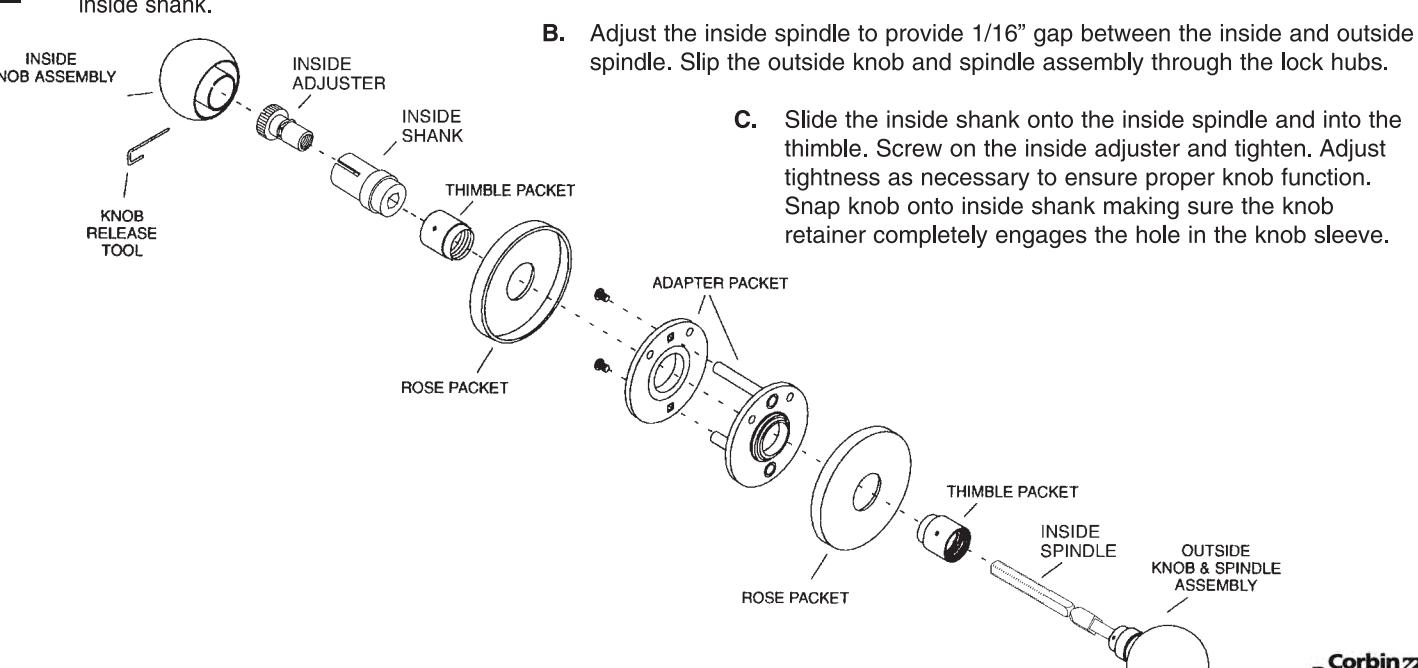
If you have WROUGHT KNOB x KNOB follow previous instructions to Steps 1 - 3 and then proceed as follows.
Install roses or escutheon and secure using the threaded thimbles, tighten securely. Unscrew the inside adjuster and remove the
Instructions for Installing Thru-Bolted Trim with Mortise Locks
Steps 1 and 2 Common to all Trim.
If you have WROUGHT KNOB x KNOB follow previous instructions to Steps 1 - 3 and then proceed as follows.
A. If cylinder is provided, install cylinder and collar (when required) into the lock body. Screw in until cylinder is tight and key way is vertical, tighten the cylinder set screw securely.
-
8
A. Complete installation by installing the armored front using the two #8-32 x 1/4" screws.
- B. Install the strike in the frame using the #12 combination screws provided.
9 A. Check to ensure proper function before closing the door.
Instructions for Installing "Half" Thru Bolted Sectional or Escutcheon Trim on Wood or Metal Doors
(Metal Door Shown)
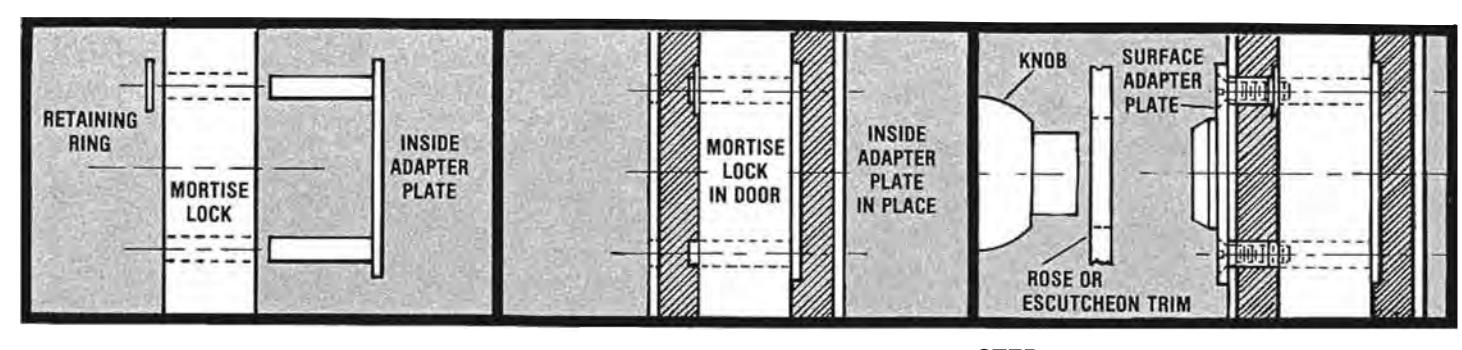
1 Insert inside adapter plate (having two ong lugs) into lock on the side opposite trim.
Install one retaining ring over top lug of adapter plate to hold it in place on the lock.
- A. For wood doors: Relieve mortise of door to take retaining ring, lugs and plate.
- B. Install the lock in the door.
3 Apply the surface adapter plate (having the two screws) to the face of the door. Line up the screws with the inside adapter lugs and draw the screws up
Instructions for Installing "Half" Thru Bolted Sectional or Escutcheon Trim on Wood or Metal Doors
(Metal Door Shown)
KNOB SPINDLE APPLICATION
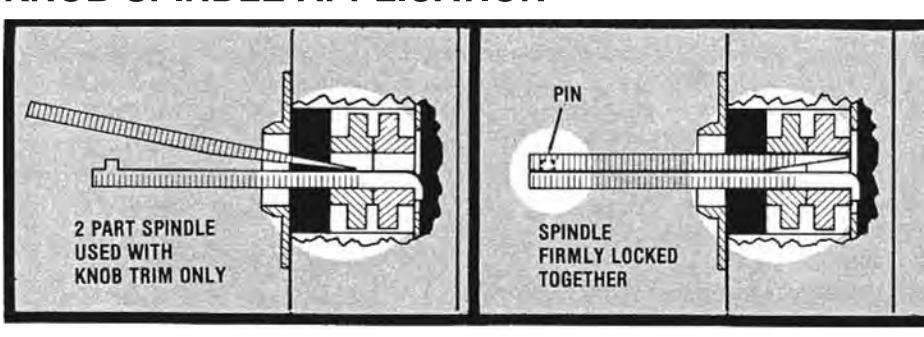
Spindle: Remove the keeper wire and eparate the two-part spindle. First insert the part with bent end so that the hook catches over the back of the lock hub. Next insert the upper part of the spindle sliding it in as shown. When fully inserted, the two parts are firmly locked together by the pin as shown.
5 Install remainder of trim and knob.
LEVER SPINDLE APPLICATION
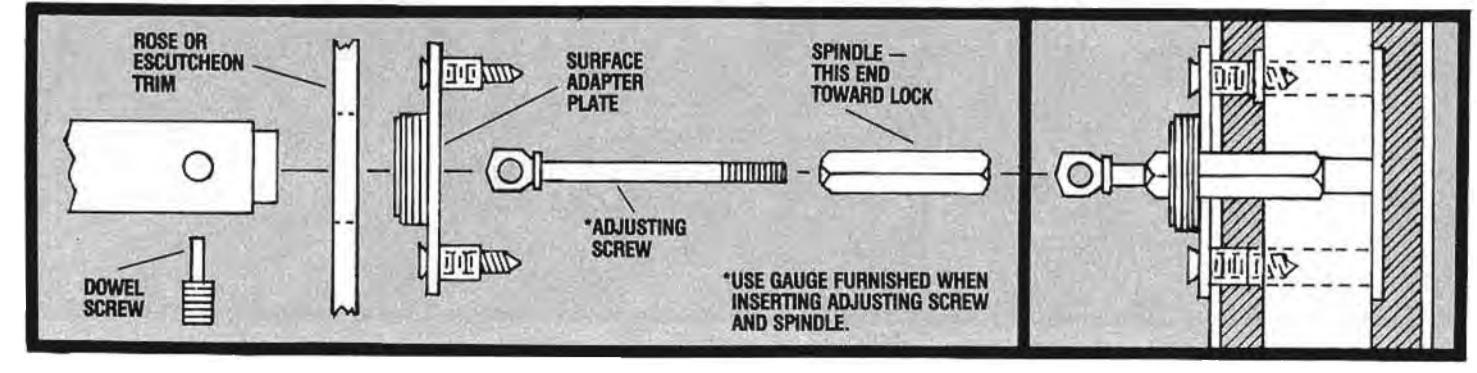
6 Apply the surface adapter plate (having the two screws) olus the spindle and adjusting screw to the face of the door being sure to insert the "Crimped" end of the spindle into the lock hub. Line up the screws with the inside adapter lugs and draw the screws up firmly.
Install remainder of trim and lever to complete installation.
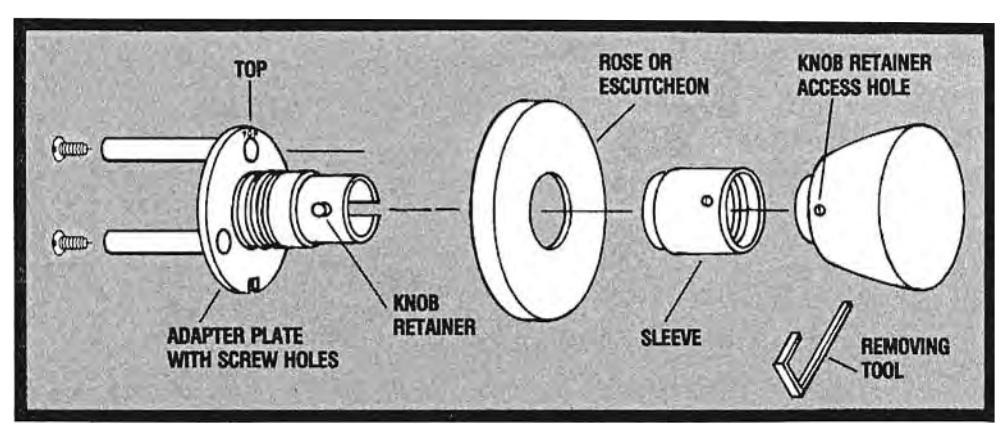
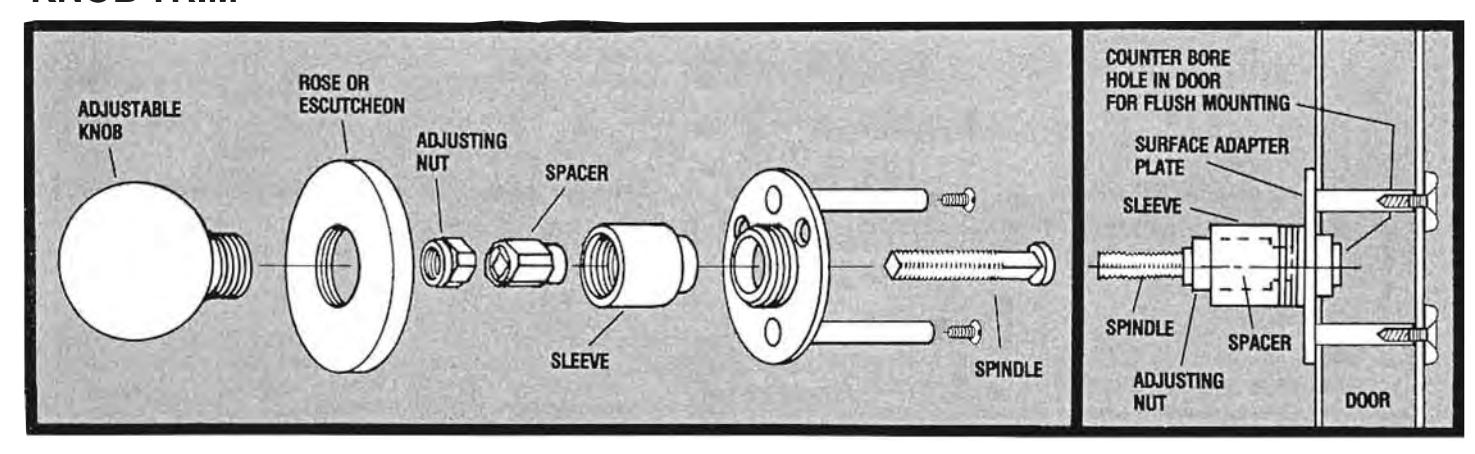
Instructions for Installing "Half Dummy Trim" on Wood or Metal Doors (Metal Door Shown)
KNOB TRIM
-
A. Insert spindle through adapter plate and assemble all parts on B. Tighten adjusting nut so that all parts fit snugly. spindle in sequence as shown.
- Slip on adjustable knob and draw it up tightly by turning sleeve counter clockwise with wrench furnished.