CM-30E Manual
Open the original PDF document
View PDF

5151 Everest Dr., Unit #6, Mississauga, ON L4W 2Z3 Telephone: 905-366-3377 Fax: 905-366-3378
Toll-Free: 1-877-226-3369 Web: www.camdencontrols.com
C M – 3 0 EXIT SWITCH
Installation Instructions
MADE IN CANADA PAGE 1 OF 1
Section 1 __________________ General Description
Camden CM-30 series illuminated Exit switches are designed to mount into a deep style single gang electrical box
The large 2" square translucent button is easy to push. One momentary micro switch is provided with Form C output, rated at 10 amps @ 125 VAC.
Standard models are supplied with a 12 – 24V AC/DC light bulb, which is accessed through the front or rear. LED models are supplied with either 12V or, 24V long-life LED's. 24V models are supplied with an inline resistor, which must not be removed.
Section 2__________________ Installation
Mounting
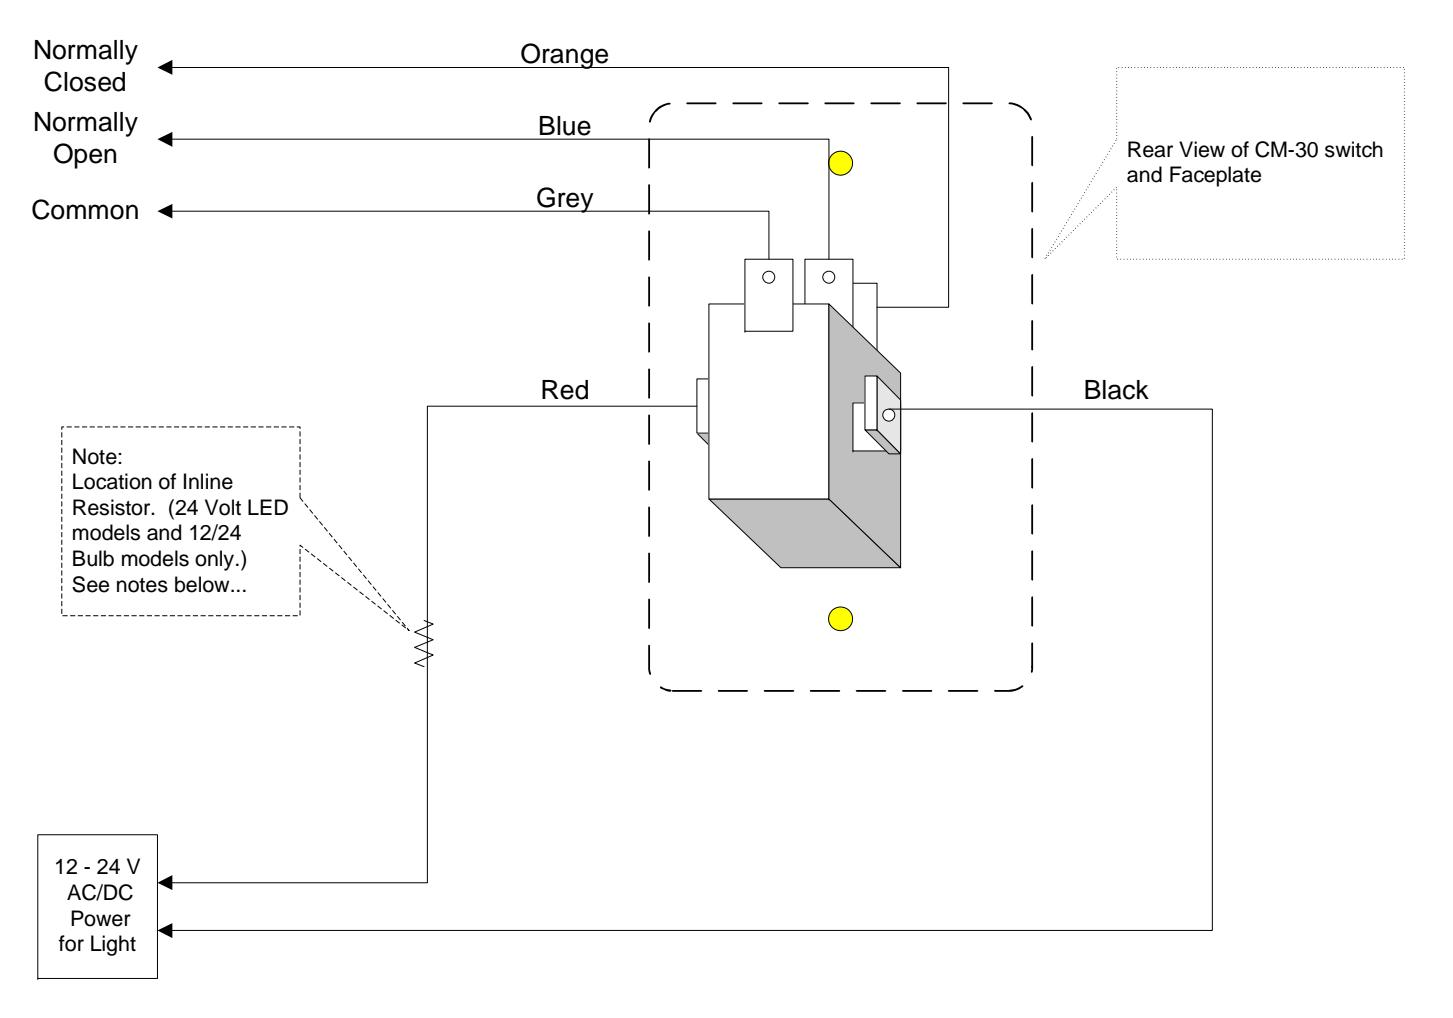
- 1. Push the colour-coded leads onto the switch terminals (if not already installed), as per the enclosed diagram. If illumination is not required, the Red & Black wires can be removed (not recommended on 24V LED models).
- 2. Connect the appropriate wires to your devices. Tuck wiring into box, and fasten switch plate using screws provided.
NOTE: For 12V light (bulb) operation, cut the Red wire just before the Inline resistor. For 24V light (bulb) operation, leave the resistor in place. (This instruction does not apply to LED version).
Section 3_________________ Technical Data
Models CM-30E | CM-30H Lens Colour Green Lens | Blue Lens Legend "Push to Exit" | Handicap Size 4.5" H x 2.75" W x 2" D
Mounting 2 x #6-32 machine screws Switch Rating 10 amps @ 125 VAC Electrical life 100,000 @ rated capacity
Technical Data Standard Light bulb Voltage required 12 - 28 V AC/DC
(see note re: resistor)
LED Models Voltage required 12 V AC/DC, or 24 V AC/DC
Section 4_________________ Warranty
Camden Door Controls Inc. guarantees the CM-30 to be free from manufacturing defects for 3 years from date of sale. If during the first 3 years the CM-30 fails to perform correctly, it may be returned to our factory where it will be repaired or replaced (at our discretion) without charge. There is no warranty for LED damage due to over voltage! Except as stated herein, Camden extends no warranties expressed or implied regarding function, performance or service.
Questions? Call us toll-free at 1-877-226-3369
Filename: CM-30 Instructions.doc Revision: 6/5/06 3:47 PM
NOTES:
- 1. Access to light bulb (or LED) is obtained by first removing Cherry switch from two plastic retaining pins. Then squeeze white retainer assembly between finger and thumb, and gently rock back and forth while pulling free of black threaded portion. Then simply pull out light bulb (or LED) to replace.
- 2. Re-installation is reverse of above sequence. The LED is not polarity sensitive. (Similar to bulb). 3. For 12V light bulb operation only, cut off inlineresistor (on Red wire). For 24V bulb or LED operation, leave resistor in place.