Alarm Lock RR-4BKEYFOB Programming Instructions
Open the original PDF document
View PDF
Amityville, New York 11701 For Sales and Repairs 1-800-ALA-LOCK For Technical Service 1-800-645-9440 (Note: Technical Service is for security professionals only) Publicly traded on NASDAQ Symbol: NSSC
RR-4BKEYFOB Wireless Remote Release Keyfob Programming Instructions When Used with Trilogy Networx™ Locking Devices
© ALARM LOCK 2012 WI2004 7/12
OVERVIEW
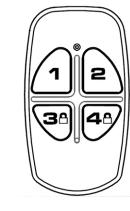
The 4-button Wireless Remote Release (order part RR-4BKEYFOB ) is used to wirelessly unlock up to four separate Trilogy Networx™ series locking devices, OR locking devices wired to the RR-RECEIVER (see WI2012). The Wireless Remote is intended as a portable pocket-size remote release (for a 1-button model intended for fixed mounting at a hidden location, see model " RR-1BUTTON "). The Wireless Remote requires one battery (pre-installed) that features a service life of up to 12,000 openings (use a 3V Lithium type CR2032 or Duracell DL2032 only). During normal operation, the locking device typically opens within 2 seconds of the button press.
Each of the four buttons can be "paired" (connected) with one Networx locking device (four buttons can be paired with four separate locking devices). In addition, each individual Networx locking device contains ten (10) "slots", with each slot available to accommodate one keyfob button. Therefore, each individual Networx locking device can ultimately be paired with up to ten Wireless Remote buttons on multiple keyfobs. Note: Each button can ONLY be paired with one specific Networx locking device at a time (thus when a previously paired button is later paired with a second locking device, the first pairing is erased). The Wireless Remote is not currently supported by PL Series Networx locking devices. Visit the Alarm Lock website (www.
PAIRING PROCEDURE
alarmlock.com) for supported firmware versions.
Pairing is performed locally at the keypad. Important: This pairing procedure should be performed after the locking device has been programmed by DL-Windows.
-
1. Open DL-Windows
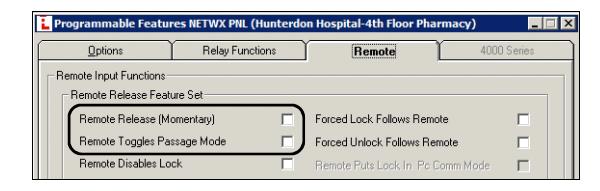
, select the desired Lock Profile, open the
Programmable Features
screen,
Remote
tab. Check to enable one of the following desired features:
- Remote Release (Momentary) --or--
- Remote Toggles Passage Mode
If neither are checked, the Wireless Remote pairing will be disabled upon subsequent DL-Windows programming downloads. Therefore, check to enable one of these two features and then send the programming to the locking device (see OI352 for complete DL-Windows programming instructions). This will ensure that the pairings to be added now will be unaffected by later downloads.
2. At the locking device keypad , enter Program Mode (press the Master Code followed by ; ).
| 3. To pair the first remote, press: |
|---|
| ;65;1: |
|---|
Verify keypad sounds " beep-beep-beep " continuously. (The " beep-beep-beep " indicates the locking device is ready and will wait about 30 seconds for the next step).
-
4. With the Wireless Remote in hand
, observe its LED as you perform the next steps:
- a. Press and hold one of the four buttons.
- b. The red LED lights ...keep holding the button…
- c. When the LED flashes green , release the button...
-
d. Wait a few seconds...observe the LED as follows:
- LED solid green = Pairing successful. Go to step 5 to pair another Wireless Remote; otherwise go to step 6.
- LED solid red = Pairing unsuccessful. Start again at step 3.
- 5. To pair another Wireless Remote , you will need to start again at step 3, but with a slight change, as follows: As previously stated, up to ten (10) Wireless Remote buttons may be enrolled into one locking device. Each Wireless Remote button added occupies a "slot" (numbered 1- 10); therefore, increment the "slot" number of the new Wireless Remote button in step 3. For example, when pairing the first remote in step 3, you pressed:
| ;65;1: |
|---|
To pair a second remote, you will need to press:
| ;65;2: |
|---|
To pair a third remote, you will need to press:
| ;65;3: |
|---|
...and so on. Therefore, to enroll another Wireless Remote, go to step 3, but use the incremented Wireless Remote "slot" number. Use the table below to track the location of each Wireless Remote button in your system:
| Location of Locking Device: | ||||
|---|---|---|---|---|
| Slot 1: | Slot 6: | |||
| Slot 2: | Slot 7: | |||
| Slot 3: | Slot 8: | |||
| Slot 4: | Slot 9: | |||
| Slot 5: | Slot 10: | |||
Use this table to track the fob button and its device pair:
| Keyfob Location of Locking Device: | |
|---|---|
| Button 1 | |
| Button 2 | |
| Button 3 | |
| Button 4 |
6. Test to ensure correct operation:
Testing the Wireless Remote is required to synchronize the Wireless Remote with the locking device. Furthermore, the first time you perform the test below, the locking device may not always open on the first try. DO NOT BE CON-CERNED, this is normal during this testing process. Test as follows:
- a. At the keypad, exit Program Mode by pressing and holding any keypad button.
- b. Press and release the paired Wireless Remote button.
- c. The LED lights red...
- d. ...within two seconds, the LED turns off...the locking device should open. If not, do not be concerned, this is normal . Wait a few seconds and start again at step b above. When the locking device unlocks and relocks, the testing process ends and "normal" Networx system operation resumes.
Note: During normal operation, the locking device is designed to always open on the first button press (no need to "press and hold"; one press is sufficient).
CLEARING THE FOB
This procedure removes the pairings of all Wireless Remote buttons to all locking devices (essentially "un-pairing" the fob of all paired data and restoring the fob to its default settings).
Note: This procedure is not required to allow a previously paired button to be paired with a new locking device; simply pair the button with the new locking device as per the " PAIRING PROCEDURE " on page 1 and the first pairing will be erased. But if you wish to remove the pairings of all buttons, proceed as follows:
- 1. Remove the key ring from the Wireless Remote case.
- 2. Carefully insert the edge of a small coin in the notch located in the bottom right corner of the Wireless Remote (near the key ring loop). Open the case by gently twisting the coin. Lift off the top cover.
- 3. Carefully remove the circuit board .
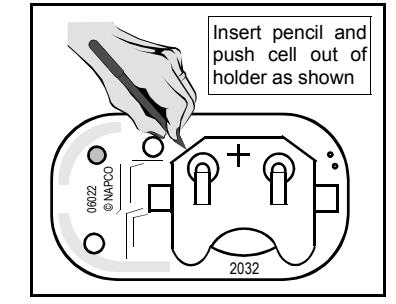
- 4. On the bottom side of the circuit board , push the battery cell out of its metal holder with a sharp pencil. The cell will slide out of its holder as shown in the image below. Note the orientation of the cell polarity, with its posi-
tive side up, before fully removing the cell.
5. Press and hold any Wireless Remote button on the circuit board . Keep holding the button and replace the battery positive (+) side up , by sliding the battery into its metal bracket. Continue holding the button .
Battery Replacement
- 6. While holding , wait until the LED rapidly toggles between red and green (" red-green-red-green " continuously), then release the button. All buttons will be "un-paired", and will be available for future pairings.
- 7. Reassemble the case by first placing the circuit board, battery side down, into the Wireless Remote base. Place the top of the Wireless Remote (with its rubber button/gasket in place) on the Wireless Remote base
- and press to snap the two Wireless Remote pieces together.
- 8. Test the Wireless Remote operation.
CLEAR A LOCKING DEVICE
Up to ten (10) Wireless Remote buttons (on multiple keyfobs) can be simultaneously paired with one individual Networx locking device. To remove all paired Wireless Remote buttons from a single locking device, use Function 64, as follows:
- 1. At the locking device keypad , enter Program Mode (press the Master Code and press ; ).
- 2. Press the following : ;64:
Note: Function 64 will disable all hardwired remote release ("Remote Input") switches, if present. In addition, if a Wireless Remote is misplaced or stolen, it will be necessary to remove ALL Wireless Remote buttons from the locking device to ensure system security.
3. Exit Program Mode (press and hold any button until a series of beeps is heard).
LOW BATTERY INDICATION
During normal operation, when a button on the Wireless Remote is pressed and its battery is weak, the LED on the Wireless Remote will flash red-green repeatedly for several seconds. Always replace a weak battery as soon as possible (see below " BATTERY REPLACEMENT " procedure).
BATTERY REPLACEMENT
Use a 3V Lithium type CR2032 or Duracell DL2032 only; use of another battery may present a risk of fire or explosion. Be careful NOT to press any buttons during this procedure .
- 1. Remove the key ring from the Wireless Remote case.
- 2. Carefully insert the edge of a small coin in the notch located in the bottom right corner of the Wireless Remote (near the key ring loop). Open the case by gently twisting the coin. Lift off the top cover.
- 3. With the bottom half of the Wireless Remote facing upwards , carefully remove the circuit board.
- 4. On the bottom side of the circuit board , push the battery out of its metal holder with a sharp pencil. The battery will slide out of its holder as shown in the image at left. Note the orientation of the battery polarity, with its positive side up, before fully removing the battery.
- 5. Replace with a new battery , positive (+) side up , by sliding the battery into its metal bracket. Be certain of battery polarity before installation .
- 6. Reassemble the case by first placing the circuit board, battery side down, into the Wireless Remote base. Place the top of the Wireless Remote (with its rubber button/gasket in place) on the Wireless Remote base and press to snap the two Wireless Remote pieces together.
- 7. Test the Wireless Remote operation. Follow the steps detailed on page 1 in the " PAIRING PROCEDURE " step 6.
REPLACING A LOCKING DEVICE
If the paired locking device is physically replaced with a new locking device, the " PAIRING PROCEDURE " must be repeated with each desired Wireless Remote button.