Alarm Lock Mag Stripe Enrolling Instructions
Open the original PDF document
View PDF

© ALARM LOCK 2017
ADDENDUM
DL-Windows V5 User's Guide Mag Stripe Enrolling Instructions
WI2249LF 8/17
Note: This addendum is intended to be used with DL‐WINDOWS SoŌware (V5.5.2 or later) and the DL‐WINDOWS Version 5 User's Guide (OI382).
Overview
Mag stripe cards are created by encoding user informaƟon and other credenƟal data on a magneƟc strip that can be read and validated by Mag stripe ‐enabled ArchiTech locks . Mag stripe cards are usually sold as blanks; the user then encodes their creden‐ Ɵal data onto any of the 3 available "Tracks" on the magneƟc strip using a pre‐determined card format (typically, this data is encod‐ ed onto Track two*). To help you get started, the DL‐WINDOWS soŌware provides a flexible interface to accommodate 3 popular pre‐configured formats (two are character‐based and one is bit field‐based ):
- ConƟnental (character based; see next secƟon)
- Swipe Format 16 Character Type 1 (standard "bank card" format, character‐based; see next secƟon)
- User Define 26‐bit Swipe Version (bit field‐based; see page 2)
First select (or create) an appropriate card format to match the user's programmed cards, then enroll the cards into DL‐Windows. This guide details the usage of the 3 "default" formats, and how to create your own opƟonal "custom" format based on each of the default formats.
Card Enrolling (Character‐Based)
Note: Refer to the secƟon Add Users with the Global Users Screen in OI382 for more informaƟon (adding Mag stripe cards to users is very similar to adding proximity cards as described in that secƟon).
- 1. To add Mag stripe cards to users, open the Global Users Screen , select a user from the User List , and click Add Card . The Card Enrolling dialog opens (see Fig. 1 and Fig. 4, below).
-
2. From the
Card Type
pull‐down, select
Swipe Cards CB
.
- The default Card Format Name shown in Fig. 1 is ConƟnental format; for this default format, all that is required is the 5‐digit Facility Code and the 6‐digit Card Code on your card.
‐‐or‐‐
- From the Card Format Name pull‐down, you may also choose Swipe Format 16 Character Type 1 shown in Fig. 4. For this default format, all that is required is the 16 digits printed on your card (standard "bank card" format).
- 3. Click OK to conƟnue.
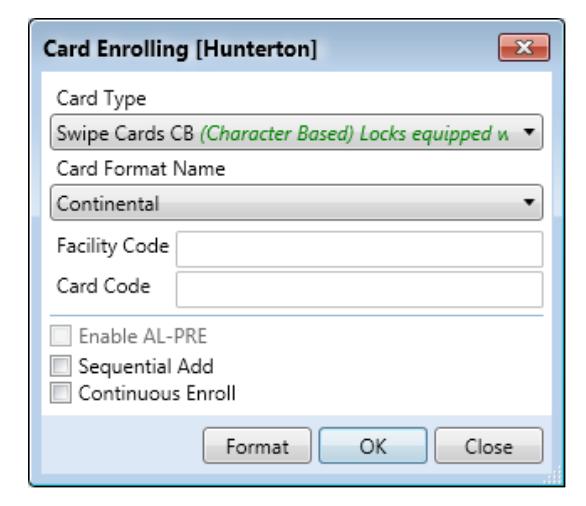

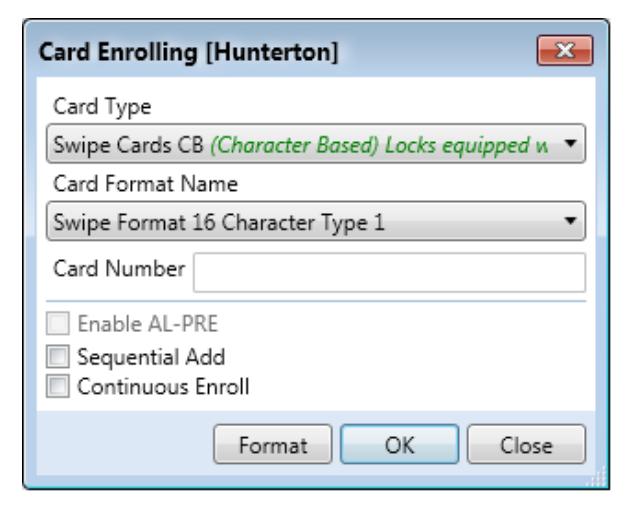
Fig. 1: Continental Format Fig. 4: Swipe Format 16 Character Type 1
* Important! Track two must ALWAYS contain data. If the user data is located on Track 1 or 3, Track 2 cannot be leŌ blank. We recommend that Track 2 should, at the very minimum, have a start senƟnel and at least 5 characters or 26 bits in total.
Note: The Format buƩon (located at the boƩom of the Card Enrolling dialog) opens the Card Formats screen that displays all the parameters of the selected card format (see " Card Formats Screen " secƟons, below).
Card Enrolling (Bit Field‐Based)
Adding Mag stripe cards to users is very similar to adding proximity cards, therefore refer to the secƟon Add Users with the Global Users Screen in OI382 for further informaƟon. To add Mag stripe cards to users:
- 1. Open the Global Users Screen , select a user from the User List , and click Add Card . The Card Enrolling dialog opens (see Fig. 5).
- 2. From the Card Type pull‐down, select Swipe Cards BF .
- 3. Click OK to conƟnue
NoƟce how this opƟon defaults to Decimal representaƟon. This bit field‐ based format is meant to be a swipe card implementaƟon of the indus‐ try standard 26‐bit proximity format using a card code and Facility Code.
Note: The Format buƩon at the boƩom of the Card Enrolling dialog opens the Card Formats screen that displays all the parameters of the selected card format (see the Card Formats Screen secƟon, below).
Card Formats Screen (Character‐Based)
To open the Card Formats screen, click the Format buƩon (described above). The Card Formats screen displays all the parameters used to create the selected card format. The default card formats are non‐
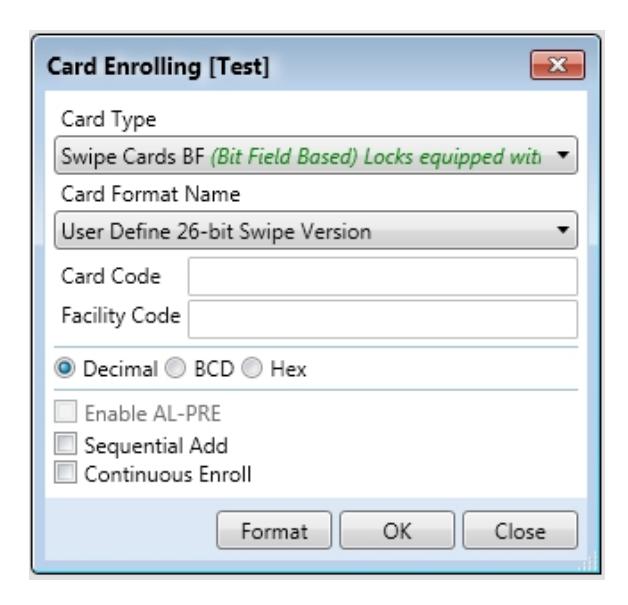
Fig 5: Card Enrolling Dialog (Bit Field-Based)
editable. From the Card Type pull down menu, there are two card opƟons that open different Card Formats screens. The first type shown below is the Swipe Cards CB (Character Based) Card Formats screen. The second is the Swipe Cards BF (Bit Field‐Based) shown on page 4.
The following is a breakdown of the Card Formats (Character Based) screen's parameter descripƟons. An example will be provid‐ ed at the end for clarity.
- Format Number ‐‐ Generated automaƟcally; used internally by DL‐Windows.
- Format Length (characters) ‐‐ The total number of characters on the Track you wish to use. Format Length = the number of characters in each field + the start senƟnel character + the end senƟnel character + any field separator characters.
- Format Length (bits) ‐‐ Calculated by taking the number of bits in a character and mulƟplying it by the Format Length (total number of characters).
- Physical Track ‐‐ One of three Tracks available on a mag stripe card. When used with ArchiTech locks, data MUST always be present on Track two.
- Character Length ‐‐ The number of bits used to make a character, including the Parity Bit.
- Parity Bit ‐‐ This number designates the posiƟon of the Parity Bit within the group of bits used to make a character. This is typically the 5th posiƟon. The Parity Bit is an extra bit used to detect errors in the data.
- LSB First (Least Significant Bit) ‐‐ When checked: AŌer the Parity Bit is removed, the remaining bits that define the character are read from right to leŌ.
- Start SenƟnel ‐‐ The very first character on a given Track; this character is the first character before any fields.
- Field Separator ‐‐ The character used to separate fields (select up to three fields to validate at the lock).
- End SenƟnel ‐‐ The very last character on a given Track, i.e. the last character aŌer all the field(s).
- Field 1/2/3 ‐‐ The fields that will be validated at the lock (up to three different fields are allowed). Here you can name the fields and select the length of each (the field length must be specified because you can choose not to use a field separator character). For example, you can take a string of 11 characters and call the first 5 characters field 1 and the next 6 characters field 2.
- Match Field 1/2/3 ‐‐ Select the fields to be validated at the lock. Important! When using mag stripe cards with ArchiTech locks, there must always be some data encoded on Track two. Even if you do not use Track two, at least some data must be present for the ArchiTech locks to funcƟon correctly .
Example using the ConƟnental Format
ConƟnental format is based on 5‐bit ABA character set found in ISO7812. This means that the characters are 5‐bits long, the 5th bit is parity and the bits are in LSB first order. This infor‐ maƟon is used to arrange user data for use by the lock.
As shown in the Card Formats screen shown in Fig. 2, the ConƟ‐ nental format is 19 characters in length. The total of 19 char‐ acters is derived from the following string of characters:
Start senƟnel (1) + Facility code (5) + Field separator (1) + Card code (6) + Field separator (1) + ExpiraƟon date (4) + End senƟ‐ nel (1) = 19 characters in length
The following parameters are used in this example:
- For the start senƟnel, the character ' ; '
- For the Facility Code, the characters '50011'
- For the filed separators, the character ' = '
- For the card code, the characters '112556'
- For the expiraƟon date, the characters '0520'
- For the end senƟnel, the character '?'
Therefore, the following character string is stored on the card (to be burned on the card by an end user or a service providing pre‐programmed cards):
;50011=112556=0520?
The format length in bits = 5 bits per character x 19 characters = 95 bits
Note: In Fig. 2, the expiraƟon date is not required for valida‐ Ɵon because the Match Field3 box is not checked. In this case, although the expiraƟon date data exists on the card, because it is unchecked it is not used in the validaƟon process. If you wish to use the expiraƟon date in the validaƟon process, or not use the Facility Code in the validaƟon process, then simply modify the format and create a custom format that fits your require‐ ments.
Custom Format Example
To create a custom format , click the Copy buƩon at the boƩom of the Card Formats screen and the fields become editable. Fig. 3 will build a custom format for a card with the following 3 Fields:
- 10‐digit Card Number
- 6‐digit Facility Number
- 4‐digit ExpiraƟon Date
If we use ABA‐ style characters as in the Fig. 2 example, your screen will look similar to the one shown in Fig. 3. You can now use the check boxes at the boƩom to select the fields the lock will use to validate the credenƟal.
Click Save to save your new format. The Card Enrolling dialog will display the fields for your custom format (see Fig. 6).
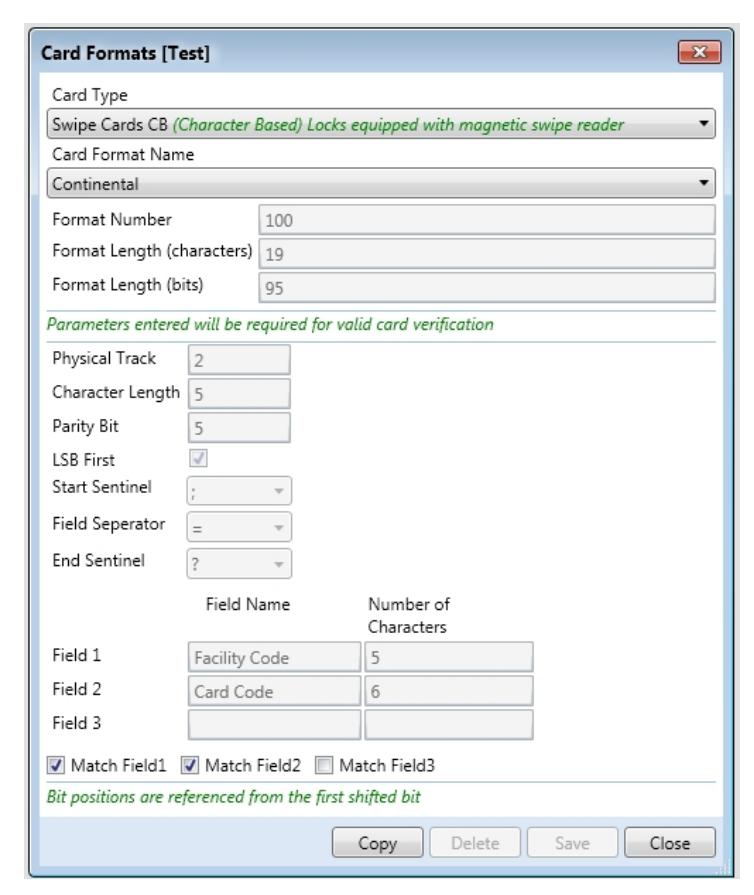
Fig. 2: Card Formats screen, Continental Format
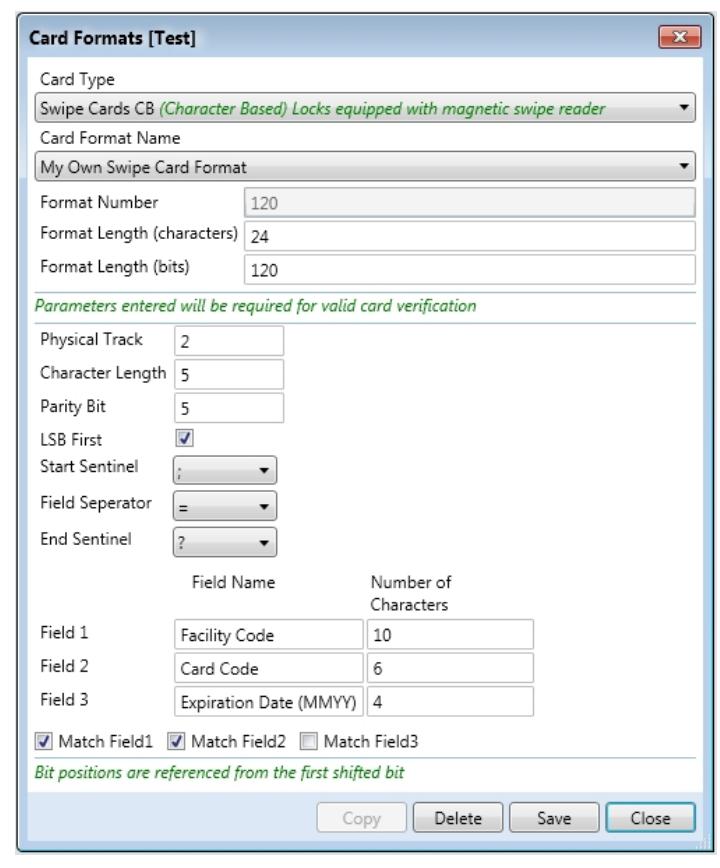
Fig. 3: Example of a "Custom" Format
Card Formats Screen (Bit Field‐Based)
In the Card Enrolling screen, click the Card Type pull down menu and select Swipe Cards BF .
The following is a breakdown of the Card Formats (Bit Field‐Based) screen's parameter descripƟons:
- Format Number ‐‐ Generated automaƟcally and is used internally by DL‐WINDOWS.
- Format Length (without senƟnel values) ‐‐ The total number of bits on the Track you wish to use. Format Length = The number of bits in each Field + Parity Bits.
- Card Number Offset ‐‐ The character locaƟon within the card number, usually starƟng from 0. Given from the vendor if there is an offset to the card number.
- Physical Track ‐‐ One of three Tracks available on a mag stripe card.
- Start SenƟnel ‐‐ The very first character on a given Track (the first character before any Fields). This character is a group of bits that is represented by its decimal and hex values.
- End SenƟnel ‐‐ The very last character on a given Track. This end senƟnel character is the last character aŌer all the
Field(s). This character is a group of bits that is represented by its decimal and hex values.
- Card Code ‐‐ The posiƟon of the card code is given by the posiƟon of its first bit, the posi‐ Ɵon of its last bit, and the length of the card code in bits.
- Facility Code ‐‐ The posiƟon of the Facility Code is given by the posiƟon of its first bit, the posiƟon of its last bit, and the length of the Facility Code in bits.
- Issue ‐ (OpƟonal) The posiƟon of the issue is given by the posiƟon of its first bit, the posi‐ Ɵon of its last bit, and the length of the Facility Code in bits.
- 1st Parity Bit ‐‐ The posiƟon of the 1st Parity Bit in the bit string and if the parity is even or odd. The Parity Bit is an extra bit used to de‐ tect errors in the data.
- 2nd Parity Bit ‐‐ The posiƟon of the 2nd Parity Bit in the bit string and if the parity is even or odd. The Parity Bit is an extra bit used to de‐ tect errors in the data.
- Set Parity Mask 1 ‐‐ Selects the bits that the 1st Parity Bit checks for, even or odd.
- Set Parity Mask 2 ‐‐ Selects the bits that the 2nd Parity Bit checks for, even or odd.
- Match Boxes ‐‐ Selects the Fields the lock will use to validate the credenƟal.
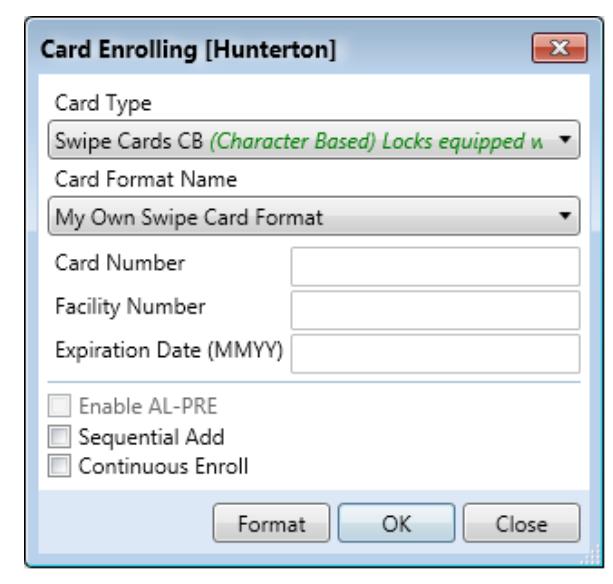
Fig. 6: (Custom) "My Own Swipe Card Format"
Fig. 7: User Define 26-bit Swipe Version Format