Alarm Lock Installing Microsoft SQL Server 2012 Express
Open the original PDF document
View PDF

For Sales and Repairs 1-800-ALA-LOCK For Technical Service 1-800-645-9440 or visit us at http://tech.napcosecurity.com/ (Note: Technical Service is for security professionals only) Publicly traded on NASDAQ Symbol: NSSC
© ALARM LOCK 2019

IMPORTANT! - Before Installing DL-Windows V5.5.3 Please Read This
WI2330ALF 7/19
DL‐Windows version 5.5.3, REQUIRES MicrosoŌ® SQL Server® 2012 Express ! Follow either the secƟon " For New InstallaƟons Only " or the secƟon " For ExisƟng/Upgrade InstallaƟons Only ".
For New InstallaƟons Only
If you are performing a BRAND NEW installaƟon of DL‐Windows 5.5.3, with no pre‐exisƟng versions in your computer, follow the steps in this secƟon ONLY (DO NOT perform any of the steps in the secƟon " For ExisƟng/Upgrade InstallaƟons Only ", below).
- 1. On the installaƟon CD (or inside the WinZip file that was downloaded from the Alarm Lock technical Library website), right‐click the file named "DL‐Windows Server Installer" and select Run as Administrator .
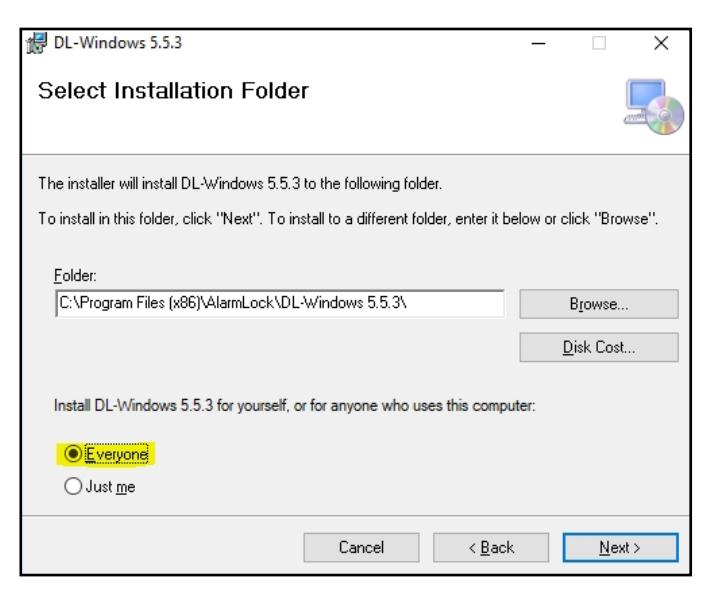
- 2. As shown in the following image, when prompted "Install DL‐Windows 5.5.3 for yourself, or for anyone who uses this computer", select Everyone, then click Next to proceed through the installaƟon prompts.
The installaƟon process will install the MicrosoŌ® SQL Server® 2012 Express database and the DL‐Windows V5.5.3 computer soŌware applicaƟon. No further steps are needed. When the installaƟon process ends, you can launch DL‐Windows V5.5.3 and log in for use. Note: The " DL‐Windows WorkstaƟon Installer " selecƟon only installs the DL‐Windows V5.5.3 computer soŌware applicaƟon, and is intended to be used only when you already have an instance of MicrosoŌ® SQL Server® 2012 Express previously installed in your com‐ puter, or when you are connecƟng to a MicrosoŌ® SQL Server® 2012 Express database over a network.
For ExisƟng/Upgrade InstallaƟons Only
The steps in this secƟon below are ONLY to be used if you ALREADY have an exisƟng DL‐Windows V5.X.X installed in your computer. Do NOT perform the steps below if you are installing DL‐Windows for the first Ɵme (i.e. a BRAND NEW installaƟon). For first Ɵme installaƟons of DL‐ Windows, follow the steps in the secƟon " For New InstallaƟons Only ", above).
- 1. Run your exisƟng DL‐Windows V5.X.X soŌware and back up the exisƟng database (click Tools > Backup Database ).
-
2. Manually install
MicrosoŌ® SQL Server® 2012 Express
as follows:
- On the installaƟon CD (or inside the WinZip file that was downloaded from the Alarm Lock technical Library website), open the folder named SqlExpress2012 . The next selecƟon depends upon your Windows operaƟng system: For 64‐bit operaƟng systems, right‐click the file named "SQLEXPR_x64_ENU.EXE" and select " Run as Administrator "; for 32‐bit operaƟng systems, right‐click the file named "SQLEXPR32_x86_ENU.EXE " and select " Run as Administrator "
- For the SQL InstallaƟon Type , select " New SQL Server Standalone InstallaƟon"
- Select "Perform a new installaƟon of SQL Server 2012"
- Accept the License Terms and click NEXT
- SELECT ALL instance features, then click NEXT
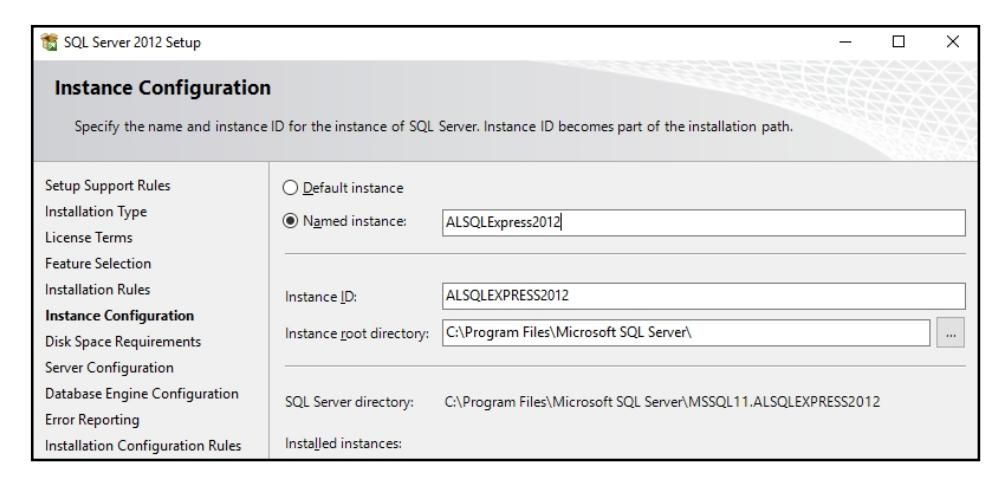
- In the Instance ConfiguraƟon screen (shown below), use the SQL Named instance " ALSQLExpress2012 " and the Instance ID " ALSQLEXPRESS2012 " (ensure the Named instance and the Instance ID both match). Click Next to conƟnue.
• Click NEXT in the Server ConfiguraƟon screen (shown below)

• In the Database Engine ConfiguraƟon screen (shown below), we recommend you select Mixed Mode and enter an SQL Server system administrator (sa) account password. This will allow future access to the database as an Administrator if your Windows User login does not permit local access. You can also specify addiƟonal SQL Server administrators by adding them manually in the secƟon " Specify SQL Server administrators " secƟon. Click Next to conƟnue.
Note: Physically retain and store the system administrator password in a secure locaƟon, or use Alarm Lock's default Password alarmlock@2012 (all lowercase).

• Click Next unƟl the installaƟon process is complete.
- 3. Uninstall DL‐Windows (5.X.X) using Programs and Features > Uninstall or change a program in MicrosoŌ Windows.
- 4. Install DL‐Windows V5.5.3 using a "WorkstaƟon" installaƟon: On the installaƟon CD (or inside the WinZip file that was downloaded from the Alarm Lock technical Library website), right‐click the file named "DL‐Windows WorkstaƟon Installer" and select Run as Administra‐ tor . Proceed with the prompts to install.
- 5. AŌer the WorkstaƟon installaƟon process ends, run the Database ConfiguraƟon uƟlity to import the previous database version into ver‐ sion 5.5.3 (the Database ConfiguraƟon uƟlity is located in Start > All Programs > DL‐Windows 5 > Database ConfiguraƟon ). Note: For this step, DL‐Windows will sƟll be using the previous version of SQL Server, i.e. version 2008.
-
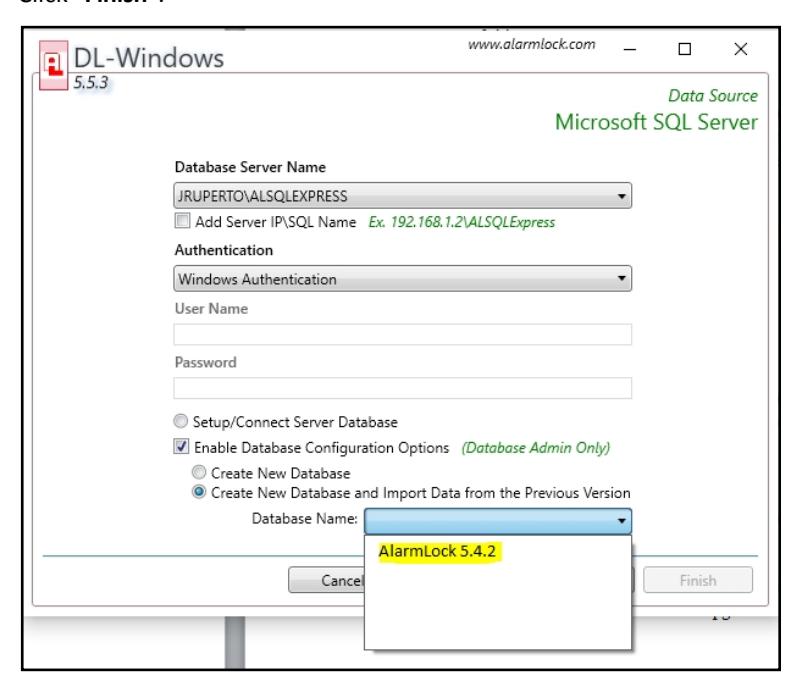
6. In the screen that appears (shown below), perform the following:
- Check the " Enable Database ConfiguraƟon OpƟons " checkbox
- Select " Create New Database and Import Data from the Previous Version "
- In the " Database Name " pull‐down, select your older database (likely your previous version)
- Click " Next ", when prompted. ConƟnue to click " Yes ", then click " Next ".
- Note: DO NOT check " Use DL‐Windows in Server Mode ".
- Click " Finish ".
- 7. AŌer successfully imporƟng your database from the previous version, run DL‐Windows V5.5.3 and click Tools > Backup Database . When complete, exit DL‐Windows V5.5.3.
-
8. Connect to the new SQL Server 2012 database and restore the backup file, as follows:
- Run the Database ConfiguraƟon uƟlity (located in Start > All Programs > DL‐Windows 5 > Database ConfiguraƟon ) and select the new database " ALSQLExpress2012 " in the " Database Server Name " pull‐down.
- Check the Enable Database ConfiguraƟon OpƟons checkbox and select Create New Database . Click Next .
- On the screen that follows, click YES if prompted to overwrite (then NEXT ). Note: DO NOT check "Use DL‐Windows in Server Mode"
- On the final screen that appears, click Finish , and a new "blank" SQL Server® 2012 Express database will have been created.
-
9. Migrate the older "Backup File" created in Step 7 to the new
SQL Server® 2012 Express
Backup directory:
- Open the folder named "Backup" located in the 2008 SQL Express main folder:
C:\Program Files\MicrosoŌ SQL Server\MSSQL10.ALSQLEXPRESS\MSSQL\Backup
- Copy the Alarm Lock V5.5.3 backup file.
- Paste the Alarm Lock V5.5.3 backup file into the newly created SQL Server® 2012 Express "Backup" folder:
C:\Program Files\MicrosoŌ SQL Server\MSSQL11.ALSQLEXPRESS2012\MSSQL\Backup
- Run DL‐Windows V5.5.3 soŌware
- Click Tools > Restore Database
- Select the backup file that includes the name "V5.5.3" and click Open .
All Finished! The database is now both restored and upgraded to DL‐Windows V5.5.3.