Alarm Lock AL-IME-USB Gateway User’s Guide
Open the original PDF document
View PDF

345 Bayview Avenue Amityville, New York 11701 For Sales and Repairs 1-800-ALA-LOCK For Technical Service 1-800-645-9440 or visit us at http://tech.napcosecurity.com/ (Note: Technical Service is for security professionals only) Publicly traded on NASDAQ Symbol: NSSC © ALARM LOCK 2014

Networx™ AL-IME-USB Gateway USER'S GUIDE
© NAPCO Security Technologies, Inc. 2014 OI386 08/14
OVERVIEW
Networx series door locks contain an integral radio that
communicates with an intermediate device called a Networx Gateway module. In a conventional Networx system, this Gateway module is connected to a computer network, allowing a Windows PC connected to the network to control and program all Networx series door locks with DL-Windows software.
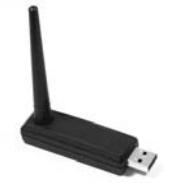
AL-IME-USB "USB Gateway"
The AL-IME-USB Portable Gateway provides full Networx Gateway functionality without the need for a network connection. Simply insert the USB Gateway into your PC or laptop USB socket, and you can quickly create a wireless connection to your Networx door locks, with all data routed through the USB Gateway . In addition, the USB Gateway can be used in an existing system with standard Networx Gateways.
The USB Gateway is a flexible device. No data is stored within the USB Gateway itself, and therefore a single USB Gateway can be switched seamlessly between computers running DL-Windows and even between DL-Windows Accounts (the USB Gateway is automatically provided with the necessary lock data from DL-Windows each time communications are initiated with locks).
Note: Only "Local" Emergency Commands are supported when using an USB Gateway as your primary means of communicating with your locks. If no standard Networx Gateways are used in your system, Emergency Commands can only be initiated by a pre-programmed Wireless Remote Release (not with DL-Windows). For more information about Emergency Commands, see the DL-Windows User's Guide (OI382) and the DL-Windows for Networx User's Guide (OI383).
This manual does NOT contain preliminary information regarding your Networx system, and only some of the many DL-Windows features that are available are covered here. If you are unfamiliar with the
terminology or operations described in this manual, stop here and read the two guides OI382 and OI383 cited above before proceeding.
CAPACITY
In a standard networked system, 1 to 32 Networx Gateways may be used, each Gateway can control up to 63 locks for a maximum of 2000 locks allowed per Account. The USB Gateways , in theory, can support up to 2000
locks. The addition of the 64th lock to a USB Gateway creates a "virtual" Gateway database, and therefore you only need one AL-IME-USB for your ENTIRE system, running thousands of locks, in an unlimited number of Accounts. Furthermore, each Networx lock can contain up to 5000 Users.
SPECIFICATIONS
Input Power: .... Supplied by the PC or laptop.
Dimensions: .... 3⅛"L x ½"H x ⅞"W (2½"H with two inch
antenna; also supplied with 6" USB extension cable for computers with USB sockets positioned in close proximity).
Range: .............. Wireless programming range up to 200
feet, depending on building construction materials. For larger systems, the use of standard Networx Gateways are rec-
ommended.
SYSTEM REQUIREMENTS
The USB Gateway only requires one (1) unused USB Communications port. For optimal performance using DL -Windows, the following minimum requirements are recommended:
- Supported operating systems: Windows XP Service Pack 3, Windows 7, 32-Bit and 64-Bit Systems
- Processor: 2GHz or faster is recommended
- RAM: 1GB or more is recommended
- Hard Disk Space: 1GB or more is recommended
- DL-Windows software version: 5.2 or greater
GETTING STARTED
DRIVER INSTALLATION
The USB Gateway requires DL-Windows version 5.2 or later. If you are running a pre-5.2 version of DL-Windows, STOP HERE and install DL-Windows version 5.2 or later (for instructions, see OI382).
IMPORTANT: Do not insert the USB Gateway into the USB port before installing its driver, thus allowing the Windows "Plug and Play" feature to install a Windowsdesignated driver. Instead, first install the dedicated driver located on the provided CD using the instructions below. If the Windows driver was previously installed, unin-
stall this driver before proceeding . Note: The provided CD is a standard DL-Windows version 5.2 installation CD containing the AL-IME-USB Gateway drivers. Even if you previously installed DL-Windows, this CD should be used to install the necessary USB Gateway drivers. Proceed as follows:
1. Place the CD into your disk drive and allow the software to AutoRun the Setup.exe file.
Note: If the Setup.exe file does not AutoRun, then double-click the Setup.exe file located in the Setup folder in the installation disk top directory.
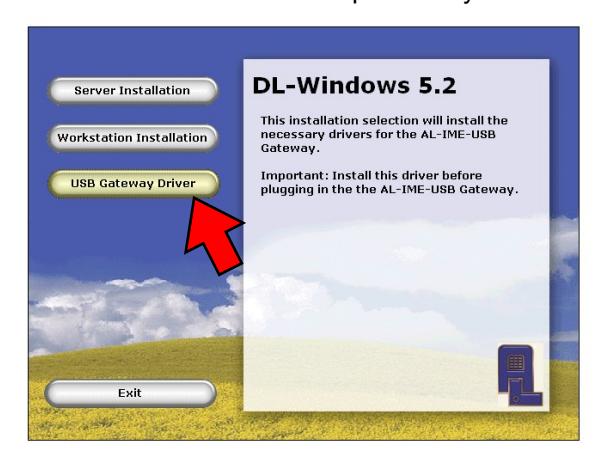
- 2. In the screen that appears, click the " USB Gateway Driver " button. The system will auto-detect the operating system (32- or 64-bit), and automatically install the drivers needed for the USB Gateway .
- 3. When the installation completes, we recommend the verification of the installed driver (4.X.X). This is normally found using the Windows Device Manager , accessed using the Control Panel .
Alternatively, you can manually explore this DL-Windows 5.2 installation CD by opening the USB Driver folder, selecting the 32-bit or 64-bit folder, and running the Setup.exe file to install the correct driver for your PC or laptop.
ADDING THE USB GATEWAY / DISCOVERY
Before using the USB Gateway , new Networx DL-Windows systems require a Security Password be set. Then you must discover the USB Gateway into your Networx system. If you are unfamiliar with these features and associated processes, stop here and read OI383.
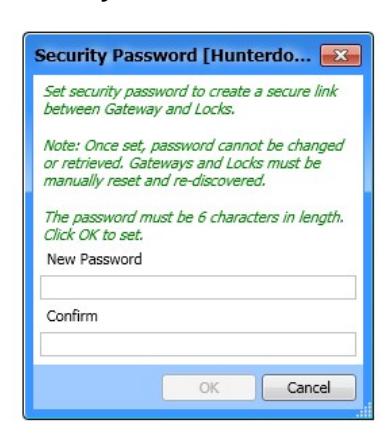
SET PASSWORD
The Security Password creates a secure connection between DL-Windows, your Gateways and the physical locks.
IMPORTANT: The Security Password cannot be changed and cannot be retrieved. (See OI382 for more information).
To set the Security Password, in the DL-Windows "Main Screen", click Tools > Set Security Password .
In the screen that appears (shown at right), type a unique 6 character (no more, no less) password in the New Password field. Retype the password in the Confirm field and click OK to set the Security Password, or click Cancel to exit without saving changes.
GATEWAY DISCOVERY / ADDITION
In the DL-Windows "Main Screen", click Gateway Config to open the Gateway Configuration screen.
Tip: For comprehensive instructions regarding how to use the Gateway Configuration screen and its options, see OI383.
There are two ways to add a USB Gateway to a DL-Windows Account, as detailed below.
Add USB Gateway -- Method 1:
In the Gateway Configuration screen, click the Discover Gateways And Auto Add button. This one click option discovers and adds ALL " Available " Gateways to the selected Account. Note: All Gateways on the same subnet of your network will be discovered and automatically added before the discovery and addition of the USB Gateways .
Add USB Gateway -- Method 2:
In the Gateway Configuration screen Actions menu, click Discover New Gateway(s) . This action will find ALL " Available " Gateways and list them on the screen. Note: The IP addresses of " Available " Gateway(s) will be highlighted green. This two-step option allows you to first discover Gateways, then selectively decide which Networx Gateways or USB Gateway to add.
The next step is to click to select a USB Gateway , then click Actions > Add Gateway to Account . Click Yes in the confirmation popup and when added, the IP address of the Gateway will be highlighted in blue.
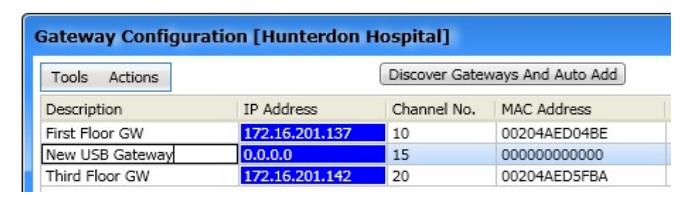
The IP address is "0.0.0.0" and the MAC address is "000000000000". The default Name ("New USB Gateway") can be edited as desired by simply double-clicking the existing text and typing a new description.
Congratulations!
After the USB Gateway has been discovered and added to your Account(s), you can now discover and add Networx locks to your USB Gateway and communicate wirelessly. Note: The USB Gateway cannot communicate with discovered locks from a Workstation-connected PC. For details regarding lock discovery / configuration and Workstations, see OI382 and OI383.
TIP: Only one USB Gateway is needed for multiple Accounts in DL-Windows. However, the USB Gateway must be discovered and added FOR EACH ACCOUNT in DL-Windows for which the USB Gateway will be used. For more information, see the next section, " USB GATEWAY INTEGRATION ".
USB GATEWAY INTEGRATION
In the DL-Windows "Main Screen", click Wireless Actions > Use USB Gateway Only . Upon selection of the Use USB Gateway Only feature, all communications to the Networx locks in the Account are routed
through the USB Gateway (regardless of the Network Gateway to which the lock may have been assigned). Note: The above is denoted by a USB "stick" icon displayed at the bottom of the DL-Windows screen (shown at right).
What does this mean?
Suppose you have an existing Account in DL-Windows, containing multiple locks assigned to multiple Gateways. By simply discovering and adding the USB Gateway into the Account, then selecting the " Use USB Gateway Only " feature, all subsequent communications to (any) lock in the Account will be sent via the USB Gateway . Therefore, an existing Networx system (containing locks and Gateways) does not need to be re-configured. In addition, the " Use USB Gateway Only " feature circumvents the network, since all communications are sent from the PC through its USB port, resulting in no additional network traffic. In theory, the " Use USB Gateway Only " feature can be used as a temporary measure when Gateways are unavailable, or if the network is "down" (non-operational).
Things to Remember:
- The " Use USB Gateway Only " feature is enabled (or disabled) per Account.
- When the " Use USB Gateway Only " feature is enabled, the Emergency icon is "greyed out" (unavailable), and therefore all Emergency features are also unavailable. Note: Anytime an AL-IME-USB is used, Global Emergency functions are unavailable.
- The " Use USB Gateway Only " feature will remain active indefinitely, even after quitting DL-Windows and re-opening. Therefore, this feature should al-
- ways be manually disabled (unchecked) when no longer needed.
- The " Use USB Gateway Only " feature may cause the failure of manual or scheduled (automatic) downloading of Networx locks that are not in range of the USB Gateway .
"TRANSFER LOCK(S) TO ANOTHER GATEWAY" FEATURE
In the Gateway Configuration screen, click Tools > Transfer Lock(s) to Another Gateway . The Lock Transfer screen opens:

This screen is used to selectively transfer locks already assigned to the USB Gateway to a Networx Gateway. There are many potential uses for this feature, but it is especially useful in situations where you wish to take advantage of the benefits of both a Networx Gateway and a USB Gateway .
To transfer locks from the USB Gateway to a Networx Gateway:
- 1. In the top window of the Lock Transfer screen, use the checkboxes to select the desired lock(s) you wish to transfer.
- 2. In the bottom window of the Lock Transfer screen, click the radio button to select the " Destination Gateway ". Only one Gateway can be selected for each operation.
- 3. Click the Transfer button. Note: This lock transfer operation may take some time; please be patient! A confirmation popup will appear when successful:
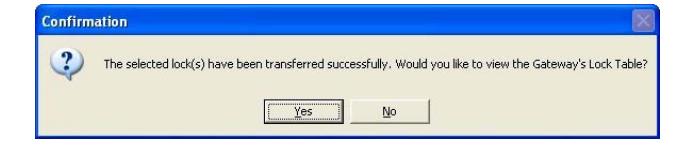
Note that the above popup optionally allows you to verify the results of the transfer operation. Click Yes to verify the operation by opening the Gateway's Lock Table , or click No to close the popup and continue without viewing the Lock Table .
For complete migration of all locks on the USB Gateway to a new Networx Gateway, select Actions > Replace Gateway with New One (for more information about this feature, see OI383).
USB GATEWAY REPLACEMENT
If your USB Gateway is lost or broken, it does not need to be deleted, rediscovered or added, etc. The solution
is to simply plug in a new USB Gateway and send the "Lock Configuration Table", as follows:
- 1. Plug in a new USB Gateway . Note: Driver reinstallation not required.
- 2. In DL-Windows, open the Gateway Configuration screen. The old / lost USB Gateway will still be highlighted in blue.
- 3. Click Tools > Send Lock Config Table to GW .
All pertinent lock data from the old USB Gateway (stored in the DL-Windows database) is moved to the new USB Gateway . For more information about this feature, see OI383.
ALARM LOCK LIMITED WARRANTY
ALARM LOCK SYSTEMS, INC. (ALARM LOCK) warrants its products to be free from manufacturing defects in materials and workmanship for twenty four months following the date of manufacture. ALARM LOCK will, within said period, at its option, repair or replace any product failing to operate correctly without charge to the original purchaser or user.
This warranty shall not apply to any equipment, or any part thereof, which has been repaired by others, improperly installed, improperly used, abused, altered, damaged, subjected to acts of God, or on which any serial numbers have been altered, defaced or removed. Seller will not be responsible for any dismantling or reinstallation charges, environmental wear and tear, normal maintenance expenses, or shipping and freight expenses required to return products to ALARM LOCK. Additionally, this warranty shall not cover scratches, abrasions or deterioration due to the use of paints, solvents or other chemicals.
THERE ARE NO WARRANTIES, EXPRESS OR IMPLIED, WHICH EXTEND BEYOND THE DESCRIPTION ON THE FACE HEREOF. THERE IS NO EXPRESS OR IMPLIED WARRANTY OF MER-CHANTABILITY OR A WARRANTY OF FITNESS FOR A PARTICU-LAR PURPOSE. ADDITIONALLY, THIS WARRANTY IS IN LIEU OF ALL OTHER OBLIGATIONS OR LIABILITIES ON THE PART OF ALARM LOCK.
Any action for breach of warranty, including but not limited to any implied warranty of merchantability, must be brought within the six months following the end of the warranty period.
IN NO CASE SHALL ALARM LOCK BE LIABLE TO ANYONE FOR ANY CONSEQUENTIAL OR INCIDENTAL DAMAGES FOR BREACH OF THIS OR ANY OTHER WARRANTY, EXPRESS OR IMPLIED, EVEN IF THE LOSS OR DAMAGE IS CAUSED BY THE SELLER'S OWN NEGLIGENCE OR FAULT.
In case of defect, contact the security professional who installed and maintains your security system. In order to exercise the warranty, the product must be returned by the security professional, shipping costs prepaid and insured to ALARM LOCK. After repair or replacement, ALARM LOCK assumes the cost of returning products under warranty. ALARM LOCK shall have no obligation under this warranty, or otherwise, if the product has been repaired by others, improperly installed, improperly used, abused, altered, damaged, subjected to accident, nuisance, flood, fire or acts of God, or on which any serial numbers have been altered, defaced or removed. ALARM LOCK will not be responsible for any dismantling, reassembly or reinstallation charges, environmental wear and tear, normal maintenance expenses, or shipping and freight expenses required to return products to ALARM LOCK. Additionally, this warranty shall not cover scratches, abrasions or deterioration due to the use of paints, solvents or other
chemicals.
This warranty contains the entire warranty. It is the sole warranty and any prior agreements or representations, whether oral or written, are either merged herein or are expressly cancelled. ALARM LOCK neither assumes, nor authorizes any other person purporting to act on its behalf to modify, to change, or to assume for it, any other warranty or liability concerning its products.
In no event shall ALARM LOCK be liable for an amount in excess of ALARM LOCK's original selling price of the product, for any loss or damage, whether direct, indirect, incidental, consequential, or otherwise arising out of any failure of the product. Seller's warranty, as hereinabove set forth, shall not be enlarged, diminished or affected by and no obligation or liability shall arise or grow out of Seller's rendering of technical advice or service in connection with Buyer's order of the goods furnished hereunder.
ALARM LOCK RECOMMENDS THAT THE ENTIRE SYSTEM BE COMPLETELY TESTED WEEKLY.
Warning: Despite frequent testing, and due to, but not limited to, any or all of the following; criminal tampering, electrical or communications disruption, it is possible for the system to fail to perform as expected. ALARM LOCK does not represent that the product/system may not be compromised or circumvented; or that the product or system will prevent any personal injury or property loss by burglary, robbery, fire or otherwise; nor that the product or system will in all cases provide adequate warning or protection. A properly installed and maintained alarm may only reduce risk of burglary, robbery, fire or otherwise but it is not insurance or a guarantee that these events will not occur. CONSEQUENTLY, SELLER SHALL HAVE NO LIABILITY FOR ANY PERSONAL INJURY, PROPERTY DAMAGE, OR OTHER LOSS BASED ON A CLAIM THE PRODUCT FAILED TO GIVE WARNING. Therefore, the installer should in turn advise the consumer to take any and all precautions for his or her safety including, but not limited to, fleeing the premises and calling police or fire department, in order to mitigate the possibilities of harm and/or damage.
ALARM LOCK is not an insurer of either the property or safety of the user's family or employees, and limits its liability for any loss or damage including incidental or consequential damages to ALARM LOCK's original selling price of the product regardless of the cause of such loss or damage.
Some states do not allow limitations on how long an implied warranty lasts or do not allow the exclusion or limitation of incidental or consequential damages, or differentiate in their treatment of limitations of liability for ordinary or gross negligence, so the above limitations or exclusions may not apply to you. This Warranty gives you specific legal rights and you may also have other rights which vary from state to state.