Aiphone IXW PBX Quick Start Programming Guide
Open the original PDF document
View PDF

IXW-PBX
Programming Guide
Table of Contents
| Page 2 |
Logging into the IXW-PBX
-Where to locate the password for the IXW-PBX, and how to log into the device |
|---|---|
| Page 2-4 | Setup Wizard |
| - Step-by-step instructions for the initial setup of the IXW-PBX | |
| Page 5 | SIP Settings |
| - Configure the SIP settings for the IXW-PBX | |
| Page 6 | Editing Extensions |
| - Adding IX Series devices to the IXW-PBX | |
| Page 7 | VoIP Trunk Settings |
| - Setting up a VoIP Trunk | |
| Page 8 | Analog Trunk Settings |
| - Setting up an Analog Trunk | |
| Page 8-9 | Registering a Phone Number |
| - Adding a Phone Number to the Support Tool | |
| Page 9 | Adding an Outbound Route rule |
| - Creating an outbound route for analog dial out | |
| Page 10 | Registering the IXW-PBX |
| - Adding the IXW-PBX to the Support Tool | |
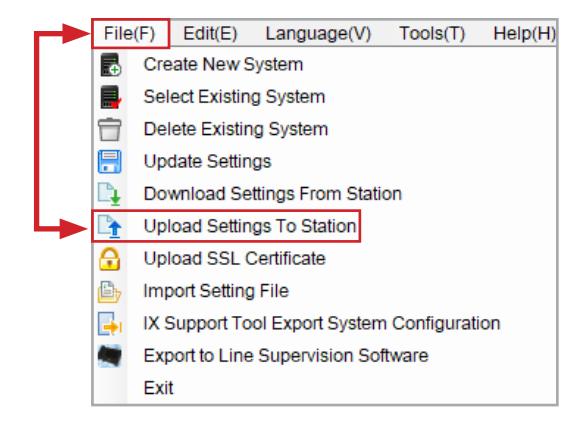
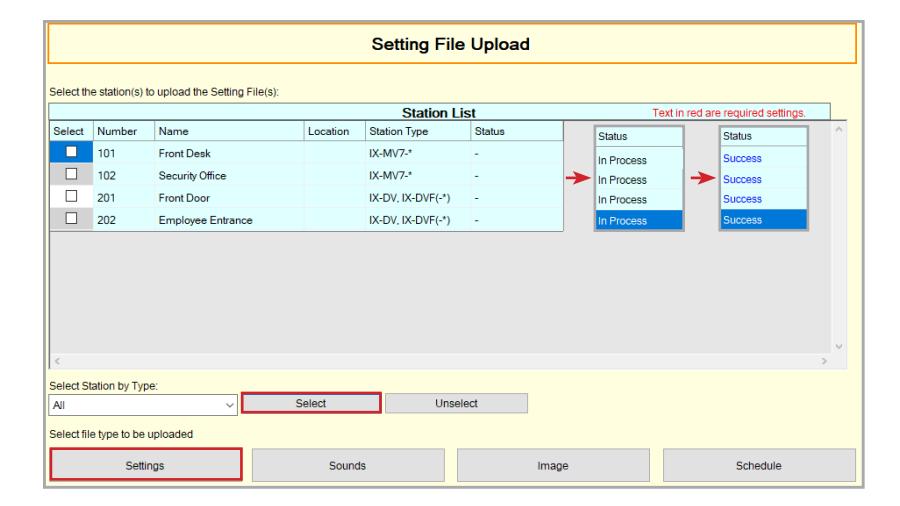
| Page 10 | Uploading |
| - Uploading Settings to Stations |
Logging into the IXW-PBX
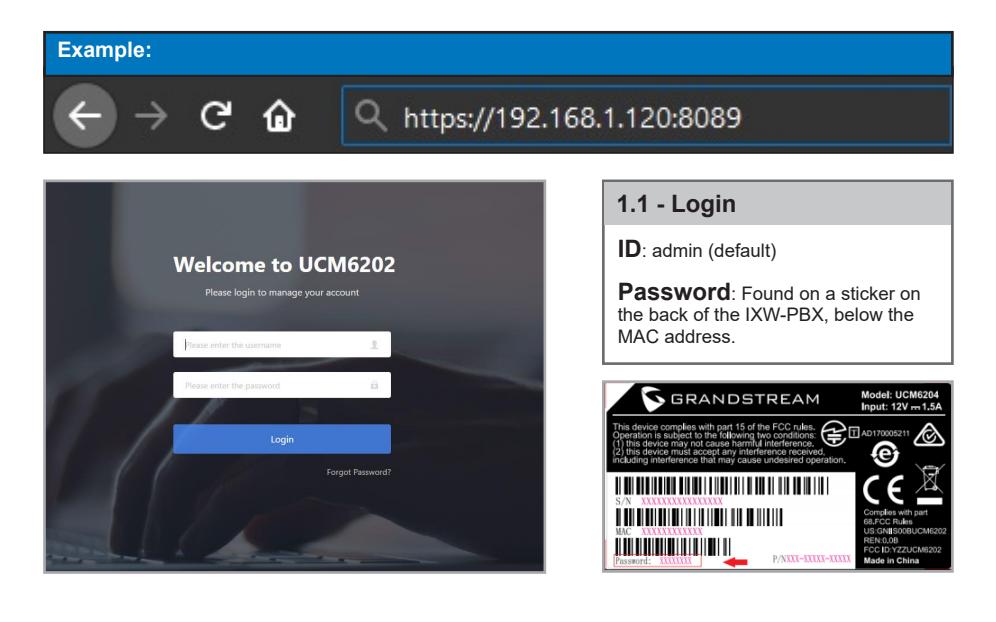
Access the IXW-PBX by entering its IP address and port in a browser. The IP address of the IXW-PBX will be shown on its LCD screen, and the port used is 8089.
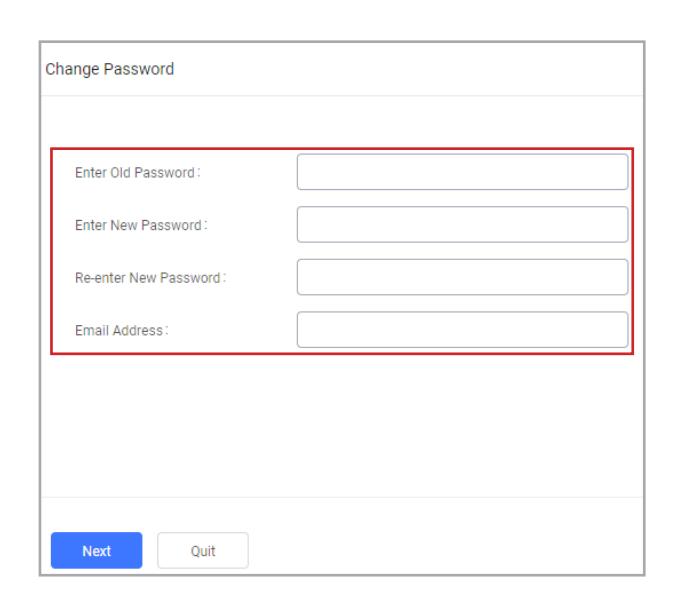
Setup Wizard - Change Password
When first logging into the IXW-PBX, you will be prompted to create a new password and enter a valid email address for password recovery.
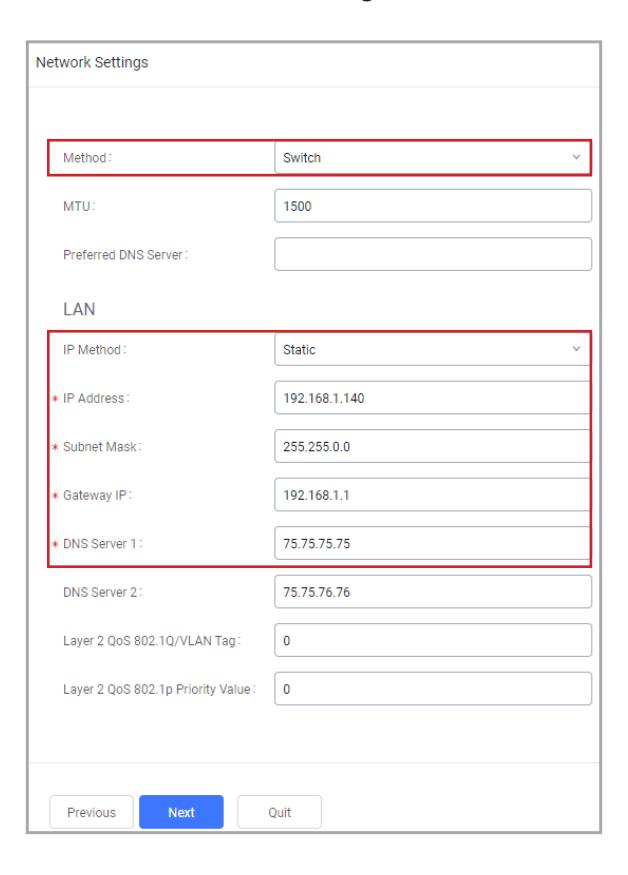
Setup Wizard - Network Settings
The network settings for the IXW-PBX will need to be changed in order for it to communicate with IX Series products. Change the Method to "Switch". The LAN settings will need to match your local network.
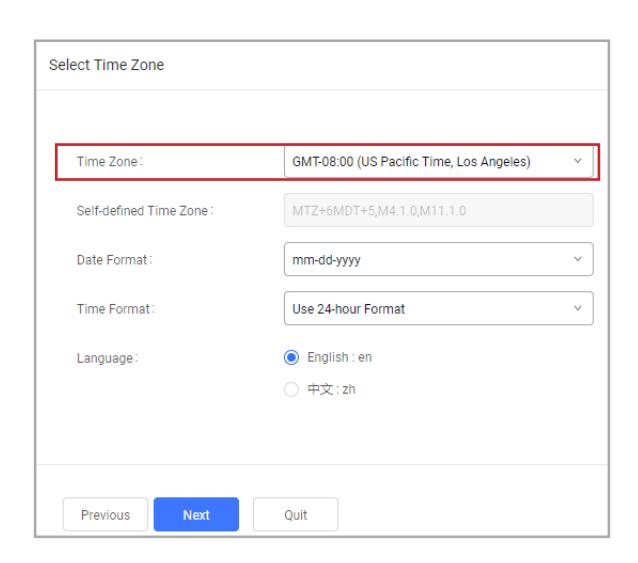
Setup Wizard - Time Zone
Change the Time Zone to match the location of the IX Series system. The date and time format can be changed to match your own preference.
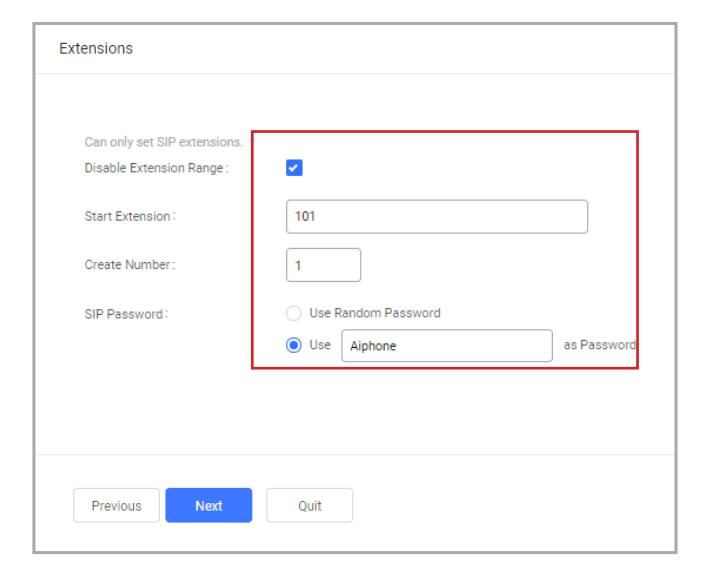
Setup Wizard - Extensions
Extensions are how the IX Series stations are assigned in the IXW-PBX. Once an extension is created the extension number cannot be edited. For this reason, select Disable Extension Range, and set the Create Number to 1. Set the Start Extension to your first station number, and use a custom SIP Password that will be assigned to all extensions.
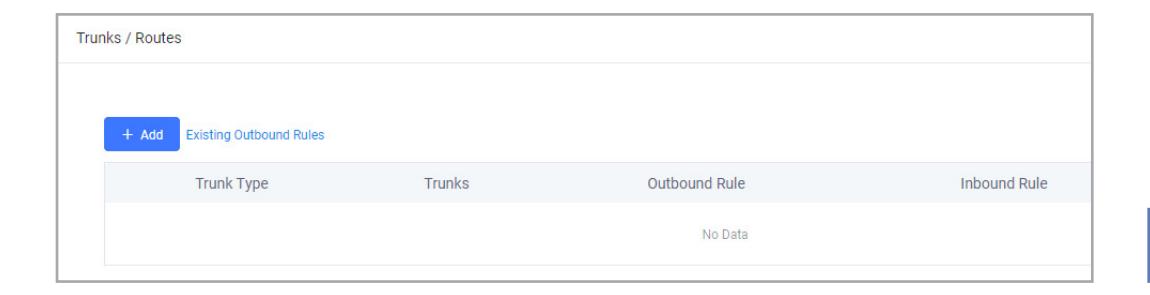
Setup Wizard - Trunk / Routes
The Trunks / Routes will be assigned in later steps in this guide with more in-depth information. Skip this step by clicking next.
Setup Wizard - Summary
Review the information from each of the previous steps and click save to move on to the next step.

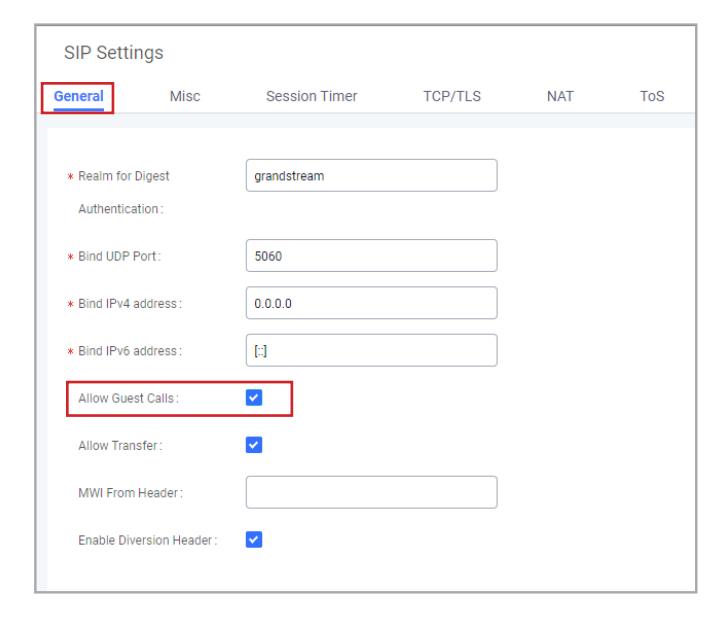
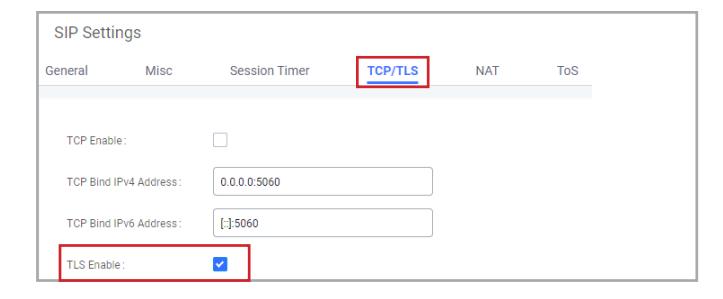
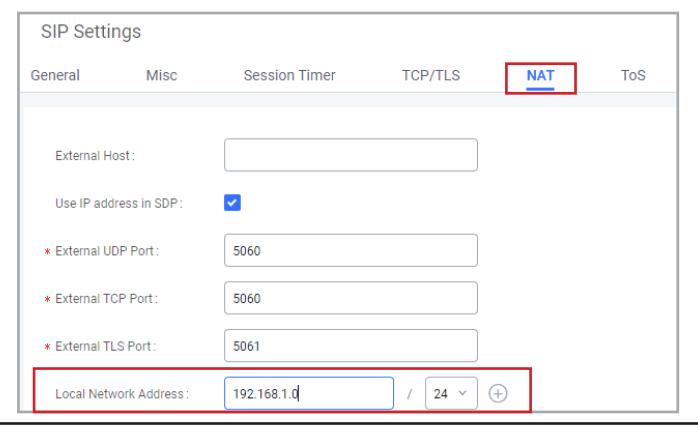
SIP Settings
From the menu bar on the left, expand PBX Settings and click SIP Settings. Adjust the following values pictured below.
General Tab
TCP/TLS Tab
NAT Tab
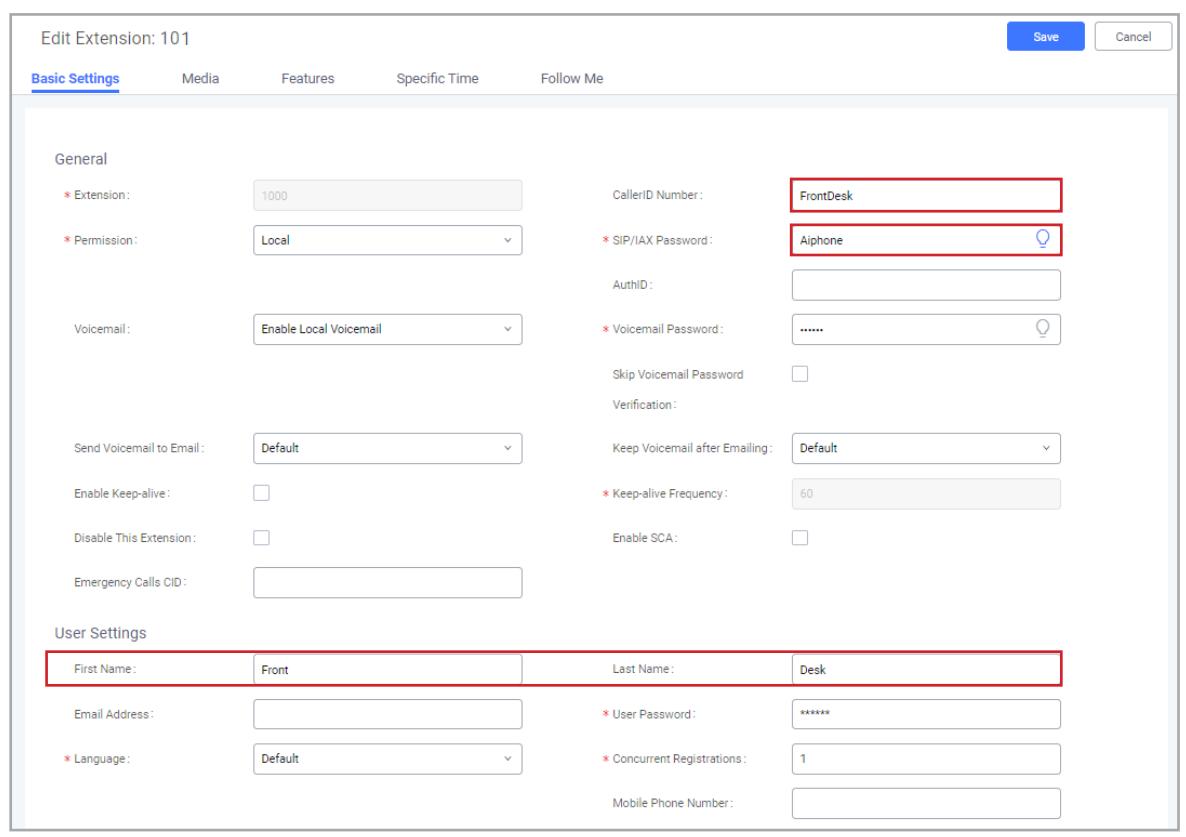
Editing Extensions
An extension is necessary for each IX Series station to be registered with the IXW-PBX. The extension number will be assigned to the station in the IX Support Tool in the following steps. To configure this, expand Extension/Trunk and click Extensions. Click highlighted below to make changes to the existing extension.
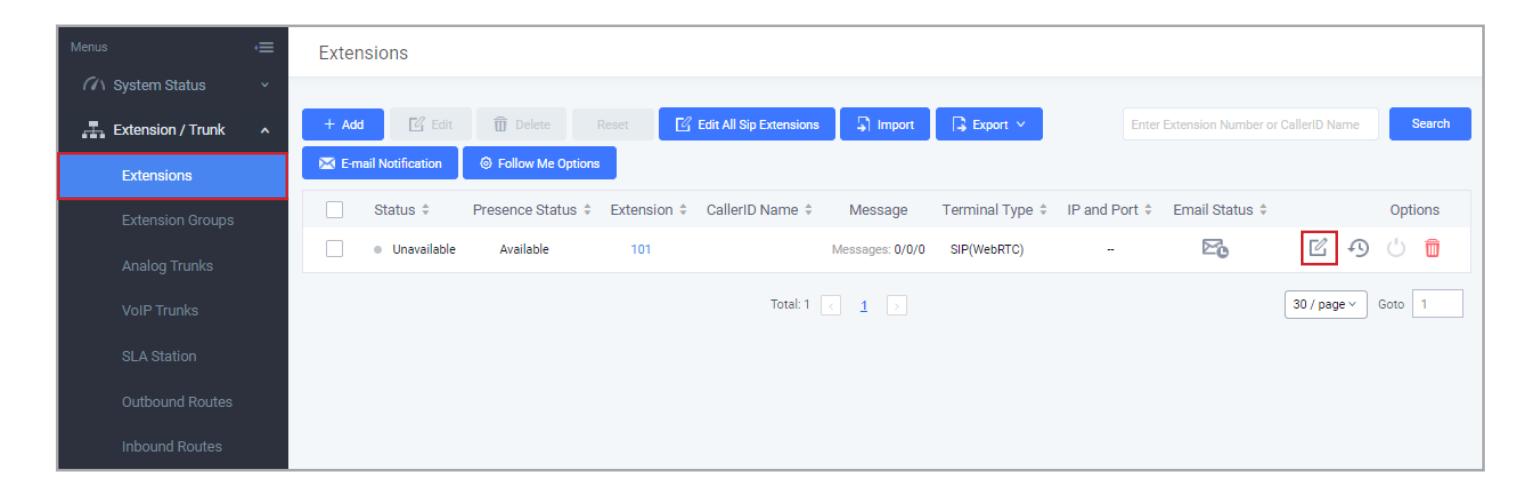
Set the CallerID Number to match the Station Name in the IX Support Tool for consistency. The SIP/IAX password was assigned in the previous steps. Make note that this password will be needed when registering the IXW-PBX.

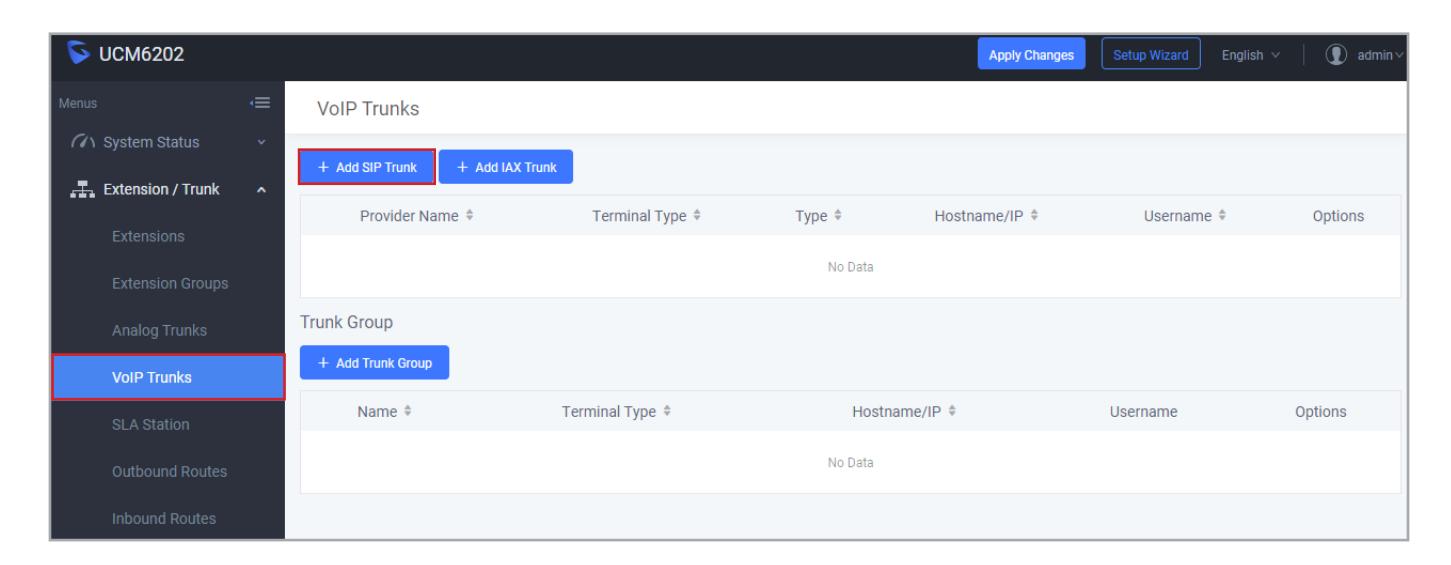
VoIP Trunk Settings
The IXW-PBX will allow SIP Trunks to be used for outbound calls. To configure this, expand Extension/Trunk and click VoIP Trunks. At the top of the page click the Add SIP Trunk button.
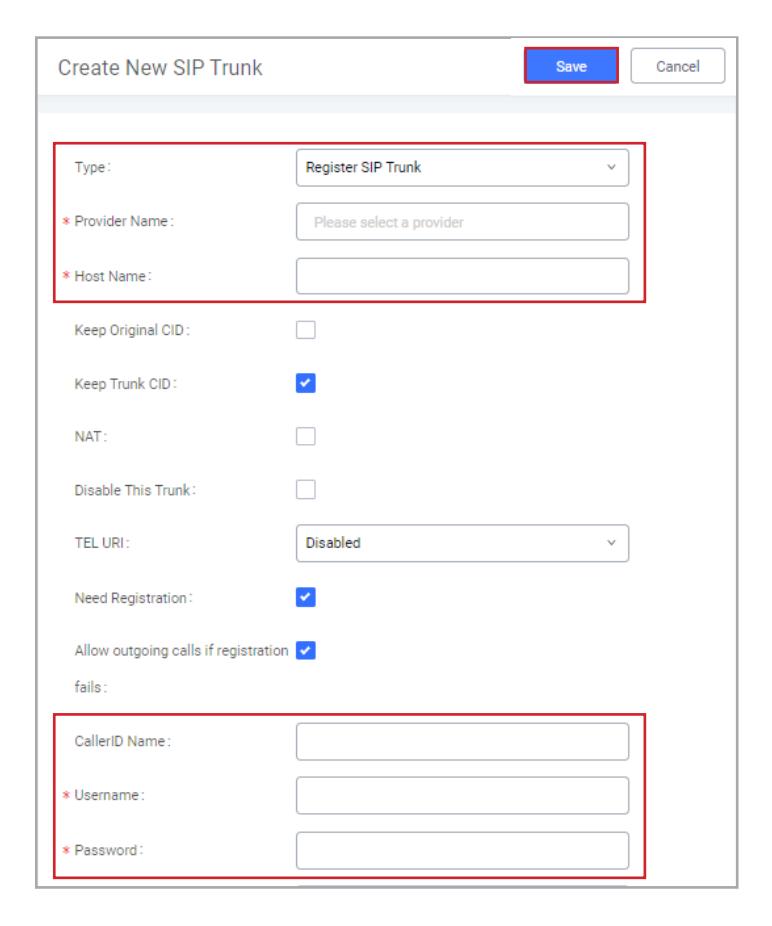
Use the Type drop-down and select Register SIP Trunk and enter the Provider and Host Name of the SIP Trunk service provider. The username and password is also required to create a SIP trunk. Verify this information with the provider of the SIP Trunk.
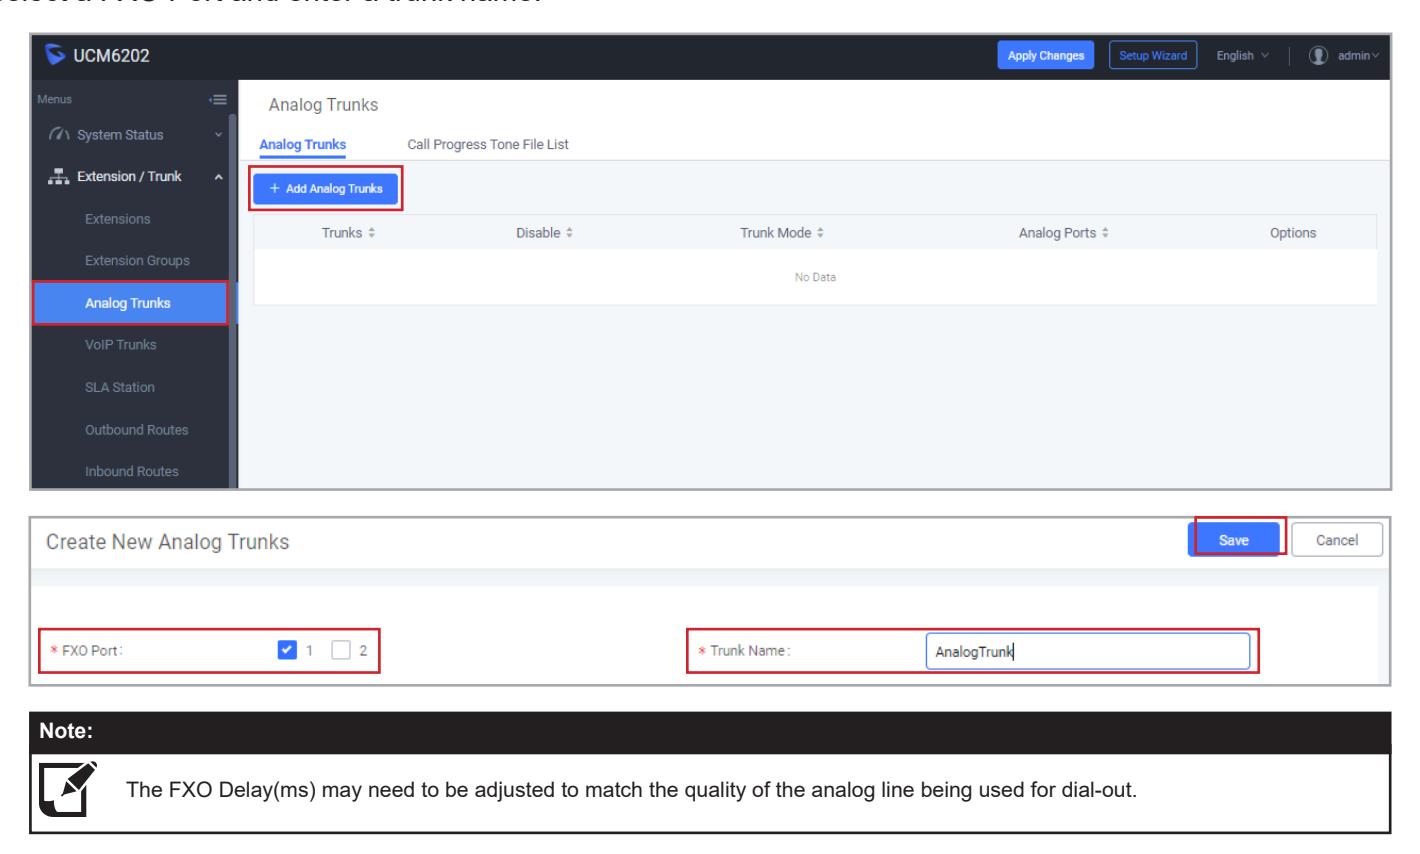
Analog Trunk Settings
The IXW-PBX will also allow for Analog Trunks for outbound calls utilizing a POTS line plugged into one of the FXO Ports on the back of the device. To configure this, expand Extension/Trunk and click Analog Trunks. At the top of the page click the Add Analog Trunks button. Once the Create New Analog Trunks page is open, select a FXO Port and enter a trunk name.
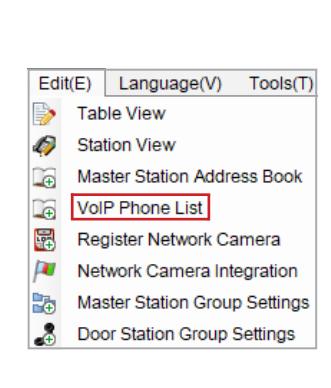
Registering a Phone Number
To call a phone number from an IX Series station using an analog trunk, the phone number will need to be registered as a VoIP Phone in the Support Tool. Open Support Tool and navigate to Edit > VoIP Phone List, and enter the phone number on the next available row.
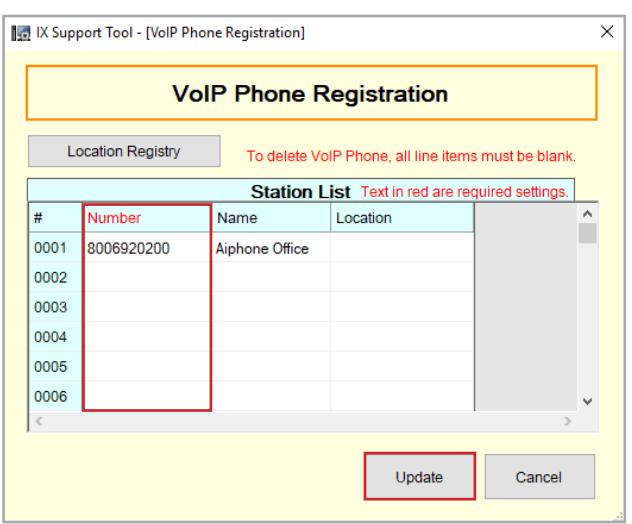
Registering a Phone Number (cont.)
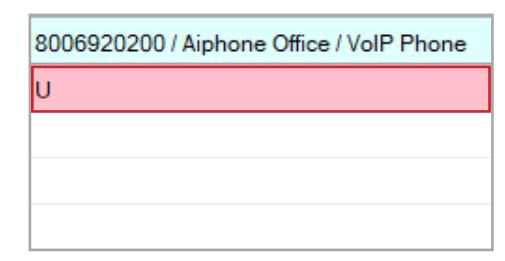
Now assign the newly registered phone number to the door station that will be placing the call. From the menu on the left, expand Call Settings and click Called Stations (Door/Sub Stations). Scroll the window to the right and locate the registered "VoIP Phone", and use the drop down box to select U in the row of the designated door station.

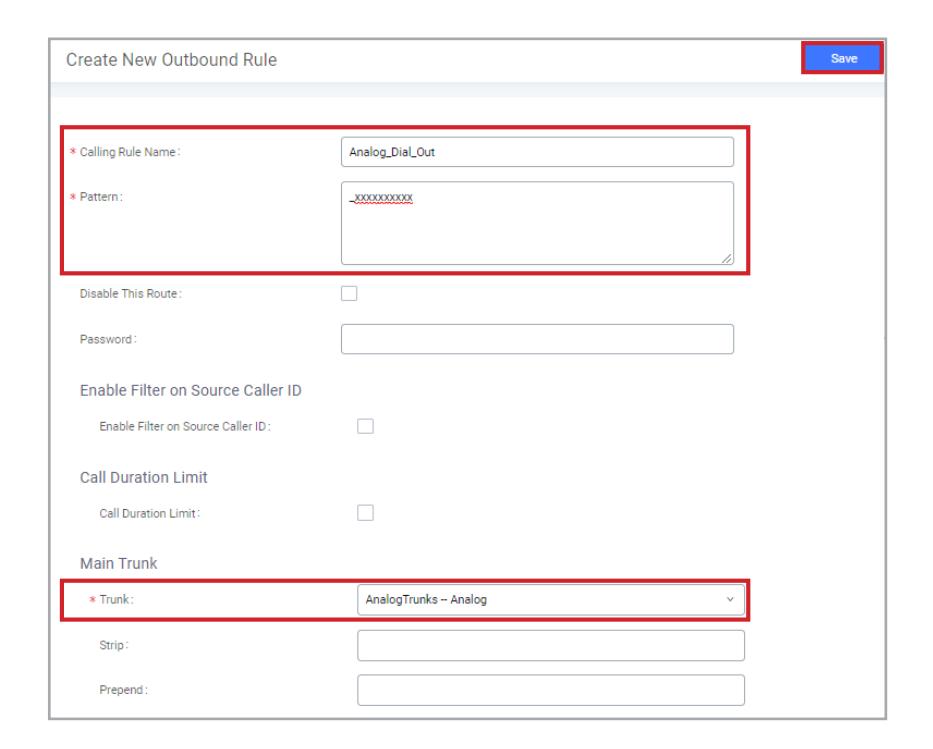
Outbound Routes
For a station to call out to the registered phone number, it is required to create an outbound route rule for the analog trunk. Expand Extension / Trunk from the menu on the left and click on Outbound Routes. Once the Outbound Routes page opens click on the Add button.
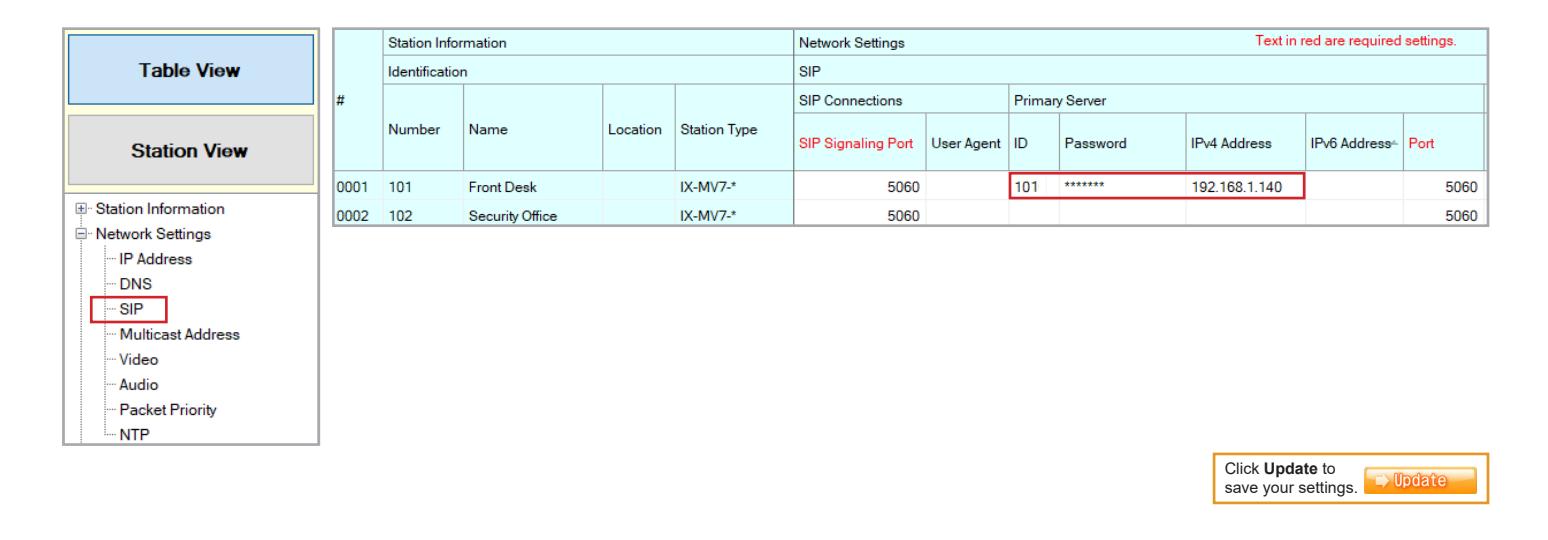
Registering the IXW-PBX
The IXW-PBX must be registered to the IX Series stations for the stations to call out. From the menu on the left, expand Network Settings and click SIP. Enter the extension number in the ID column, the SIP password in the password column, and the IP address of the IXW-PBX in the IPv4 Address column.
Uploading the Settings
In this step, upload the newly configured settings to the IX Series stations. To test your system, press the call button on the door station. The phone extension that was programmed to ring should receive the call. Answer it and ensure that you have 2-way communication between the phone extension and the door station.