Aiphone IX System Quick Start Programming Guide
Open the original PDF document
View PDF

IX SYSTEM
IP Network-Compatible System
Quick Start Programming Guide

ATTENTION:
This is an abbreviated programming manual, addressing basic program settings for an IX System using the IX Support Tool. A complete set of instructions (IX Web Setting Manual / IX Operation Manual / IX Support Tool Setting Manual) can be found on the DVD-ROM provided with the IX-MV Master Station.
GENERAL OVERVIEW:
For basic system programming, all steps are REQUIRED unless marked OPTIONAL. Refer to the IX Support Tool Setting Manual on the DVD-ROM included with the IX-MV for complete programming information.
Step 1: Change PC Network Settings (OPTIONAL)
- Allows the PC to communicate with the Door Stations and Master Stations.
Step 2: Opening IX Support Tool
- Open program, define size of system, and name of system.
Step 3: Station Information - Customizing Station Numbers and Names (OPTIONAL)
- Create unique station numbers and names.
Step 4: Network Settings
- Assign IP address (batch).
(Refer to the IX Support Tool Setting Manual when using an IPv6 network)
Step 5: Association Settings
- Link station settings to stations found in Search.
Step 6: System Information - Address Book "Master Station" (OPTIONAL)
- Add or remove stations from the Address Book.
Step 7: Call Settings - for Door Stations
- Select called station, call level, and broadcast method.
Step 8: Setting the Time
- Manually enter time or sync time with PC.
Step 9: Updating the System
- Uploading setting file to stations (batch).
Step 1: Change Network Settings (OPTIONAL)
The Door Station and Master Station's default IP address is https://192.168.1.160. The PC will need to be set in the same subnet in order to connect to the Door Stations and Master Stations.
A. Open Control Panel
- Windows XP® (Classic View) Network Connections Double click Local Area Connection to open Connection Status window.
- Windows 7® (Category View) Network and Internet View network status and tasks Click Local Area Connection to open the Local Area Connection Status window.
- B. Click the Properties button to open Local Area Connection Properties window.
- C. Scroll down and left click Internet Protocol (TCP/IP) then click Properties button to open Internet Protocol Properties window.
- D. Select the Use the following IP address radio button. Type in the IP address 192.168.1.100 (the last number can be any valid host address except 160) and change the subnet mask to 255.255.255.0. Click [OK].
- E. Click [OK] in Connection Properties window to accept these changes.
Step 2: Opening IX Support Tool
Step 2.1 Connect all IX stations and the programming PC to the same network.
Step 2.2 Install the IX Support Tool on the programming PC.
Step 2.3 Open the IX Support Tool.
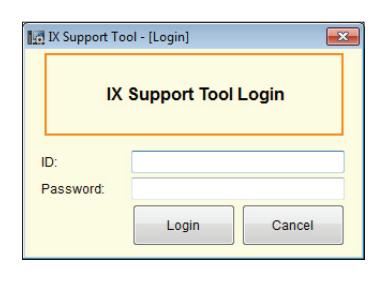
Step 2.4 . Log in. Default Settings:
ID: admin Password: admin
Step 2: Open IX Support Tool (continued)
Step 2.5 The New System screen will appear ( Figure 2-B ). Enter in quantity of:
Master Stations Video Door Stations Audio Only Door stations System Name
Step 2.6 Select appropriate radio button for door release.
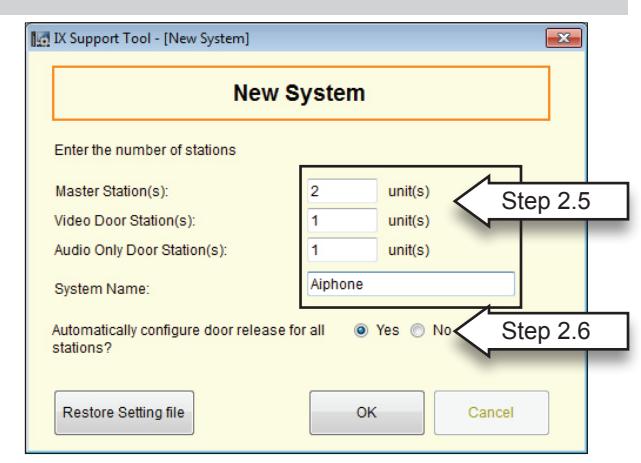
Figure 2-B: New System Screen
Step 2.7 The IX Support Tool Settings Table View will be displayed with default station numbers and station names ( Figure 2-C ). To customize, proceed to Step 3.
Figure 2-C: Table View with default names

Step 3: Station Information - Customizing Station Numbers and Names (OPTIONAL)
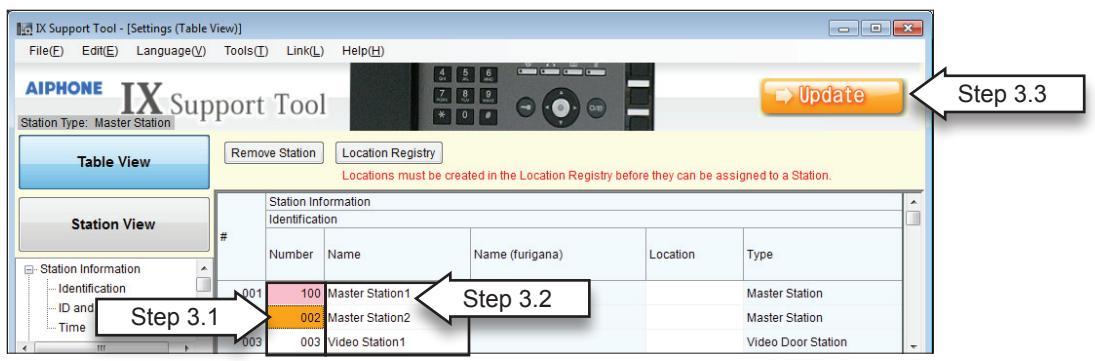
- Step 3.1 Select Number cell to be changed. Selection will turn orange. -Enter custom number (3-5 digits) Edit will turn pink.
- Step 3.2 Select Name cell to be changed. Selection will turn orange. -Enter custom name (no special characters allowed) Edit will turn pink.
- Step 3.3 Click to save changes.


Figure 3-A: Customizing Numbers and Names
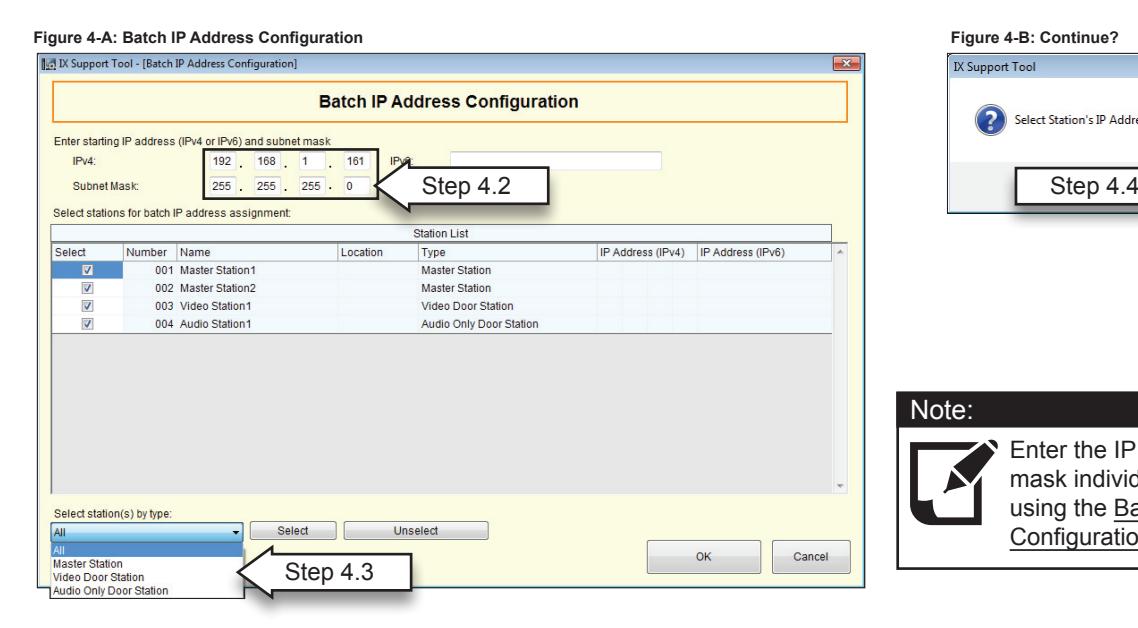
Step 4: Network Settings
- Step 4.1 From menu on left, under Network Settings, select IP Address.
- Click on Batch IP Address Configuration .
- Step 4.2 Enter starting IP Address, and Subnet Mask (see Figure 4-A).
- Step 4.3 Select All from the Select Station(s) by type drop-down menu to apply IP Address and Subnet Mask to all stations.
- Click Select .
- Click OK .
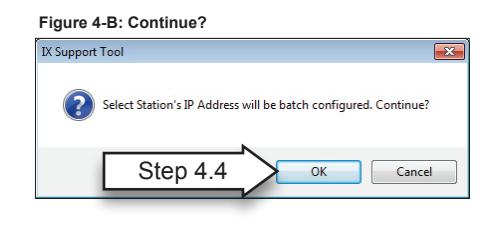
- Step 4.4 A pop-up will occur asking Select Station's IP Address will be batch configured. Continue? (see Figure 4-B).
- Click OK .
- Step 4.5 Click on the main page to save changes.
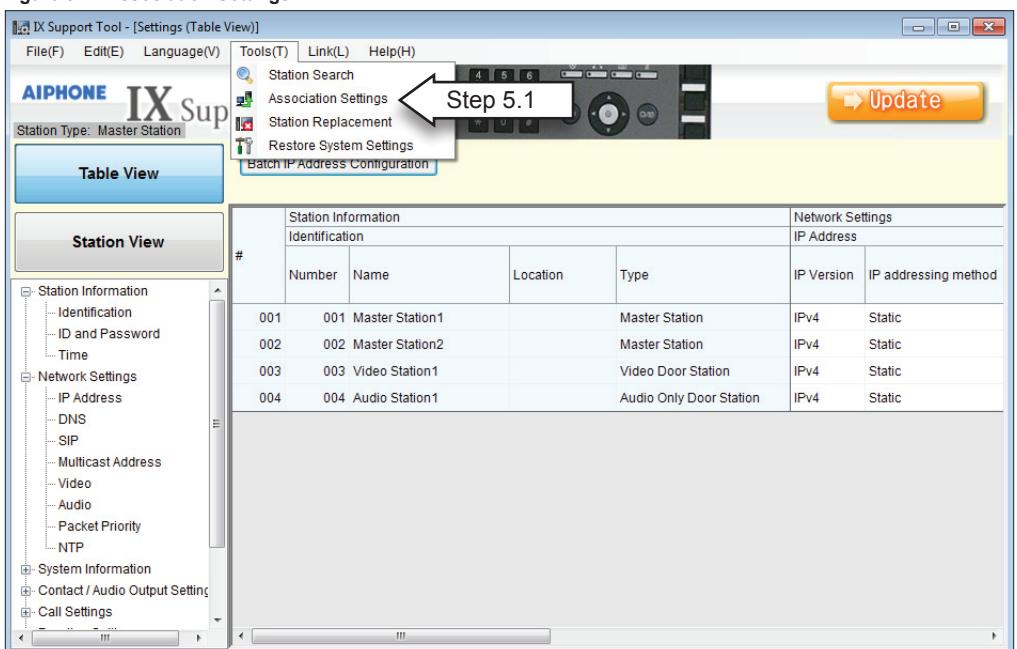
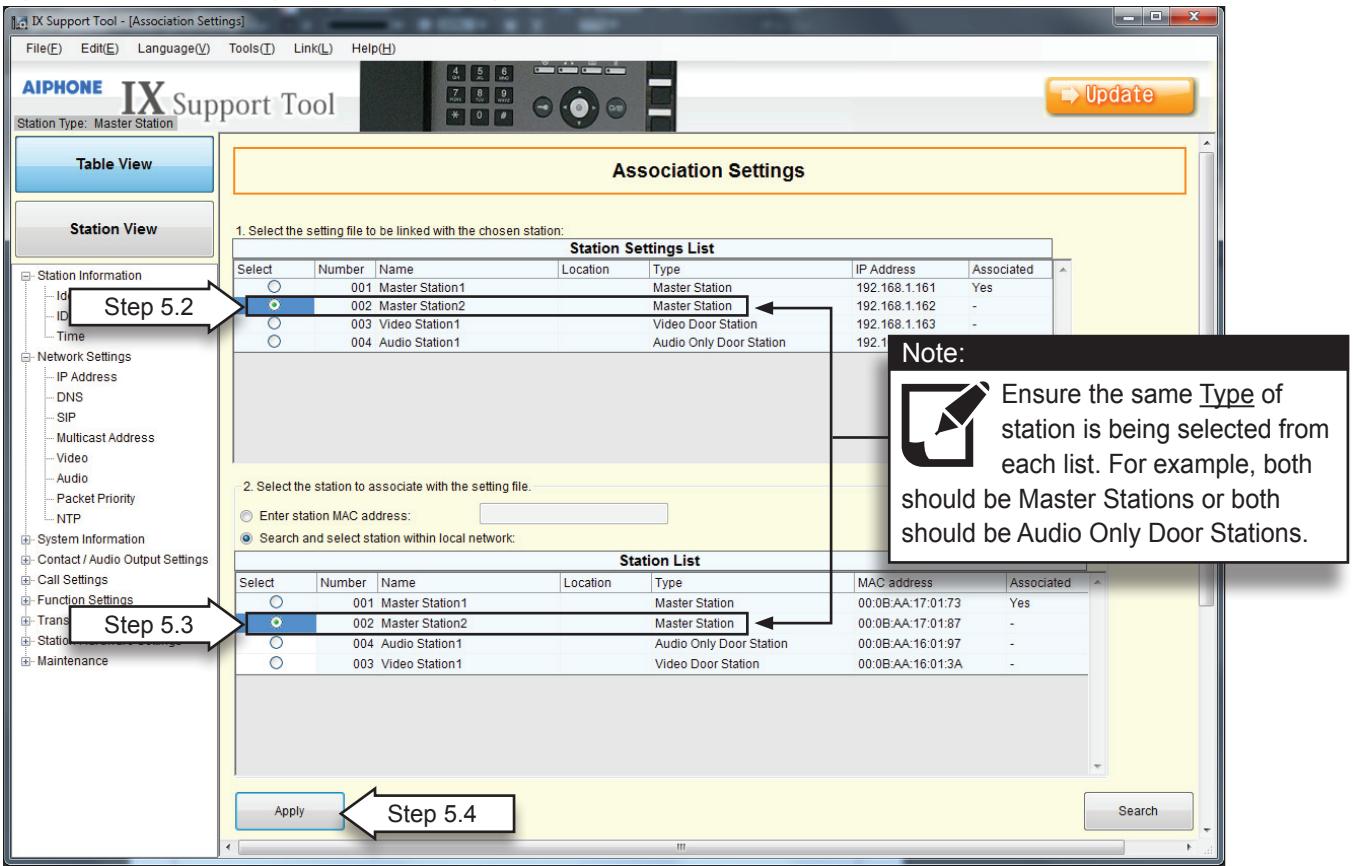
Step 5: Association Settings
Step 5.1 From the Tools(T) drop-down menu, select Association Settings (see Figure 5-A).
Figure 5-A: Association Settings
Step 5: Association Settings (continued)
When the Association Setting window appears:
- Step 5.2 Select a station from the Station Settings List (upper window).
- Step 5.3 Select a station from the Station List (middle window).
- Step 5.4 Once both have been selected, click Apply (see Figure 5-B).
Figure 5-B: Association Setting Window (Station Settings List / Station List)
Stations that have been associated will appear in the Associated Stations List (bottom window). Repeat steps above until all stations have been associated (see Figure 5-C).
Step 5.5 Click to save changes.
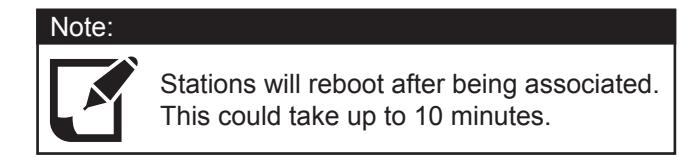
Figure 5-C: Association Setting Window (Associated Stations List)
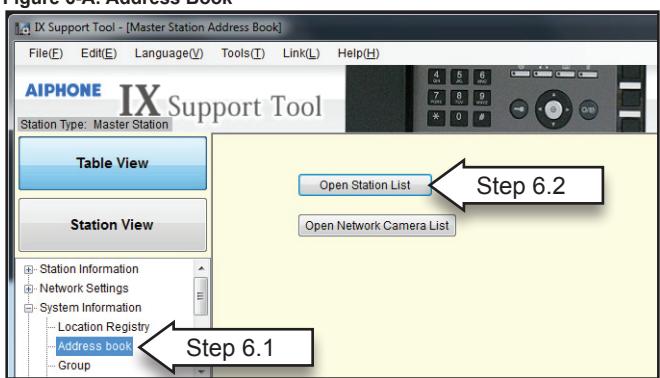
Step 6: System Information - Address Book "Master Station" (Optional)
- Step 6.1 From menu on left, under System Information, select Address Book (see Figure 6-A).
- Step 6.2 Click Open Station List to view the Address Book.
Figure 6-A: Address Book
- Step 6.3 To Remove or add stations to an Address Book (see Figure 6-B).
-
In the Available Stations list, select appropriate icon from drop-down menu
- " "= Display in address book , " "(blank space) = Do not display in address book.
- Changed stations will turn pink.
- Step 6.4 Click to save changes.
Figure 6-B Address Book

Step 7: Call Settings (for Door Stations)
Step 7.1 From menu on left, under Call Settings,
select Called Stations (for Door Stations) (see Figure 7-A).
Step 7.2 In the Call Settings column, select the call-in level.
Normal = low level Priority = mid level
Urgent = high level
Step 7.3 Click Open Called Station List
Step 7.4 When Save changes? pop-up appears, (see Figure 7-B), click YES .
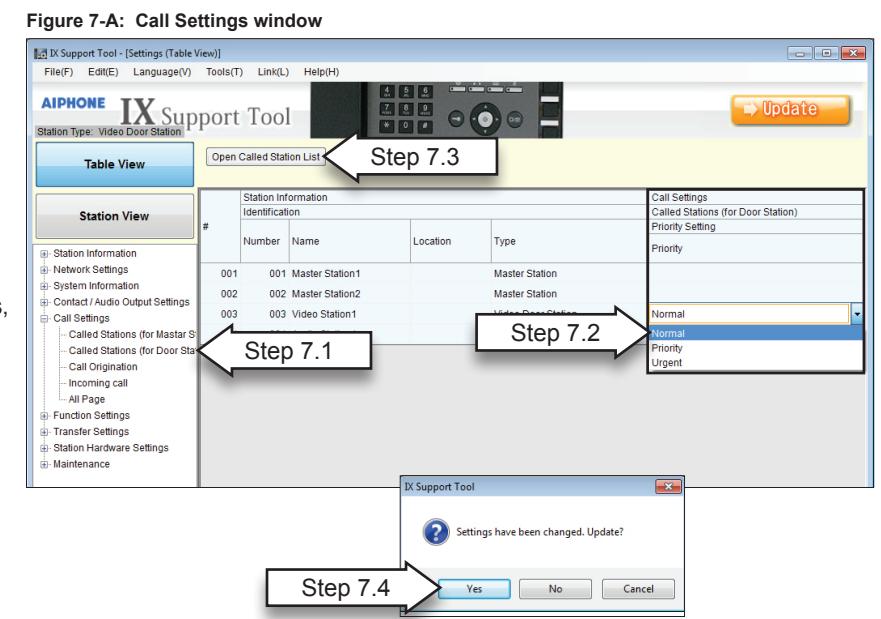
Figure 7-B: Save Changes? window
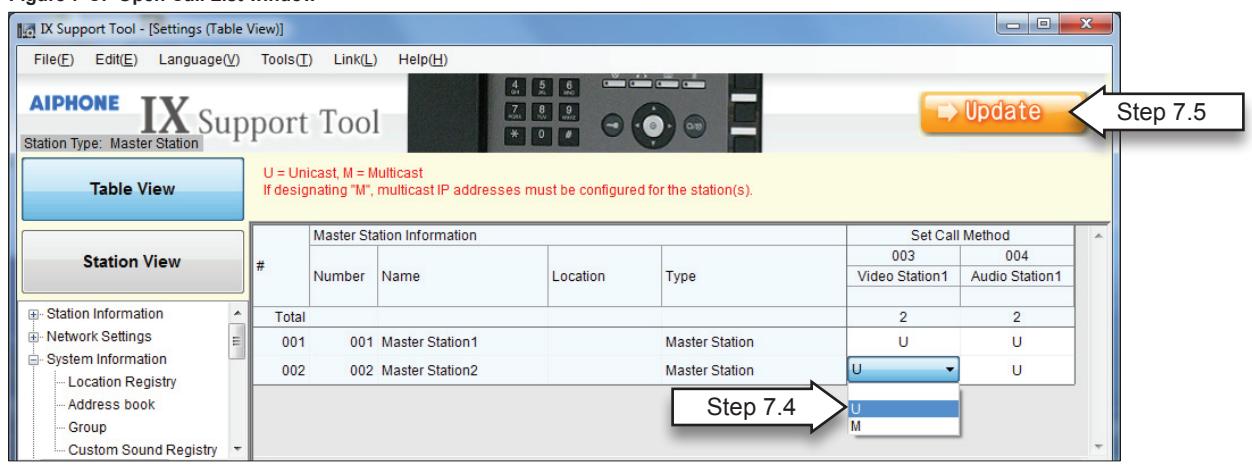
Step 7: Call Settings (continued)
Step 7.4 In the Open Called Station List (see Figure 7-C), select call method from drop-down menu.
U = Unicast
M = Multicast
Blank space = No call or not call (blank space)
Changes will be shown in pink.
Step 7.5 Click to save changes.
Figure 7-C: Open Call List window
Step 8: Setting the Time
- Step 8.1 From menu on left, under Station Information, select Time (see Figure 8.1).
- Step 8.2 In the Select time zone column, select the appropriate time zone from the drop-down menu. Changes will be shown in pink.
- Step 8.3 Click Manual Date / Time Setup .
- Step 8.4 When pop-up appears asking to Save changes, click OK .


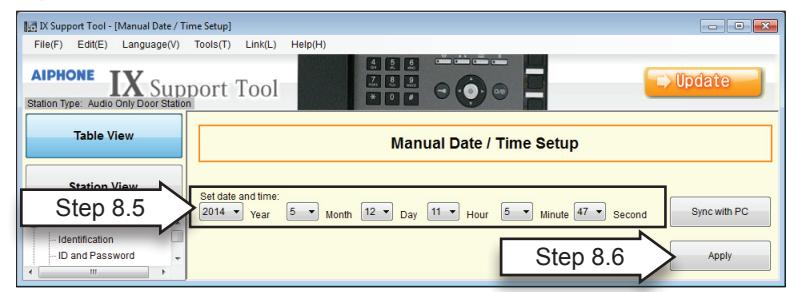
Step 8: Setting the Time (continued)
-
Step 8.5
In the Manual Date / Time Setup window:
- Enter in current date and time. or
- Click Sync With PC .
Step 8.6 Then click Apply (see Figure 8-B).
Figure 8-B: Manual Date / Time Setup
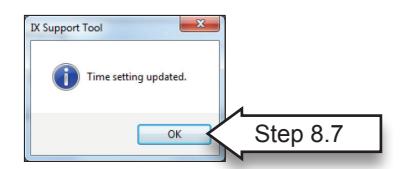
Step 8.7 When Time setting updated pop-up appears, click OK .
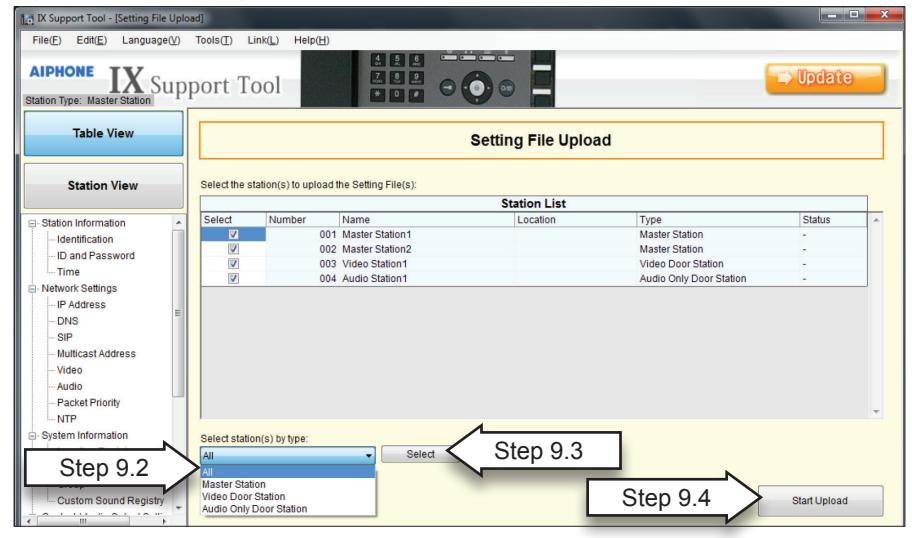
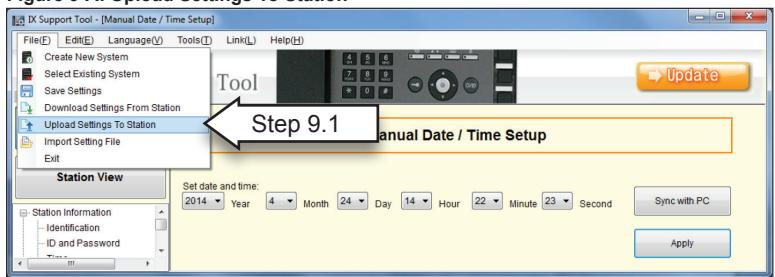
Step 9: Updating the System
Step 9.1 From the File(F) drop-down menu, select Upload Settings To Station. (see Figure 9-A).
Figure 9-A: Upload Settings To Station
- Step 9.2 Use the Select stations(s) by type drop-down menu to select all stations or stations by type.
- Step 9.3 Click Select (see Figure 9-B).
- Step 9.4 When stations have been selected (checkmark displayed in the Select column) click Start Upload (see Figure 9-B).
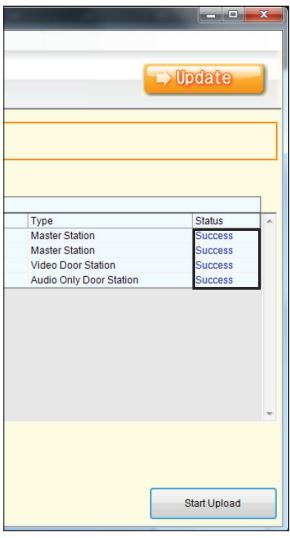
- Step 9.5 The status of the upload will be displayed for each station in the Status column displaying either Success or Failed (see Figure 9-C).
Figure 9-B: Upload Settings To Station Figure 9-C: Upload Status