Aiphone IX Series IP Network Compatible System IXW-MA Quick Start Programming Guide 1
Open the original PDF document
View PDFIX SERIES
IP Network-Compatible System
IXW-MA Programming Guide
Table of Contents
| Pages 2-5 |
Programming a New System that Includes the IXW-MA
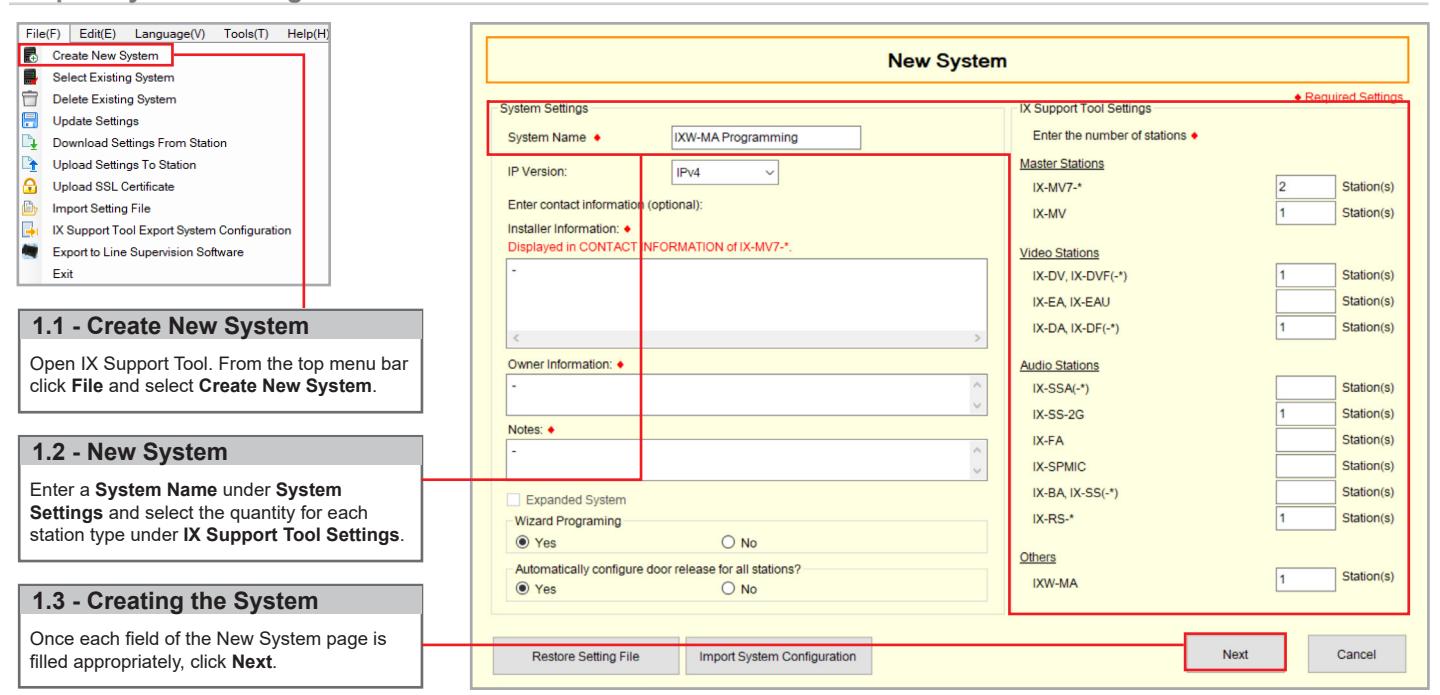
- Create a New System Using the Support Tool Programming Wizard |
||
|---|---|---|---|
| Page 5-6 |
Adding the IXW-MA (Skip if IXW-MA was included when new system was created)
- Adding to a system using the Support Tool Programming Wizard |
||
| Page 7 |
Configuring IX2 Stations to Communicate with IXW-MA
- Enabling SIF |
||
| Page 8-9 |
Configuring IX1 Stations to Communicate with IXW-MA (IXW-MA FW 2.01 or later required)
- Enabling SIF and uploading the SIF.ini file |
||
| Page 9-10 |
Configuring the IXW-MA
- Setting the Door Release |
||
| Page 11 |
Relay Output 2 Association
- Configure the IXW-MA to trigger from a station's relay output 2 |
||
| Page 12 |
Uploading and Exporting
- Uploading Settings to Stations and Exporting System Configuration |
||
| Page 13-20 | Configuring IX Mobile | ||
| - Step-by-step guide on configuring IX Mobile with the IXW-MA | |||
ATTENTION:
This is an abbreviated programming manual addressing basic IXW-MA program settings using IX Support Tool. A complete set of instructions (IX Web Setting Manual / IX Operation Manual / IX Support Tool Setting Manual) can be found at www.aiphone.com/IX.
The IXW-MA adaptor has 10 relays that can be used to trigger when the change contact SIF event is sent from specific stations. This guide will walk through programming a system to include the IXW-MA and how to program the adaptor.
Step 1: System Settings
Step 2: Station Customization
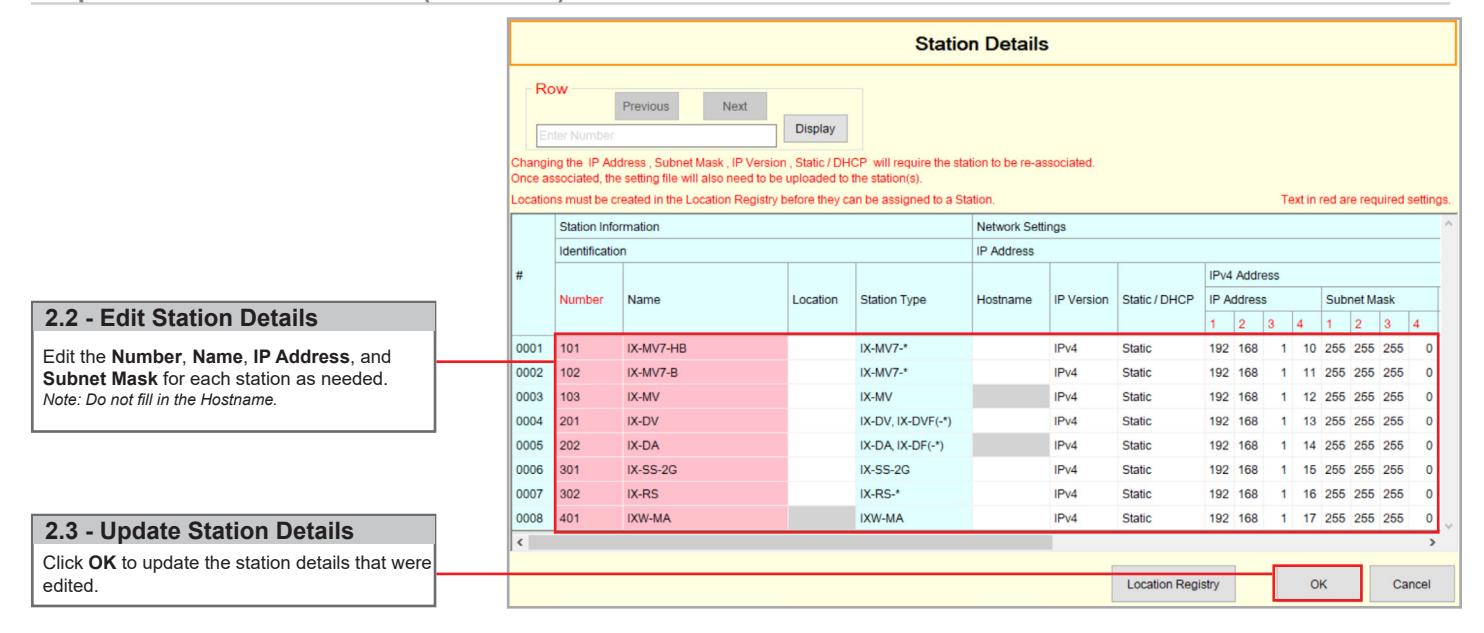
Support Tool will provide each station a default Station Name, four-digit Number, and IP Address starting from 192.168.1.10. To edit this information, click Station Details in the Advanced Settings section, shown below. To use the default information created by Support Tool, skip to Step 3.
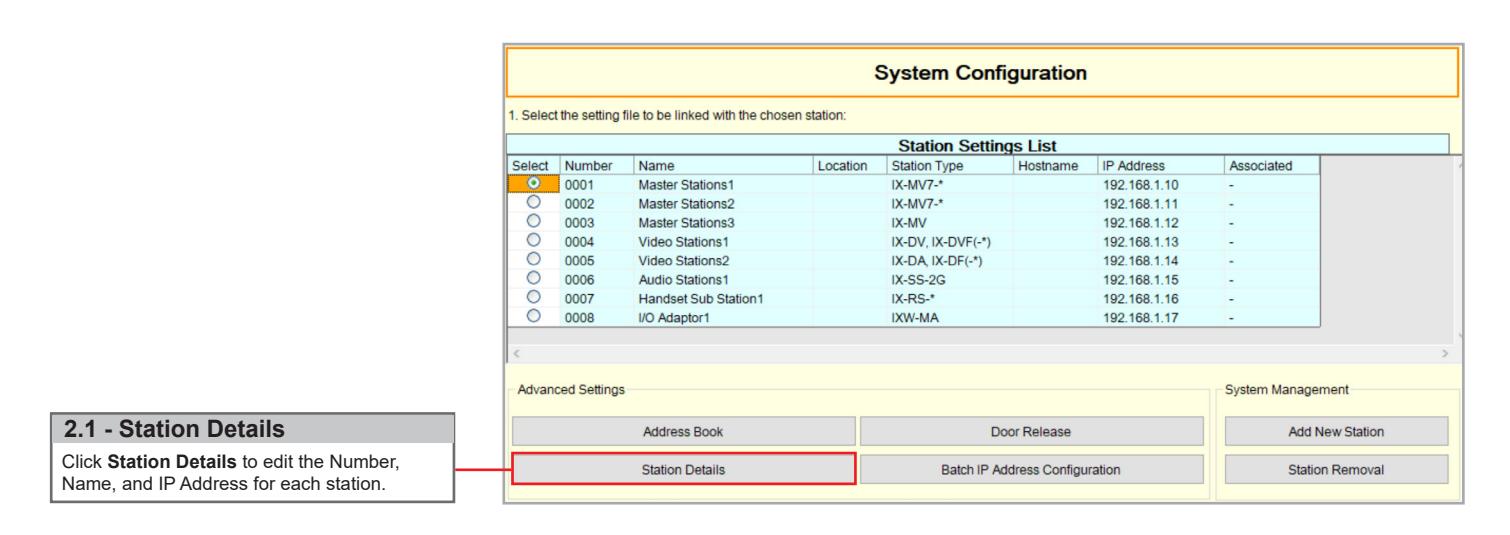
Step 2: Station Customization (continued)
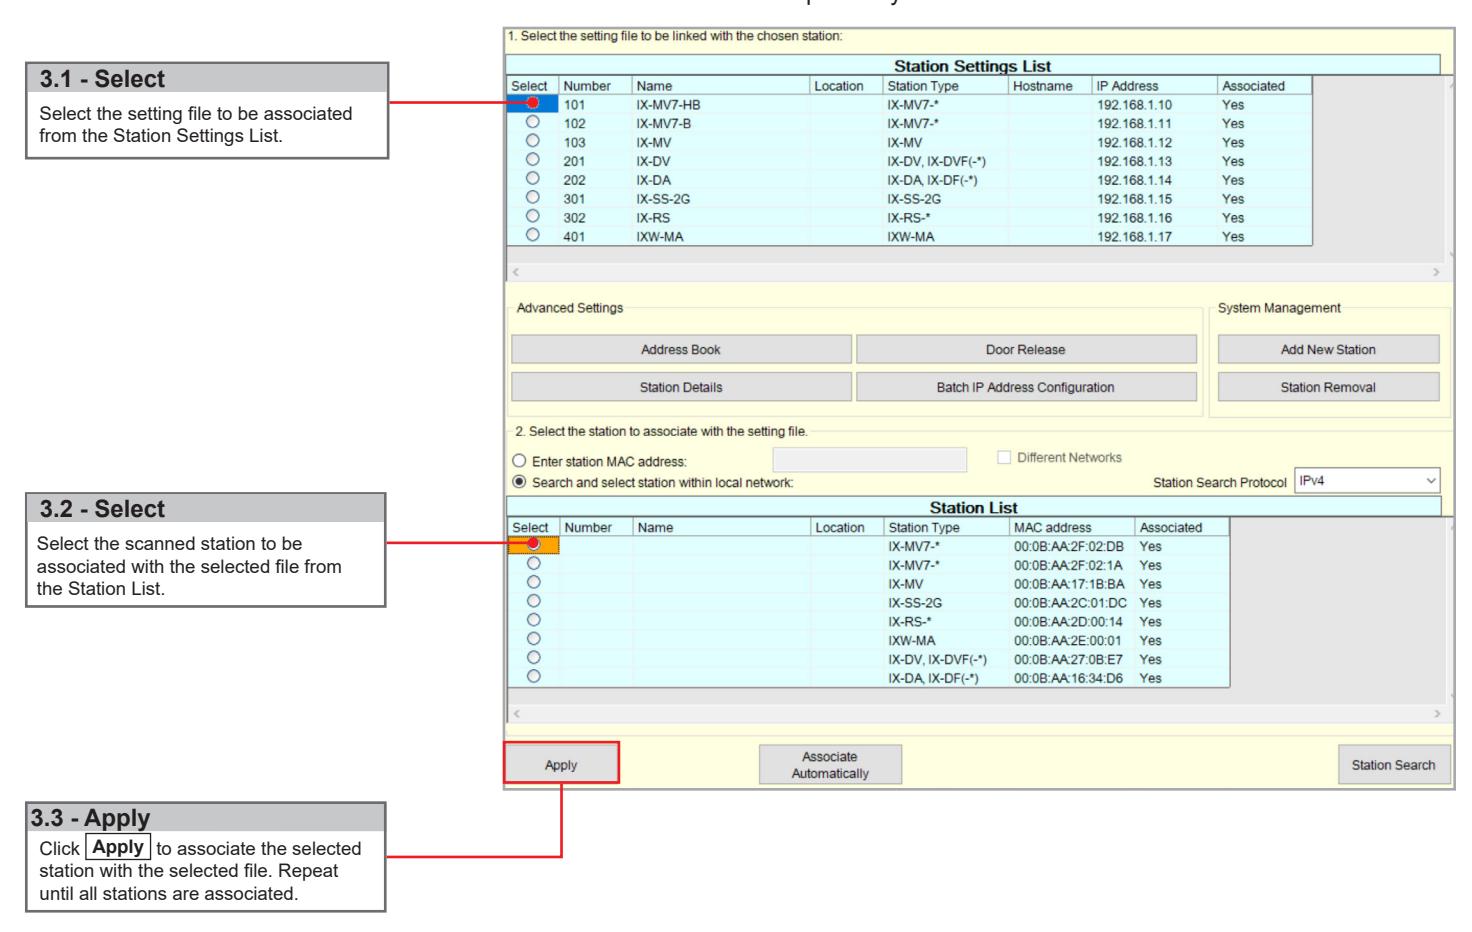
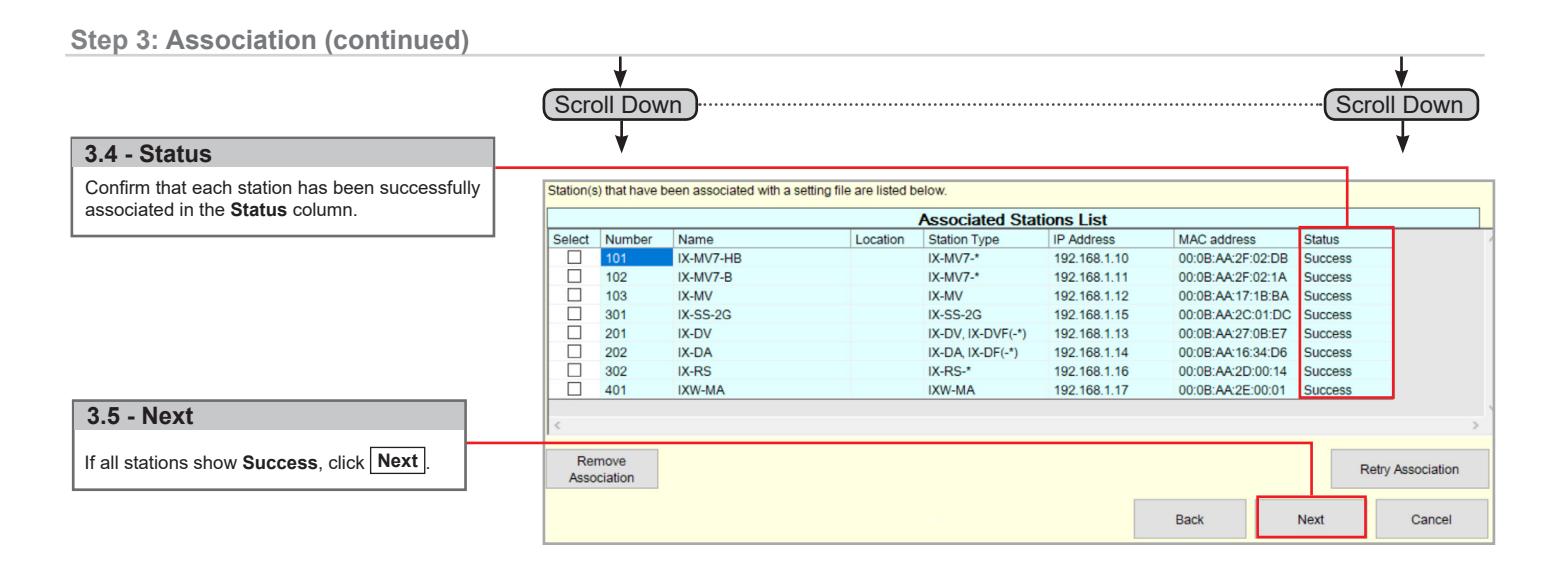
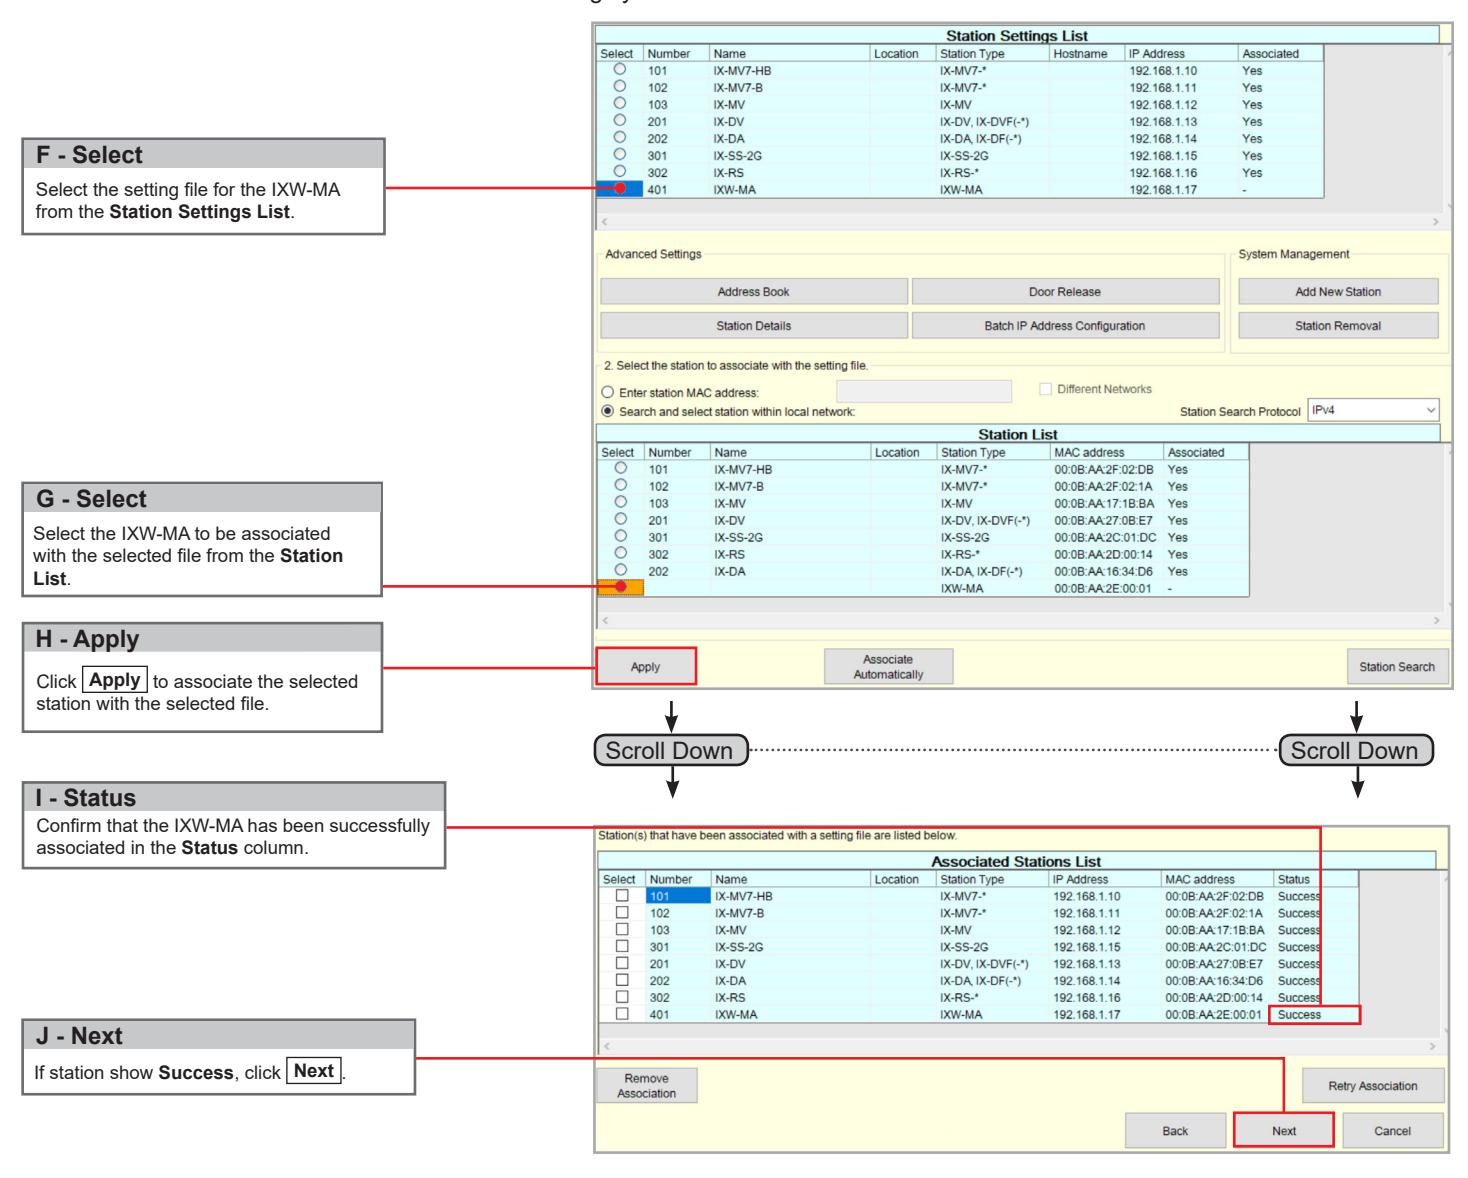
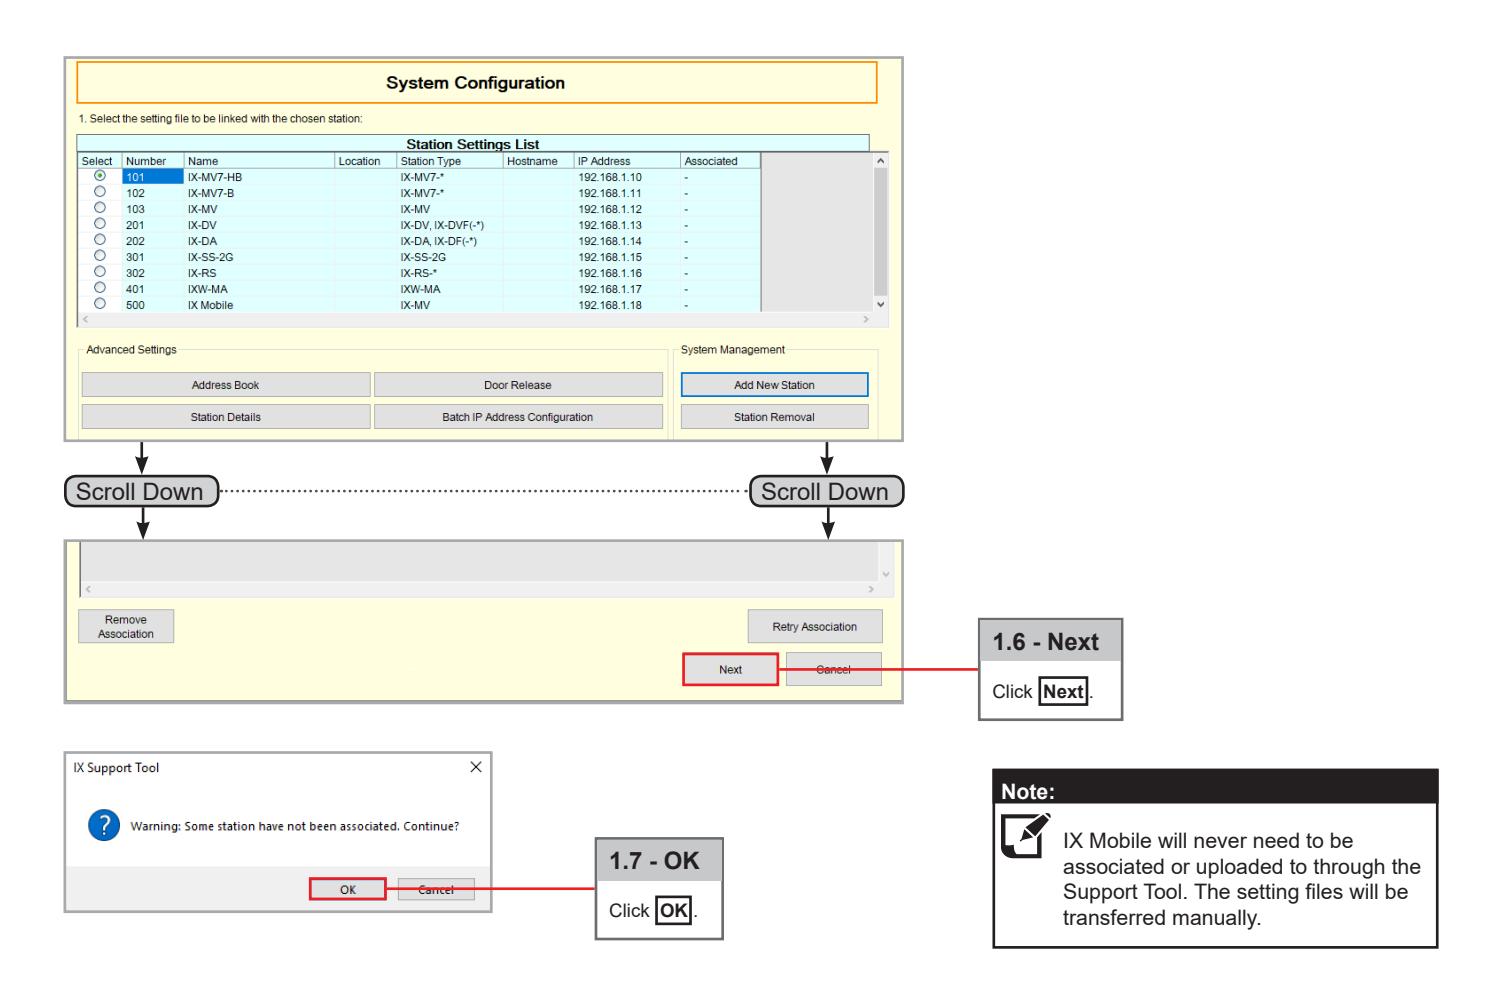
Step 3: Association
The association process will link the information created in Support Tool with a station found on the network. Once associated, the station will receive its station name and network information after a short power cycle.
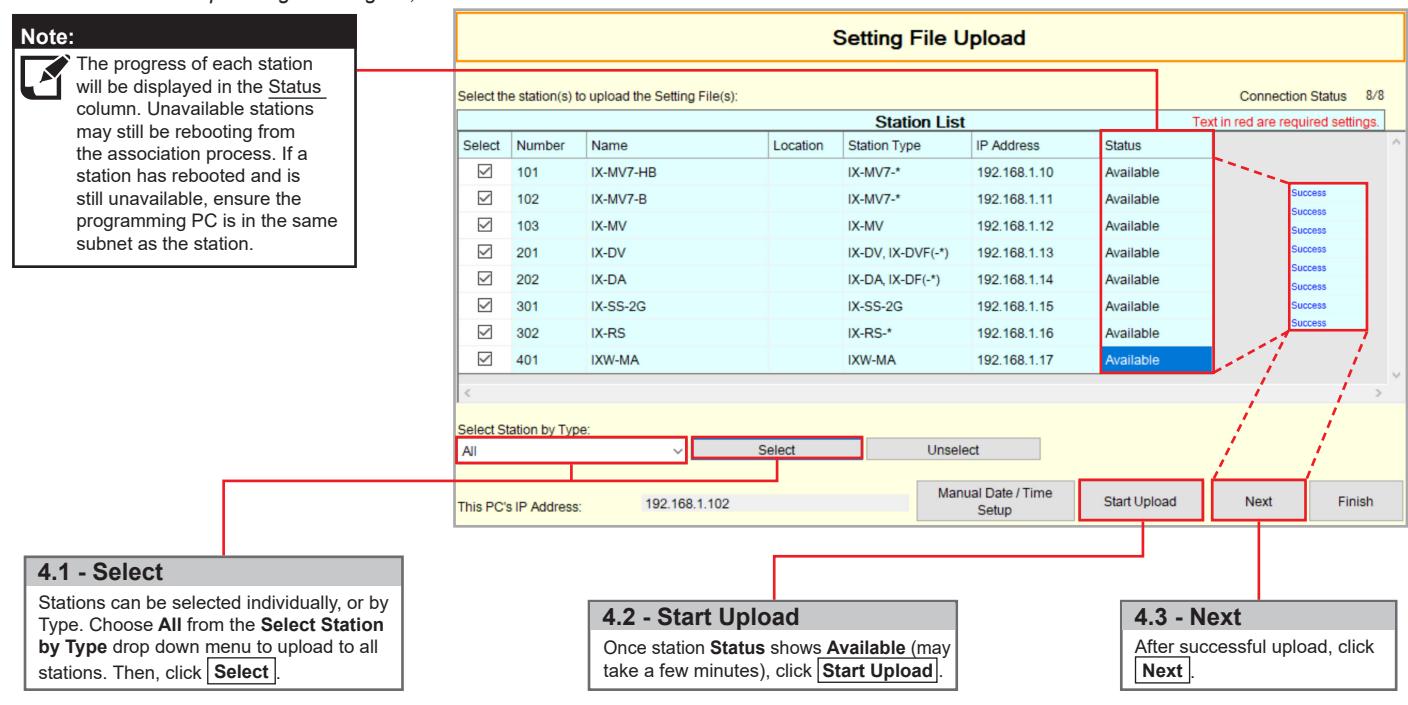
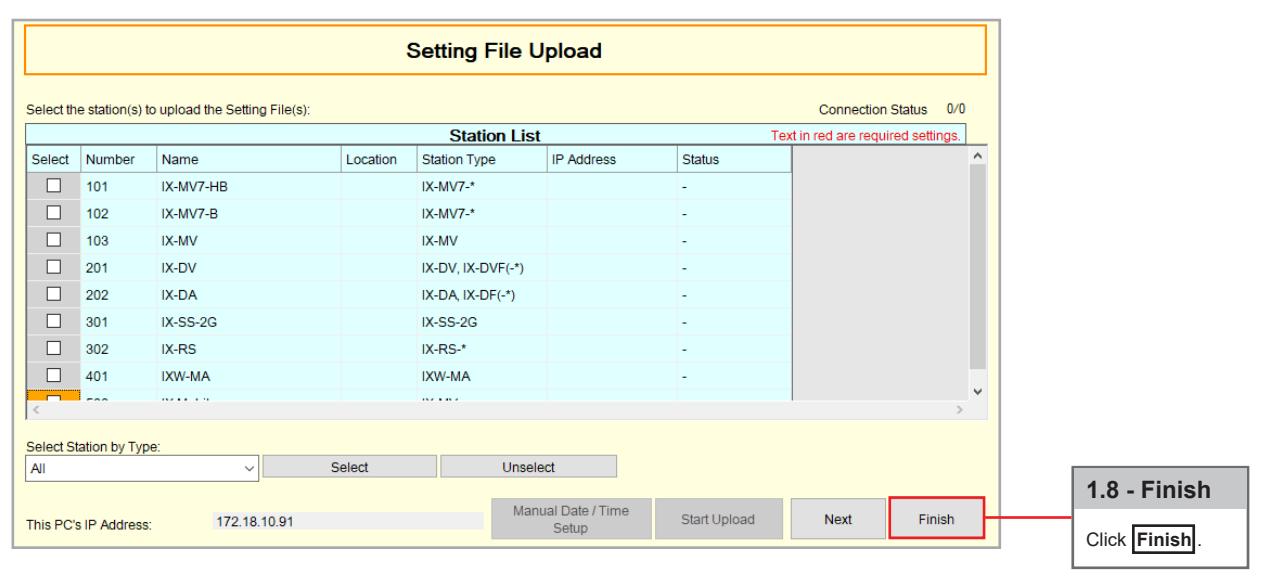
Step 4: Setting File Upload
Once each station has been associated with its individual station information, the setting file containing the rest of the system's information will need to be uploaded to each station. To upload the setting file, the programming PC will need to be in the same subnet as the associated stations. The PC's current IP address is listed in the bottom left-hand side of this window.
Note that without uploading a setting file, most functions and features will be unavailable to the stations.
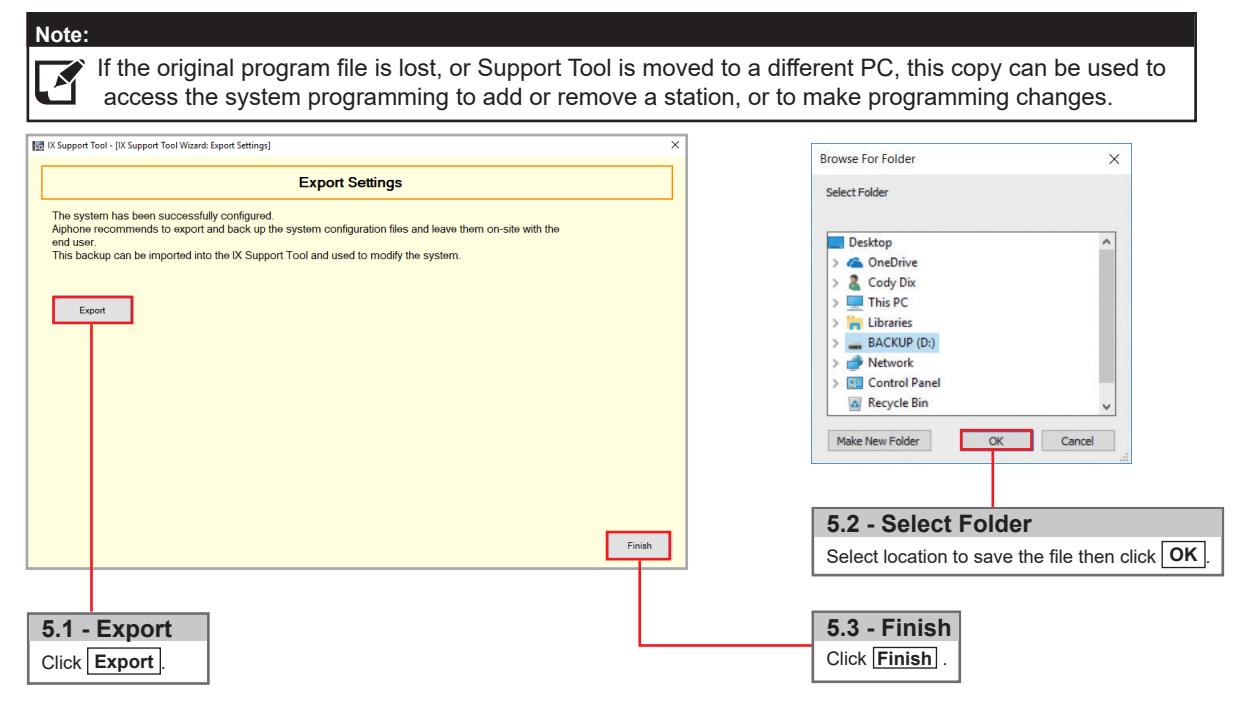
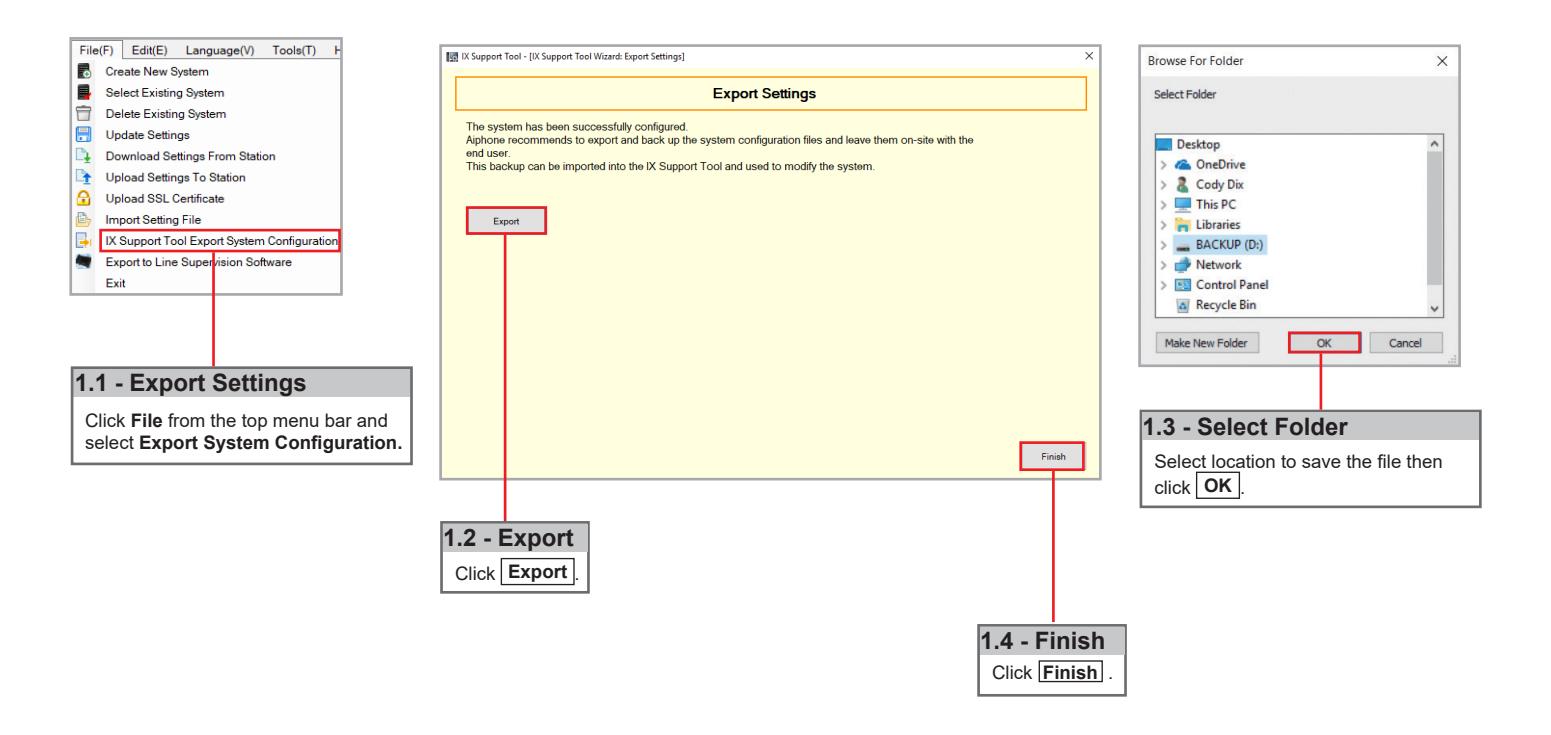
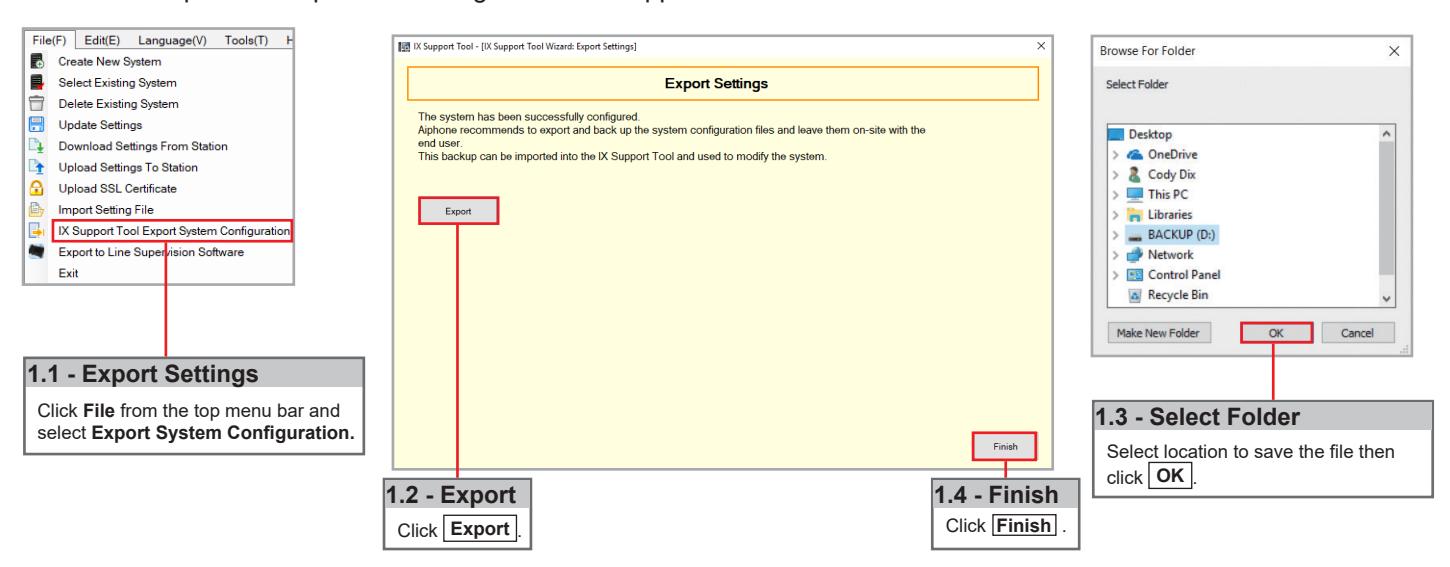
Step 5: Export Settings
The final step in the Programming Wizard is to create a copy of the system's setting file and export it to a secure location or external drive.
Adding IXW-MA (skip if IXW-MA was included from beginning)
Do not proceed with this section if the IXW-MA was already included when creating the new system. The steps below will walk through adding an IXW-MA relay adaptor to an existing system. The IXW-MA should be connected to the same network as the existing system before proceeding.
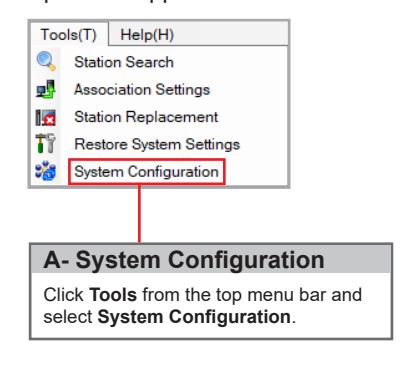
Open IX Support Tool and select the existing system to be edited.
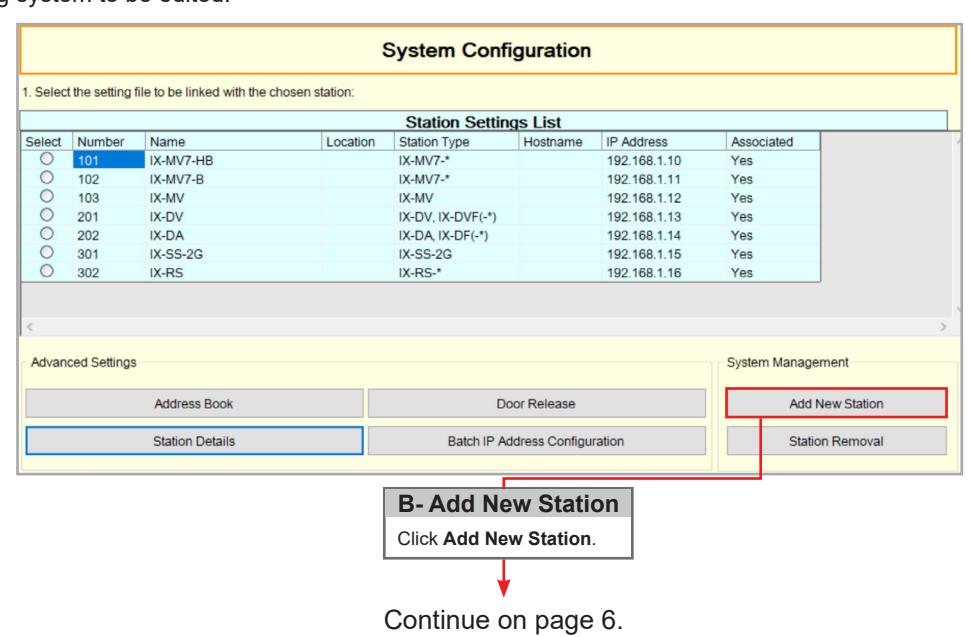
Adding IXW-MA (skip if IXW-MA was included from beginning)

The added station will appear in the Station Settings list with the number and name assigned. The IP address assigned will be the next available in the IP address scheme of the existing system.
The setting file will need to be uploaded to each station. Refer to page 12 for this procedure.
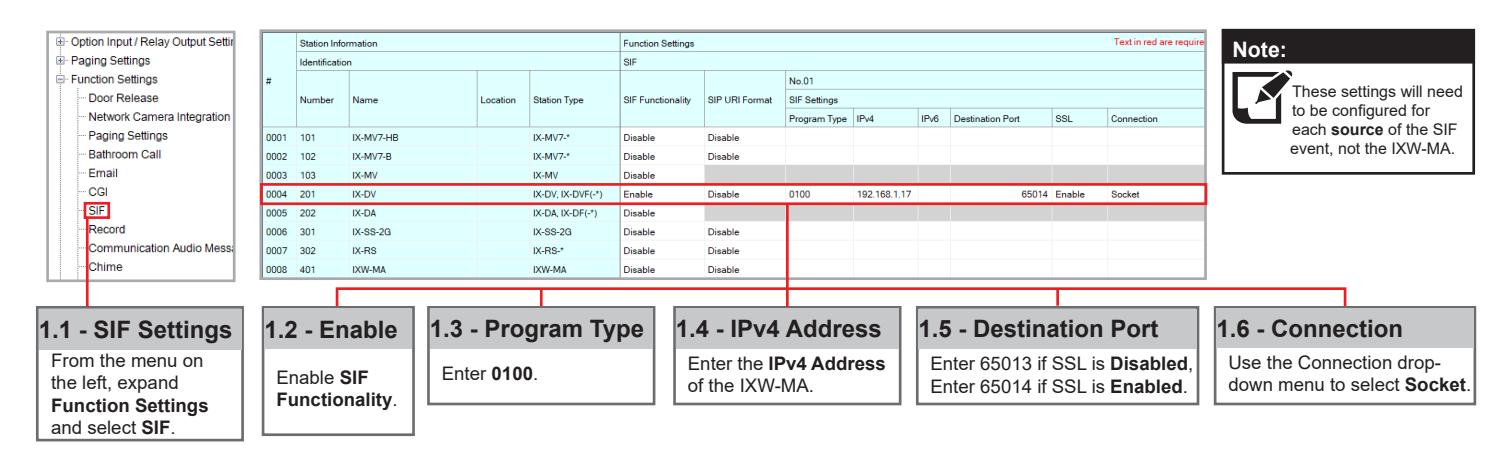
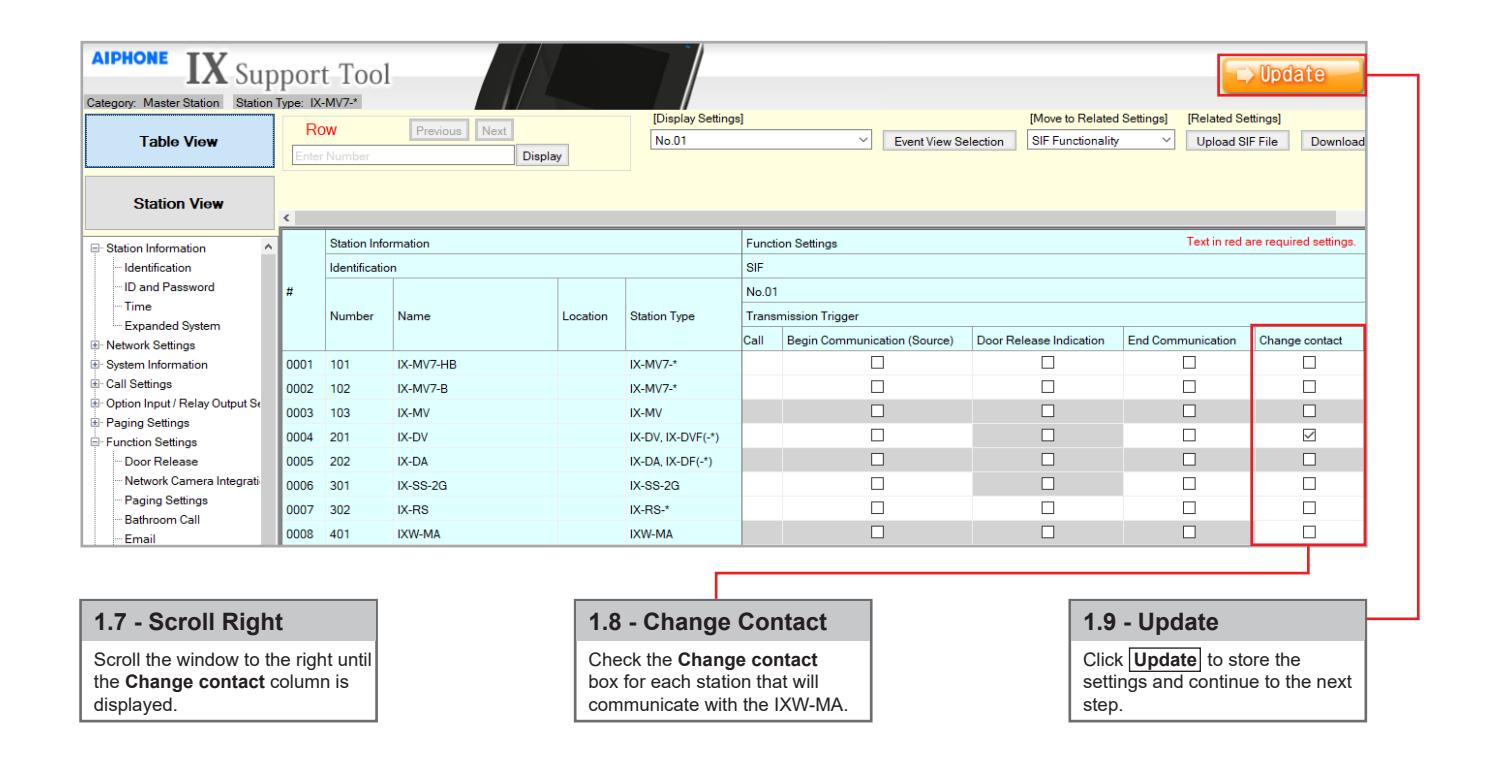
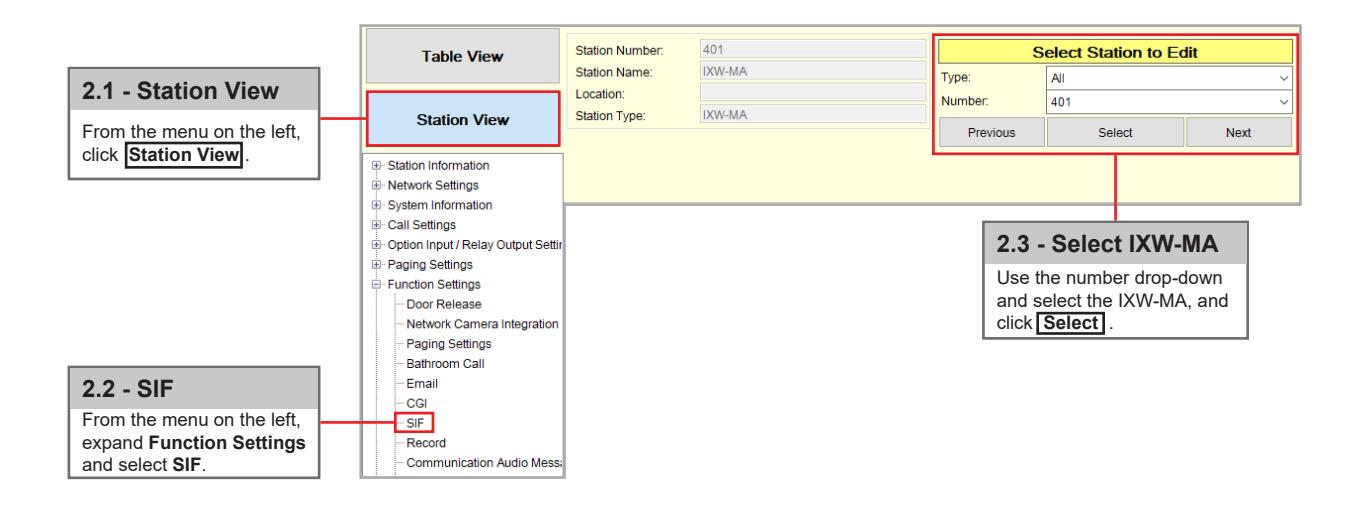
Configuring IX Series 2 Stations to Communicate with the IXW-MA
Step 1: Enabling SIF Functionality for IX Series 2 Stations
The IXW-MA will only recognize the change contact transmission trigger. All other transmission triggers will be ignored by the adaptor. The transmission trigger is sent from the station receiving the release command to the IXW-MA. The following process outlines the settings required to send this SIF event by the door station.
Configuring IX Series 1 Stations to Communicate with the IXW-MA
IMPORTANT
The IX Series 1 stations will only work with the IXW-MA adaptor loaded with firmware version 2.01 or later. Ensure that the IXW-MA being used has a compatible firmware.
Step 1: Creating the SIF.ini File
Creating a line of code, in the form of a .ini file, is required to allow an IX Series 1 (IX-DA, IX-BA, IX-MV) device to communicate to the IXW-MA. The example below is shown using a common text editor (i.e. Notepad), and saving it with a .ini extension.
Program Type: Must be binary number 0100. IXW-MA IP Address: IP address assigned to the IXW-MA .
Destination Port: Port number assigned on the IXW-MA. Enter 65013 if SSL is disabled, enter 65014 if SSL is enabled .
SSL Y/N : Input 0 if disabled, input 1 if enabled.
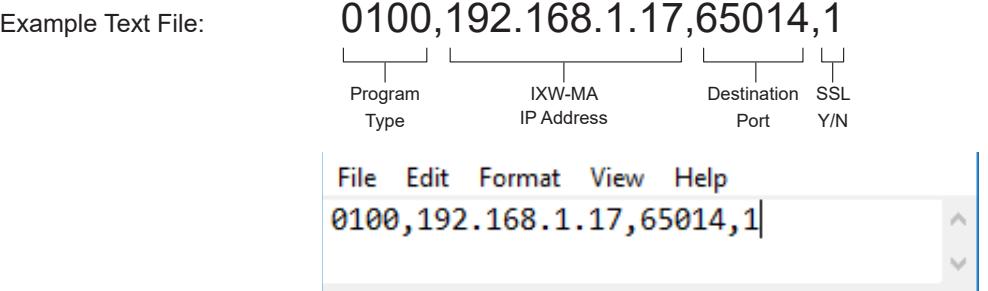
Save the SIF file with a .ini extension (.ini must be typed manually) to a location on the PC being used for programming the IX Series 1 stations. This file must be uploaded to each device associated with the IXW-MA using the instructions that follow.

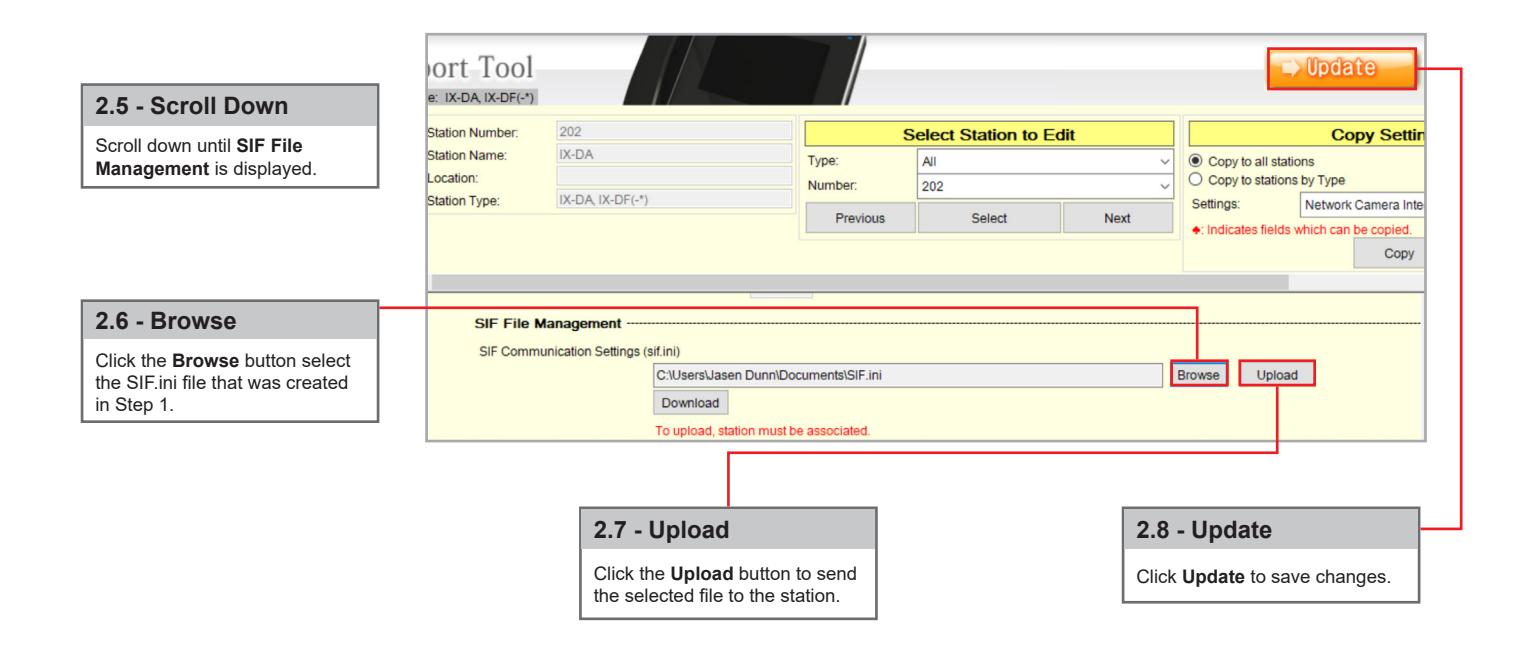
Step 2: Enabling SIF Functionality for IX Series 1 Stations
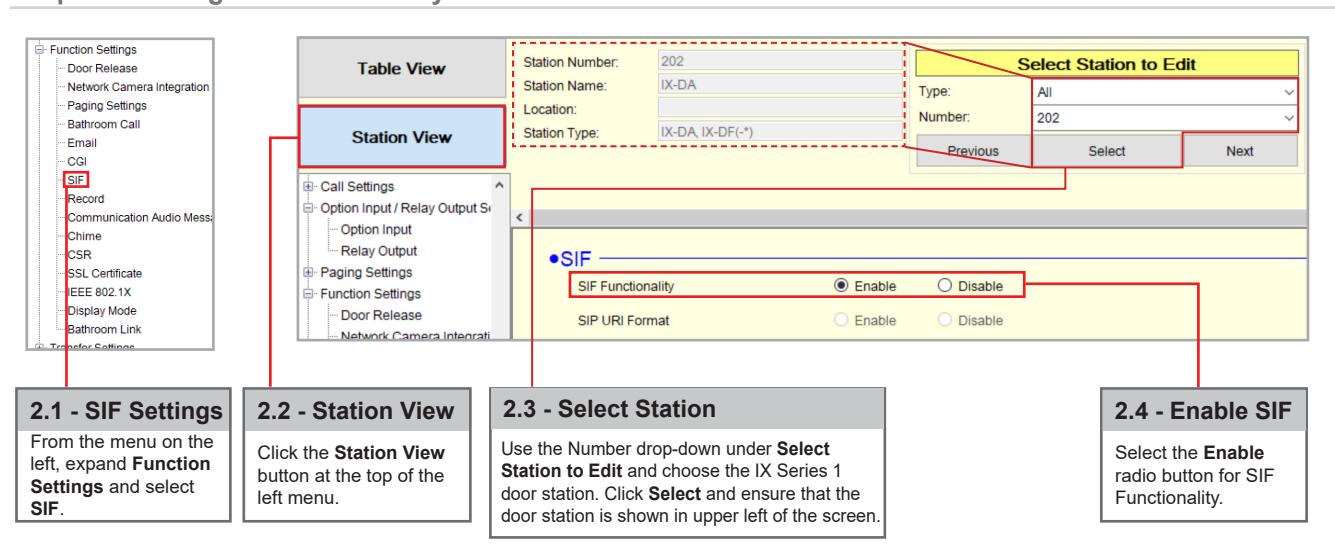
Configuring IX Series 1 Stations to Communicate with the IXW-MA
Step 2: Enabling SIF Functionality for IX Series 1 Stations (continued)
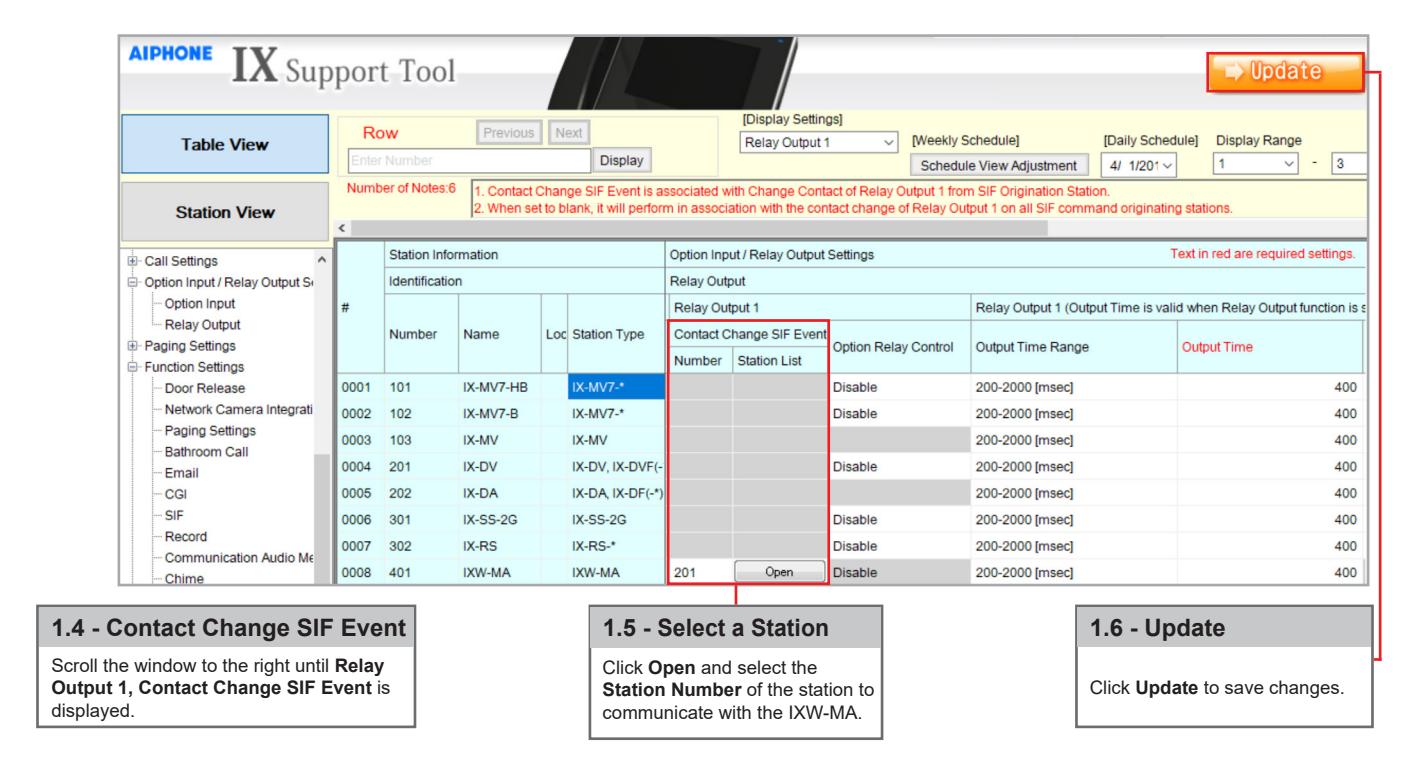
Configuring the IXW-MA
Step 1: Configuring the individual IXW-MA Relays
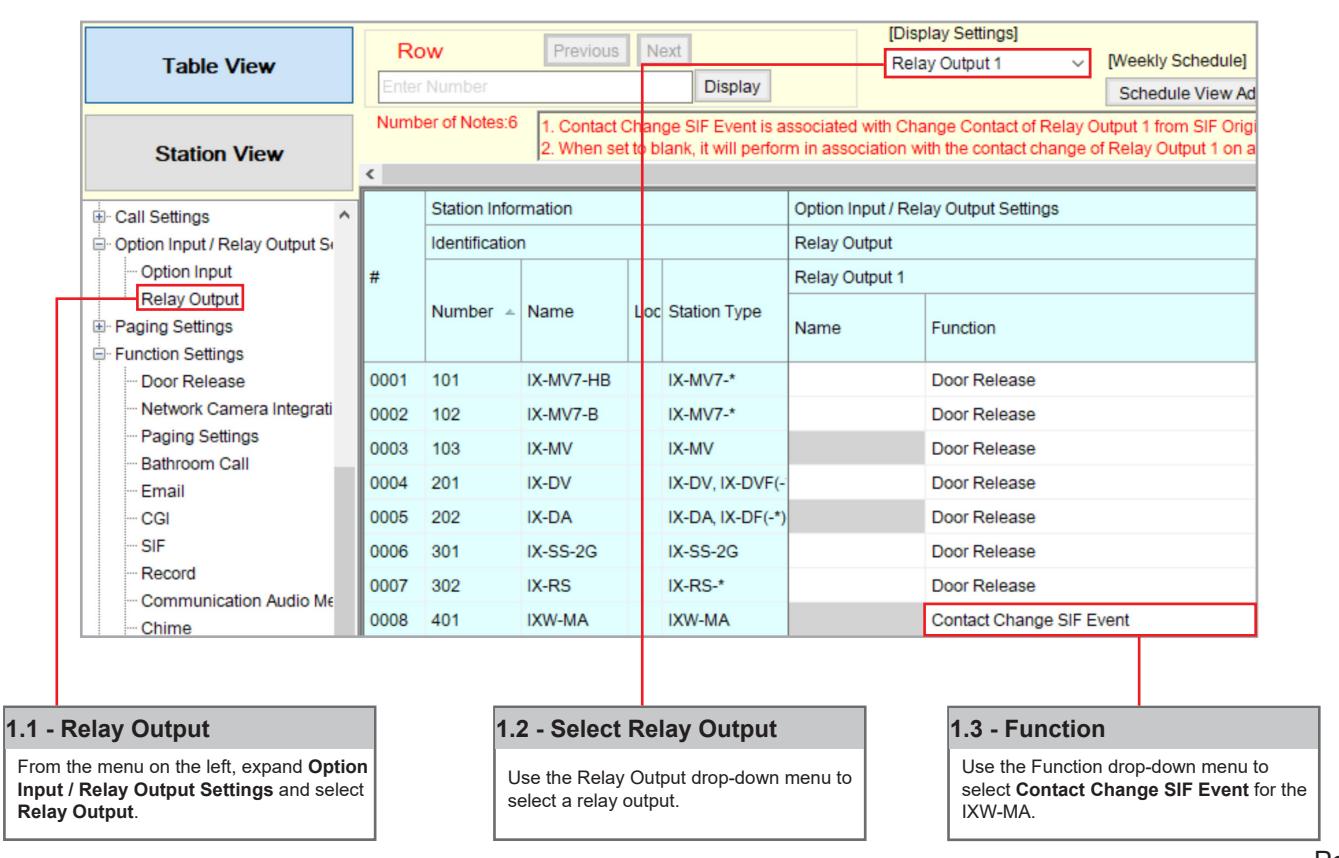
Configuring the IXW-MA
Step 1: Configuring the individual IXW-MA Relays (continued)
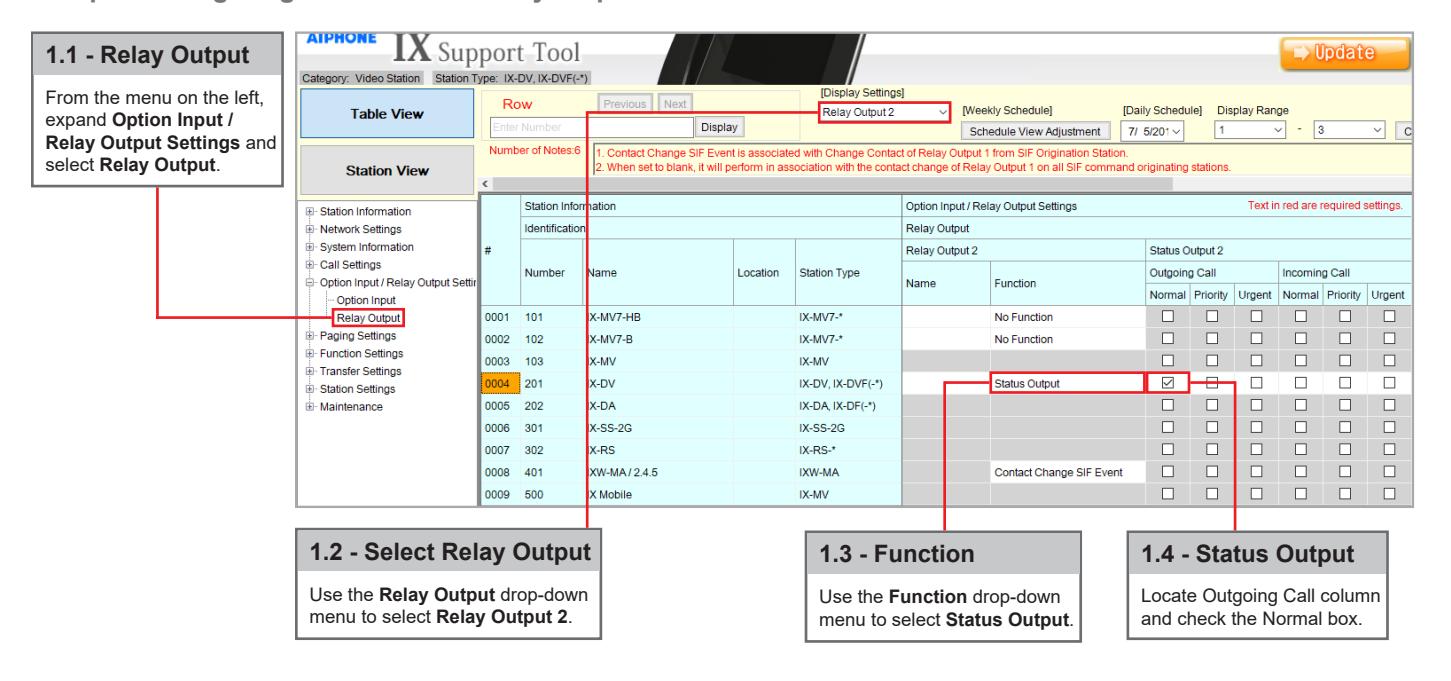
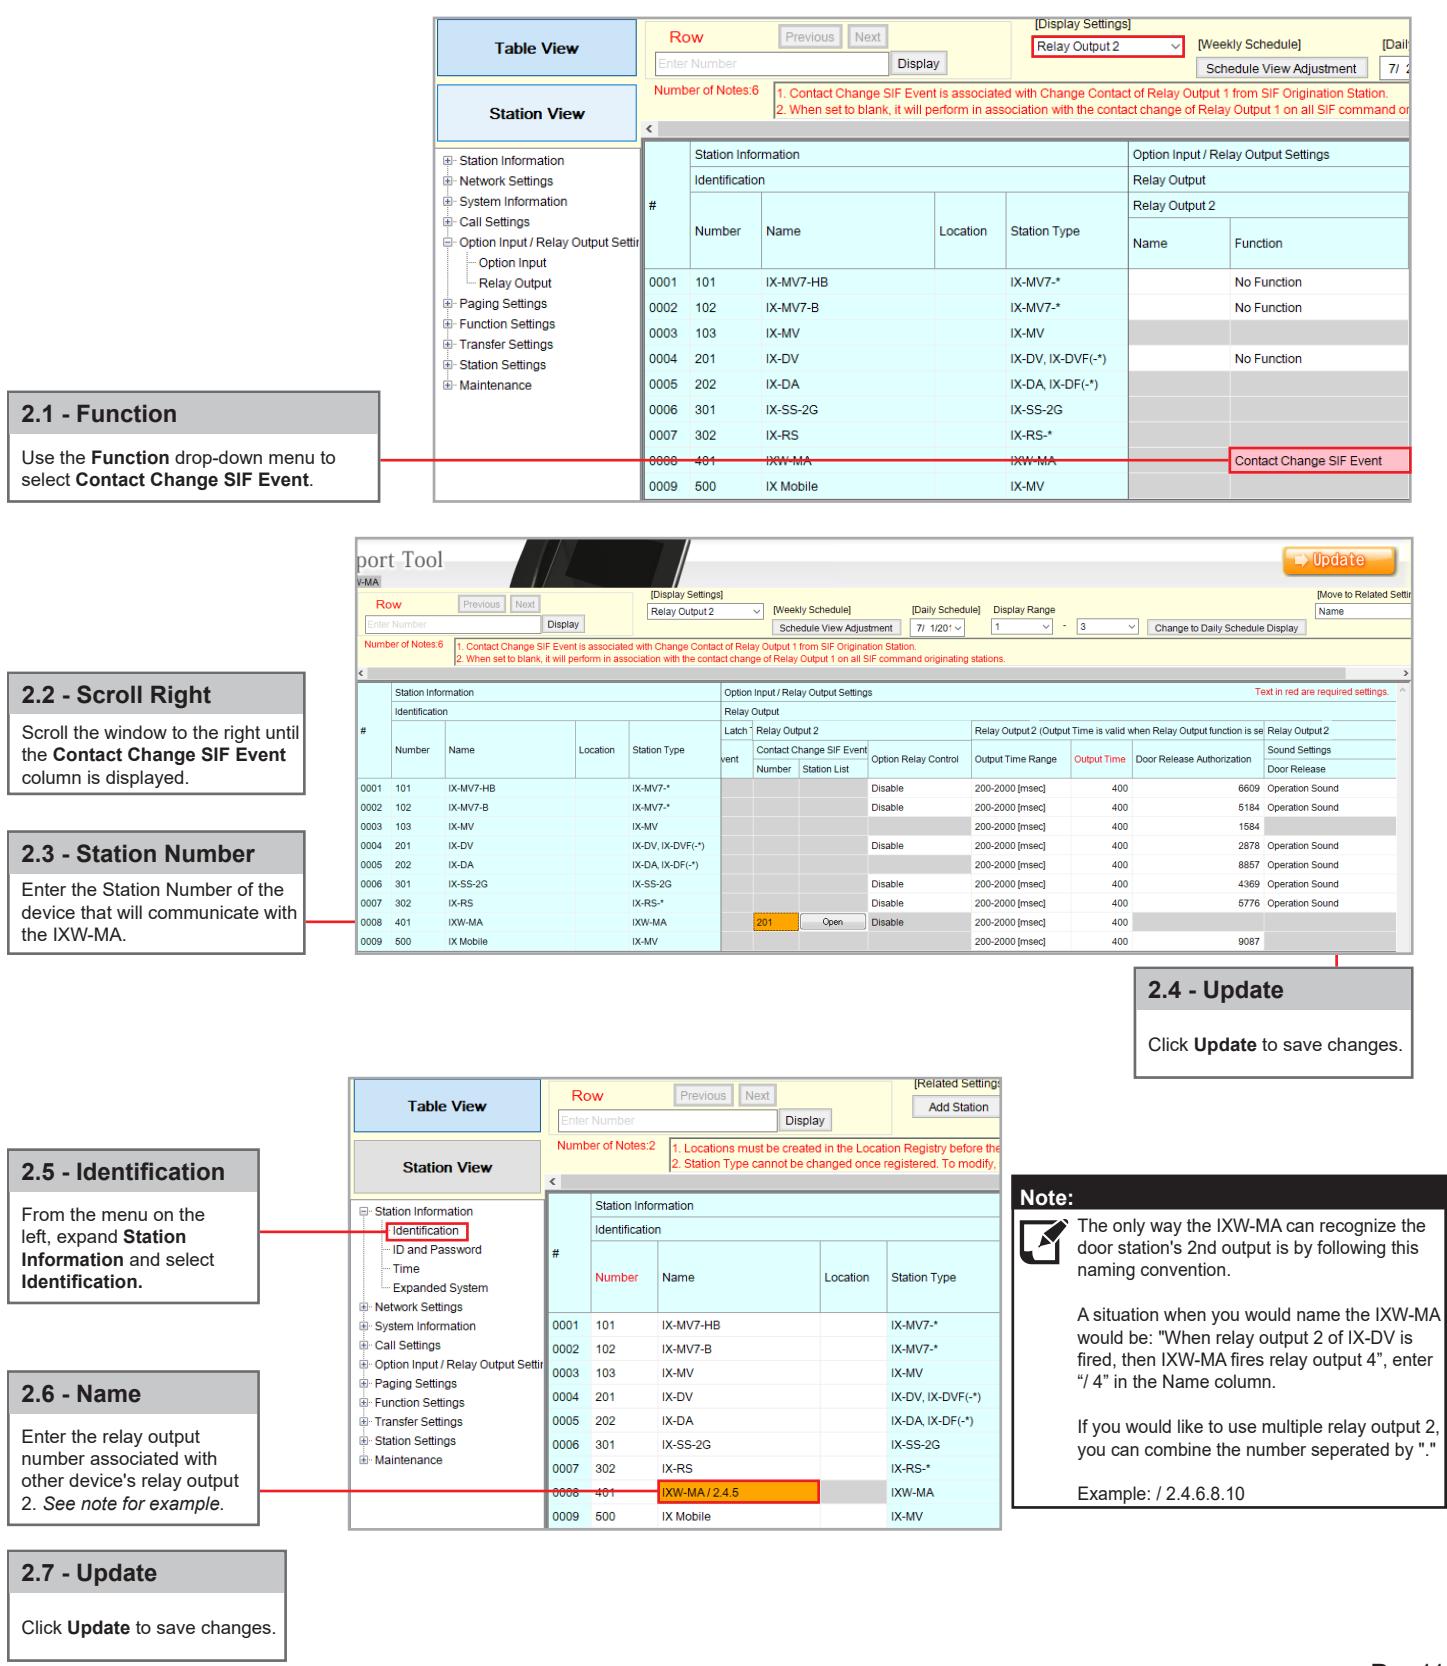
Associating Relay Output 2
Configure relay 2 of the door station to trigger when the door places a call. This could in turn be used to trigger a relay on the IXW-MA for the purpose of external signaling.
Step 1: Configuring door station's relay output 2
Associating Relay Output 2 (cont.)
Step 2: Configuring IXW-MA's relay output
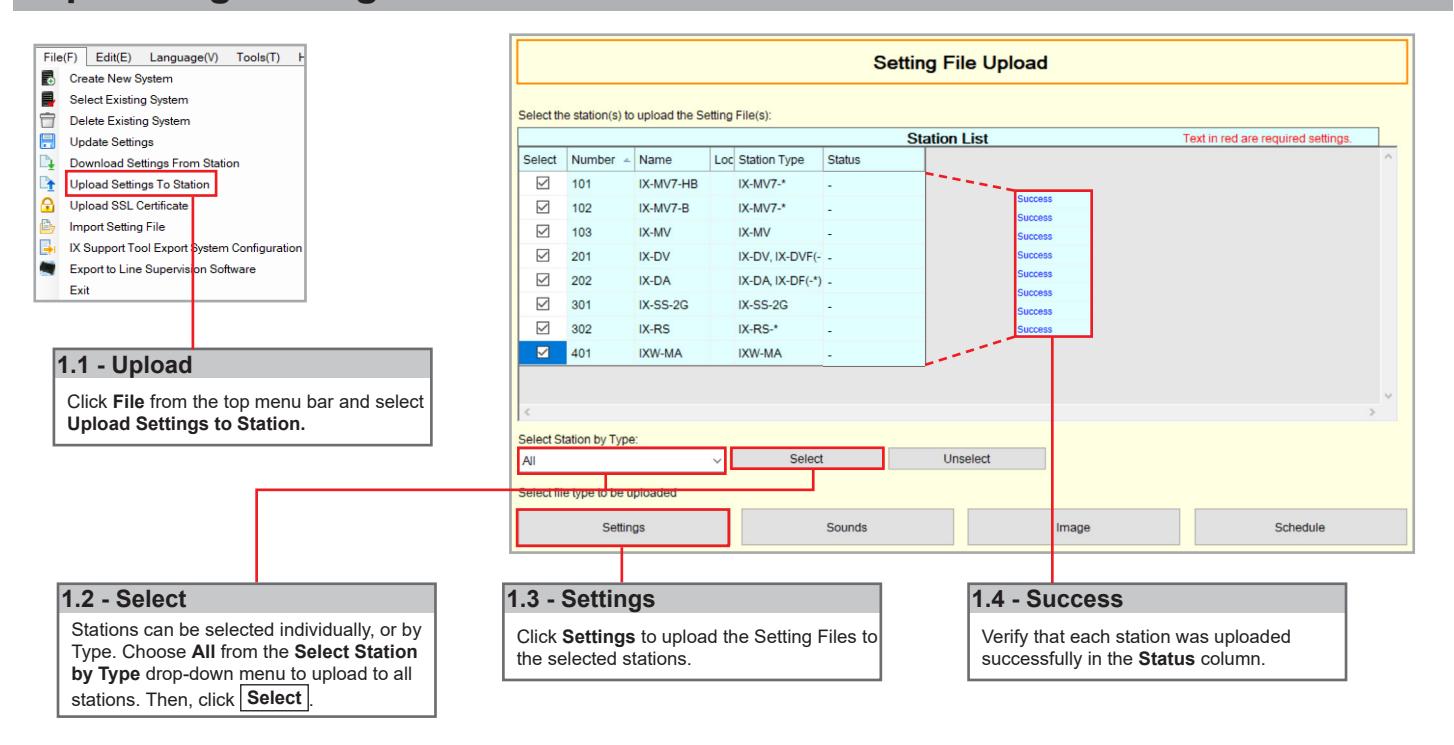
Uploading Settings to Stations
Exporting the Settings

If the original program file is lost, or Support Tool is moved to a different PC, this copy can be used to access the system programming to add or remove a station, or to make programming changes.
IX Mobile
IX Mobile is an app for iOS (v8.0+) and Android (v4.1+) turning a mobile device into an IX Series sub master. This allows 2-way audio communication, video, and door release. Four shortcut buttons can be configured to initiate a call to specific stations, groups, or page.
The following steps assist in the configuration of an IX Series system with IX Mobile and the configuration of IX Mobile on a mobile device.
Requirements: A system must contain at least one IX-MV/MV-7 and one IXW-MA for every 8 instances of IX Mobile. IX Mobile also requires a constant connection to the network the IX Series system is deployed on, utilizing either a Wi-Fi or VPN connection.
| Note Station Information here to refer to later | ||||
|---|---|---|---|---|
| Number | Name | IP Address | ||
Adding a Mobile Device to the Support Tool
Connect all IX Series stations and the programming PC to a PoE switch. Open IX Support Tool on the programming PC.
Step 1: Adding a Mobile Device as an IX-MV
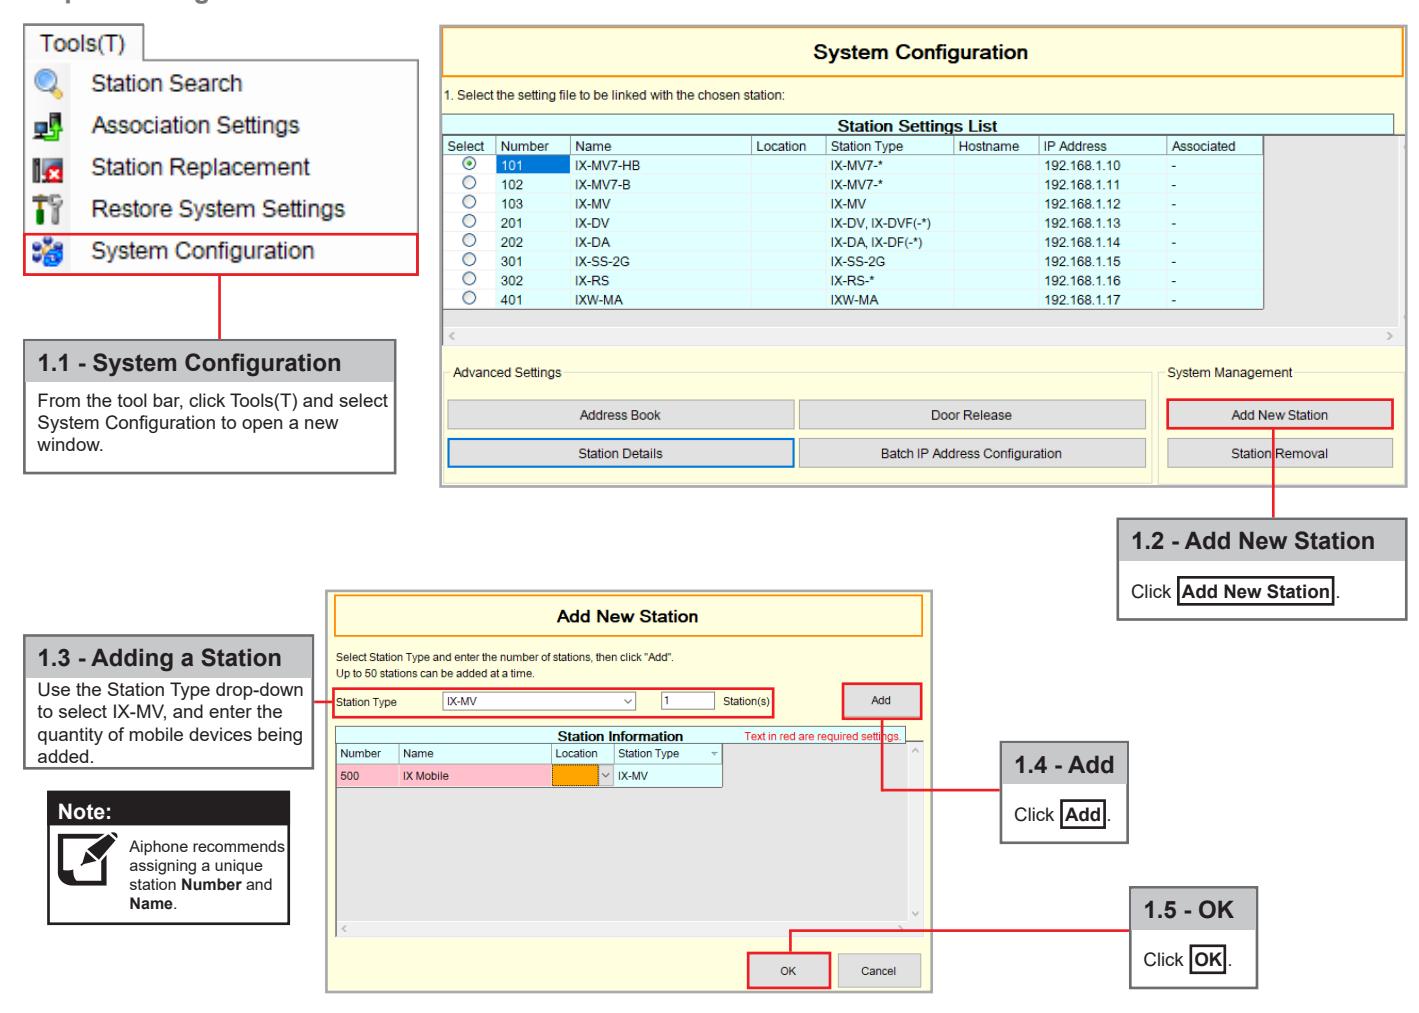
Adding a Mobile Device to the Support Tool (cont.)
Configuring the IXW-MA for IX Mobile
Each mobile device added to Support Tool will need to be listed in the IXW-MA. Fill out the SIF Settings table with each mobile device's IPv4 address.

Note: A maximum of 8 Mobile Devices per IXW-MA can be added to the system.
Uploading the Setting File
The setting changes made in the previous steps will need to be uploaded to every station with the exception of the IX Mobile devices.

Exporting the Setting File
Each mobile device configured in the Support Tool will have a setting file generated. To upload the setting file to the mobile device it is required to export the settings from the Support Tool.
Navigate to the location that you exported the system settings to. Open the file and click on the Setting folder. Locate the configuration file with the same number that was assigned to the mobile station in IX Support Tool. Copy the configuration file to a location on the programming PC that can easily be transferred to the mobile device.
Configuration File Example:
Downloading IX Mobile (iOS)
In order to continue you will need iTunes on the programming PC, as well as IX Mobile on each mobile device.
Download IX Mobile from the App StoreSM App Store is a service mark of Apple Inc.

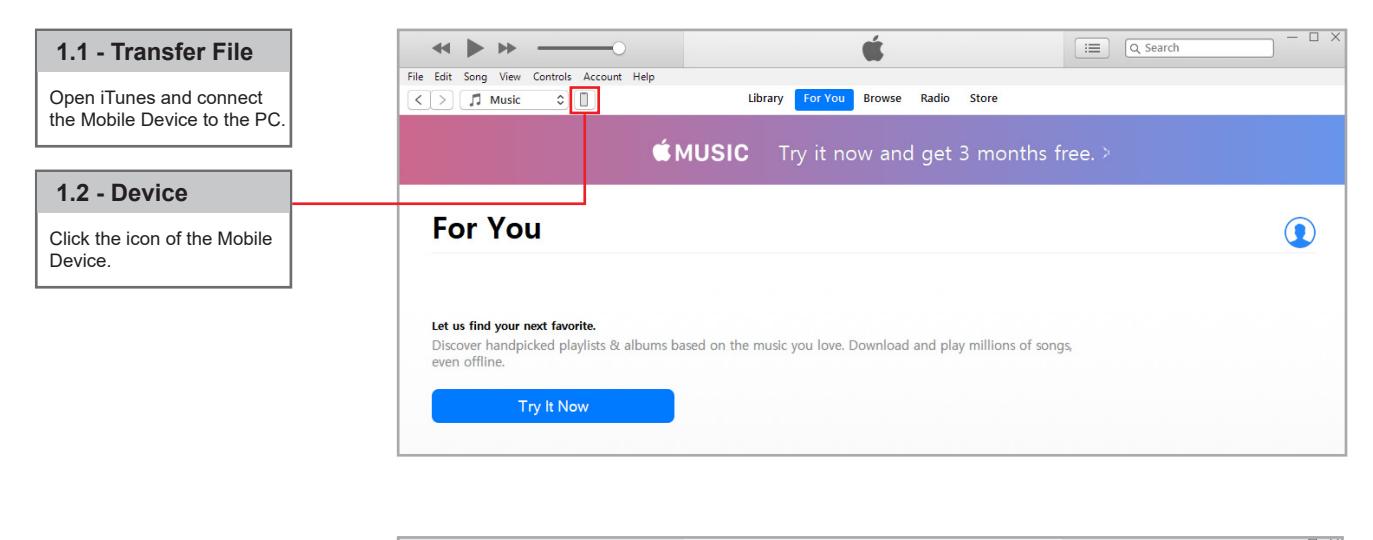
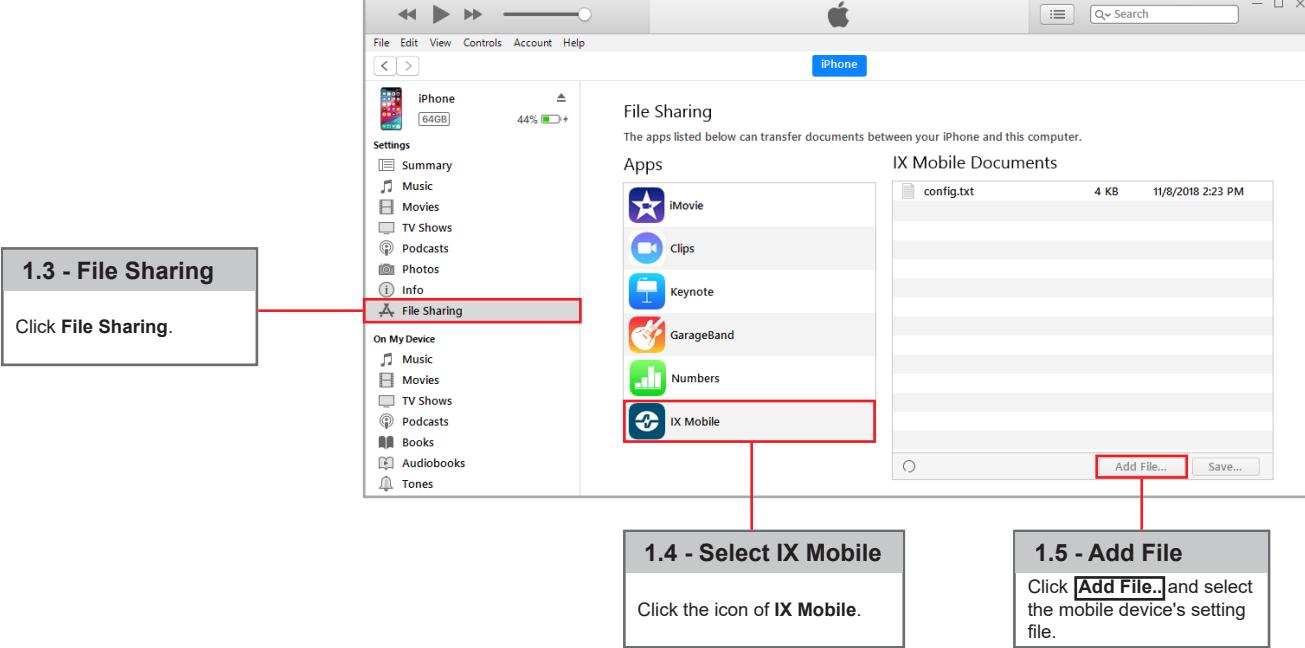
Transferring the Setting File (iOS)
Apple, the Apple logo, iPhone, iPad, iPod touch, and iTunes are trademarks of Apple Inc., registered in the U.S. and other countries. The App Store is a service mark of Apple Inc.
Downloading IX Mobile (Android)
In order to continue you will need IX Mobile on each mobile device.
Download IX Mobile using Google PlayTM

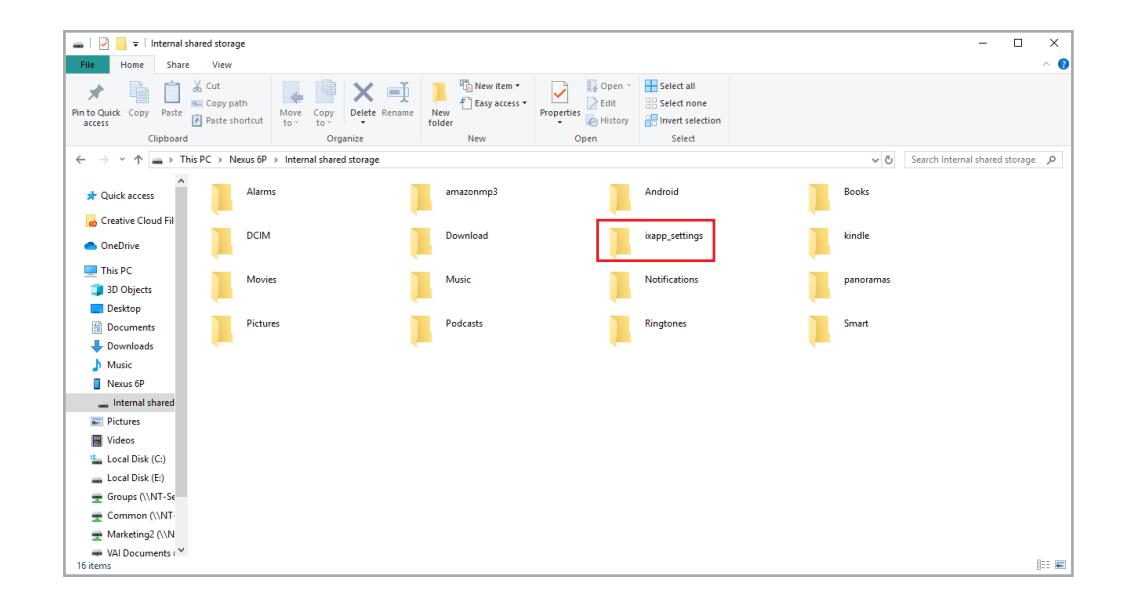
Transferring the Setting File (Android)
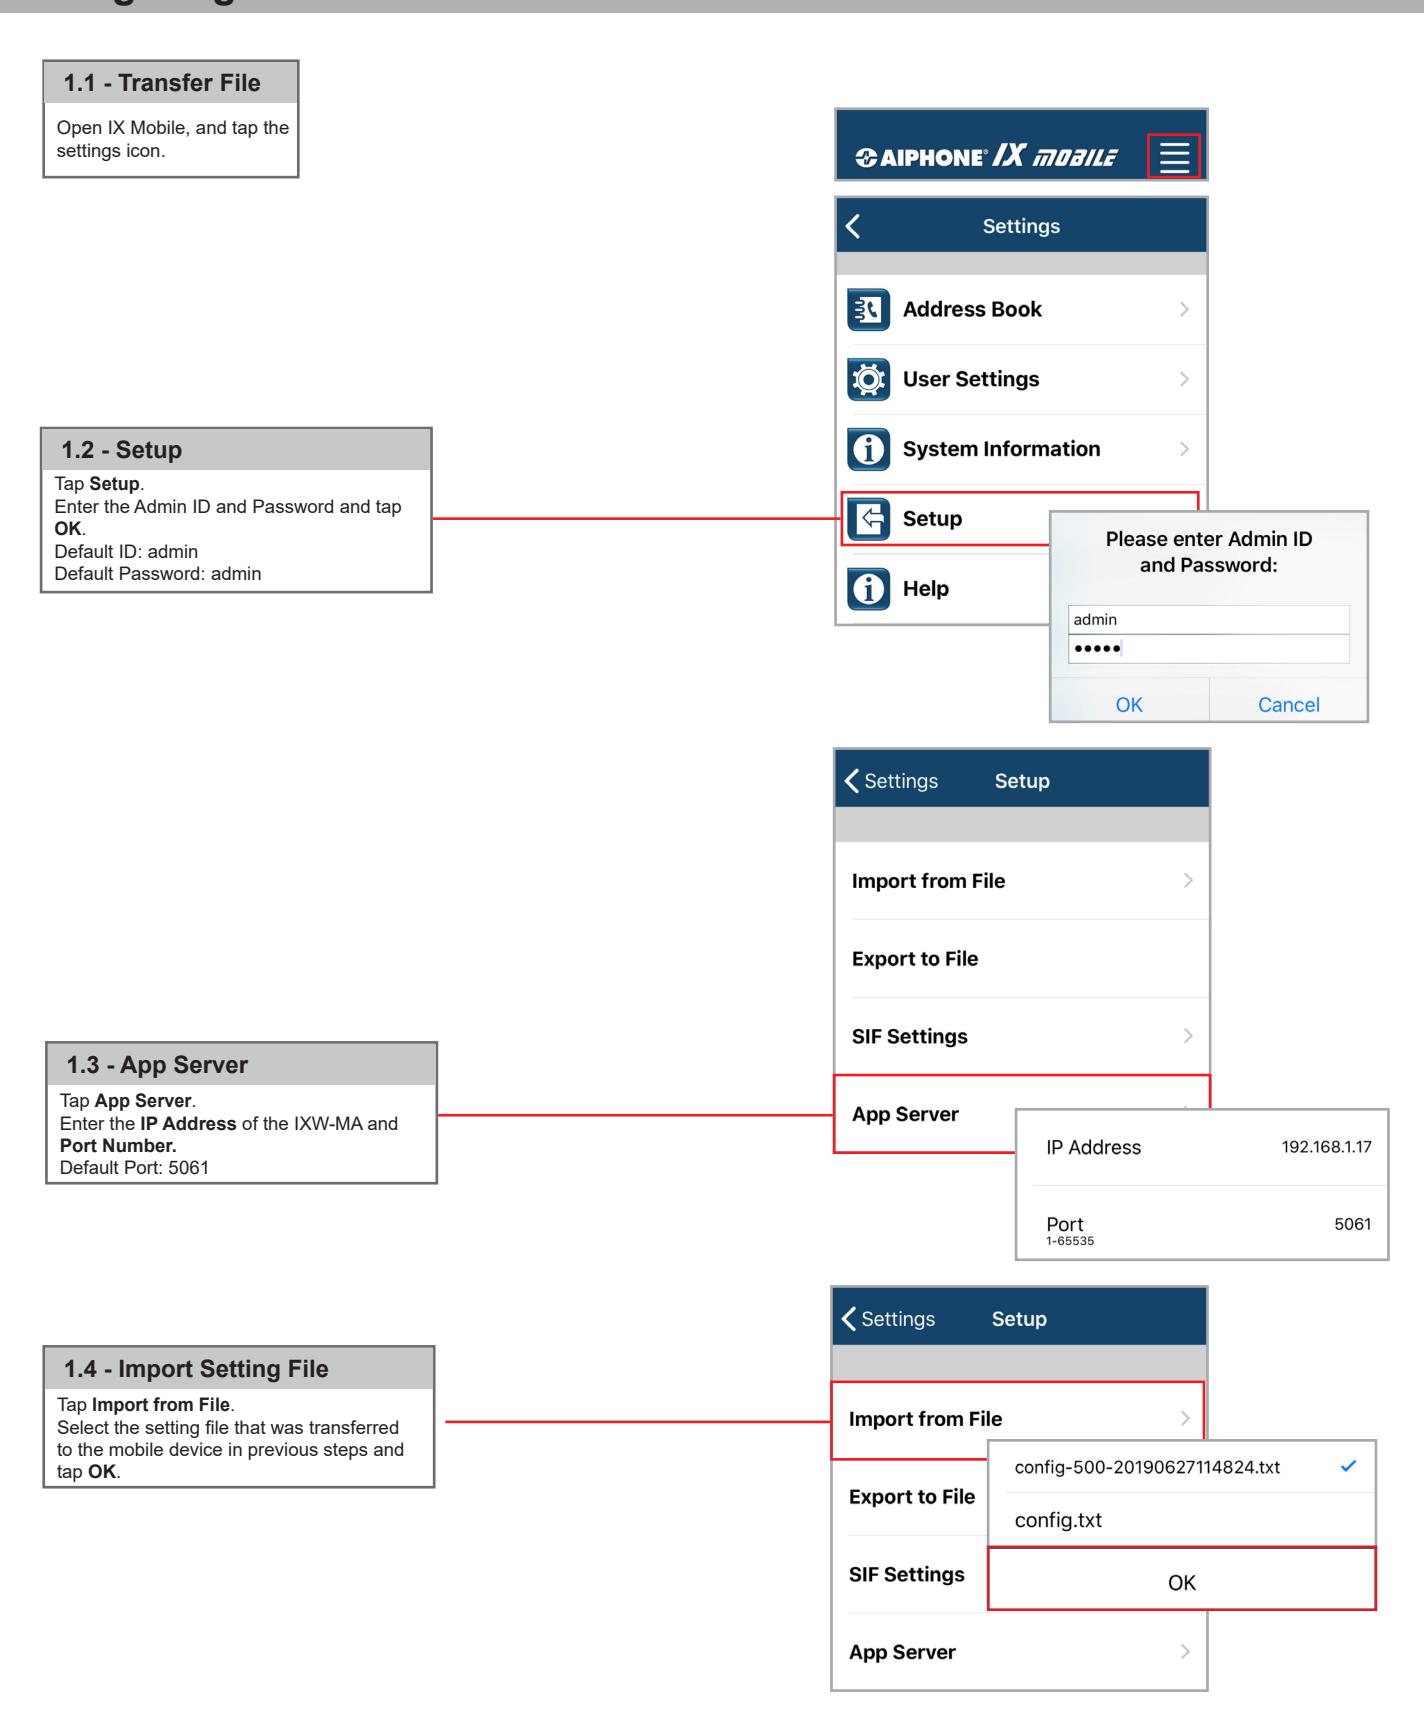
1.1 - Transfer File
Connect the Mobile Device to the PC.
1.2 - ixapp_settings
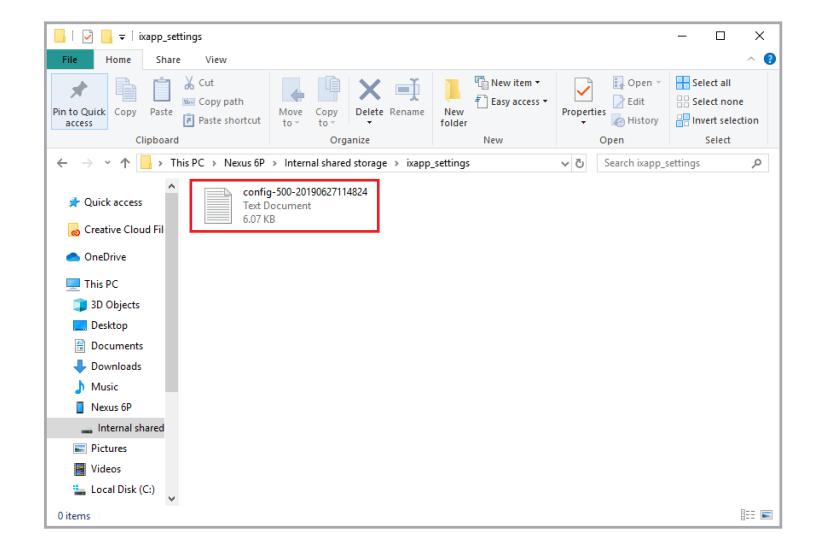
Locate and open the ixapp_settings folder.
1.3 - Transfer File
Paste the mobile device's setting file in this folder.
Note:

If the mobile device is connected to the PC and no folders are displayed, ensure that the Android device is set to "Use USB to transfer files" and not "Charging". Refer to the manufacturer's manual for further instructions.
Setting a Static IP Address (iOS)
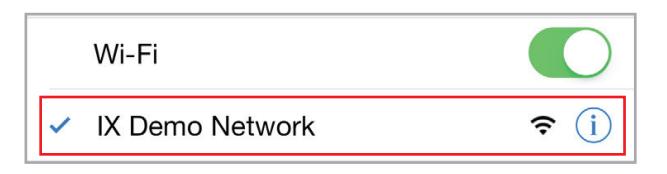
1.1 - Connecting
Connect to the WiFi network associated with the IX Series system installation. Once connected, tap on icon of the connected network.
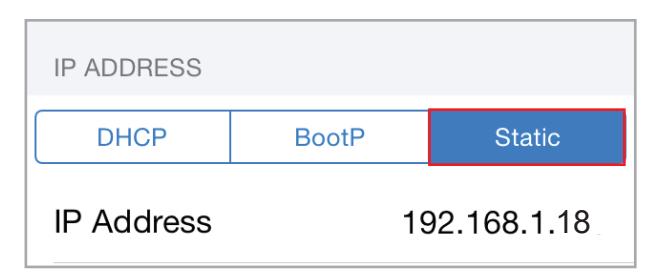
1.2 - Assigning IP Address
Tap Static and enter the IP Address that was assigned when configuring the mobile device with the IX Support Tool.
Setting a Static IP Address (Android)
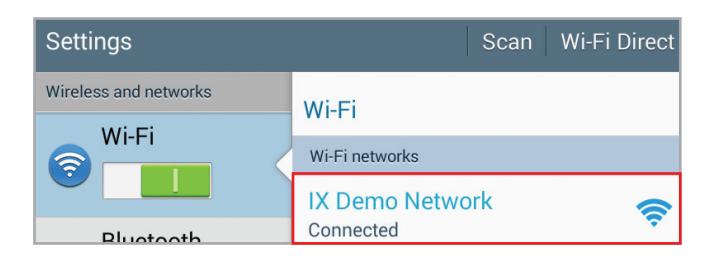
1.1 - Connecting
Connect to the WiFi network associated with the IX Series system installation. Once connected, tap and hold on the connected network.
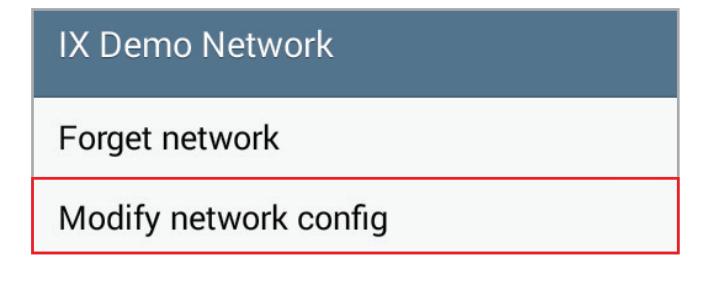
1.2 - Modify Network Config
A pop-up will appear. Tap Modify network config .
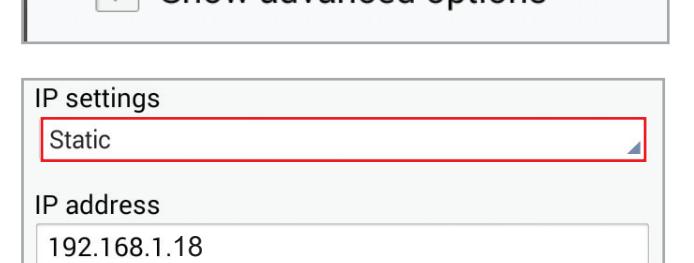
1.3 - Advanced Options
Check the box beside Show advanced options .
1.4 - Assigning IP Address
Under IP settings, select Static and enter the IP Address that was assigned when configuring the app with the IX Support Tool. Once entered, tap Save.
Configuring IX Mobile