ASSA ABLOY ACCENTRA 836A(B), 838A(B) Rigid Knob & Lever Handle Dummy Trim for 8800 Series Mortise Locks Installa…_80-9086-0005-010
Open the original PDF document
View PDF836A, 836B, 838A, & 838B
Rigid Knob & Lever Handle Handle Dummy Trim
Installation Instructions
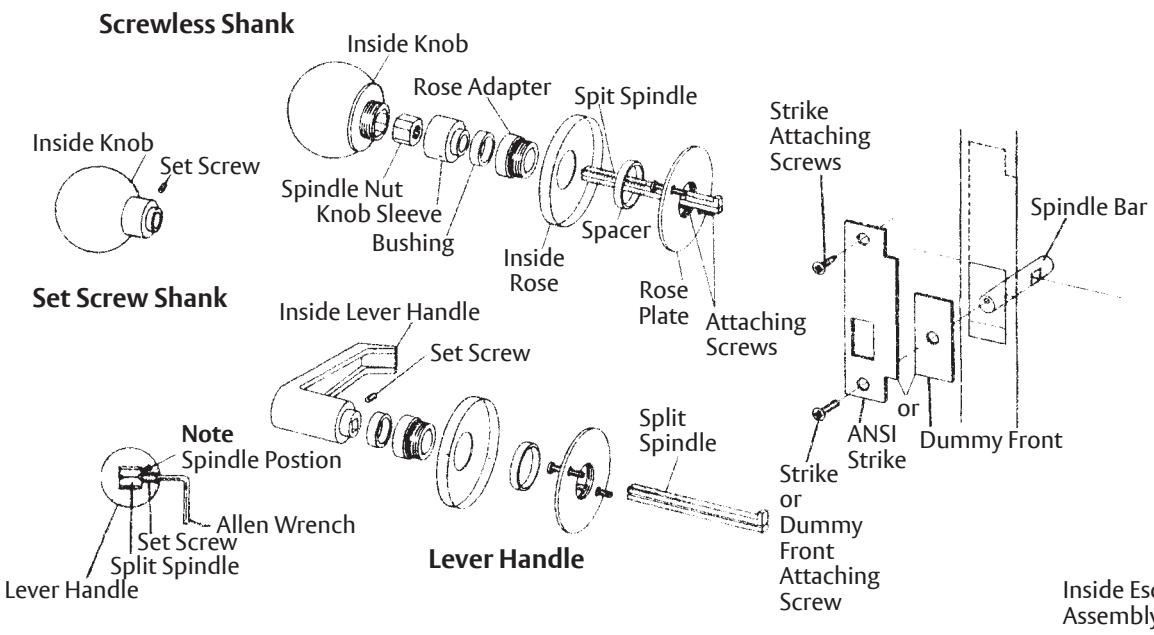
Sectional Trim
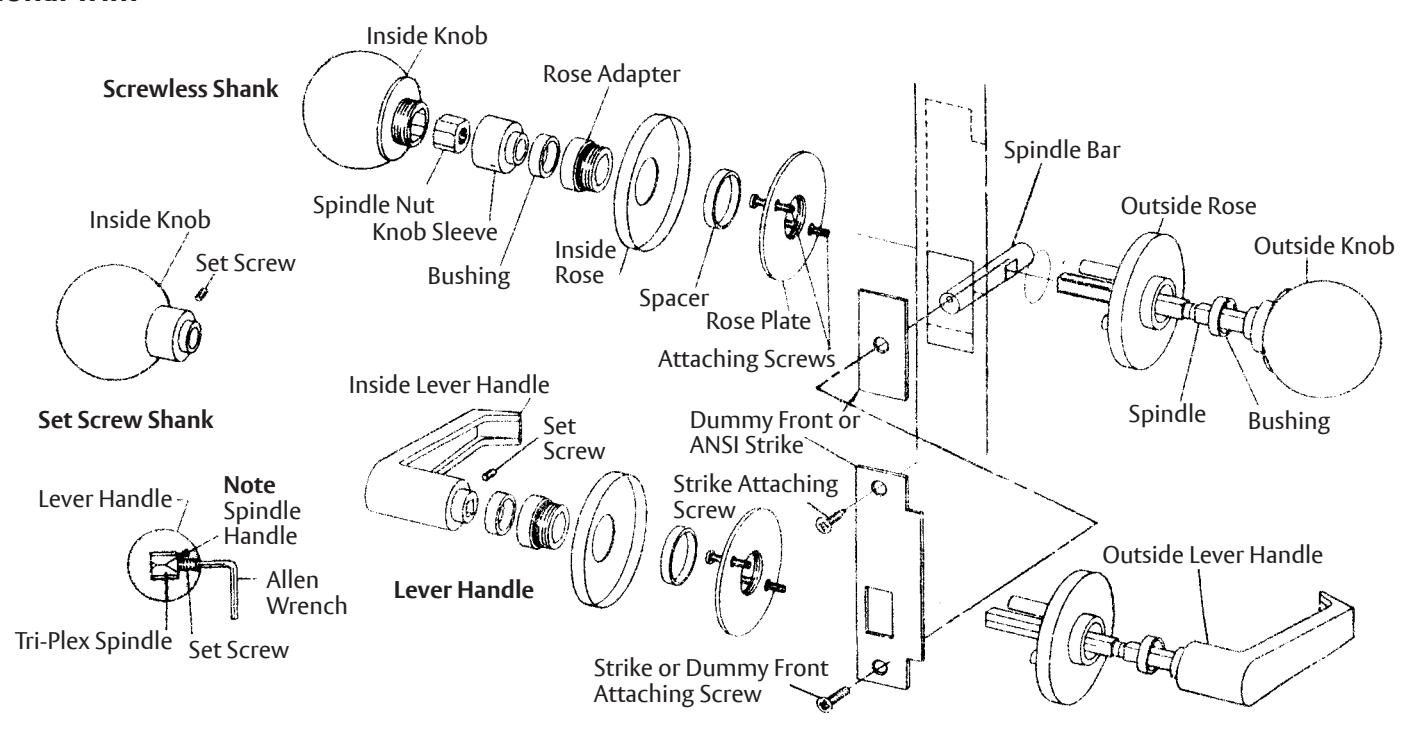
1. Install Spindle Bar
Thread mounting screw into spindle bar several turns. While holding and manipulating bar with screw, insert spindle bar into edge of door. Screw must be upward.
2. Install Roses
a. Insert outside rose assembly posts into thru-bolt holes in door. Align inside rose plate with holes on inside surface of door. Insert connecting screws thru inside rose plate into the outside rose assembly posts. Tighten securely.
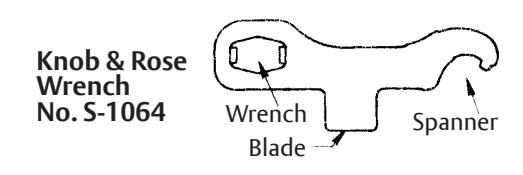
b. Place inside rose over rose plate, screw rose adapter thru rose into rose plate. Use blade portion of Knob & Rose Wrench (see page 3). Insert bushings in both roses.
3A. Install Knobs - Screwless Shank (when used)
-
a. Disassemble knob assembly.
- Unscrew knob sleeve and remove inside knob from spindle.
- Unscrew spindle nut and remove sleeve
b. Insert outside knob/spindle assembly thru outside rose, door, spindle bar, and inside rose.
c. Slip knob sleeve on spindle, placing the boss end into the rose bushing. Screw spindle nut onto spindle. Tighten with wrench portion of Knob & Rose Wrench (see page 3). just enough to take the end play out of spindle.
d. Slide the inside knob onto the spindle and over the spindle nut. Mate the knob to the sleeve. Turn the sleeve by hand to draw up knob. Tighten sleeve security with spanner portion of Knob & Rose Wrench (see page 3).
3B. Install Knobs - Set Screw Shank (when used)
- a. Insert outside knob/spindle assembly thru outside rose, door spindle bar, and inside rose.
- b. Thread inside knob onto spindle and into thimble bushing enough to take the end play out of spindle. Tighten set screw securely with allen wrench.
3C. Install Lever handles (when used)
- a. Insert outside lever handle/spindle assembly thru outside rose, door, spindle bar, and inside rose. Note the position of tri-plex spindle in relation to set screw.
- b. Slide inside lever handle onto spindle. With minimum end play of spindle, tighten set screw securely with allen wrench.
4. Install Strike or Dummy Front
Remove screw from spindle bar and install strike or dummy front.
80-9086-0005-010 02/24
ASSA ABLOY
836A, 836B, 838A, & 838B
Rigid Knob & Lever Handle Dummy Trim Installation Instructions
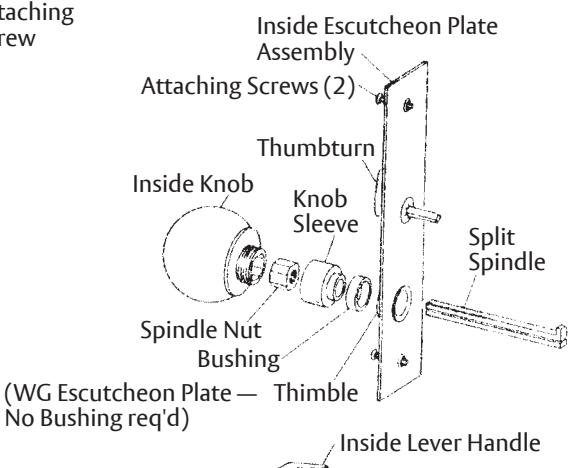
Escutcheon Plate Trim (Thru-Bolted)
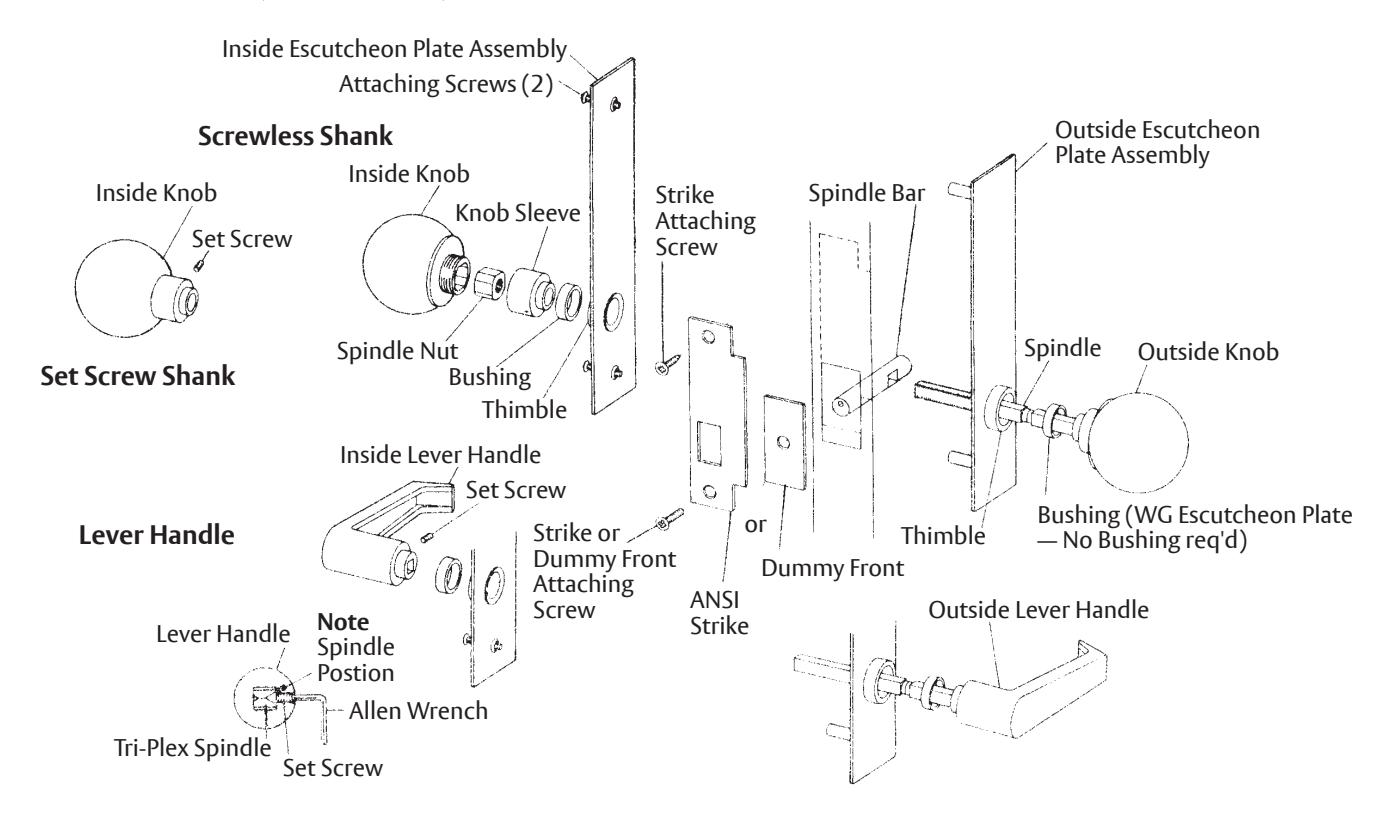
1. Install Spindle Bar
Thread mounting screw into spindle bar several turns. While holding and manipulating bar with screw, insert spindle bar into edge of door. Screw must be upward.
2. Install Escutcheon Plates
Insert outside escutcheon plate posts into thru-bolt holes in door. Align inside escutcheon plate with holes on inside surface of door. Insert two connecting screws thru inside escutcheon plate into the outside escutcheon plate into outside escutcheon plate posts. Tighten screws enough to allow a slight movement in the escutcheon plate. Insert bushings in both escutcheon thimbles.
3A. Install Knobs - Screwless Shank (when used)
-
a. Disassemble knob assembly.
- Unscrew knob sleeve and remove inside knob from spindle.
- Unscrew spindle nut and remove sleeve
b. Insert outside knob/spindle assembly thru outside escutcheon plate, door, spindle bar, and inside plate.
c. Slip knob sleeve on spindle, placing the boss end into the bushing. Screw spindle nut onto spindle. Tighten with wrench portion of Knob & Rose Wrench (see page 3). just enough to take the end play out of spindle.
d. Slide the inside knob onto the spindle and over the spindle nut. Mate the knob to the sleeve. Turn the sleeve by hand to draw up knob. Tighten sleeve security with spanner portion of Knob & Rose Wrench (see page 3).
3B. Install Knobs - Set Screw Shank (when used)
- a. Insert outside knob/spindle assembly thru outside escutcheon plate, door, spindle bar, and inside plate.
- b. Thread inside knob onto spindle and into thimble bushing enough to take the end play out of spindle. Tighten set screw securely with allen wrench.
3C. Install Lever handles (when used)
- a. Insert outside lever handle/spindle assembly thru outside escutcheon plate, door spindle bar and inside escutcheon plate. Note the position of tri-plex spindle in relation to set screw.
- b. Slide inside lever handle onto spindle. With minimum end play of spindle, tighten set screw securely with allen wrench.
4. Install Strike or Dummy Front
Remove screw from spindle bar and install strike or dummy front. Tighten escutcheon plate connecting screws securely.
80-9086-0005-010 02/24
836A, 836B, 838A, & 838B
Rigid Knob & Lever Handle Dummy Trim
Installation Instructions

Escutcheon Plate Trim (Surface-Mounted)
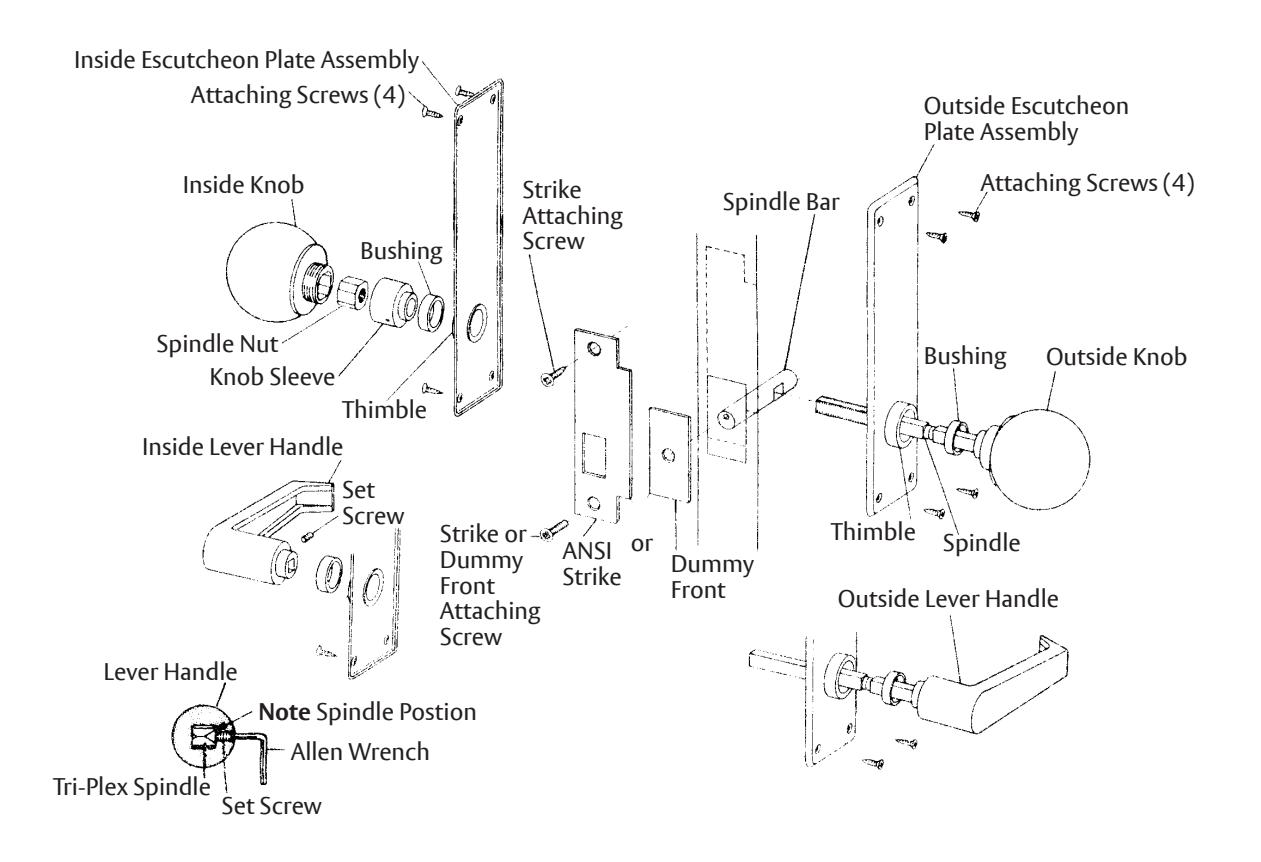
1. Install Spindle Bar
Thread mounting screw into spindle bar several turns. While holding and manipulating bar with screw, insert spindle bar into edge of door. Screw must be upward.
2. Install Escutcheon Plates
Align inside escutcheon plate with holes on inside surface of door. Insert bushings in both escutcheon thimbles.
3A. Install Knobs (when used)
-
a. Disassemble knob assembly.
- Unscrew knob sleeve and remove inside knob from spindle.
- Unscrew spindle nut and remove sleeve
b. Insert outside knob/spindle assembly thru outside escutcheon, plate, door, spindle bar, and inside plate.
c. Slip knob sleeve on spindle, placing the boss end into the bushing. Screw spindle nut onto spindle. Tighten with wrench portion of Knob & Rose Wrench (see this page). just enough to take the end play out of spindle.
d. Slide the inside knob onto the spindle and over the spindle nut. Mate the knob to the sleeve. Turn the sleeve by hand to draw up knob. Tighten sleeve security with spanner portion of Knob & Rose Wrench.
3B. Install Lever Handles (when used)
- a. Insert outside lever handle/spindle assembly thru outside escutcheon plate, spindle bar, and inside escutcheon plate. Note position of tri-plex spindle in relation to set screw.
- b. Slide inside lever handle onto spindle. With minimum end play of spindle, tighten set screw securely with allen wrench.
4. Install Strike or Dummy Front
Remove screw from spindle bar and install strike or dummy front.
80-9086-0005-010 02/24
Experience a safer and more open world
1. Install Spindle Bar
Thread mounting screw into spindle bar several turns. While holding and manipulating bar with screw, insert spindle bar into edge of door. Screw must be upward.
2A. Install Rose (if req'd)
a. Align rose plate with holes on inside surface of door. Attach with two screws. Tighten securely.
b. See page 1, Instruction2, Item b.
2B. Install Escutcheon Plate (if req'd)
Align escutcheon plate with holes on inside surface of door. Attach with two screws. Tighten securely.
3A. Install Knob - Screwless Shank (when used)
-
a. Disassemble knob assembly.
- Unscrew knob sleeve and remove inside knob from spindle.
- Unscrew spindle nut and remove sleeve from spindle.
- Remove pin holding sindle halves together.
b. Insert hooked half of spindle with hook end up into rose, door, and spindle bar. Insert straight half of spindle under the hooked half. Line up the holes in the spindle and replace pin into the spindle. Note: Threaded portion of halves must be on outside corners of spindle.
c. See page 1, Insttruction 3A, Items c and b.
3C. Install Lever Handle (when used)
a. Remove pin holding spindle halves together. Insert hooked half of spindle with hook end going into door and spindle bar. Note the position of hook end portion is to be perpendicular to set screw in lever handle. Insert straight half of spindle under the hooked half. Line up the holes in the spindle and replace pin into spindle. Note: Threaded portion of halves must be on outside corners of spindle.
b. See page 1, Instruction 3C, Item b
4. Install Strike or Dummy Front
Remove screw from spindle bar and install strike or dummy front.
80-9086-0005-010 02/24
Split Spindle