1562SC-1562SCHDB Installation Instructions
Open the original PDF document
View PDF801 Avenida Acaso, Camarillo, Ca. 93012 • (805) 494-0622 • Fax: (805) 494-8861 www.sdcsecurity.com • E-mail: service@sdcsecurity.com
INSTALLATION INSTRUCTIONS SHEAR EMLOCKS 1562SC AND 1562SCHDB MAX. HOLDING FORCE 2000 LBS.
REFER TO THE PROPER DRAWING ACCORDING TO THE TYPE OF DOOR AND FRAME APPLICATION.
READ THESE INSTRUCTIONS AND STUDY THE DRAWING THOROUGHLY BEFORE BEGINNING THE INSTALLATION.
IMPORTANT NOTES:
Although electromagnetic shear locks provide the utmost in aesthetics for fail-safe applications, they are less forgiving than electric bolt locks and direct pull magnetic locks where alignment problems exist. Therefore, great care must be taken during preparation and installation of the frame, door hardware and the shear Emlock to attain proper alignment and ensure positive lock operation.
Unbalanced air conditioning (stack pressure) can hinder door alignment and must be corrected to help ensure positive locking.
Use only the highest quality door closer.
POSITIVE CENTERING DOOR CLOSERS ONLY should be used on double acting doors to help attain consistent dead center alignment.
Door latching problems must be corrected prior to installation.
The maximum locking strength of the 1562SC AND 1562SCHDB Hi/Shear Emlock is 2000 lbs.
INSTALLATION:
- 1. Make sure the clearance between the door top and frame header is 1/8" (5/32" FOR 1562SCHDB. Make adjustments to the door as required.
- 2. Adjust single acting door and door closer to ensure the door settles immediately and is fully closed and at rest against the stop allowing for mutes, smoke seals or weather stripping where applicable.
Adjust double acting door and POSITIVE CENTERING DOOR CLOSER to ensure the door settles immediately and is fully closed and at rest in the dead center of the frame.
- 3. Locate the vertical centerline of the Emlock and armature as close as possible to the leading door edge.
-
4. Armature Installation
- 1562SC Refer to Fig. B. Install armature on door using #1/4-20 socket head cap bolts and sexbolts
- 1562SCHDB Refer to Fig. E. Install armature on glass door with rubber sheet and shim. Tighten the three set screws to secure to the glass door.
- 5. Determine the horizontal centerline of the armature on the door (for 1562SC see Fig. C, for 1562SCHDB see Fig. F).
- 6. Before determining the frame header centerline, single acting doors must be fully closed and at rest against the stop allowing for mutes, smoke or weather stripping where applicable. Double acting doors must be fully closed and at rest in the dead center of the frame.
- 7. Mark the frame header per the template (see Fig. G). Mortise and prepare the frame for EmLock installation.
- 8. With the power off, make all wire connections to a properly fused power supply (see Fig. H).
- 9. Both the 1562SC and 1562SCHDB have an auto relock time delay board (TDA). The relock delay is adjustable for 1 6 seconds to delay relocking after initial door closure to ensure the door is fully closed and at rest to optimize the alignment before the EmLock is energized.
- 10. Since the Time Delay Board (TDA) will be installed in the frame and inaccessible, carefully adjust the timer adjustment screw to mid-range (about 3 seconds). Turning clockwise to increase and counter-clockwise to decrease the delay relock time.
- 11. Install EmLock in the frame and align with armature on the door with the auto relock switch assembly toward the leading edge of the door.
- 12. Close door and apply 12VDC or 24VDC to the EmLock. Verify the relock time of about 3 seconds. If the relock time (TDA) needs to be adjusted, turn off the power and remove the EmLock from the frame and adjust the TDA screw. Turning clockwise to increase and counter-clockwise to decrease the delay relock time.
- 13. For proper operation, the armature must be adjusted upward as close as possible and parallel to the Emlock without interfering with opening and closing of the door. Proper operation cannot be expected with more than 1/8" clearance between the armature and the Emlock. If you find the clearance to be more than 1/8", readjust the door or shim the armature in the housing by installing shims (shims not provided).
- 14. With the door closed, turn the lock power on. Check the lateral alignment. The armature shear stops should be centered between each pair of magnet shear stops.
- 15. If the clearance between the shear stops is sufficient, open and close the door a few times to ensure the Emlock will lock and unlock positively.
- 16. Adjust the auto relock switch magnet to avoid early activation and help ensure positive locking on door closure. Adjust inward to delay Emlock activation. Do not adjust higher than the armature rest position.
- 17. If the shear stops are too close or binding, double check the templating and door alignment, and make corrections as required.
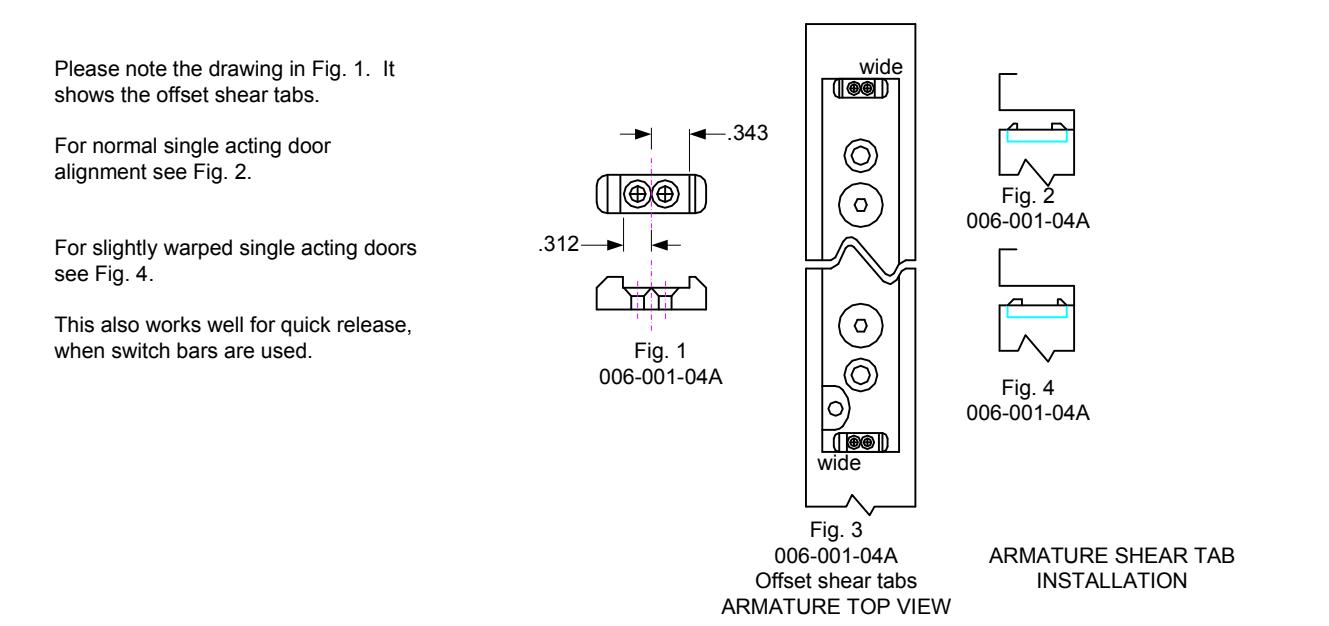
- 18. If positive locking cannot be attained due to misalignment after the previous adjustments, the armature shear stops can be reversed with the wide clearance shear stops (refer to Fig. I ).
CAUTION: The use of armature offset shear stops may correct misalignment but should not be used when proper door latching is inhibited.
- 19. Repeat steps 13 through 17 as necessary following shear stop replacement.
- 20. Cycle the door and Emlock several times after the completion of installation.
| MODEL # | LOCK DIMENSION | HOLDING | POWER |
SURFACE
ARMATURE DIMENSION |
||||||
|---|---|---|---|---|---|---|---|---|---|---|
| L | W | D | FORCE | 12VDC |
CONSUPTION
24VDC |
L | W | D | ||
| 1562 | 8" | 1-1/2" | 1-1/4" | 2000 | 650mA | 350mA | 8" | 1-3/4" | 1" | |
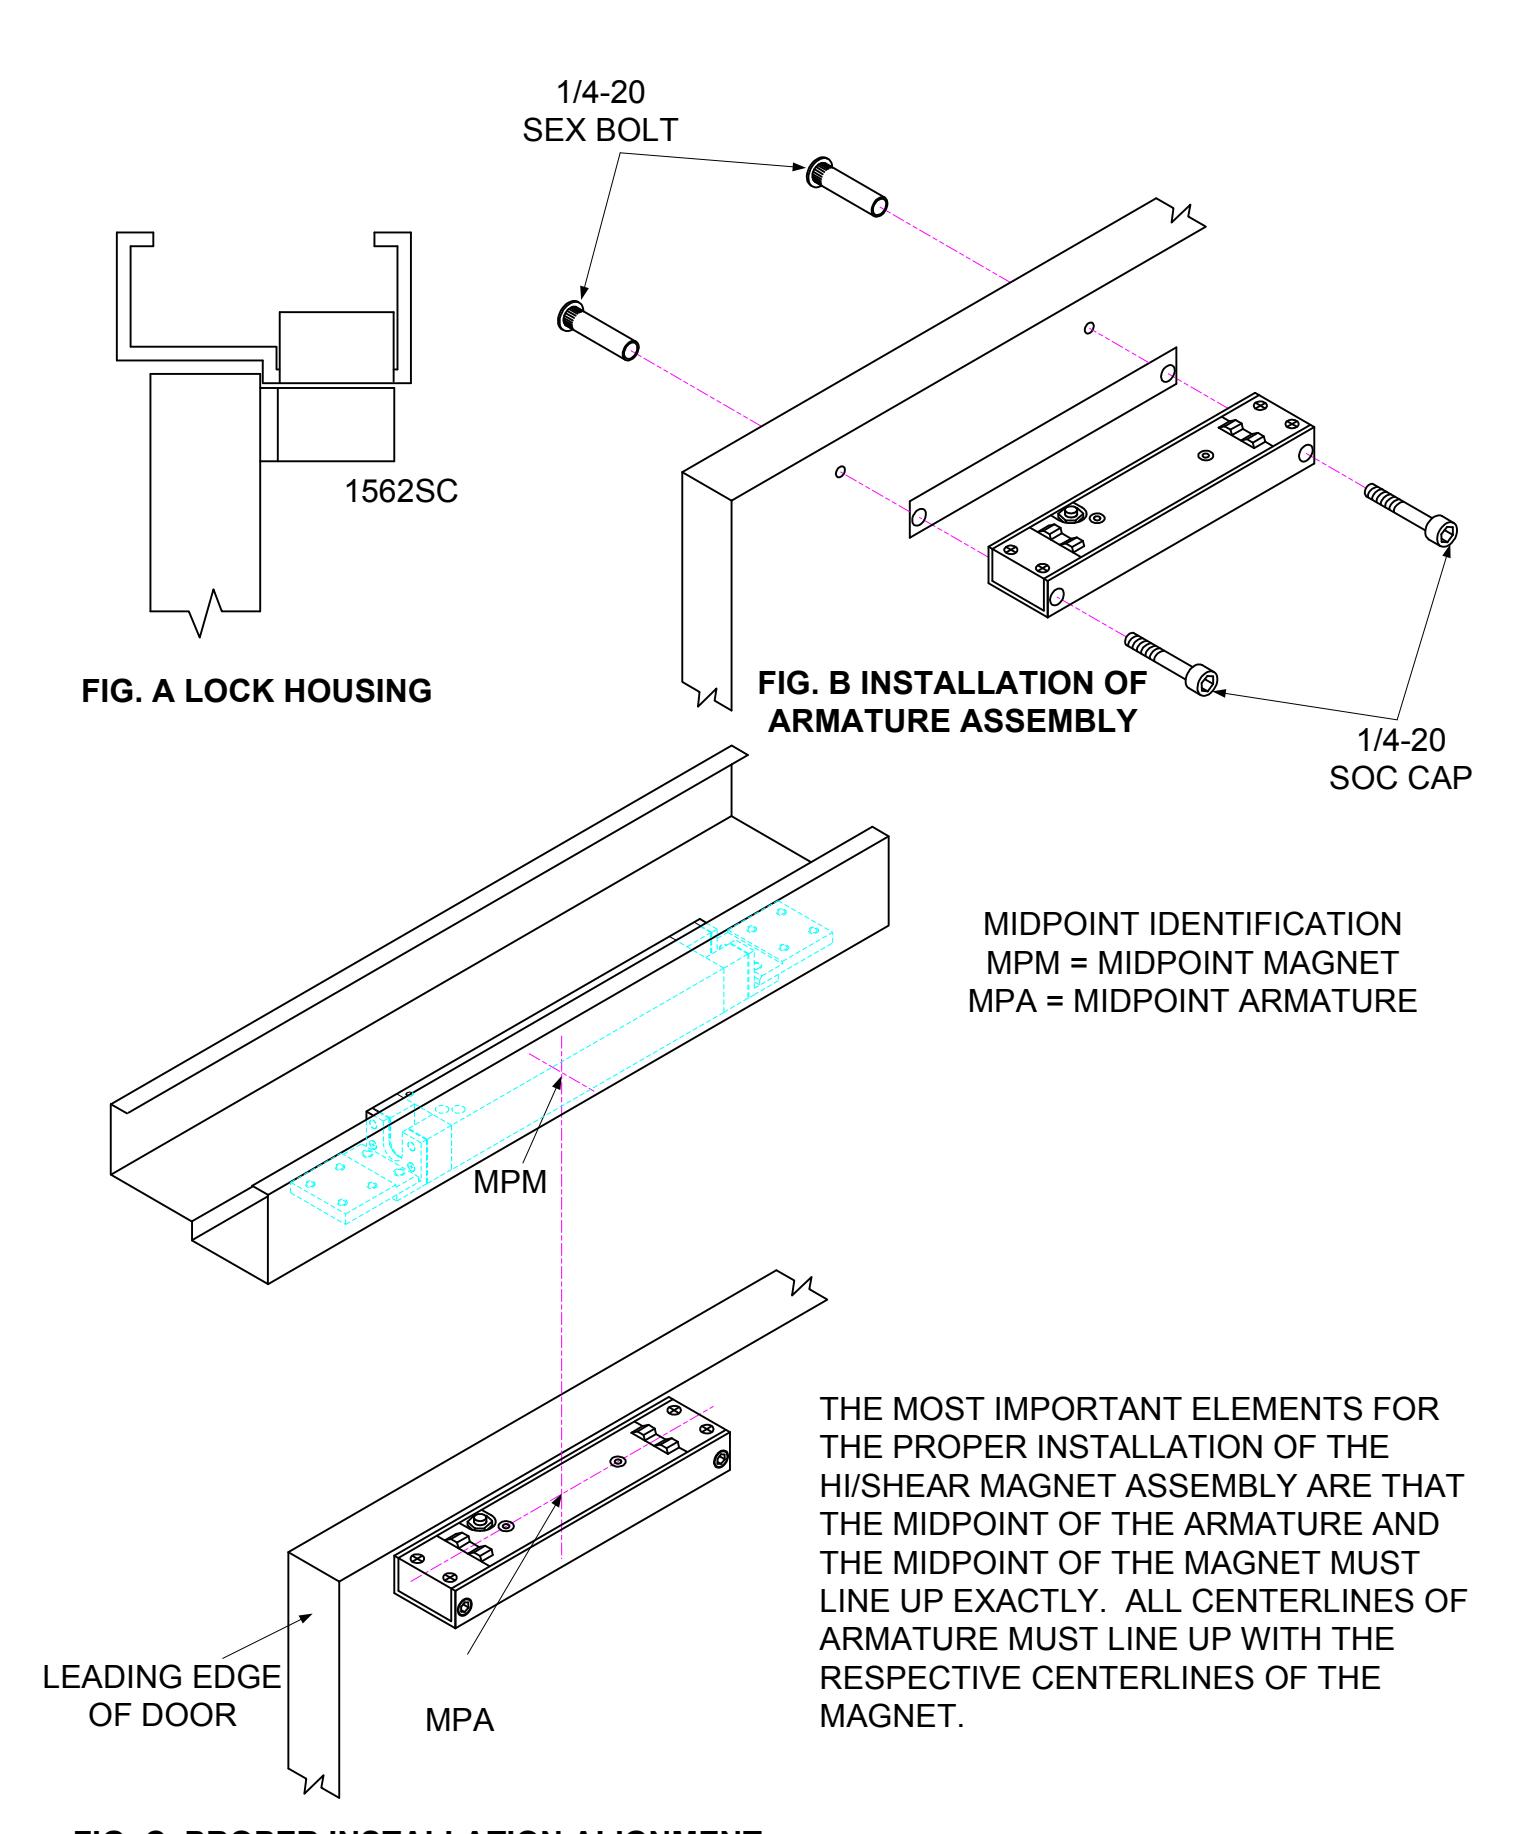
FIG. C PROPER INSTALLATION ALIGNMENT
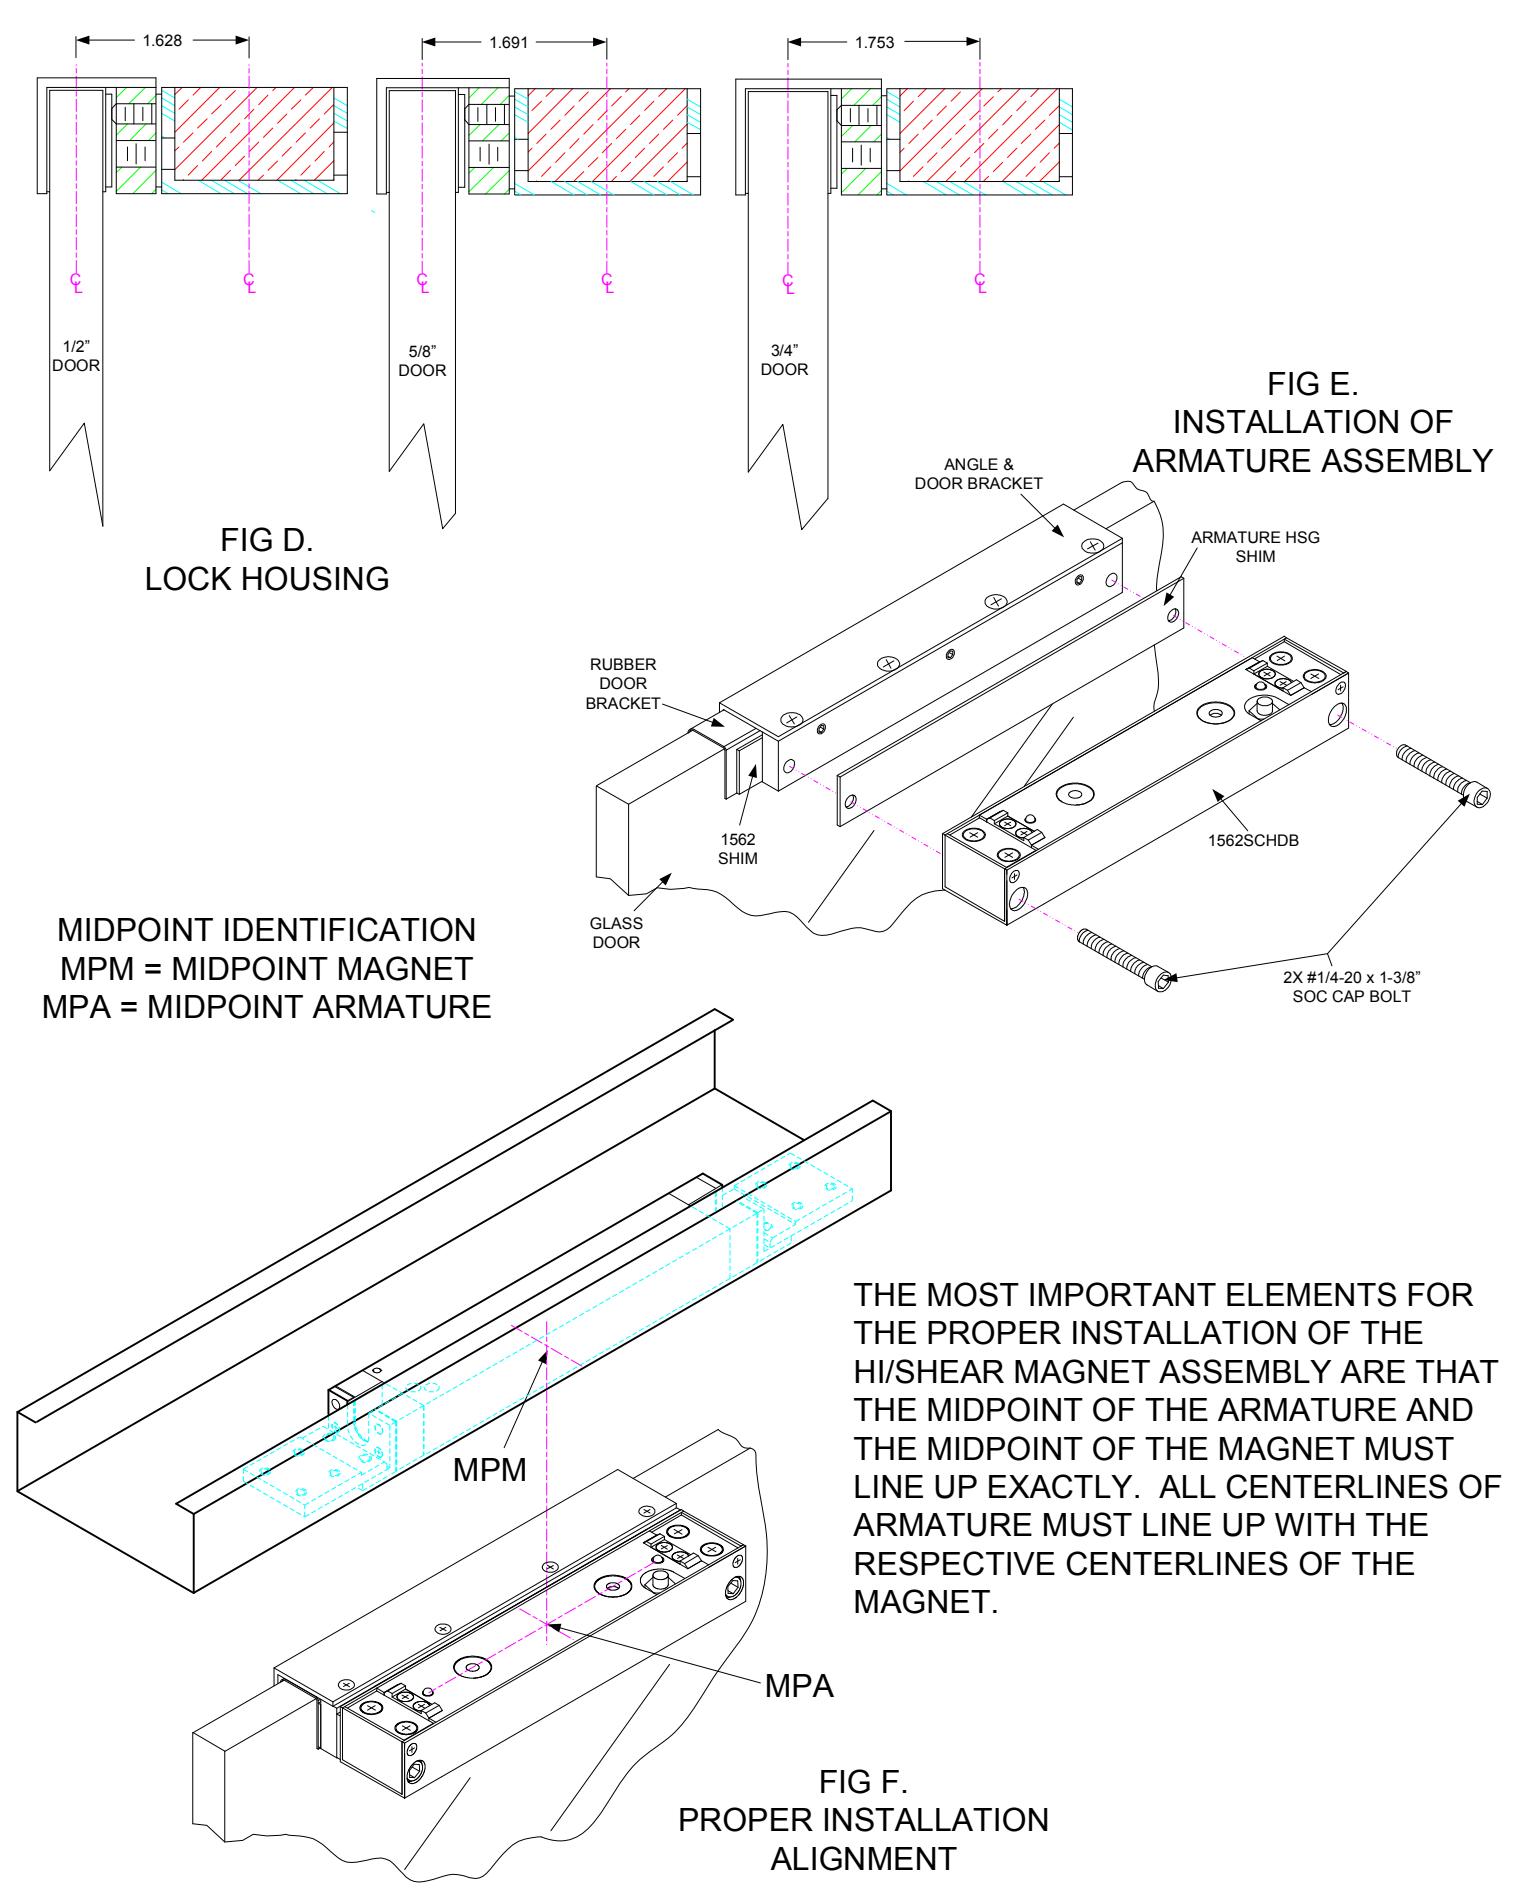
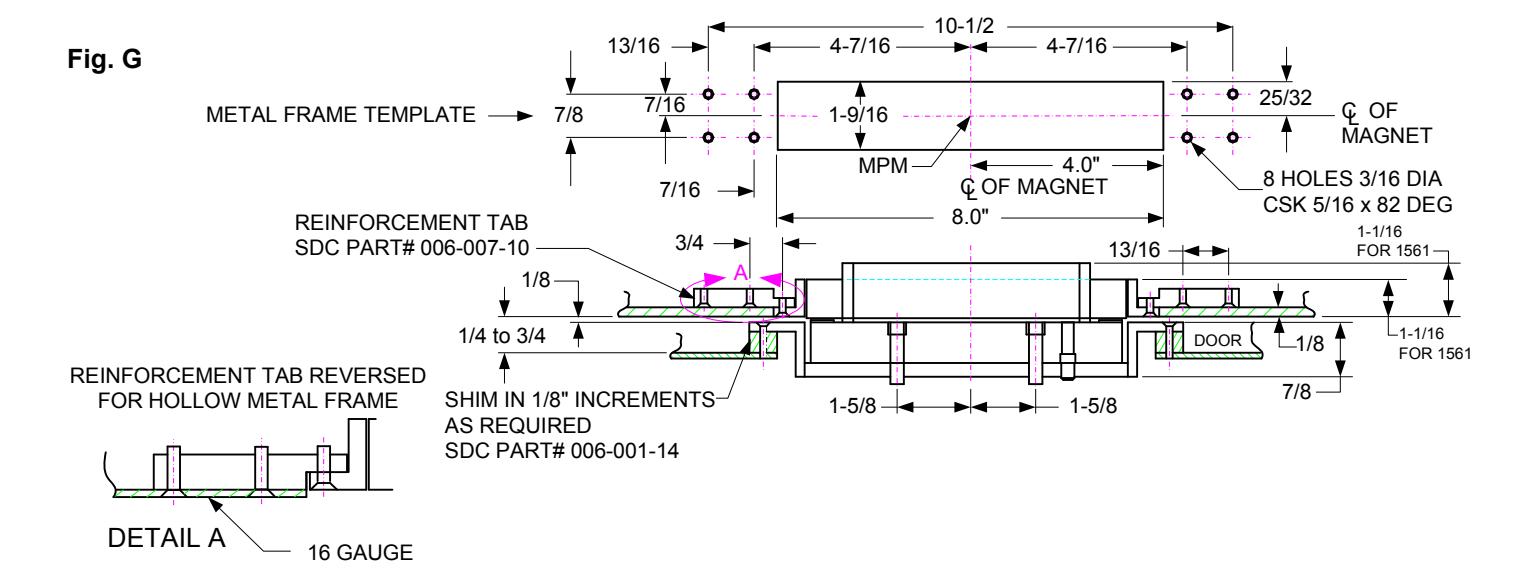
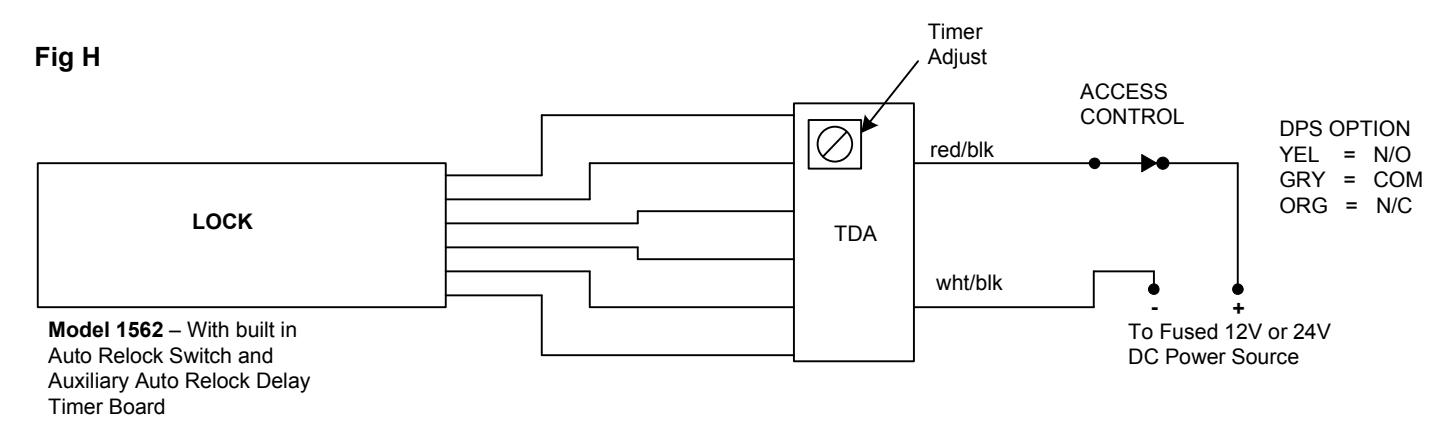
Fig. I
MAINTENANCE INSTRUCTIONS
The electromagnet and the armature should be handled carefully. Any damage to the surface such as paint, burrs, dirt and rust may hinder bonding of the surface and reduce holding power.
IF THE SURFACE PLATING BECOMES DAMAGED
- 1. Do not touch lock face with your hands.
- 2. Use a soft clean dry cloth or abrasive cloth (i.e., Scotch-Brite by 3M) to clean the lock face. Do not use sand paper.
- 3. A rust inhibitor, such as M1 manufactured by Starret, or LPS3 manufactured by LPS Laboratories (available in most hardware stores) can then be applied to the lock face.
- 4. Apply a coat of rust inhibitor to the armature face also.